


- Introduction
- Before You Begin
- Getting Started
- Installation Options
- Installation for Developers and Contributors
- Usage
- Uninstall
- Get In Touch
- Other Resources
- Contributing
- License
- Prerequisites Notes
- Troubleshooting Dependencies Installation
- WSL2 VSCode IDE Environment Setup
- Running Superalgos on a Headless Linux Server as a Daemon
Superalgos is a community-owned open-source project with a decentralized and token-incentivized Social Trading Network crowdsourcing superpowers for retail traders.
We are an open and welcoming community nurtured and incentivized with the project's native Superalgos (SA) Token, which is distributed among contributors to accelerate development.
✅ Join the Telegram Community Group or the new Discord Server to connect with other users!
Superalgos is a vast project. The focus of this README file is the Superalgos Platform. Please, visit the platform's page on the website for an overview of features and functionality.

Worth noting before you start:
-
Online Demo | To get a feel of what Superalgos is about without installing anything, take the (limited) online demo for a spin!
-
System requirements | Learn about the minimum hardware required to run the platform on different settings.
-
FAQS:
-
Documentation | The platform features interactive and searchable documentation counting over 1500 pages. The Docs are available on the website and within the app. The in-app version of the Docs interacts with the app itself and is likely more up-to-date than the web version.
Superalgos is an ever-growing ecosystem of tools and applications. This guide will walk you through the main ways to install the Superalgos Platform — the flagship application of the ecosystem.
Once you install and launch the app, a series of interactive tutorials take you by the hand and walk you around the system while you learn the basic skills required to use the interface, mine data, backtest strategies, and even run a live trading session. It is highly recommended to do all tutorials, as they are carefully crafted to make your onboarding as easy as possible.
✅ NOTE: Tutorials are the absolute best way to tackle the learning curve. You should do all tutorials before you start exploring other avenues on your own.

The tutorial uses Binance or Binance US as the exchange of choice. If you don't have an account with Binance or Binance US, you will still be able to follow 100% of the tutorial. When you get to the live trading section, keep going even if you don't intend to run the session. You will learn how to work with other exchanges later on. If both Binance and Binance US are blocked in your region, you will need to set up a different exchange from the get-go.
There are a few methods to install the Superalgos Platform.
We will briefly describe the options available. Click the link to go to the specific README file with further instructions for the installation method of your choice.
-
Developers and Contributors | This is the default installation for developers that wish to dive into the codebase and contribute to making Superalgos better. It is also the recommended installation for non-developers who wish to contribute improvements to the Docs, translations, design work, and so on. Instructions are available further down this same file.
-
Docker deployments | Docker offers the ability to install the platform in a clean and isolated environment. The standard Docker installation is not optimized for development or contributions, but some workarounds are offered.
-
Raspberry Pi | Raspberry Pi installations are a great economical option for running live trading sessions. You will need to be comfortable with either options 1 or 2 above to proceed here.
-
Public Cloud | This is a great option for those who wish to run live trading sessions in the cloud. You will need to be comfortable with option 3 above to proceed here.
✅ ABOUT REMOTE INSTALLATIONS AND MINIMALIST HARDWARE: Remote installations and minimalist hardware — both virtual and physical — are better suited for production deployments, where the use of the GUI is minimal. We highly recommend learning Superalgos in a local installation, on a full-size PC. Mastering the system takes time, and the use of the GUI to go through in-app tutorials is crucial during the learning process. Your experience will be orders of magnitude better if you follow this advice: leave remote installations and minimalist hardware for when you are ready to start trading live.
✅ EXPERIENCING ISSUES INSTALLING SUPERALGOS? If you're having trouble installing or running the app for the first time, do not open an issue. Instead, join the Support Telegram Group and follow the instructions on the pinned message to ask for help. You may also join the new Discord Server, but bear in mind that the response time tends to be longer. Online support is provided by volunteers — please provide clear information and sufficient context about the issue you are facing, and be mindful of people's time.
If you opt for the Developers and Contributors Installation (recommended), please keep on reading. Otherwise, click one of the other options above.
This is the purest way of installing Superalgos. It has no limitations to contributing, which is highly appreciated and rewarded with SA tokens, and gives you the most freedom for custom configurations.
All procedures (other than prerequisites) are the same for Windows, Linux, or Mac OS. Raspberry Pi terminal commands have been included for ease of use. Some edge cases are covered separately, further down this README.
You will need the latest versions of Node JS and Git installed. You will also need a web browser to access the interface. Google Chrome is recommended because it is the most tested browser being used by the development team and power users.
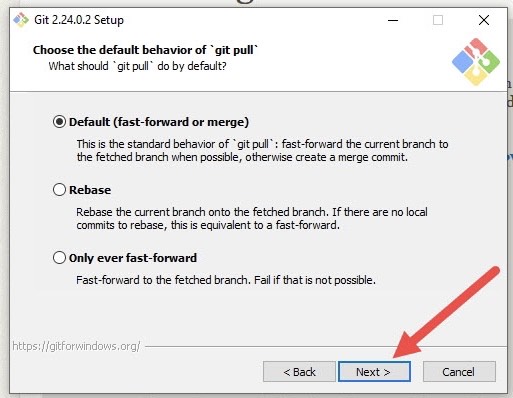
Follow the installation wizards to install the latest NodeJS and Git. Make sure to follow all the default and recommended settings while installing Git. If desired also install Chrome.
If you are running headless (i.e. as a server without a monitor attached) then you do not need to install a web browser and you can follow the tutorial for information on connecting remotely to the server.
✅ ENVIRONMENT-SPECIFIC NOTES: Additional notes about installing prerequisites on specific environments, distributions and edge cases can be found in the Prerequisites Notes section in the Appendix. We recommend checking these instructions before installing prerequisites manually from the above websites.
✅ TENSORFLOW NOTE: If you wish to test the (partial and incomplete) TensorFlow integration, you will also need Python 3.
You will need to get an access token from Github.com so that you may authenticate with the service from within the app and the terminal/command line.
If you don't have a Github.com account, please open one! Once you are logged in, go to the New Github Personal Access Token Page and create a new token.
Make sure you give it the repo and workflow scopes. Check the clip below for clarity:

Once you get the token, copy it and save it somewhere on your local machine. You will need it for later steps of the installation process and from time to time also when using Superalgos.
Now that you have all the prerequisites and optional environment configurations set up, we can get to the core installation of Superalgos!
There are four steps required to install Superalgos:
-
Fork the Superalgos Repository
-
Clone Your Fork
-
Install Node Dependencies
-
Install Community Plugins
Let's get on with it!
Scroll this page to the top. Find and click the Fork button to create your fork/copy of this repository.
✅ NOTE: On the page that opens when you click the fork button, Github gives you the option to fork only the master branch by default. You must remove the selection so that you fork all branches instead. Play the following video for clarity.

To fork Superalgos, you need a Github account. If you don't have one, go ahead and create it. This was one of the listed pre-requirements.
✅ NOTE: A Fork is required so that the setup scripts may build the app from multiple repositories, and also for your contributions to the project. The reason why Superalgos is free and open-source is that the project has set up a collective business in which all users may participate. The way to participate is to contribute to making Superalgos better. The project's native SA token is distributed among contributors as rewards for the value each adds to the project.
✅ NOTE: You will need your Github username and the API token you created earlier.
Once the fork is created, you will land on the page of your fork. Copy the complete URL from your browser's address bar.
✅ NOTE: Notice it is your fork you will be cloning, not the upstream repository.
In your computer/laptop/server, open a command prompt or terminal. Make sure you are in a directory where you have write permissions.
✅ NOTE: On most systems, the terminal will open in your user's home directory. It's better to install Superalgos in the root folder of any of your drives, or at least in a path that is not too long. Some systems may experience issues with long paths.
Clone the git repository using the command:
git clone <URL of your Superalgos fork>For example, if your Github username is John, the command will look like this:
git clone https://github.com/John/SuperalgosThis creates the Superalgos folder in the current directory, which contains the whole installation.
After the Superalgos directory has been installed, you need to set up the necessary node dependencies. In the same command prompt or terminal you just used, type the following:
cd SuperalgosThat should take you inside the Superalgos folder created by the git clone command earlier. The node setup command installs the dependencies (notice there are a few options you may use).
node setupAvailable Options:
node setup <options>| Option | Description |
|---|---|
shortcuts |
Use this option to create desktop shortcuts. Otherwise, you will launch the app from the command line/terminal. |
tensorflow |
Use this option to include the TensorFlow dependencies, only if you intend to test the (partial and incomplete) TensorFlow integration. |
If you experience any issues installing dependencies, check the Troubleshooting Dependencies Installation section in the Appendix below.
Before using the software, you will need to install the plugins built by the community. To do so, just run this command from the Superalgos main folder:
node setupPlugins <Your-Github-Username> <Your-Github-Personal-Access-Token>For example:
node setupPlugins John ghz_2pBD4Sas0iYtwQGPjTq1Xlm3Ot4KpH3RLcr5✅ NOTE: This is the token you created during earlier steps!
This script is going to fork all Community Plugins repositories into your own Github account, and then it will clone each of these repositories into your local Superalgos/Plugins folder. The process is designed in a way that if someday a new type of plugin is added, you just need to run this command again and it will fork the new repo and clone it. This script will also find any missing forks needed and clone them too. You are safe running this script whenever you think is good.
✅ NOTE: If you ever have issues with your Plugins repos, you can delete individual folders inside
Superalgos/Pluginsand run this script to fix the problems for you. Also, if you have any issues with any of your plugin forks in your Github account, you can delete the offending fork and run this script again to fix the problem.
Congratulations! Your setup is complete. Now you may finally run the app for the first time. Please, follow the usage instructions below!
In case you are re-installing the platform from an older fork, you may want to update your fork's repositories.
Prerequisites:
node setup and node setupPlugins commands must be executed beforehand.
node updateGithubReposIf you ran node setup shortcuts while installing dependencies, then you should have a desktop icon that you can double-click to launch the Superalgos application. A terminal window will show the server is running, and a browser window will open with the GUI.
To run Superalgos, go to the Superalgos directory/folder and run this command:
node platformOptions usage:
node platform <options> <project> <workspace>| Option | Description |
|---|---|
minMemo |
Run with minimal memory footprint. This is critical for running on platforms with 8GB of RAM or less, like a Raspberry Pi. |
noBrowser |
Do not open the GUI in a browser. This is useful on headless servers where a UI is not available. |
To load a specific workspace on launch, add any option you may require, then the project, then the workspace. For example, to load the Blank-Template workspace of the Foundations project with no options:
node platform Foundations Blank-TemplateThe Client will run on your terminal and the GUI will launch on your default browser. If Chrome/Safari is not your default browser, copy the URL, close the browser, open Chrome/Safari, and paste the URL. Be patient... it takes a few seconds to fully load the GUI.
We are testing the UI on Google Chrome and Safari on macOS only. It may work on other browsers as well — or not. If you are running on a different browser and ever need support, make sure you mention that fact upfront, or even better, try on Chrome/Safari first.
✅ TIP: If your computer has 8 GB of RAM or less, use
node platform minMemoto run the system with minimal RAM requirements.
Superalgos writes nothing outside of the Superalgos folder other than shortcut files. To quickly remove the shortcut files, open a terminal or command prompt, navigate to your main Superalgos directory, and type the following command:
node uninstallThen simply delete the Superalgos folder to completely remove the application.
⚠️ BEWARE OF IMPERSONATORS — SCAMMERS ARE LURKING!Superalgos Admins, the Founding Team, and Community Mods will never contact you directly unless you contact them first. We will never ask you for API keys, coins, or cash. We will never ask you to trust us in any way. Our Community Safety Policy explains why.
In short, we want to make it clear that if someone contacts you directly claiming to work with or for the project, it is a scam.
Please report scammers in the Community group so that they may be banned and to increase awareness of the problem, but also block them and report them to Telegram if the option is available.
We just opened a brand new Discord server for Support and the Community.
That said, support questions tend to get faster responses in the Support Telegram Group.
We also meet on other Telegram groups, where it all started!
-
Web Site
-
For an overview of what Superalgos can do for you, check the Superalgos Website.
-
List of community resources featuring written, audiovisual, and interactive content.
-
-
Telegram
-
For official news, join the Superalgos Announcements Channel.
-
Meet other users in the Superalgos Telegram Community Group.
-
Meet developers in the Superalgos Telegram Developer's Group.
-
Users meet in other topic-specific Telegram Groups. There's a complete list of groups on the website.
-
-
Blog: find official announcements and various articles on the Superalgos Blog.
-
Twitter: to stay in the loop, follow Superalgos on Twitter. Help us spread the word!
-
Facebook: follow Superalgos on Facebook.
Superalgos is a Community Project built by users for users. Learn how you may contribute.
Superalgos is open-source software released under Apache License 2.0.
When following the Windows installer for Git, it is very important to make sure that you follow all the recommended and default settings, particularly on this step below:
For Windows users interested in testing the (partial and incomplete) TensorFlow integration, you need to install Python.
Github Desktop is a helpful tool to manage Git conflicts and issues. You can install it using the following link.
- GitHub Desktop download page. Click the "Download for Windows" button and follow the wizard to install after the download completes.
Rather than manually installing NodeJS, Git, and Python, Homebrew can be used to install the prerequisites with minimal effort on Mac OS. After you clone the repository, change the directory to the Superalgos base and install the requirements using Homebrew.
There are two ways to use Homebrew. The first is to type:
brew install git node npm python@3.9The second is to use the Brewfile included in the code repository. After downloading, run this command in the same directory where the Brewfile resides:
brew bundle✅ NOTE: You can use Safari or Google Chrome as your default browser. If you run into a bug in Safari, you will be asked to reproduce it in Chrome as the development team uses Chrome.
Installing Superalgos is easiest when using a Linux distribution already including Node.js in a version >= 16. We successfully tested this for these distributions:
- Debian version >= 12 ("Bookworm")
- Fedora version >= 39
- Rocky Linux >= 9
- AlmaLinux >= 9
For Debian-based distributions (e.g. Debian, Ubuntu), run the following command to install required dependencies:
apt-get install nodejs npm gitWhen using RHEL-oriented distributions (e.g. Fedora, CentOS, Rocky Linux, AlmaLinux), run the following command to install required dependencies:
dnf install nodejs gitNode.js installation instructions for many other distributions are available.
✅ NOTE: You need to have sufficient privileges on your system to install new packages. It may be required to precede above commands by sudo for them to work.
✅ NOTE: While some distributions package npm together with node, other distributions require you to install npm separately.
✅ NOTE: You may additionally install the package "python3". Python 3 is only required for testing the (partial and incomplete) TensorFlow integration.
You may now verify the successful installations and the installed software versions with these commands:
node -v
npm -v
git --version
All three commands should execute successfully and return a version number. If the version number of node is < 16, please proceed with the below instructions for setting up a newer version of Node.js. At the time of writing, particularly Ubuntu users will need to do these additional steps as the node version shipped with Ubuntu is outdated.
If you want to run Superalgos on a machine different from a standard PC with x86 chipset, such as on ARM-based machines, please ensure to install the additional prerequisites for non-standard chipsets.
After all prerequisites are successfully installed, continue with obtaining your Github Personal Access Token and proceed with the Superalgos Platform Client Installation.
Users of Linux distributions shipping outdated versions of Node.js (e.g. Ubuntu) will need to install a newer version of Node.js manually. We recommend using the Node Version Manager (nvm) to do this. For installing nvm, execute one of these commands (depending on the availability of curl or wget on your system):
curl -o- https://raw.githubusercontent.com/nvm-sh/nvm/v0.39.7/install.sh | bashor
wget -qO- https://raw.githubusercontent.com/nvm-sh/nvm/v0.39.7/install.sh | bash✅ IMPORTANT:
After installing nvm, you need to close your current terminal and open a new one (log out and log in again) for the installation to take effect.
With nvm successfully set up, you can now easily obtain a newer version of node by running nvm install, followed by the version number you'd like to set up. For example to install Node.js v20:
nvm install 20Last but not least, check if the active version of node is now meeting your needs:
node -vUsers running machines with chipsets different from a standard PC (x86), e.g. users of arm64-based machines, will additionally need to install make, gcc and g++ to successfully complete the setup process.
For Debian-based distributions (e.g. Debian, Ubuntu) running on machines with chipsets other than x86:
apt-get install build-essentialFor RHEL-oriented distributions (e.g. Fedora, CentOS, Rocky Linux, AlmaLinux) running on machines with chipsets other than x86:
dnf install make gcc gcc-c++For any other distribution, please investigate the package names for make, gcc and g++ and install these packages accordingly.
✅ NOTE FOR WINDOWS USERS INSTALLING TENSORFLOW DEPENDENCIES: You may get an error at the end of the setup process. If you do, please follow the instructions following the error message.
✅ NOTE FOR USERS INSTALLING MULTIPLE INSTANCES OF SUPERALGOS ON THE SAME MACHINE: To avoid name conflicts between shortcuts, make sure to rename each Superalgos directory before running
node setup shortcuts.
✅ NOTE FOR USERS INSTALLING ON LINUX: If after running
node setupyou are prompted to address issues by running 'npm audit fix' ignore this step.
✅ NOTE FOR USERS INSTALLING ON LINUX MACHINES WITH NON-STANDARD CHIPSETS: If after running
node setupyou are receiving error messages pointing to applications like make, cc or gcc missing, check the additional prerequisites for non-standard chipsets.
✅ NOTE FOR USERS INSTALLING ON COMPUTERS WITH 1GB OF RAM Superalgos has just about outgrown computers with only 1GB of RAM. For Instance a Raspberry Pi 3 does run the Getting Started Tutorials, but over time (Into 2023) this may significantly slow and could even stop. If still wish to use a computer with only 1GB of RAM (you have been warned), you will need to use version 16.x of Node.js as version 18.x needs well over 1 GB of RAM during setup.
If you are having difficulty running the node setup command here are a few common issues that may be getting in the way.
-
Check the version of node and npm you have installed. Make sure that you are running an updated version of node greater than version 16.6 and npm greater than version 5. You can check which version you have by typing
node -vandnpm -vinto a command prompt or terminal. If your version numbers are below these, you can update your installation by following the instructions outlined in the "Node JS Installation" step above. -
If you are installing Superalgos in an administratively protected directory you will need to do one of the following:
-
For Windows start your command prompt as an administrator.
-
For Linux and Mac Systems make sure to add the sudo command to node setup. This will look like
sudo node setup.
-
-
For Windows it is important that you have C:\Windows\System32 added to your global PATH. For instructions on how to do this google "add to the path on Windows 10."
-
If you are getting a lot of 'unexpected' errors during node setup, try resetting npm using the command
npm ci --omit=optionalbefore runningnode setupagain.
The majority of shortcuts that are installed will work out of the box. Desktop shortcuts on Ubuntu, however, require a few additional steps to set up. First, desktop icons need to be enabled within the Tweaks app.
-
Check if Tweaks is installed.
-
If not go to Ubuntu Software.
-
Install Tweaks.
-
Open Tweaks.
-
Under extensions turn on Desktop Icons

✅ TIP: If you do not see the desktop shortcut appear right away you may need to restart your computer.
Finally, you will need to enable the desktop shortcut. Right-click Superalgos.desktop and select Allow Launching.
Now both launcher and desktop shortcuts will launch Superalgos like any other program on your computer.
VSCode is a popular IDE. This short section covers some helpful tips for setting up the IDE's development environment.
There are a few things that need to be configured to obtain full functionality from VSCode. These configurations will make it possible to run notebooks for ML/AI algos and turn VSCode and Windows into a development bench for working with Superalgos.
On windows:
-
First, you need to install WSL and WSL2 https://docs.microsoft.com/en-us/windows/wsl/install then reboot if prompted.
-
You may want to review the Docker WSL2 Backend information for VSCode as well before proceeding. https://aka.ms/vscode-remote/containers/docker-wsl2
-
Install Debian or Ubuntu from the Windows Store, Setup the VM as instructed.
-
On windows and Debian:
To make managing these WSL instances a lot easier, we will now move to installing VSCode + Tools to allow for Dockerizing and rapidly deploying as well as editing and managing test/usage cases of Superalgos edit and forks you create and contribute.
-
Install VSCode https://code.visualstudio.com/docs/?dv=win64user
-
Install the remote container and remote docker plugins/extensions for Visual Studio Code https://code.visualstudio.com/docs/remote/containers#_installation
- You may want to spend time reading the specifics of this documentation on their website.
-
When prompted install shell shortcuts for right-click options, this way you can open Superalgos easy inside of VSCode.
-
✅ IMPORTANT:
As mentioned above, you need to remove node.js/node from your system and install NVM if you are using Debian. Please refer to the information above for properly setting up node.js and npm on Debian systems with complications regarding versions of node.
Once the install finishes you can now use VSCode as an interactive IDE/Shell to access SuperAlgos, run Dockers for working with Superalgos, and more.
If you're running Superalgos on a headless Linux server like a Raspberry Pi, you might want to run it as a daemon so it isn't attached to your current login session. The easiest, most standard way to go about this is probably using systemd. Most Linux distributions use it as the default init system/service manager.
Create a superalgos.service file looking like this (change <user> to your user name and /path/to/Superalgos to your Superalgos folder, for instance /home/John/Superalgos):
[Unit]
Description=Superalgos Platform Client

[Service]
Type=simple
User=<user>
WorkingDirectory=/path/to/Superalgos
ExecStart=/usr/bin/node platform minMemo noBrowser

[Install]
WantedBy=multi-user.target
There is no need to run Superalgos as root so we're running it as a user. The minMemo option assumes you're running on a small machine like a Raspberry Pi, while noBrowser makes sense for running daemonized. Now, you'll need to move the file to /etc/systemd/system/ for it to be recognized. You'll need then to enable and start the service.
sudo mv superalgos.service /etc/systemd/system
sudo systemctl daemon-reload
sudo systemctl enable superalgos
sudo systemctl start superalgos
To check the service status
sudo systemctl status superalgosTo stop the service:
sudo systemctl stop superalgos
sudo systemctl disable superalgos
To see the output of Superalgos, use:
journalctl -u superalgosor to follow the output with -f:
journalctl -u superalgos -f