The
adminof JSF templates!
![]()


A JSF fully responsive admin template based on Primefaces, Admin LTE and Bootstrap.
Below is a non exhaustive list of notable features brought out of the box by this template:
-
Fully responsive
-
Its based on Bootstrap and AdminLTE two well tested and solid frameworks
-
-
Enhanced mobile experience
-
Material design load bar
-
Material design flat buttons
-
Ripple effect based on materialize css

-
Touch enabled menu to slide in/out and show navbar on scroll up

-
Auto show and hide navbar based on page scroll
-
Scroll to top
-
-
Automatically activates (highlight) menu based on current page

-
Custom error pages
-
Two menu modes, left and horizontal based menu
-
Configurable, see Configuration
-
Breadcrumb based navigation
-
Layout customization via Control Sidebar
-
High resolution and responsible icons based on Glyphycons and FontAwesome
-
Menu items search

-
Builtin
darkandlightskins -
Back to previous screen when logging in again after session expiration (or accessing a page via url without being logged in)


|
ℹ️
|
Most of the above features can be enabled/disabled via configuration mechanism. |
First include it in your classpath:
<dependency>
    <groupId>com.github.adminfaces</groupId>
    <artifactId>admin-template</artifactId>
    <version>version</version>
</dependency>|
|
Admin template will bring the following transitive dependencies: <dependency>
<groupId>com.github.adminfaces</groupId>
<artifactId>admin-theme</artifactId>
<version>version</version>
</dependency>
<dependency>
<groupId>org.primefaces</groupId>
<artifactId>primefaces</artifactId>
<version>12.0</version>
</dependency>
<dependency>
<groupId>org.omnifaces</groupId>
<artifactId>omnifaces</artifactId>
<version>4.1</version>
</dependency>Which you can override in your pom.xml as needed. |
With the template dependency in classpath now you can use admin facelets template into your JSF pages.
Consider the following sample page:
<?xml version="1.0" encoding="UTF-8"?>
<ui:composition xmlns="http://www.w3.org/1999/xhtml"
                xmlns:ui="jakarta.faces.facelets"
                xmlns:p="http://primefaces.org/ui"
                template="/admin.xhtml"> (1)

    <ui:define name="head">
        <title>Admin Starter</title>
    </ui:define>

    <ui:define name="logo-lg">
        Admin Starter
    </ui:define>

    <ui:define name="logo-mini">
        Admin
    </ui:define>

    <ui:define name="menu">
        <ul class="sidebar-menu">
            <li>
                <p:link href="/index.xhtml" onclick="clearBreadCrumbs()">
                    <i class="fa fa-home"></i>
                    <span>Home</span>
                </p:link>
            </li>
	        <li class="header">
	            General
	        </li>
	        <li>
	            <p:link href="/car-list.xhtml">
	                <i class="fa fa-car"></i>
	                <span>Cars</span>
	            </p:link>
	        </li>
        </ul>
     </ui:define>

    <ui:define name="top-menu">
        <ui:include src="/includes/top-bar.xhtml"/>
    </ui:define>

      <ui:define name="title">
        <h2 class="align-center">
            Welcome to the <span class="text-aqua"> <i><a href="https://github.com/adminfaces/admin-starter" target="_blank"
                                                          style="text-transform: none;text-decoration: none"> AdminFaces Starter</a></i></span> Project!
            <br/>
            <small>Integrating <p:link value="Primefaces" href="http://primefaces.org"/>, <p:link value="Bootstrap"
                                                                                                  href="http://getbootstrap.com/"/> and
                <p:link value="Admin LTE" href="https://almsaeedstudio.com/themes/AdminLTE/index2.html/"/> into your
                <p:link value="JSF" href="https://javaserverfaces.java.net/"/> application.
            </small>
        </h2>
    </ui:define>

    <ui:define name="description">
        A page description
    </ui:define>

    <ui:define name="body">
    	<h2>Page body</h2>
    </ui:define>


    <ui:define name="footer">
          <a target="_blank"
           href="https://github.com/adminfaces/">
            Copyright (C) 2017 - AdminFaces
        </a>

        <div class="pull-right hidden-xs" style="color: gray">
            <i>1.0.0</i>
        </div>
    </ui:define>


</ui:composition>-
/admin.xhtml is the location of the template
The above page definition renders as follows:

There are also other regions defined in admin.xhtml template, see here.
|
💡
|
A good practice is to define a template on your application which extends the admin template, see admin-starter application template here. So in your pages you use your template instead of admin. |
Instead of repeating sections like menu, logo, head and footer on every page we can create a template inside our application which uses admin.xhtml as template:
<?xml version="1.0" encoding="UTF-8"?>
<ui:composition xmlns="http://www.w3.org/1999/xhtml"
                xmlns:ui="jakarta.faces.facelets"
                xmlns:p="http://primefaces.org/ui"
                template="/admin.xhtml">

    <ui:define name="head">
            <title>Admin Starter</title>
            <h:outputStylesheet library="css" name="starter.css"/>
    </ui:define>

    <ui:define name="logo-lg">
        Admin Starter
    </ui:define>

    <ui:define name="logo-mini">
        Admin
    </ui:define>

    <ui:define name="menu">
        <ul class="sidebar-menu">
            <li>
                <p:link href="/index.xhtml" onclick="clearBreadCrumbs()">
                    <i class="fa fa-home"></i>
                    <span>Home</span>
                </p:link>
            </li>
	        <li class="header">
	            General
	        </li>
	        <li>
	            <p:link href="/car-list.xhtml">
	                <i class="fa fa-car"></i>
	                <span>Cars</span>
	            </p:link>
	        </li>
        </ul>
     </ui:define>

    <ui:define name="top-menu">
        <ui:include src="/includes/top-bar.xhtml"/>
    </ui:define>

    <ui:define name="footer">
        <a target="_blank"
           href="https://github.com/adminfaces/">
            Copyright (C) 2017 - AdminFaces
        </a>

        <div class="pull-right hidden-xs" style="color: gray">
            <i>1.0.0</i>
        </div>
    </ui:define>

</ui:composition>
And now the page can just define its content and title:
<?xml version="1.0" encoding="UTF-8"?>
<ui:composition xmlns="http://www.w3.org/1999/xhtml"
                xmlns:ui="jakarta.faces.facelets"
                template="/WEB-INF/templates/template.xhtml">

    <ui:define name="title">
        A page title
    </ui:define>

    <ui:define name="description">
        A page description
    </ui:define>

    <ui:define name="body">
    	<h2>Page body</h2>
    </ui:define>

</ui:composition>AdminFaces supports two layout modes, one is left based menu and the other is top based menu.
The user can change layout modes via control sidebar but to make it work you have to use LayoutMB to define page template:
<?xml version="1.0" encoding="UTF-8"?>
<ui:composition xmlns="http://www.w3.org/1999/xhtml"
                xmlns:ui="jakarta.faces.facelets"
                template="#{layoutMB.template}">

<!-- page content -->

</ui:composition>
As a convention over configuration LayoutMB will load templates from the following locations:
-
webapp/WEB-INF/templates/template.xhtmlandresources/META-INF/resources/templates/template.xhtmlfor theleft menubased template -
webapp/WEB-INF/templates/template-top.xhtmlandresources/META-INF/resources/templates/template-top.xhtmlfor horizontal menu layout.
|
ℹ️
|
If you don’t provide a Application template then built in admin.xhtml and admin-top.xhtml templates will be used.
|
See admin-starer templates for a reference: https://github.com/adminfaces/admin-starter/tree/master/src/main/webapp/WEB-INF/templates
Template configuration is made through admin-config.properties file present in src/main/resources folder.
Here are the default values as well as its description:
admin.loginPage=login.xhtml (1)
admin.indexPage=index.xhtml (2)
admin.dateFormat= (3)
admin.breadcrumbSize=5 (4)
admin.renderMessages=true (5)
admin.renderAjaxStatus=true (6)
admin.disableFilter=false (7)
admin.renderBreadCrumb=true (8)
admin.enableSlideMenu=true (9)
admin.enableRipple=true (10)
admin.rippleElements= .ripplelink,button.ui-button,.ui-selectlistbox-item,.ui-multiselectlistbox-item,.ui-selectonemenu-label,.ui-selectcheckboxmenu,\
.ui-autocomplete-dropdown, .ui-autocomplete-item ... (the list goes on) (11)
admin.skin=skin-blue (12)
admin.autoShowNavbar=true (13)
admin.ignoredResources= (14)
admin.loadingImage=ajaxloadingbar.gif (15)
admin.extensionLessUrls=false (16)
admin.renderControlSidebar=false (17)
admin.controlSidebar.showOnMobile=false (18)
admin.controlSidebar.leftMenuTemplate=true (19)
admin.controlSidebar.fixedLayout=false (20)
admin.controlSidebar.boxedLayout=false (21)
admin.controlSidebar.sidebarCollapsed=false (22)
admin.controlSidebar.expandOnHover=false (23)
admin.controlSidebar.fixed=false (24)
admin.controlSidebar.darkSkin=true (25)
admin.rippleMobileOnly=true (26)
admin.renderMenuSearch=true (27)
admin.autoHideMessages=true (28)
admin.messagesHideTimeout=2500 (29)
admin.iconsEffect=true (30)-
login page location (relative to webapp). It you only be used if you configure Admin Session.
-
index page location. User will be redirected to it when it access app root (contextPath/).
-
Date format used in error page (500.xhtml), by default it is JVM default format.
-
Number of breadcrumbs to queue before removing the older ones.
-
When false, p:messages defined in admin template will not be rendered.
-
When false ajaxStatus, which triggers the loading bar on every ajax request, will not be rendered.
-
Disables AdminFilter, responsible for redirecting user after session timeout, sending user to logon page when it is not logged in among other things.
-
When false, the breadCrumb component, declared in admin template, will not be rendered.
-
If true will make left menu touch enable (can be closed or opened via touch). Can be enable/disabled per page with <ui:param name="enableSlideMenu" value="false".
-
When true it will create a wave/ripple effect on elements specified by
rippleElements. -
A list of comma separated list of (jquery) selector which elements will be affected by ripple effect.
-
Default template skin.
-
Automatic shows navbar when users scrolls page up
on small screens. Can be enable/disabled per page with <ui:param name="autoShowNavbar" value="false". -
Comma separated resources (pages or urls) to be skiped by AdminFilter. Ex: /rest, /pages/car-list. Note that by default the filter skips pages under CONTEXT/public/ folder.
-
image used for the loading popup. It must be under
webapp/resources/imagesfolder. -
Removes extension suffix from breadCrumb links.
-
When true it will activate control sidebar component.
-
When true control sidebar will be also rendered on mobile devices.
-
Switches layout between left (default) and top menu.
-
Toggles fixed layout where navbar is fixed on the page.
-
Toggles boxed layout which is helpful when working on large screens because it prevents the site from stretching very wide.
-
When true left sidebar will be collapsed.
-
When true left sidebar will expand on mouse hover.
-
When true control sidebar will be fixed on the page.
-
Changes control sidebar skin between
darkandlight. -
When true the ripple effect will be enabled only on mobile (small) screens.
-
Enables or disables menu search.
-
If true PrimeFaces info messages will be hidden after a certain timeout.
-
Timeout to hide info messages. Note that the timeout is composed by
configured timeout + number of wordsin message. -
Enables material effect when icons (e.g modal close, calendar) are clicked.
|
❗
|
You don’t need to declare all values in your admin-config.properties, you can specify only the ones you need to change. |
|
💡
|
Since vRC16 config properties can be passed as Java system properties.
|
|
ℹ️
|
Controlsidebar entries (admin.controlSidebar.xxx) will be used only for initial/default values because they will be stored on browser local storage as soon as user changes them. |
AdminSession is a simple session scoped bean which controls whether user is logged in or not.
 public boolean isLoggedIn(){
        return isLoggedIn; //always true by default
    }
By default the user is always logged in and you need to override it (by using bean specialization or via injection and calling setIsLoggedIn() method) to change its value, see Overriding AdminSession.
When isLoggedIn is false you got the following mechanisms activated:
-
Access to any page, besides the login, redirects user to login;
-
When session is expired user is redirected to logon and current page (before expiration) is saved so user is redirected back to where it was before session expiration.
|
ℹ️
|
It is up to you to decide whether the user is logged in or not. |
There are two ways to override AdminSession default value which is specialization and injection.
A simple way to change AdminSession logged in value is by extending it:
import jakarta.enterprise.context.SessionScoped;
import jakarta.enterprise.inject.Specializes;
import com.github.adminfaces.template.session.AdminSession;
import org.omnifaces.util.Faces;
import java.io.Serializable;

@SessionScoped
@Specializes
public class LogonMB extends AdminSession implements Serializable {

    private String currentUser;
    private String email;
    private String password;
    private boolean remember;


    public void login() throws IOException {
        currentUser = email;
        addDetailMessage("Logged in successfully as <b>" + email + "</b>");
        Faces.getExternalContext().getFlash().setKeepMessages(true);
        Faces.redirect("index.xhtml");
    }

    @Override
    public boolean isLoggedIn() {

        return currentUser != null;
    }

    //getters&setters
}Another way is to inject it into your security authentication logic:
import com.github.adminfaces.template.session.AdminSession;
import org.omnifaces.util.Messages;
import org.omnifaces.util.Faces;

@SessionScoped
@Named("authorizer")
public class CustomAuthorizer implements Serializable {

    private String currentUser;

    @Inject
    AdminSession adminSession;

    public void login(String username) {
        currentUser = username;
        adminSession.setIsLoggedIn(true);
        Messages.addInfo(null,"Logged in sucessfully as <b>"+username+"</b>");
        Faces.redirect("index.xhtml");
    }

}|
❗
|
As isLoggedIn is true by default you need to set it to false on application startup so user is redirected to login page. This step is not needed when AdminSession Specialization.
|
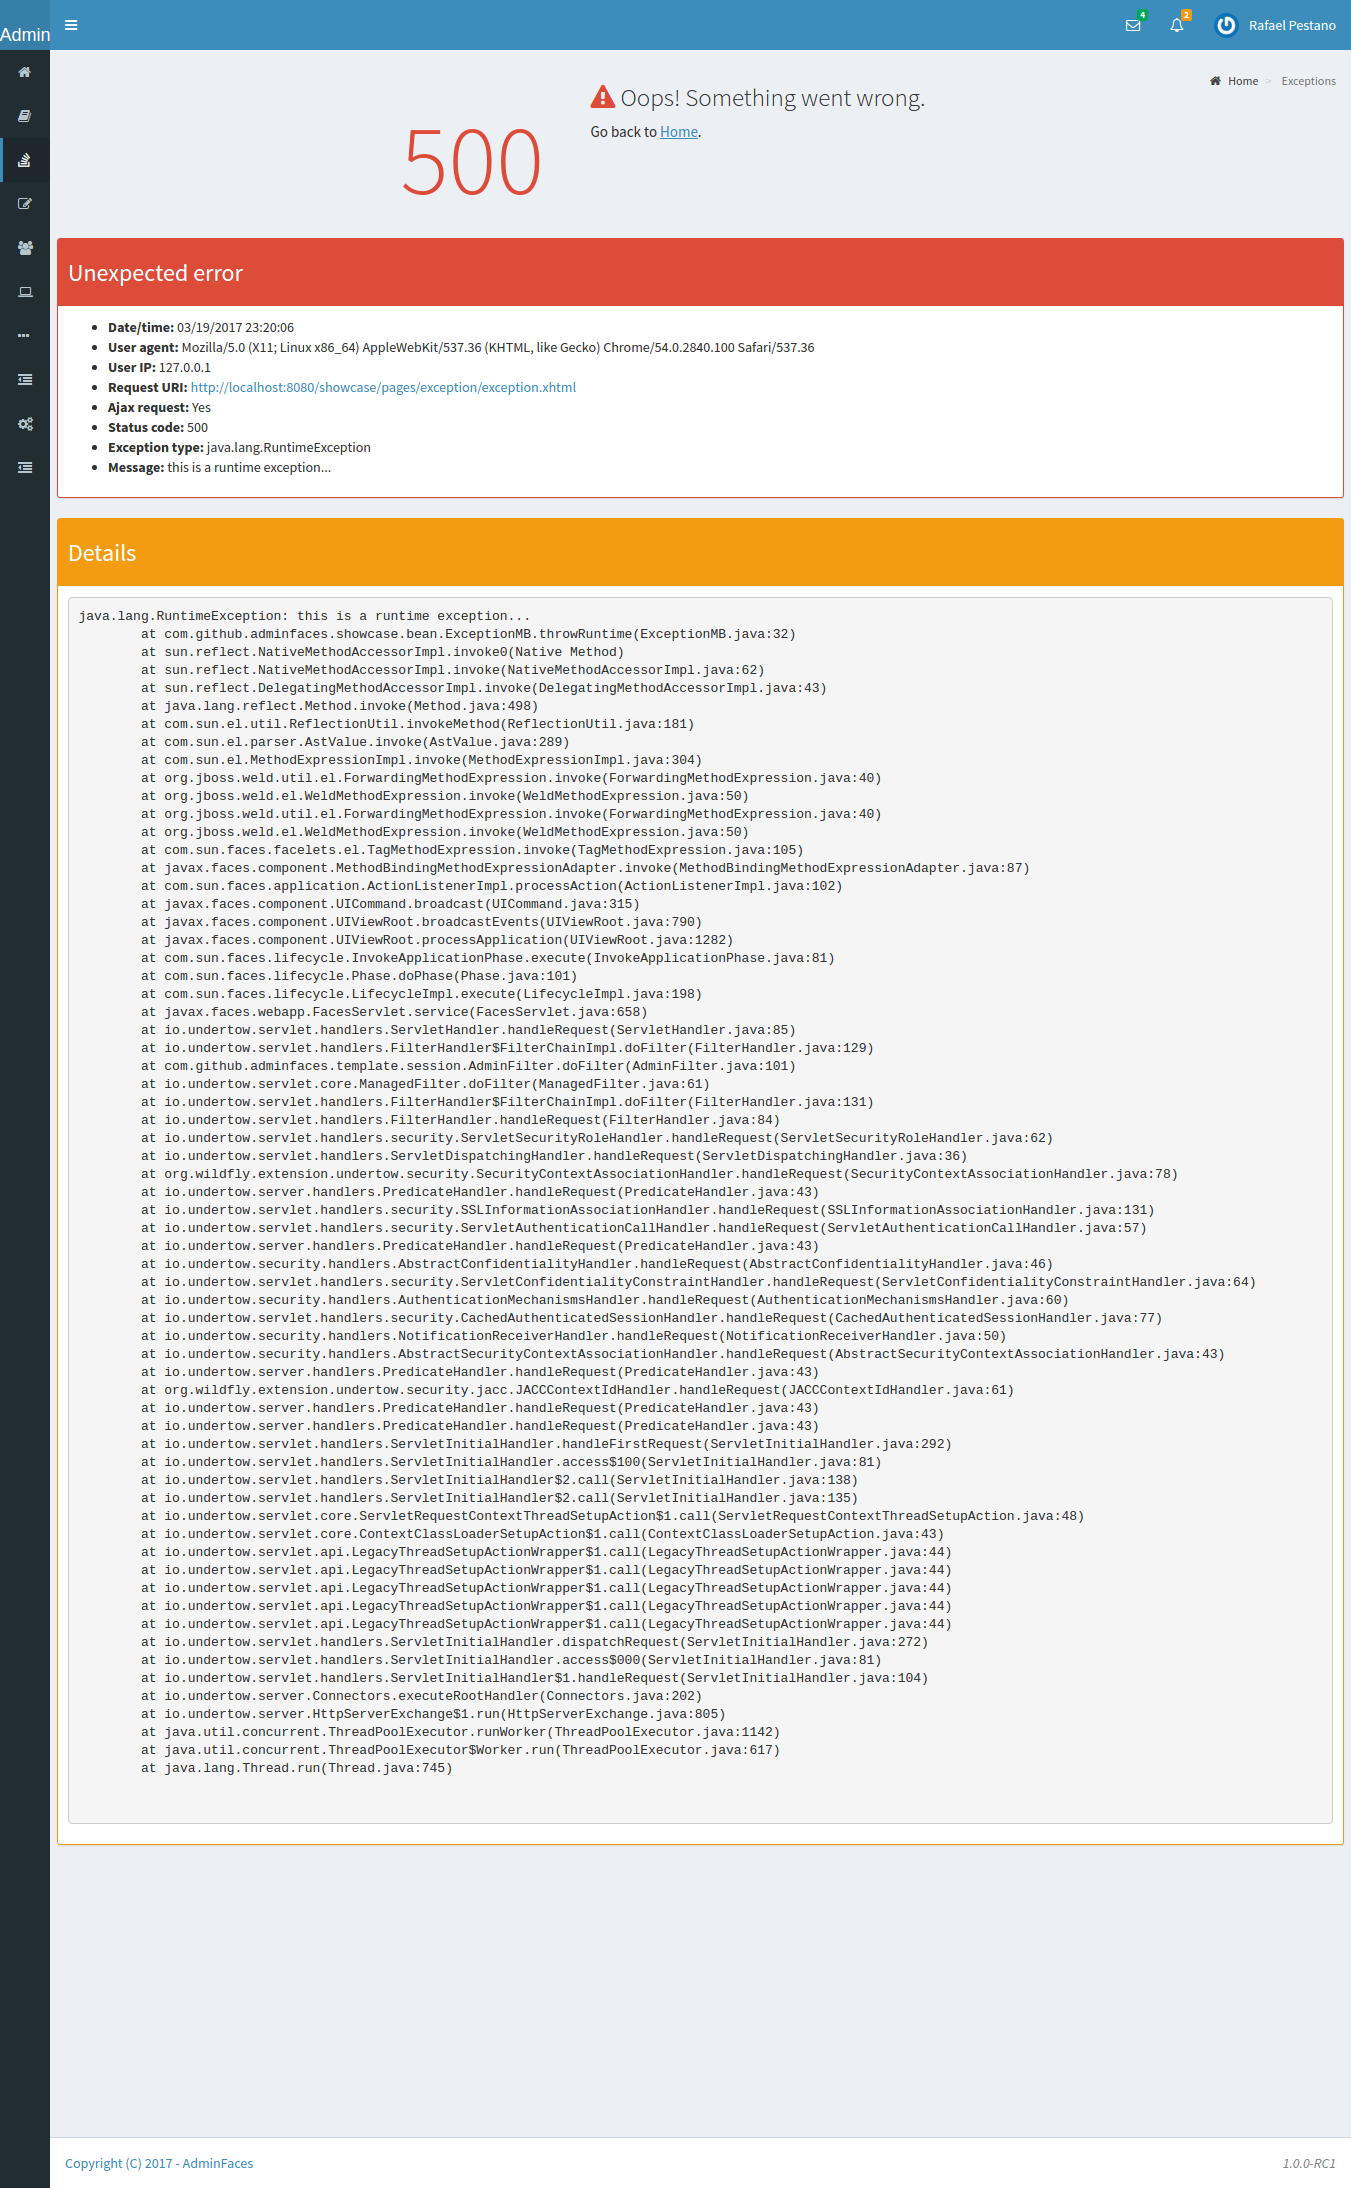
The template comes with custom error pages like 403, 404, 500, ViewExpired and OptimisticLock.
User is going to be redirected to 500.xhtml whenever a 500 response code is returned in a request.
The page will also be triggered when a Throwable is raised (and not catch).
Here is how 500 page look like:
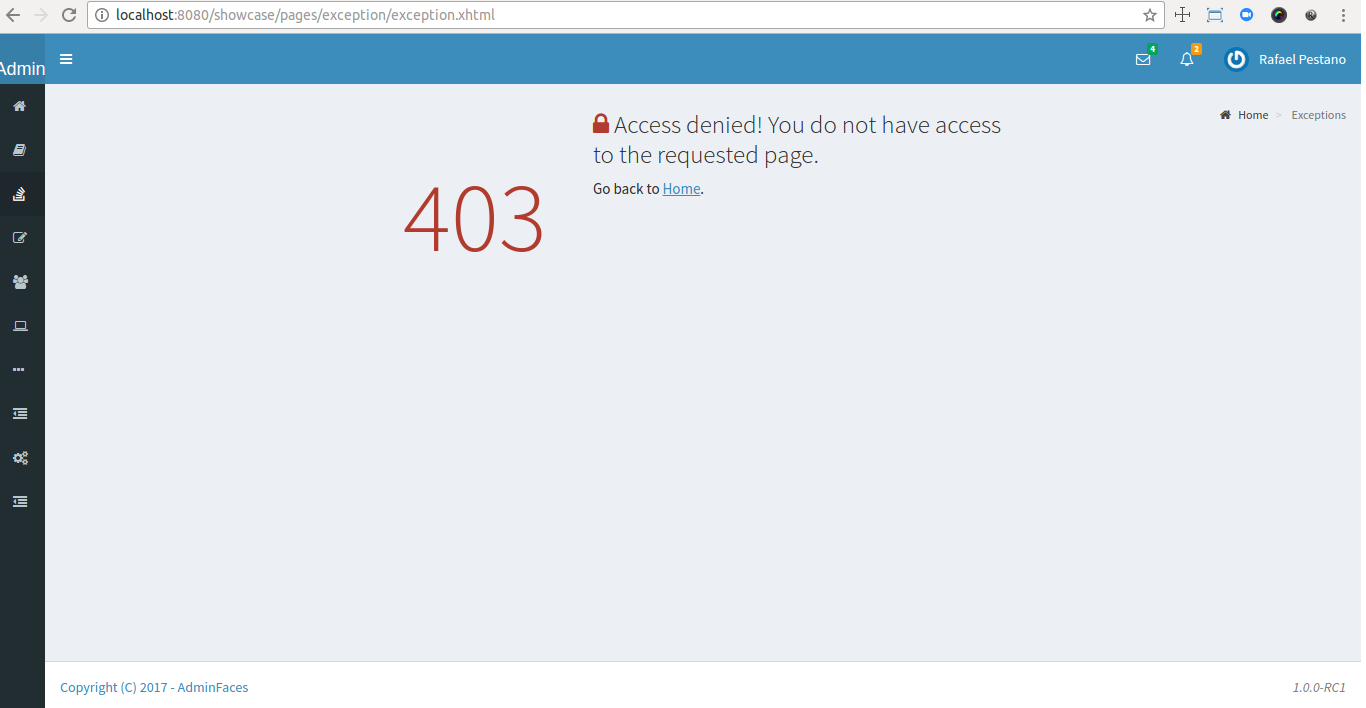
User is redirected to 403.xhtml whenever a 403 response code is returned in a request. The page will also be triggered when a com.github.adminfaces.template.exception.AccessDeniedException is raised.
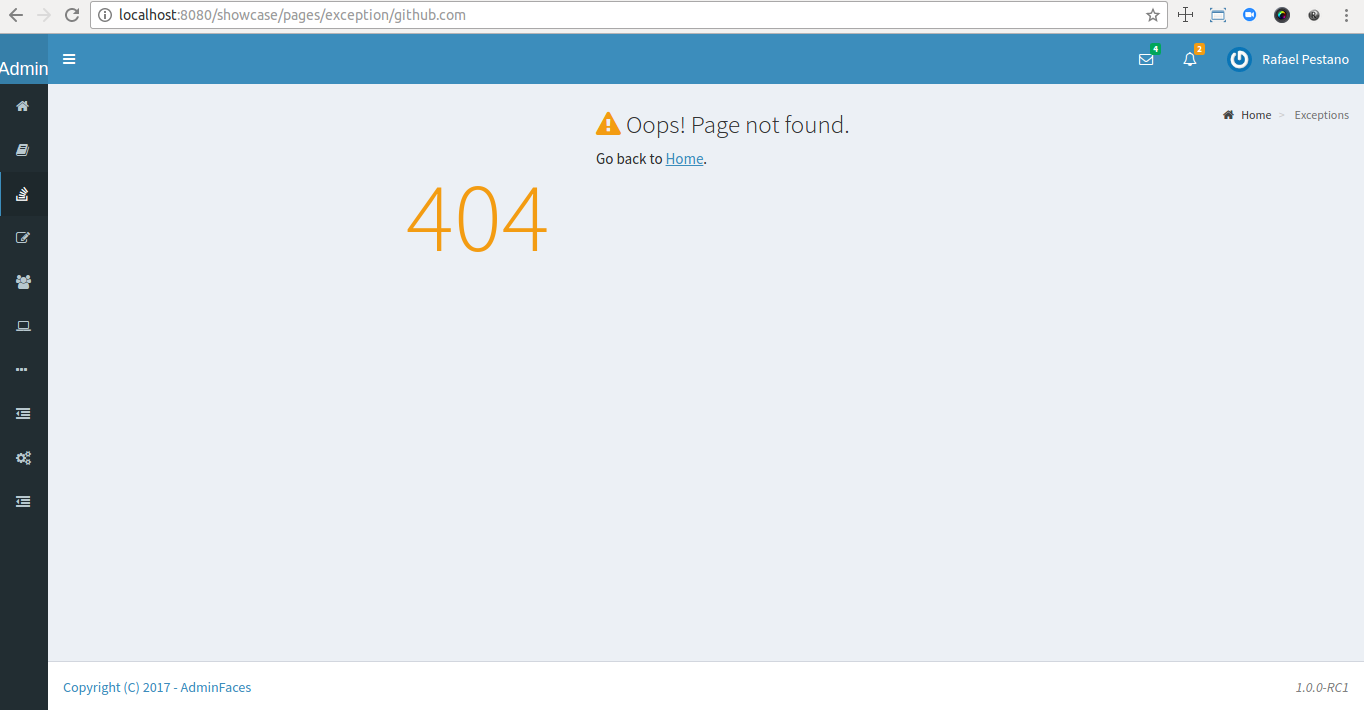
User will be redirected to 404.xhtml whenever a 404 response code is returned from a request.
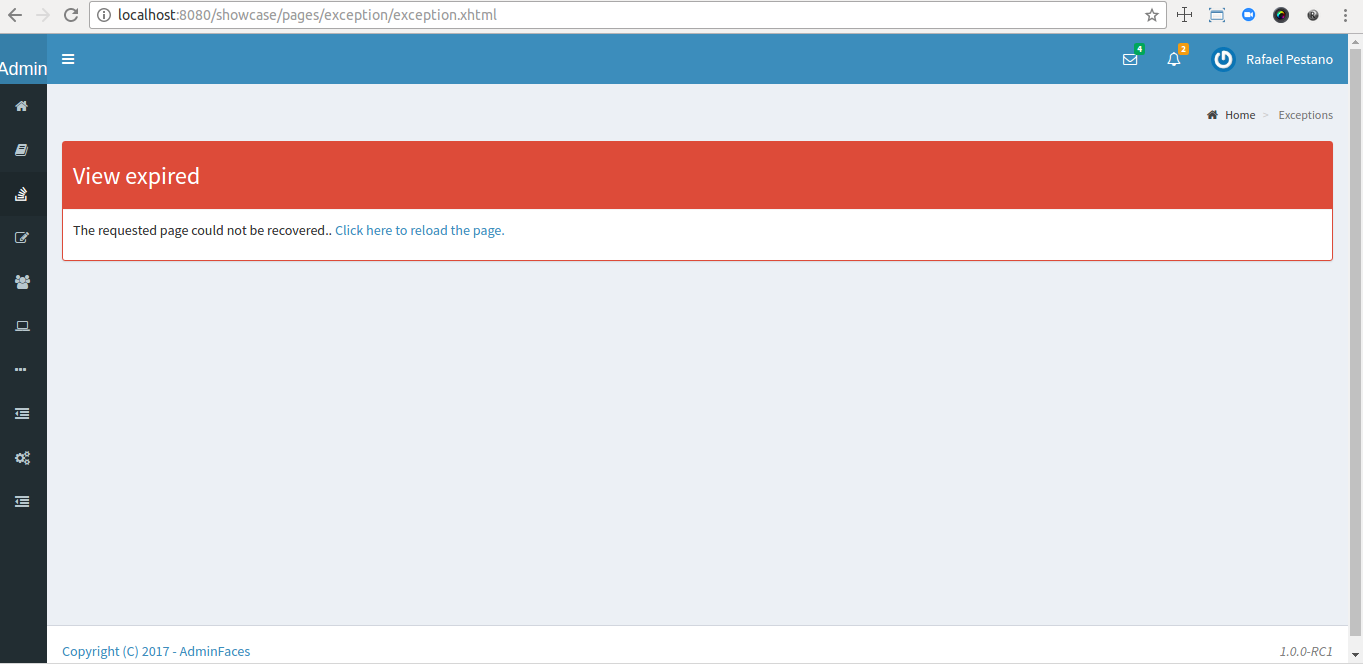
When a JSF javax.faces.application.ViewExpiredException is raised user will be redirected to expired.xhtml.
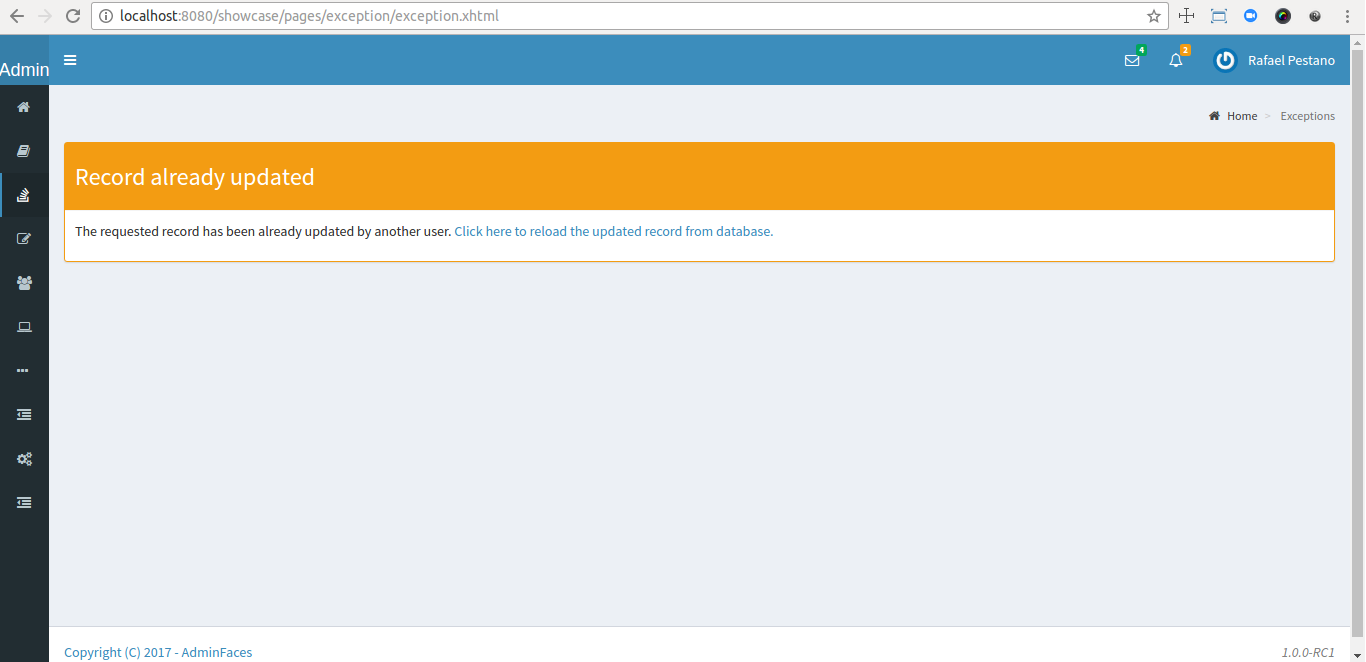
When a JPA javax.persistence.OptimisticLockException is thrown user will be redirected to optimistic.xhtml.
You can provide your own custom pages (and other status codes) by configuring them in web.xml, example:
<error-page>
    <error-code>404</error-code>
    <location>/404.xhtml</location>
</error-page>
<error-page>
    <error-code>500</error-code>
    <location>/500.xhtml</location>
</error-page>
<error-page>
    <exception-type>java.lang.Throwable</exception-type>
    <location>/500.xhtml</location>
</error-page>You can also override error pages by placing the pages (with same name) described in Error Pages section on the root of your application (webapp/).
Labels in error pages and control sidebar are provided via JSF resource bundle mechanism.
Following are the default labels in admin resource bundle:
#general
admin.version=${project.version}
label.home=Home
label.go-back=Go back to
label.or-to=or to
label.previous-page=previous page

#403
label.403.header=403
label.403.message=Access denied! You do not have access to the requested page.

#404
label.404.header=404
label.404.message=Oops! Page not found

#500
label.500.header=500
label.500.message=Oops! Something went wrong
label.500.title=Unexpected error
label.500.detail=Details

#expired
label.expired.title=View expired
label.expired.message= The requested page could not be recovered.
label.expired.click-here= Click here to reload the page.

#optimistic
label.optimistic.title=Record already updated
label.optimistic.message= The requested record has been already updated by another user.
label.optimistic.click-here= Click here to reload the updated record from database.

#controlsidebar
controlsidebar.header=Layout Options
controlsidebar.label.restore-defaults=Restore defaults
controlsidebar.label.menu-horientation=Left menu layout
controlsidebar.txt.menu-horientation=Toggle menu orientation between <b class\="sidebar-bold">left</b> and <b class\="sidebar-bold">top</b> menu.
controlsidebar.label.fixed-layout=Fixed Layout
controlsidebar.txt.fixed-layout=Activate the fixed layout, if checked the top bar will be fixed on the page.
controlsidebar.label.boxed-layout=Boxed Layout
controlsidebar.txt.boxed-layout=Activate the boxed layout.
controlsidebar.label.sidebar-collapsed=Collapsed Sidebar
controlsidebar.txt.sidebar-collapsed=If checked the sidebar menu will be collapsed.
controlsidebar.label.sidebar-expand-hover=Sidebar Expand on Hover
controlsidebar.txt.sidebar-expand-hover=If checked the left sidebar will expand on hover.
controlsidebar.label.sidebar-slide=Control Sidebar fixed
controlsidebar.txt.sidebar-slide=If checked control sidebar will be fixed on the page.
controlsidebar.label.sidebar-skin=Dark Sidebar Skin
controlsidebar.txt.sidebar-skin=If checked <b class\="sidebar-bold">dark</b> skin will be used for control sidebar, otherwise <b class\="sidebar-bold">light</b> skin will be used.
controlsidebar.header.skins=Skins

#menu search
menu.search.placeholder=Search menu items...|
💡
|
You can provide your own language bundle adding a file named admin_YOUR_LANGUAGE.properties in your application Don’t forget to add it as |
|
❗
|
You can contribute your language locale to AdminFaces, check here the current supported locales. |
ControlSidebar is a component which provides a panel so user can customize the template layout:
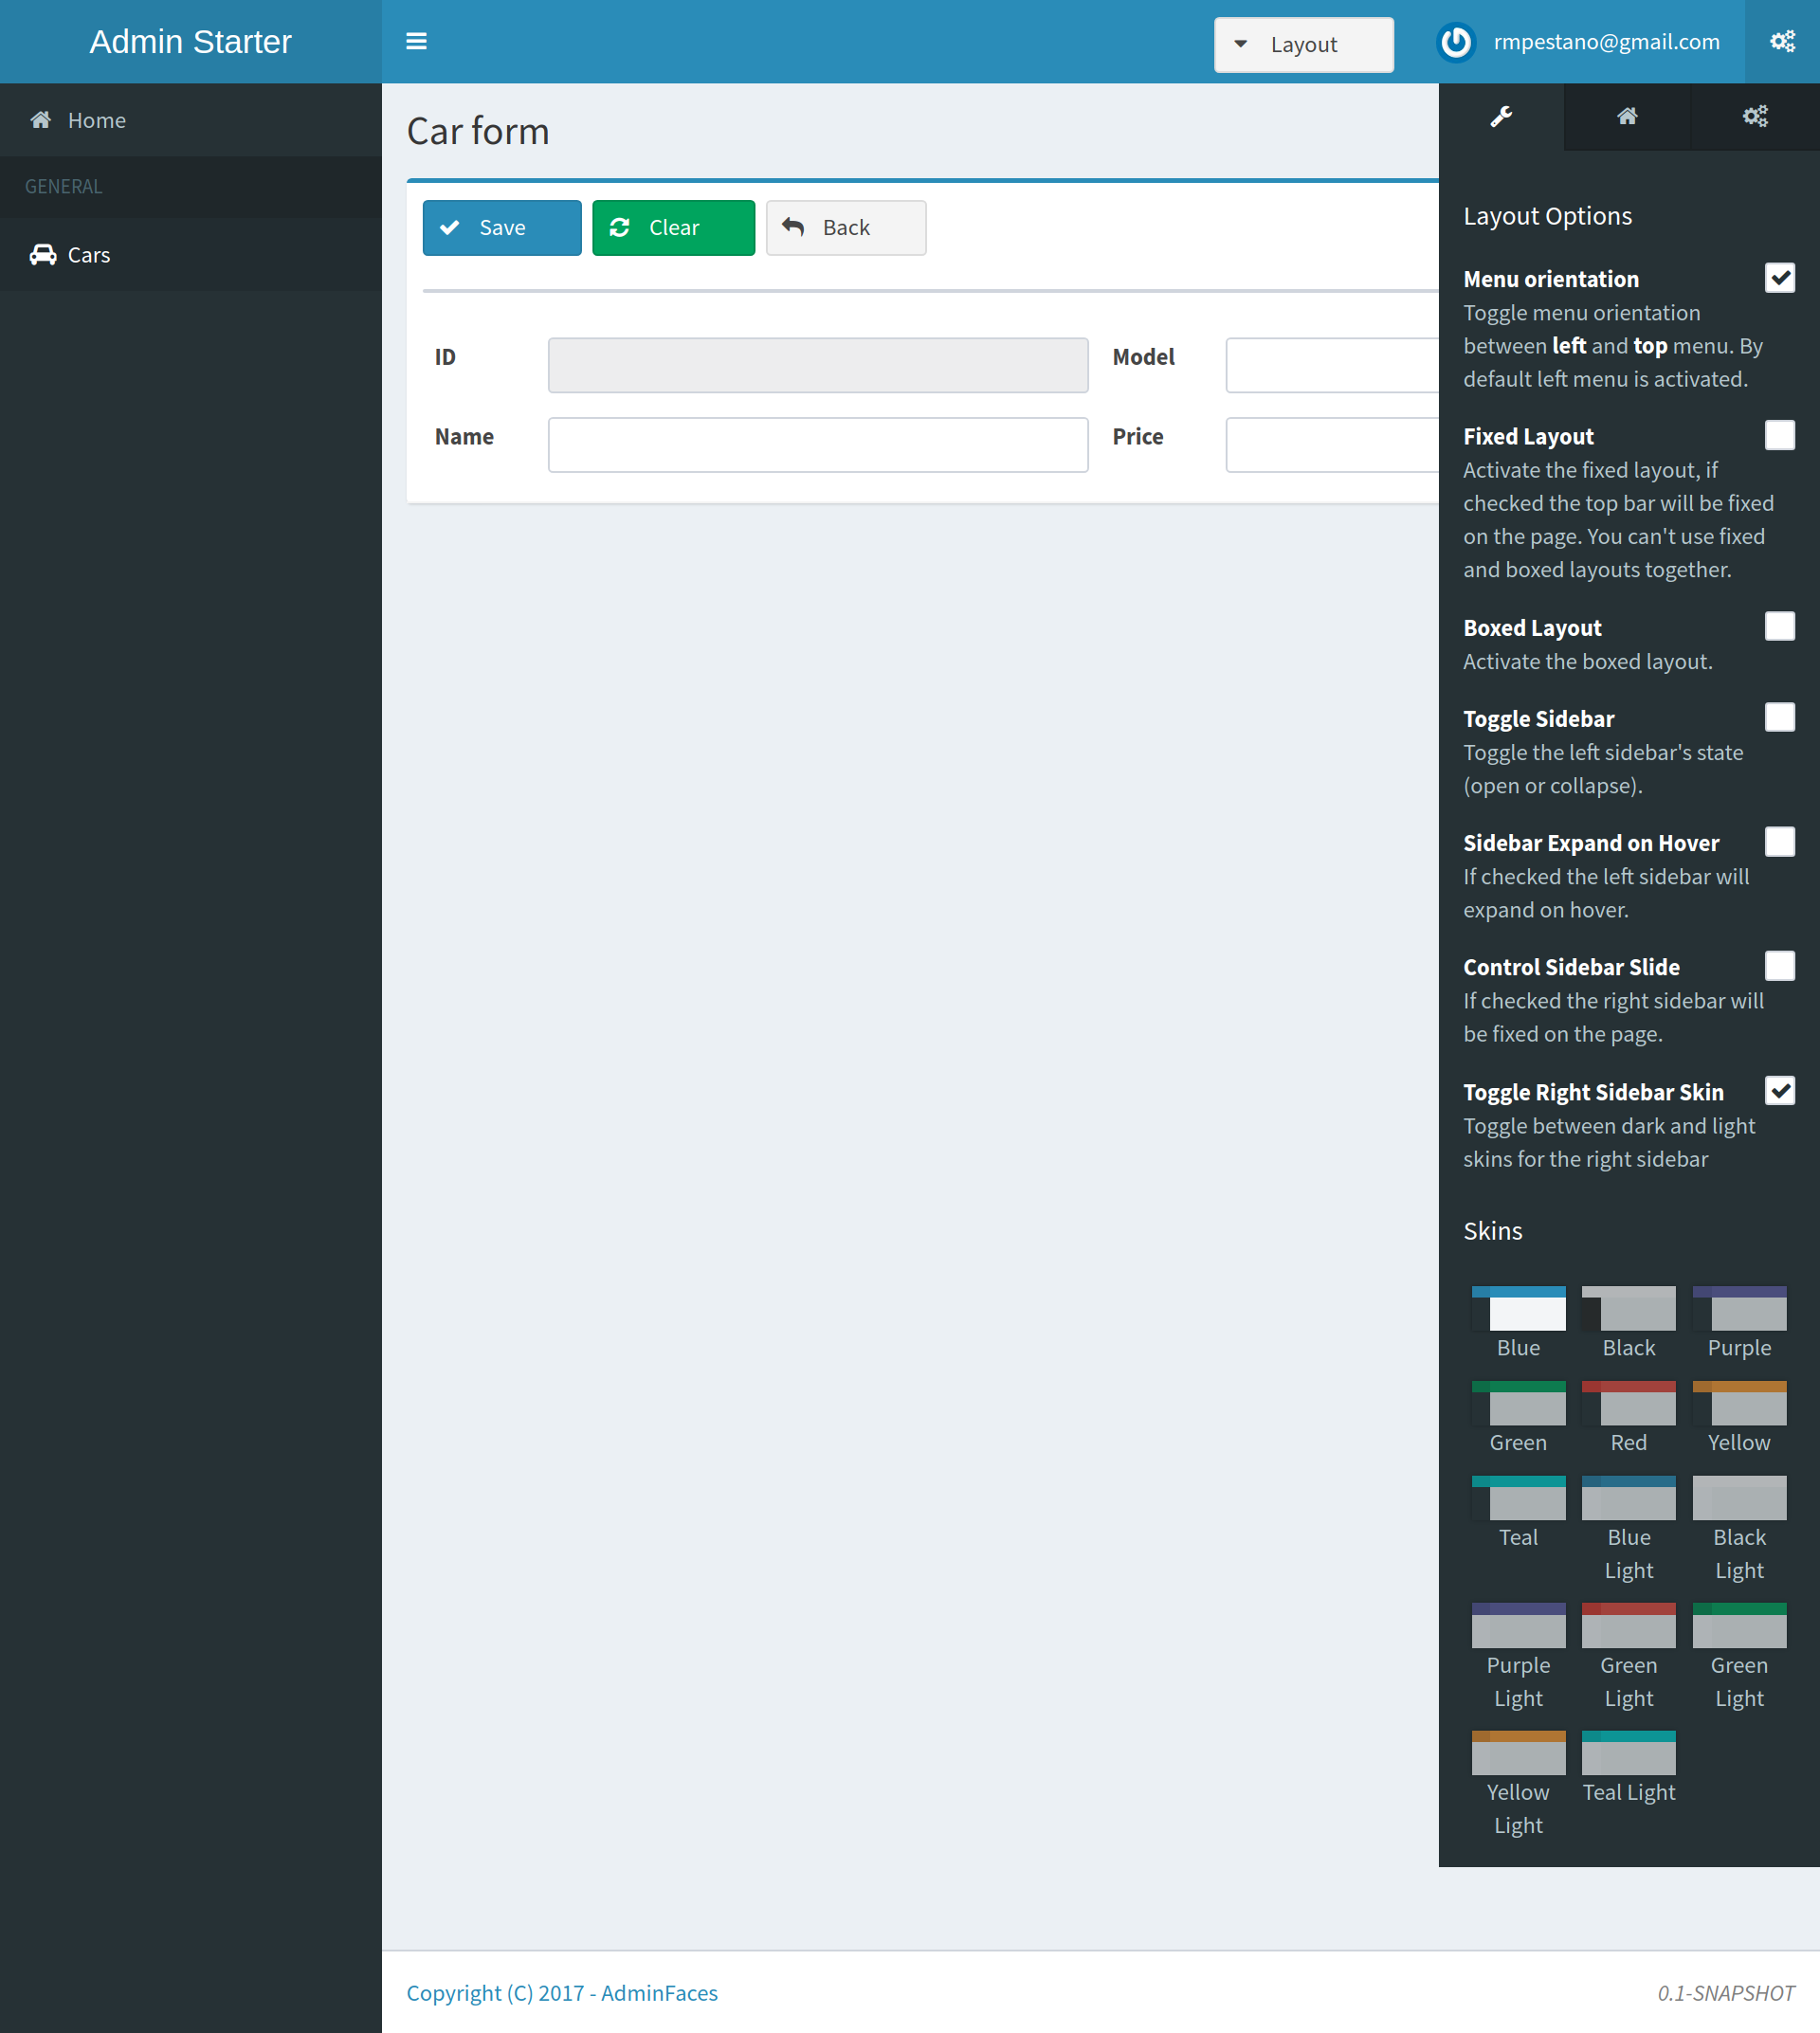
Options selected by user are stored on browser local storage so they are remembered no matter the user logs off the application.
To enable the control sidebar you need to add the following entry in src/main/resources/admin-config.properties:
admin.renderControlSidebar=trueAnd then add a link or button on your page which opens the sidebar. The link or button must use data-toggle attribute:
<a href="#" id="layout-setup" data-toggle="control-sidebar" class="hidden-sm hidden-xs"><i class="fa fa-gears"></i></a>On admin-starter the link is located on top-bar.xhtml.
{link-admin-showcase-openshift}/pages/layout/controlsidebar.xhtml[Click here^] to see controlsidebar in action on admin showcase.
By default the control sidebar comes only with the configuration tab but you can define additional tabs by defining controlsidebar-tabs and controlsidebar-content on your template. An example can be found on admin-starter template.
|
💡
|
ControlSidebar is hidden on mobile devices by default. You can change this on admin.controlSidebar.showOnMobile=trueAlso don’t forget to remove the <a href="#" class="ui-link ui-widget" data-toggle="control-sidebar"><i class="fa fa-gears"></i></a> |
Since version 1.6.0 admin-template supports jakartaEE by default, see admin-starter for a sample project.
Snapshots are published to maven central on each commit, to use it just declare the repository below on your pom.xml:
<repositories>
    <repository>
        <snapshots/>
        <id>snapshots</id>
        <name>libs-snapshot</name>
        <url>https://oss.sonatype.org/content/repositories/snapshots</url>
    </repository>
</repositories>