![]()
![]()
A4988, DRV8825, DRV8834, DRV8880 and generic two-pin stepper motor driver library. Features:
- Constant speed mode (low rpms)
- Linear (accelerated) speed mode, with separate acceleration and deceleration settings.
- Non-blocking mode (yields back to caller after each pulse)
- Early brake / increase runtime in non-blocking mode
Hardware currently supported:
- DRV8834 Low-Voltage Stepper Motor Driver up to 1:32
- A4988 Stepper Motor Driver up to 1:16
- DRV8825 up to 1:32
- DRV8880 up to 1:16, with current/torque control
- any other 2-pin stepper via DIR and STEP pins, microstepping up to 1:128 externally set
The library can set microstepping and generate the signals for each of the support driver boards.
High RPM plus high microstep combinations may not work correctly on slower MCUs, there is a maximum speed achieveable for each board, especially with acceleration on multiple motors at the same time.
- 4-wire bipolar stepper motor or
- some 6-wire unipolar in 4-wire configuration (leaving centers out) or
- 28BYJ-48 (commonly available) with a small modification (search for "convert 28byj-48 to 4-wire").
Minimal configuration from Pololu DRV8834 page:
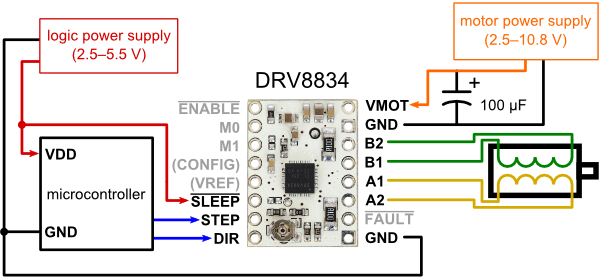
This is suggested wiring for running the examples unmodified. All the pins below can be changed.
-
Arduino to driver board:
- DIR - D8
- STEP - D9
- GND - Arduino GND
- GND - Motor power GND
- VMOT - Motor power (check driver-specific voltage range)
- A4988/DRV8825 microstep control
- MS1/MODE0 - D10
- MS2/MODE1 - D11
- MS3/MODE2 - D12
- DRV8834/DRV8880 microstep control
- M0 - D10
- M1 - D11
- ~SLEEP (optional) D13
-
driver board to motor (this varies from motor to motor, check motor coils schematic).
-
100uF capacitor between GND - VMOT
-
Make sure to set the max current on the driver board to the motor limit (see below).
-
Have a motor power supply that can deliver that current.
-
Make sure the motor power supply voltage is within the range supported by the driver board.
The max current is set via the potentiometer on board. Turn it while measuring voltage at the passthrough next to it. The formula is V = I5R where I=max current, R=current sense resistor installed onboard
- DRV8834 or DRV8825 Pololu boards, R=0.1 and V = 0.5 * max current(A). For example, for 1A you will set it to 0.5V.
For latest info, see the Pololu board information pages.
See the BasicStepperDriver example for a generic driver that should work with any board supporting the DIR/STEP indexing mode.
The Microstepping example works with a DRV8834 board.
For example, to show what is possible, here is the ClockStepper example that moves a stepper motor like the seconds hand of a watch:
#include <Arduino.h>
#include "A4988.h"

// using a 200-step motor (most common)
#define MOTOR_STEPS 200
// configure the pins connected
#define DIR 8
#define STEP 9
#define MS1 10
#define MS2 11
#define MS3 12
A4988 stepper(MOTOR_STEPS, DIR, STEP, MS1, MS2, MS3);

void setup() {
    // Set target motor RPM to 1RPM and microstepping to 1 (full step mode)
    stepper.begin(1, 1);
}

void loop() {
    // Tell motor to rotate 360 degrees. That's it.
    stepper.rotate(360);
}- Arduino-compatible board
- A stepper motor driver, for example DRV8834, DRV8825, DRV8824, A4988.
- A Stepper Motor.
- 1 x 100uF capacitor