CrazyflieROS Node Details below.
This assumes my latest custom firmware flashed.
Please note this document might be outdated. For discussions and questions on using the kinect part, please ask here.
Update: Branch joyManager was merged into master, no more mix-ups :)
Update: Sixaxis/sixpair instructions updated to (workaround for a bug introduced by the later kernels)
Update: Relative barometric pressure for above ground level estimation. Details
Update: MSc Thesis is now online: Visual Inertial Control of a Nano-Quadroto With Video: Video on Youtube
This package / document was created to help some friends get working with the crazyflie, ROS and the mocap system here at TUM. Still very much a work in progress. The goal is to obtain a general overview of the flie, get a development environment set up for changing the firmware and implementing client side code.
I assume you are familiar with ROS and are running a recent version of Ubuntu. This was tested on 12.04 and ROS Fuerte to Hydro. You will need a joystick to fly the flie with - the code in this package was written to fly the flie with PS3 Sixaxis controller.
Also, some permissions might be messed up (thanks Mr NTFS partition..) so you might need to chmod +x a few files (the *.cfg files probably).
A quick list of useful links
- Bitcraze Crazyflie Blog They just got GPS working....
- Crazyflie WIKI Good index
- Client Python API Most important resource (aside from reading code) if developing client side code
- Firmware Stuff Important resource for compiling firmware
- Intro Basic info, which side is the front, what leds mean
- Assembly Lots of pictures
- Installing
- Balancing, tipc, etc
- Troubleshooting
- Logging/param tutorial video Intro video on the logging/param frame work. Not Seen this yet..
- Crazyflie pc client repo (Update to github)
- Crazyflie firmware repo (Update to github)
- CrazyRADIO repo not so important, can update the FW once in a while (Update to github)
- Forum Especially Crazyflie Developer Discussions section is nice :)
- Some pics of mine
One has to distinguish between:
- Firmware
- c code that runs on the flie
- compiled on the computer and then flashed using the boot loader
- Client side code
- code that runs on the computer and communicates with the flie
- python is officially used, other wrappers exist
- ~20g quadrotor
- ~5g payload
- 9 cm diagonal
- 170 mah battery
- 7 min flight
- 3 with camera
- degrades pretty quickly (100 cycles?)
- 4 layer PCB design
- Plastic motor mounts
- The old ones are crap and break, be careful with the motor wires wearing through
- 72 MHZ 32 bit MCU, 128kb flash, 20kb ram
- 10 pin expansion header (I2C, UART, SPI/ADC, power, etc)
- 3 axis gyro
- drift around Z axis
- 500hz on board polling
- 100hz remote logging
- 3 axis accelerometer
- Quite noisy
- 500hz on board polling
- 100hz remote logging
- 3 axis magnetometer
- Need to calibrate it A LOT
- No real work has been done here, Mike had some good results
- same 500hz / 100 hz onboard/offboard logging
- Barometer
- Interweaved temp/pressure polling at combined 100 hz
- With some hacks, 90hz pressure and 10hz temp onboard and offboard logging
- Very noisy, but sensitive enough to notice +- 10ish cm differences
- careful with air conditioning, opening windows/doors, storms
- 2.4GHZ via custom USB dongle
- 127 channels = max 127 flies communicating at once
- can be set at different kb/s (250Kb/s, 1Mbit/s, 2Mbit/s)
- lower = more range but more collisions with wifi networks
- I default to 2Mbit
- Flies are addressed as URIs
- For now its one flie per computer
- limitation of the library, not the hardware
- should be extendable without too much effort
- eg
radio://0/1/2Mmeans Flie 0, on channel 1, at 2Mbit/s
- For now its one flie per computer
- randomly disconnects sometimes
Lets download all the code and prereqs we need. I probably missed a couple, so please let me know (either via githib or the crazyflie forums)
You will need the following, os run:
sudo apt-get install python2.7 python-usb python-pygame python-qt4 beep terminator ipython ros-$ROS_DISTRO-joystick-drivers
To compile the firmware you will need GNU Tools for ARM Embedded Processors
sudo add-apt-repository ppa:terry.guo/gcc-arm-embedded
sudo apt-get update
sudo apt-get install gcc-arm-none-eabi
I recommend you use git to obtain the latest source code:
- Git:
sudo apt-get install git-core
You will need 3 sets of source code. Put them in your working ros directory.
- This code:
git clone https://github.com/omwdunkley/crazyflieROS.git - Official client code:
git clone https://github.com/bitcraze/crazyflie-clients-python - Custom firmware:
git clone https://github.com/omwdunkley/crazyflie-firmware
To use the crazyradio you will need to set some udev rules. For conveniance, just run sudo sh udev.sh from the crazyflieROS directory.
Some of the files in this repo should be executable, but are not (thanks to my crappy NTFS permission). Especially some of the the files in crazyflieROS/cfg, crazyflieROS/bin and crazyflieROS/src/crazyflieROS/driver.py will need chmod +x path/file (Update: most of this should be fixed now, let me know if it is not)
To use the optional beeping functionality of my crazyflie driver you will need to enable the terminal bell:
sudo modprobe pcspkr
I guess you can use any IDE, but I will use the following in this guide:
- python for client side code: PyCharm
- c for the firmware Eclipse for C++
The crazyflie client is a GUI fully in python that exposes all aspects of the flie. You can use it to flash the flie with new firmware, remote control it, observe sensor data, set parameters. Run bin/cfclient from the crazyflie-clients-python directory.
Lets flash the flie with latest stock firmware. For now, instead of compiling it, we will download the latest bin directly from here. Extract it, we need the .bin file.
Unplug the flie if it is plugged in. Insert the dongle into a usb2 port (usb3 might work with the most recent radio firmware). Note at this point the flie does not need a battery or motors, just the PCB will suffice.
Run bin/cfclient from the crazyflie-clients-python directory.
Then follow the Bootloader instructions and use the bin file you just downloaded.
Using the instructions and links on that page you should now be able to connect and fly the flie.
Start up eclipse and
- File | import | existing code as makefile project | next.
- Give it a name
- chose the crazyflie-firmware directory
- Unclick c++
- Select GNU Autotools Toolchain
- Click okay
This should open a new project with the crazyflie firmware. Press ctrl+b to build it. This should result in a short summary of ram/rom usage and if all goes well produce a cflie.bin file you can flash the flie with using the procedure above.
Start up pycharm, File | Open, chose the crazyflieROS directory.
TODO
- set up run configuration in pycharm
- experiment around with ipython
Some important concepts based on how the communication with the flie works are important befor you can start anything. The flie has its own custom communication protocol called the Crazy RealTime Protocol (CRTP). Has the notion of packets, ports, etc. Luckily a higher level python library implemented, so we dont need to deal with the details Details can be found Here
Use this when you wish to set/get a variable on the crazyflie with low frequency. Eg turning an led on/off, setting PID values, etc. Getting and setting is initiated from the computer. Update: here is an example.
TODO: Examples of how to add logging to the firmware and read it from the client side code
High throughput reading of variables on the crazyflie. One requests them, and the crazyflie sends them at a given frequency. Useful for continuously reading sensor data Maxes out at 100hz What can be logged is specified in the firmware. Logs are then requested from the client and the flie starts pushing the data back Update: here is an example.
TODO: Examples of how to add parameters to the firmware and set/read them from the client side code
Primitive but fast way to throw values at the crazyflie. Only used for sending it command data, eg roll, pitch yaw Recommened to use at 100hz. Send a command at least once every 2 seconds to keep the flie alive.
TODO: Show the function that reads the variables in the firmware and the client side code that sends them
Setting up bluetooth PS3 Controller using PS3 Joy
__Update: One the kernel updates broke the default PS3 driver (sixpair). Please see these instruction to fix it (tested with 12.04).
Once one has done the above, run
sixad --start
This exposes your joystick under ls /dev/input/js*.
To test it, you can use jstest-gtk: jstest-gtk or jstest /dev/input/js*
Next you will need to start a ros node to read the joystick data and send it over the ros network. Here Ive made a launch file that launches 3 nodes: one that exposes the controller to ROS; one that reads it and exposes crazyflie controls, and a gui to set some settings. Launch with
roslaunch crazyflieROS joy.launch js:=0
where you will need to replace X with your joystick nr. Now you can visualise the outputs of the nodes:
- Test the joy_node:
rostopic echo /joy - Test the crazyflie joy node:
rostopic echo /cfjoy
This is a ros node wrapped in QT gui. For now some of the functionality is still in separate python nodes (especially joy_manager_pid.py), but all should eventually fuse into this one.
- Full blown GUI
- settings (table column positions, dimensions, settings, etc) are saved between sessions per radio (eg if you use multiple radios, each will have its own settings saved)
- Scans for all flies, connects to a specific one
- Options:
- Connect on startup
- Auto-Reconnect on disconnect
- Options:
- Nodes can run in parallel, each with their own radio. This allows them to share info (eg relative barometric differences)
- Parameters
- Can be viewed in realtime
- Can be changed in realtime. The GUI is very particular about only showing confirmed values from the flie
- Grouped by read/read-write
- Logging
- Shows which values are being logged in a collapsible tree structure
- Shows requested logging frequency for each group
- shows actual logging freq for each group
- can dynamically select groups/group subsets for logging
- can dynamically set the requested logging rate
- shows the logging type
- ROS
- Ros support for fuerte-hydro
- Automatically generates .msg files, independent of the firmware used.
- It inspects which log variables are available and generates the required messages.
- This way, if you add a log group in the firmware, you can generate the needed message files with a click of a button, allowing to stream all incoming log data over the ROS network.
- For example, a logging configuration called "accel" with a float 'accX' and 'accY' with compile into a ros message 'accel.msg' with accX and accY defined as floats.)
- Stream all logging data over the ros network using the generated messages.
- Logging data will be streamed on a topic with the format
/cf<radio nr>/<log group name>
- Logging data will be streamed on a topic with the format
- TF transforms of the flies estimated attitude are sent out if the roll, pitch and yaw logging data is available
- crazyflie debug output is sent to the ros loggers
- Sound feedback
- Optionally, the GUI makes distinct sounds for connecting, and disconnecting
- Info
- Another tab shows firmware info, crazyradio info, which sensors were detected and the self test status.
- Realtime monitoring
- Incoming Bytes per second
- Out going Bytes per second
- CPU usage
- Link Quality (slightly more pessimistic than the original client)
- Battery (if being logged)
- A tab shows the crazyflies debug prints
- Attitude Indicator
- Realtime drawing of the flies roll, pitch, yaw, barometer, accelerometer (fuse in more stuff, as displayed in my old c++ hud)]
- Batches all drawing together at a user specified frequency (eg 30hz). This should avoid some crazy CPU usage people have seen in the original hud if displayed at more than 30hz.
- Displays if thrust failsafe is on
- Shows yaw a compass heading
- Manual yaw offset
- Can "zero" the yaw (set current yaw to north)
- Or specify an offset to north
- Many Settings
- chose how fast the GUI updates different components
- the Attitude indicator
- logging frequency estimtaion
- in/out throughput
- chose how fast the GUI updates different components
- Kinect Tracking and 3 dof pose estimation
- Track the flie in 3d. Together with the flies attitude estimate, full PID position & yaw control possible
- Segments the flie from depth images
- All options exposed to the GUI
- With rviz, one can overlay the depth/rgb images with the flie pose estimation
- PID Controller (todo: merge in from joy_driver_pid.py)
- Monitoring Joystick input (todo: merge in from joy_driver_pid.py)
- Barometric Pressure offset
- can set ground level with a single click
- can connect to a second flie and use it as a reference
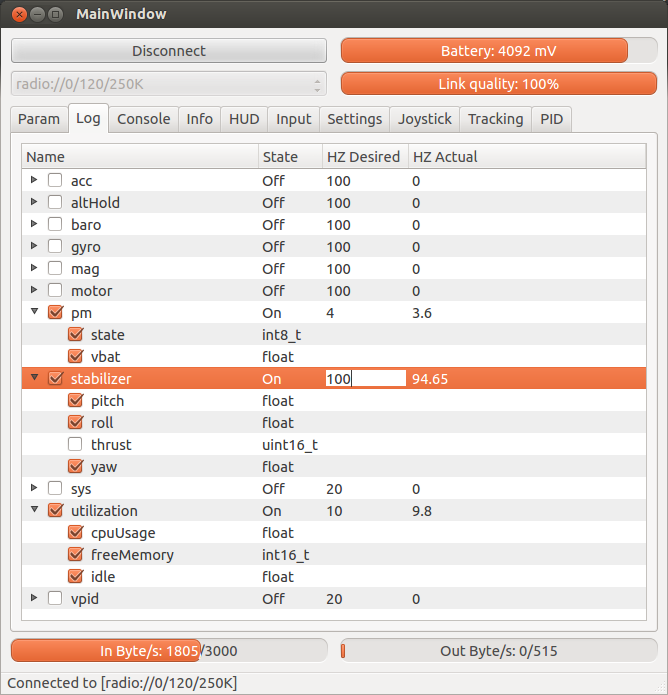
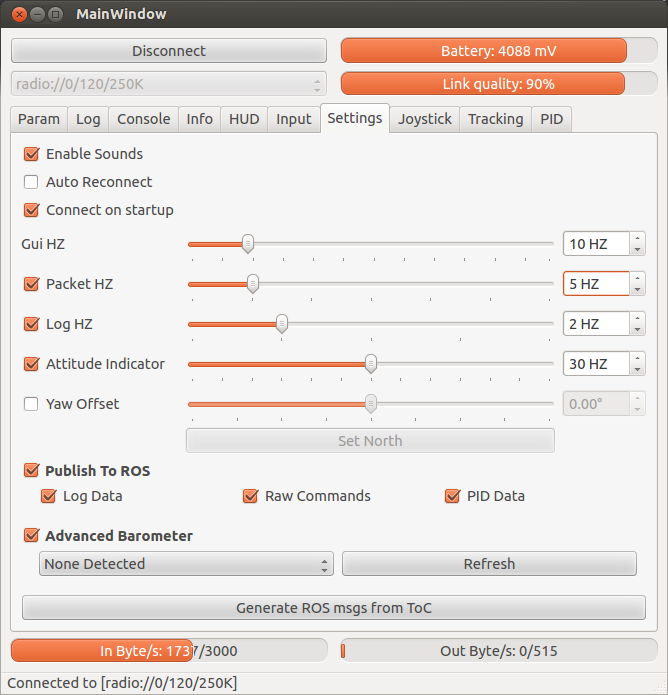
Here are some screenshots. Note some are outdated as they do not show CPU usage.
Logging
Params

Attitude Indicator

Kinect

Input

Settings
Run is just like any ros node: rosrun crazyflieROS driver.py
Show optional input arguments: rosrun crazyflieROS driver.py --help
TODO: Overview, way poin control, wand control, pid.launch
- Log on, using the PW I gave you
- Turn on the capture system (white power socket, so the red light is on)
- Wait for them to boot up (observe IDs being displayed on the cameras)
- Connect your laptop to the local network cable, possibly dissable WLAN
- Start Qualisys Track Manager (icon on the desktop)
- Open profile / create new project using "QualisysFlie" project template
- Define bodies you wish to track
- Record data for a few seconds
- Reduce realtime freq = 100
- stop on button only = on
- save captured and proc measurement auto = off
- -> Start
- -> Stop a few seconds later
- Click 3d, ctrl+click desired markers, right click | define ridgid body | give it a name
- Define local coord system of new tracked object
- X points forwards, Y left, Z up
- Tools | Project Options | 6 DOF Tracking
- Translate to point/mean, etc etc
- Make sure the Euler Angle sub menu is set to: GLOBAL rotation, x,y,z = roll, pitch, yaw
- New measurement: observe in 3d, repeat for wand
- Record data for a few seconds
rosrun Qualisys2Ros Qualisys2Ros- For each n of N ridgid bodies defined, this spams out ros tf /Q0, ..., /QN
- Use RVIZ to visualise tfs:
rosrun rviz rviz- TODO: default configuration file
- The order corresponds to the order that the ridig bodies were defined as (see Tools | Project Options | 6 DOF Tracking)
- Now we neet to link the /Qn transforms to ones used by the PID controler
- The flie tf is called /cf_gt, the wand is called /wand
- The /wand transform defines the goal position of the flie. Obviously we do not want this to be in side the defined rigid body, so we move it forward in x direction. Notice the 0.7 in the static transfrom publisher below
- run the following in three terminals, making sure to adjust Q0, Q1 to match wand/flie ridig bodies
rosrun tf static_transform_publisher 0 0 0 0 0 0 1 "/world" "/Qualisys" 10rosrun tf static_transform_publisher 0 0 0 0 0 0 1 "/Q0" "/cf_gt" 10rosrun tf static_transform_publisher 0.7 0 0 0 0 0 1 "/Q1" "/wand" 10
- Start the PID controller
roslaunch crazyflieROS pid.launch js:=XWhere x is the joystick you need.- Use
ls /dev/input/js*andjstest /dev/input/x/to determine which joystick you need
- Use
- This launched 3 nodes, and configures them to respawn if closed. Also sets deadzone/coalesce intervals, etc
- joy_node, which reads the file system for joystick input and outputs a joy msg
- joy_pid_controller, read tfs and joy msg to either remote contorl flie or pid control flie
- dynamic_reconfigure, a gui to change the parameters of the joy node
One can also use the kinect to track the 3d position of the flie. However, one must use the on board attitude to estiamte the yaw. As yaw drifts one must manually align it to the camera optical axis. The gui has an option to "set north" in the current direction the flie is facing. More on this later.
Make sure you have the latest custom client code.
Make sure you have the latest custom firmware flashed.
Install the freenect ROS stack using the instructions from here - this will install all the drivers, etc you need to use the kinect.
Highly Recommended:
Add some paper to the flie to make it have a larger cross section and improve tracking

#####Get the PS3 controller running
Start the sixaxis driver:
sixad --start, and follow the instructions
Then start the joystick controller with PID functionality:
roslaunch crazyflieROS pid.launch js:=0 # where 0 is your joystick nr- Using dynamic reconfigure, set the following settings:
- control - on
- set goal, then
- live update - off
- xy,yaw, thrust checked
- pid passive
- max thrust 100
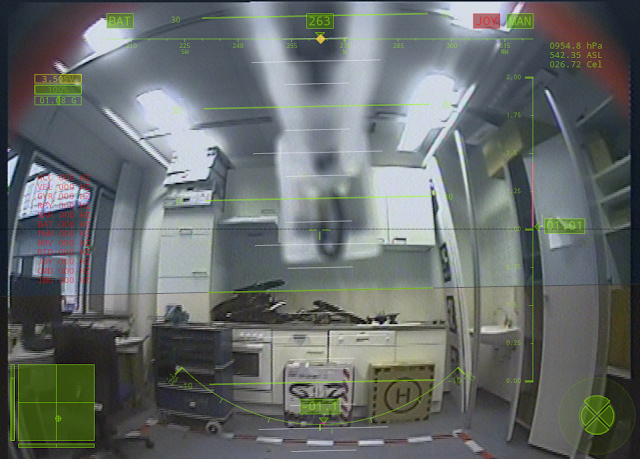
Here is a screenshot (note your pitch may vary)

#####Launch the crazyflie driver:
rosrun crazyflieROS driver.py- Then do the following from the GUI
- Input Tab
- Check Disable Thrust [x]
- X-Mode unchecked [ ]
- Check Monitor Outputs [x]
- Press L1 half way, and move the two analogue sticks around. All the values should change. If you want them to change faster, go to the settings tab and turn up the GUI hz slider.
- Press L2 all the way, it should say hover.
- Later when you fly, you need to press L1 half way to fly manually, and all the way for the automatic control to take over
- When finished checking the input is smooth and working in the right direction, uncheck Disable Thrust [ ]
- Press Connect / Scan to connect to the flie
- From the log tab, check these at minimum:
- Check pm and vbat; set to 4-10 hz
- Check stabilizer, pitch, roll, yaw; set to 100 hz
- Check utilization, cpuUsage; set to 4-10 hz
- Screenshot:
- Go the HUD tab
- move around the flie; you should see pitching, roll, and yaw (compass on the horizon) motions
- From the settings tab
- Make sure publish to ROS and Log Data are checked [x]
- Check yaw offset [x]
- Position the kinect where you will use it, and rotate the flie so the front of the flie is pointing to the left of the kinect
- Press set north (see image below on how to align)
- If you move the kinect or crash the flie, you will need to do this again
- This is needed as the kinect cannot determine the yaw of the crazyflie, so we use the on board attitude estimation for this, but it first needs to be aligned.
- Input Tab


At this point it makes sense to fly the flie around and make sure it is balanced. To adjust the trim, you can use the d-pad. To set it to the current joystick position, press and release R1. To reset, press square. If all is working, continue.
#####You will also need the following transformations
rosrun tf static_transform_publisher -1.5 0 1 0 0 0 /world /camera_link 10- OR ``````
- This relates the kinect to the world frame. If you use the above, make sure the kinect is level. If you position the kinect at an angle, you will need to change the transform above.
rosrun tf static_transform_publisher 0 0 0 0 0 0 /cf0 /cf_gt 10
#####You will need to start the kinect driver
roslaunch freenect_launch freenect.launch- You will need to align align the depth images to the colour ones:
- in dynamic reconfigure
- Select /camera/driver from the drop-down menu. Enable the depth_registration checkbox
- Note the topic changes from
/camera/depth/pointsto ```/camera/depth_registered/points``
- in dynamic reconfigure

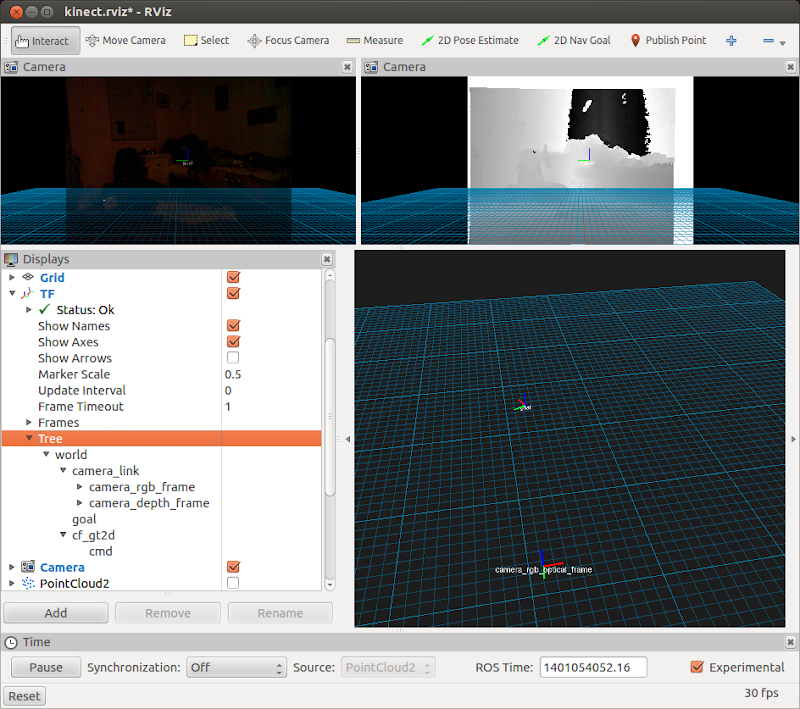
#####You can use RVIZ to verify everything:
roscd crazyflieROS && rosrun rviz rviz -d kinect.rviz- Sometimes rviz doesnt display the load modules properly. Just uncheck and recheck the box to spawn the view.
- Fixed frame should be "world".
- This is what the TF tree as shown in RVIZ should look like (some frames might only appear later):
- In the displays toolbox, under camera, under visibilty, you can chose what you overlay on the camera image.
- In the displays toolbox, under TF, you can set Timeout to 1 to avoid showing old frames and uncheck arrows, to reduce clutter.
#####Now start the tracking.
- Make sure your scene is static
- Go to the Tracking Tab
- Click start tracking. This might take a few seconds - it waits for the kinect data to start publishing
- click reset background
- You might need to change some of these settings depending on your scene. I recommend setting
- Observation time: around 5 seconds - this is the time it uses to estimate the scene.
- Method: minimum
- Maximum Depth - 3-5 meters. Anything more than 5 meters is usually pointless as the kinect resolution might not pick up the flie
- foreground distance: 40-60cm. This means that anything that close to the scene will be ignored. For example, if you fly close too close to the wall, the algorithm will think the flie is the wall. This is mainly to remove noise.
- Crazyflie detection: 6 cm. This depends on how "big" your flie is (ie with the paper on it)
- Size Tolerance: 4 cm, this means we consider an object to be the flie if we estimates the size to be 6+-4cm. The size is estimated from the segmented depth image.
- Opening kernel: 2*2+1, this is to smooth out the depth image.
- Prio: Distance from background. Some of these options are buggy. This is how we chose which object is the flie if multiple objects are being tracked. Obviously a particle filter or whatever would be better here.
- Depth estimate: Center pixel depth. How we chose the depth of the object we track.
- The crazyflie control options are duds for now.
- Test the tracker
- Fly around in the field of view of the kinect. Look at rviz to make sure it is tracking well with few false positives.
- Make sure the red TF axis (X) transform is pointing the direction the flie is facing.
- Set the goal
- Using dynamic reconfigure, select [/CrazyFlieJoystickDriver] from the dropdown
- Check LiveUpdate
- you can now set the goal using the x,y,z,rz sliders.
- The goal should be update in realtime (if your ps3joy is publishing)
- View them in rviz
- MAKE SURE THE GOAL IS IN THE FIELD OF VIEW. Set it to about 2 meters in front of the camera.
- These coordinates are in the world frame. Verify everything with rviz
- Uncheck live update to prevent accidentally changing the goal
- With the tracker working and goal set:
- Manually fly to the goal, stabilise, then hold and press L1 all the way down. The flie should hold this position.
- The PID values might be too conservative, play with them.
- A lot more could be done here, such as clicking in rviz to set the goal
Connecting to multiple crazyflies with the same dongle is not supported yet (although there is an experimental branch I have not tested), but using two radios works with recent updates, despite being a little buggy.
Two connect to two flies, attach two dongles, then run
rosrun crazyflieROS driver.py #defaults to --radio=0
rosrun crazyflieROS driver.py #defaults to --radio=1
This should launch two nodes, one which advertises topics over /cf0/... and the other over /cf1/...
Turn both flies on (make sure they use different channels), and scan using each client. Then connect each client to a different flie (using the dropdown). Sometimes scanning is a little buggy, somehow the order matters. Some sort of bug in the radio driver, supporting multiple radios is experimental.
Make sure you are logging the baro.asl data with both clients (@ 100hz). Then put the flies on the ground, and in both clients go to settings, click Check Sea Level, click Set Level. The, for the flie you wish to fly with, check advanced barometer, and press "connect". This now listens to the data from the other flie and uses it as a baseline. So if someone opens a window or so, both flies will notice the pressure change, but the flying flie wont care, as the relative pressure difference between them stays the same.
##First person video #####Forum discussion


Remember
- If you change the GUI, you need to recompile it. See
crazyflieROS/src/crazyflieROS/ui/compileGUI.sh - Firmware changes need compiling and flashing
- If you change the TOC, you might need to regenerate and recompile the ros messages. See the Config tab
- JoyStick needs porting
- Class
- UI
- Trim
- Visualisation
- Configuration options (slew, response curves, etc)
- Add reading joy from PyGame
- Tracker needs porting
- Qualisys TF stuff
KinectShow depth image with overlay(now on a ros topic)
- PID needs porting
- subclass QTableWidget
- save/load configs
- generate response curves
- realtime graphing
- error column in table - add colour info
- checkboxes in table,
- read/write between sessions, etc
- General Stuff
- image topic viewer (for cam, for kinect)
- label, spinbox, horizontal viewer combo
finish all the signals from logManager for the rest of the ui- add the offset of the gyro yaw ASAP, ie right at the source where the logs comes in
- ROS needs it
- The UI needs it
Deal with yaw offset in Settings tab- Deal with reading/writing the Settings tab values
- Add ROS startup check, ie a dialog which says "WAiting ... Cancel"
- Add Icon, change window name
- Some things should be undockable!
- ctrl+c from the terminal should kill it
- parse command line arguments
- argument to reset the default QSettings
- If multiple drones discovered, dont autoconnect the first time
- AI
- needs baro, accel, motors, crash, etc connected to it
- Add a slider and spin box in the config to set the update hz and turn it on/off
- Show overlay from ROS images
- right click functionality
- Inspiration from c++ code
- double click full screen
Q Control + Track K Track
- X
rosrucrazyflieROS printW2K.py rosrun tf static_transform_publisher 0 0 0 0.121965 0.126995 -0.691227 0.700858 /cf0 /cf_kinect 10