Plugin ona nmap scans
This plugin provides the ability to generate nmap based scans and integrate the results into the ONA interface. You can then run audits of your network and compare it against data in ONA via a report. Then from there you can easily update ONA to reflect the output of the report as needed.
This can be used as a quick and simple way to autodiscover new IP addresses that are active on your network and easily add them to ONA as a new host or as an IP address on an existing host.
This plugin comes with the default installation of ONA but there are a few steps you must take to make it functional.
- Click
Plugins->Manage Pluginswhile logged in as an admin user - Click the install icon for the ona_nmap_scans plugin

- Follow any instructions it prompts you with. They may or may not include the following (some user/group names may differ on various platforms):
chown -R www-data /opt/ona/www/local/pluginscp /opt/ona/www/plugins/ona_nmap_scans/nmap.xsl /opt/ona/www/local/nmap_scans/subnets/nmap.xslln -s /opt/ona/www/plugins/ona_nmap_scans/nmap_scan_cron /opt/ona/bin/nmap_scan_cron- if you have not already, run the following command
echo '/opt/ona' > /etc/onabase. This assumes you installed ONA into/opt/ona
- Ensure you have prerequisites installed:
- dcm.pl
- NMAP scanning tool
- If needed, you may have to change the path to the nmap executable in the
/opt/ona/bin/nmap_scan_cronscript to the appropriate value. The variable to change is called NMAPCOMMAND and it defaults to/usr/bin/nmap
You must first perform at least one scan to get initial data. The scan is performed by the /opt/ona/bin/nmap_scan_cron tool. Here is the usage information as displayed when you pass the -h flag to the script:
Usage: nmap_scan_cron [-u] [-l] [-n x.x.x.x/NN] [-a]

  -u:  Update the last response timestamp for IPs that are up.
  -l:  Display a list of subnets generated from the database
  -n:  Specify a single subnet to scan. I.E. 10.1.1.0/24
  -a:  Scan all subnets in DB not flagged as 'N'

Description:
  This tool is meant to run via cron and by default will run nmap scans
only on subnets in the ONA database that have the nmap_scan custom
attribute set to Y.  If you wish to run the scan on any subnet in the
database not marked as N, then use the -a flag.  The output of each
scan will be stored in the local filesystem under
/opt/ona/www/local/nmap_scans/subnets/<baseip>.xml.

  If you choose to send the -u flag, it will update the "last response" column
in the interface table for each IP that shows as "up".
This tool is expected to be ran from the same server that you have installed ONA on. It will write the resulting scan data to the local /opt/ona directory. If you wish to run reports on nmap scans that are ran from a different server, please refer to the "file" option described later under the CLI Report section.
You should set this script to run via cron as often as possible. It only takes a few seconds to scan an entire class C subnet (256 IP addresses). I typically scan once a day around 11AM. This way I catch laptops and other PCs that may be off at night.
If your system supports /etc/cron.d, I would suggest placing a cron entry into /etc/cron.d/ona so that you can keep your ONA related cron jobs in one place. I usually use the following in my cron:
# Perform a daily nmap ping scan and update last_response
# Found it is best to ping during the day to pick up laptops that might be gone at night
0 11 * * * root nmap_scan_cron -a -u > /dev/null 2>&1
Once you have ran nmap_scan_cron at least once, you should have the output files in /opt/ona/www/local/nmap_scans/subnets. These files can now be reviewed from within the GUI as follows:
- Click
View->List Reportsthen select ona_nmap_scans from the list OR - Navigate to a subnet you wish to view scan results and in the Reports box you will see an nmap scans report to view.
From here you can perform various actions on each entry. These are suggested actions to help you get more accurate information on the database. You must determine the proper action as the tool has no way of knowing things such as the fact that multiple IPs may be associated with a single host or that there are not other more appropriate DNS names.
Also if you want to see a report based on ALL xml scans, then check the 'Show global issues' checkbox. WARNING: depending on how many scan files you have, this could take a long time to generate. Also, deleted subnets may still have old scan files remaining, these would show up as part of this global report.
Clicking the 'Display RAW scan' link will show you the nmap output as formated by the nmap.xsl file in /opt/ona/www/plugins/ona_nmap_scans
In addition to the GUI report, you can also run the report from the CLI. This is done using the dcm.pl module called 'report_run'. Here are a few examples:
Basic Usage
$ /opt/ona/bin/dcm.pl -r report_run name=ona_nmap_scans
ERROR => There was a problem getting the output:
ERROR => No hosts found, check that the XML file is not empty, or that your subnet exists in the database.
Report: nmap_scan
  Processes the XML output of an nmap scan and compares it to data in the database.

  Required:
    subnet=ID|IP|STRING   Subnet ID, IP, or name of existing subnet with a scan
      OR
    file=PATH             Local XML file will be sent to server for processing
      OR
    all                   Process ALL XML files on the server
      OR
    update_response       Update the last response field for all UP IPs to time in scan

  Output Formats:
    html
    text
    csv

NOTE: When running update_response, any entry that was updated will have a * indication
      at the beginning of the line.
Example Report
$ /opt/ona/bin/dcm.pl -r report_run name=ona_nmap_scans subnet=172.22.22.0
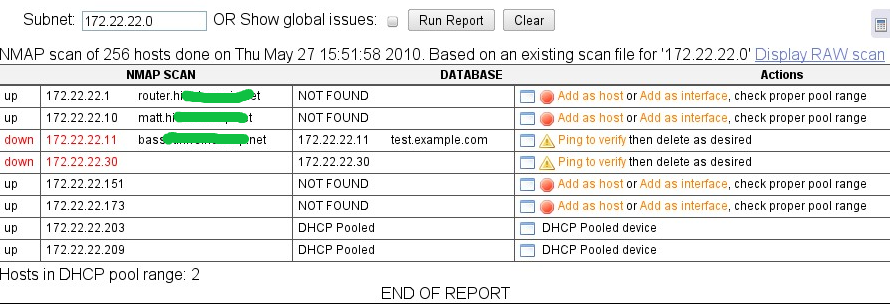
NMAP scan of 256 hosts done on Thu May 27 15:51:58 2010. Based on an existing scan file for '172.22.22.0'
STAT NET IP NET NAME NET MAC DB IP DB NAME DB MAC ACTION
up 172.22.22.1 router.xxxxx.net NOT FOUND Add as host or Add as interface, check proper pool range
up 172.22.22.10 matt.xxxxx.net NOT FOUND Add as host or Add as interface, check proper pool range
down 172.22.22.11 basset.xxxxx.net 172.22.22.11 test.example.com Ping to verify then delete as desired
down 172.22.22.30 172.22.22.30 Ping to verify then delete as desired
up 172.22.22.151 NOT FOUND Add as host or Add as interface, check proper pool range
up 172.22.22.173 NOT FOUND Add as host or Add as interface, check proper pool range
up 172.22.22.203 DHCP Pooled DHCP Pooled device
up 172.22.22.209 DHCP Pooled DHCP Pooled device
Hosts in DHCP pool range: 2
END OF REPORT
Or in CSV format:
$ /opt/ona/bin/dcm.pl -r report_run name=ona_nmap_scans subnet=172.22.22.0 format=csv
NMAP scan of 256 hosts done on Thu May 27 15:51:58 2010. Based on an existing scan file for '172.22.22.0'

STAT,NET IP,NET NAME,NET MAC,DB IP,DB NAME,DB MAC,ACTION
 up,172.22.22.1,router.xxxxx.net,,NOT FOUND,,,"Add as host or Add as interface, check proper pool range"
 up,172.22.22.10,matt.xxxxx.net,,NOT FOUND,,,"Add as host or Add as interface, check proper pool range"
 down,172.22.22.11,basset.xxxxx.net,,172.22.22.11,test.example.com,,"Ping to verify then delete as desired"
 down,172.22.22.30,,,172.22.22.30,,,"Ping to verify then delete as desired"
 up,172.22.22.151,,,NOT FOUND,,,"Add as host or Add as interface, check proper pool range"
 up,172.22.22.173,,,NOT FOUND,,,"Add as host or Add as interface, check proper pool range"
 up,172.22.22.203,,,DHCP Pooled,,,"DHCP Pooled device"
 up,172.22.22.209,,,DHCP Pooled,,,"DHCP Pooled device"

Hosts in DHCP pool range: 2
END OF REPORT
Note that if you see an asterisk (*) next to an name it indicates multiple A records. These show up in bold on the GUI output.
If you have an xml file produced by nmap that you would like to run a report on that was generated outside of the nmap_scan_cron tool, you can provide it as a source to the report. Instead of using the "subnet" option from the CLI use the "file" option. The subnet option will try to find an existing subnet in the database and reference its xml file on the ONA server. If you provide the file option, it will take a local file and send it to the server for processing. This file will not be saved on the server.
This plugin works best with subnets that have smaller netmasks such as /24 or /22 etc. I have seen some environments that use a /16 subnet mask and therefore have A LOT of address space to scan. There are several challenges here. First off nmap will likely run into an issue with buffers on the system. This can be fixed by editing /etc/sysctl.conf and adding the following lines:
net.ipv4.neigh.default.gc_thresh1 = 1024
net.ipv4.neigh.default.gc_thresh2 = 4096
net.ipv4.neigh.default.gc_thresh3 = 65536
Then run sysctl -p to refresh the settings on the system.
Now you should expect the nmap_scan_cron script to take 30-40 minutes to complete a scan of this size. Once it is complete and you navigate to the report, it can take several minutes to render on the screen. If there are a lot of IP addresses that are up and active in that list you can also easily exhaust the PHP memory limits. If the page renders completely with no errors then count yourself lucky that its able to handle all the data.
Keep these things in mind when enabling the nmap_scan_cron script. I highly recommend using smaller subnet masks like /24. This is a better practice and an overall better network design as well as making this process more efficient.