
Slim Neovim config for 0.11+ with minimal plugins.
This configuration is a migration from my-nvim-ide with two main goals:
-
Leverage Neovim 0.11+ Built-in Features:
-
Optimize Plugin Selection:
- Trim down the plugin list to only essential ones
- Use
blink.cmpfor completion instead of built-in completion for better UX - Maintain a minimal yet powerful development environment
The result is a faster, more maintainable configuration that still provides all the necessary features for modern development.

🏠 Homepage
# Install with default app name (tiny-nvim)
curl -s https://raw.githubusercontent.com/jellydn/tiny-nvim/main/install.sh | bash

# Or install with custom app name
curl -s https://raw.githubusercontent.com/jellydn/tiny-nvim/main/install.sh | bash -s -- --appname my_nvim
This will:
- Backup your existing Neovim configuration (if any)
- Clone the repository
- Install all required tools
- Install all plugins in headless mode
- Set up your complete Neovim environment
After installation, you can start Neovim with:
# If using default app name
NVIM_APPNAME=tiny-nvim nvim

# If using custom app name
NVIM_APPNAME=my_nvim nvimTo completely remove this configuration, run:
# Replace APPNAME with your chosen name (tiny-nvim or custom name)
rm -rf ~/.config/APPNAME
rm -rf ~/.local/share/APPNAME
rm -rf ~/.cache/APPNAME
rm -rf ~/.local/state/APPNAMEIf you prefer to install manually:
- Clone this repository:
git clone https://github.com/jellydn/tiny-nvim.git ~/.config/tiny-nvim- Run the installation script to set up all required tools:
cd ~/.config/tiny-nvim
./scripts/install-tools.sh- Launch Neovim with this configuration:
NVIM_APPNAME=tiny-nvim nvimAfter installation, run the following commands to ensure everything is set up correctly:
- Check overall Neovim health:
:checkhealth- Verify LSP configuration:
:check vim.lsp- For formatting issues, check conform.nvim status:
:ConformInfoFor more detailed debugging information, refer to conform.nvim debugging guide.
Click to expand features
This configuration provides a minimal yet powerful development environment with carefully selected plugins organized by category:
-
LSP & Completion
- Built-in LSP support (Neovim 0.11+)
- blink.cmp (v1.*): Enhanced completion menu
- conform.nvim: Code formatting
- nvim-lint: Linting support
-
AI & Code Assistance
- CopilotChat.nvim: AI-powered coding assistant
- blink-copilot: Copilot integration
- copilot.vim: GitHub Copilot integration
-
Code Generation & Documentation
- LuaSnip (v2.*): Snippet engine
- friendly-snippets: Snippet collection
- neogen: Documentation generator
- ts-comments.nvim: Comment utilities
- mini.pairs: Auto pairs
- mini.ai: Extend and create a/i textobjects
-
Git Integration
- gitsigns.nvim: Git signs in the sign column
- neotest: Testing framework
- vim-test: Testing framework
- trouble.nvim: Diagnostics and quickfix management
- kanagawa.nvim: Beautiful theme inspired by Kanagawa wave
- bufferline.nvim: Enhanced buffer management
- mini.statusline: Lightweight statusline
- mini.icons: Improved icon support
- noice.nvim: Improved notifications and command-line UI
- snacks.nvim: Enhanced UI and utilities
- flash.nvim: Navigation and search enhancements
- which-key.nvim: Keybinding hints and management
- better-escape.nvim: Better escape functionality
- grug-far.nvim: Advanced search and replace functionality
- hurl.nvim: Run HTTP requests directly from
.hurlfiles - overseer.nvim: Task runner and job management
- persistence.nvim: Session management
- quick-code-runner.nvim: Quick code execution
- refactoring.nvim: Code refactoring tools
- todo-comments.nvim: Highlight and search for todo comments
- render-markdown.nvim: Markdown rendering and preview
- previm: Markdown preview in browser
- ts-error-translator.nvim: TypeScript error translation
- typecheck.nvim: Type checking for TypeScript
This configuration works seamlessly with VSCode through the vscode-neovim extension. The configuration includes:
- VSCode-specific keymaps for enhanced productivity
- Integration with VSCode's built-in features
- Support for multiple cursors and fast cursor movement
- Git integration and file navigation
- Task running and debugging support
To use this configuration in VSCode:
-
Install the vscode-neovim extension
-
Set your Neovim configuration path to point to this config:
"vscode-neovim.NVIM_APPNAME": "tiny-nvim",
-
Restart VSCode
You'll get the same Neovim experience in VSCode, including all the plugins and keybindings.
The configuration includes specialized support for various programming languages in the lua/langs directory:
- TypeScript: Enhanced TypeScript development with type checking and error translation
- Lua: Lua development with syntax highlighting and completion
- Go: Go development with gopls LSP integration
- Python: Python development support with LSP integration
- Markdown: Markdown editing with preview support
Each language configuration is modular and can be customized according to your needs.
This configuration uses kanagawa.nvim as the default theme. The theme is inspired by the Kanagawa wave and provides a beautiful, elegant color scheme that's easy on the eyes while maintaining good contrast and readability.
Click to expand keymaps
| Key | Description |
|---|---|
<leader>bp |
Toggle Pin |
<leader>bP |
Delete Non-Pinned Buffers |
<leader>bo |
Delete Other Buffers |
<leader>br |
Delete Buffers to the Right |
<leader>bl |
Delete Buffers to the Left |
<S-h> or [b |
Previous Buffer |
<S-l> or ]b |
Next Buffer |
[B |
Move Buffer Left |
]B |
Move Buffer Right |
<leader>bb |
Switch to Other Buffer |
<leader> |
Switch to Other Buffer |
| Key | Description |
|---|---|
<C-h> |
Go to Left Window |
<C-j> |
Go to Lower Window |
<C-k> |
Go to Upper Window |
<C-l> |
Go to Right Window |
<C-Up> |
Increase Window Height |
<C-Down> |
Decrease Window Height |
<C-Left> |
Decrease Window Width |
<C-Right> |
Increase Window Width |
<leader>ww |
Other Window |
<leader>wd |
Delete Window |
<leader>w- |
Split Window Below |
<leader>w| |
Split Window Right |
<leader>- |
Split Window Below |
<leader>| |
Split Window Right |
| Key | Description |
|---|---|
<leader><tab>l |
Last Tab |
<leader><tab>o |
Close Other Tabs |
<leader><tab>f |
First Tab |
<leader><tab> |
New Tab |
<leader><tab>] |
Next Tab |
<leader><tab>d |
Close Tab |
<leader><tab>[ |
Previous Tab |
| Key | Description |
|---|---|
j |
Down (with gj for wrapped lines) |
k |
Up (with gk for wrapped lines) |
<A-j> |
Move Line Down |
<A-k> |
Move Line Up |
gl |
Go to end of line |
gh |
Go to start of line |
<A-h> |
Go to start of line |
<A-l> |
Go to end of line |
<A-a> |
Select all text |
| Key | Description |
|---|---|
]h |
Next Hunk |
[h |
Previous Hunk |
]H |
Last Hunk |
[H |
First Hunk |
<leader>ghs |
Stage Hunk |
<leader>ghr |
Reset Hunk |
<leader>ghS |
Stage Buffer |
<leader>ghu |
Undo Stage Hunk |
<leader>ghR |
Reset Buffer |
<leader>ghp |
Preview Hunk Inline |
<leader>ghb |
Blame Line |
<leader>ghB |
Blame Buffer |
<leader>ghd |
Diff This |
<leader>ghD |
Diff This ~ |
<leader>tb |
Toggle Blame Line |
<leader>gs |
Git Status |
| Key | Description |
|---|---|
<leader>ca |
Code Action |
<leader>cA |
Source Action |
<leader>cr |
Rename |
<leader>cf |
Format Document |
<leader>ck |
Run Type Check (TypeScript) |
<leader>cR |
Refactor |
<leader>. |
Quick Fix |
gr |
Find References |
gd |
Go to Definition |
gi |
Go to Implementation |
go |
Go to Type Definition |
K |
Show Documentation |
| Key | Description |
|---|---|
<C-y> |
Accept Suggestion |
<C-i> |
Accept Line |
<C-j> |
Next Suggestion |
<C-k> |
Previous Suggestion |
<C-d> |
Dismiss Suggestion |
| Key | Description |
|---|---|
<leader>sr |
Search and Replace (with file type filtering) |
n |
Next Search Result |
N |
Previous Search Result |
<leader>ur |
Redraw / Clear hlsearch / Diff Update |
| Key | Description |
|---|---|
<leader>xx |
Toggle Diagnostics |
<leader>xX |
Toggle Buffer Diagnostics |
<leader>cs |
Toggle Symbols |
<leader>cl |
Toggle LSP Definitions/References |
<leader>xl |
Toggle Location List |
<leader>xq |
Toggle Quickfix List |
[q |
Previous Quickfix |
]q |
Next Quickfix |
<leader>cd |
Line Diagnostics |
]d |
Next Diagnostic |
[d |
Previous Diagnostic |
]e |
Next Error |
[e |
Previous Error |
]w |
Next Warning |
[w |
Previous Warning |
| Key | Description |
|---|---|
<C-s> |
Save File |
<leader>fn |
New File |
<leader>qq |
Quit All |
<C-c> |
Copy whole file content |
<leader>m |
Markdown preview (Previm) |
<leader>tm |
Toggle Markdown preview (Render) |
| Key | Description |
|---|---|
<leader>ui |
Inspect Position |
<leader>uI |
Inspect Tree |
<leader>uf |
Toggle Autoformat |
<leader>zz |
Open Lazy Plugin Manager |
<leader>? |
Show Buffer Keymaps |
| Key | Description |
|---|---|
<leader>st |
Show all todo comments |
<leader>sT |
Show todo/fix/fixme comments |
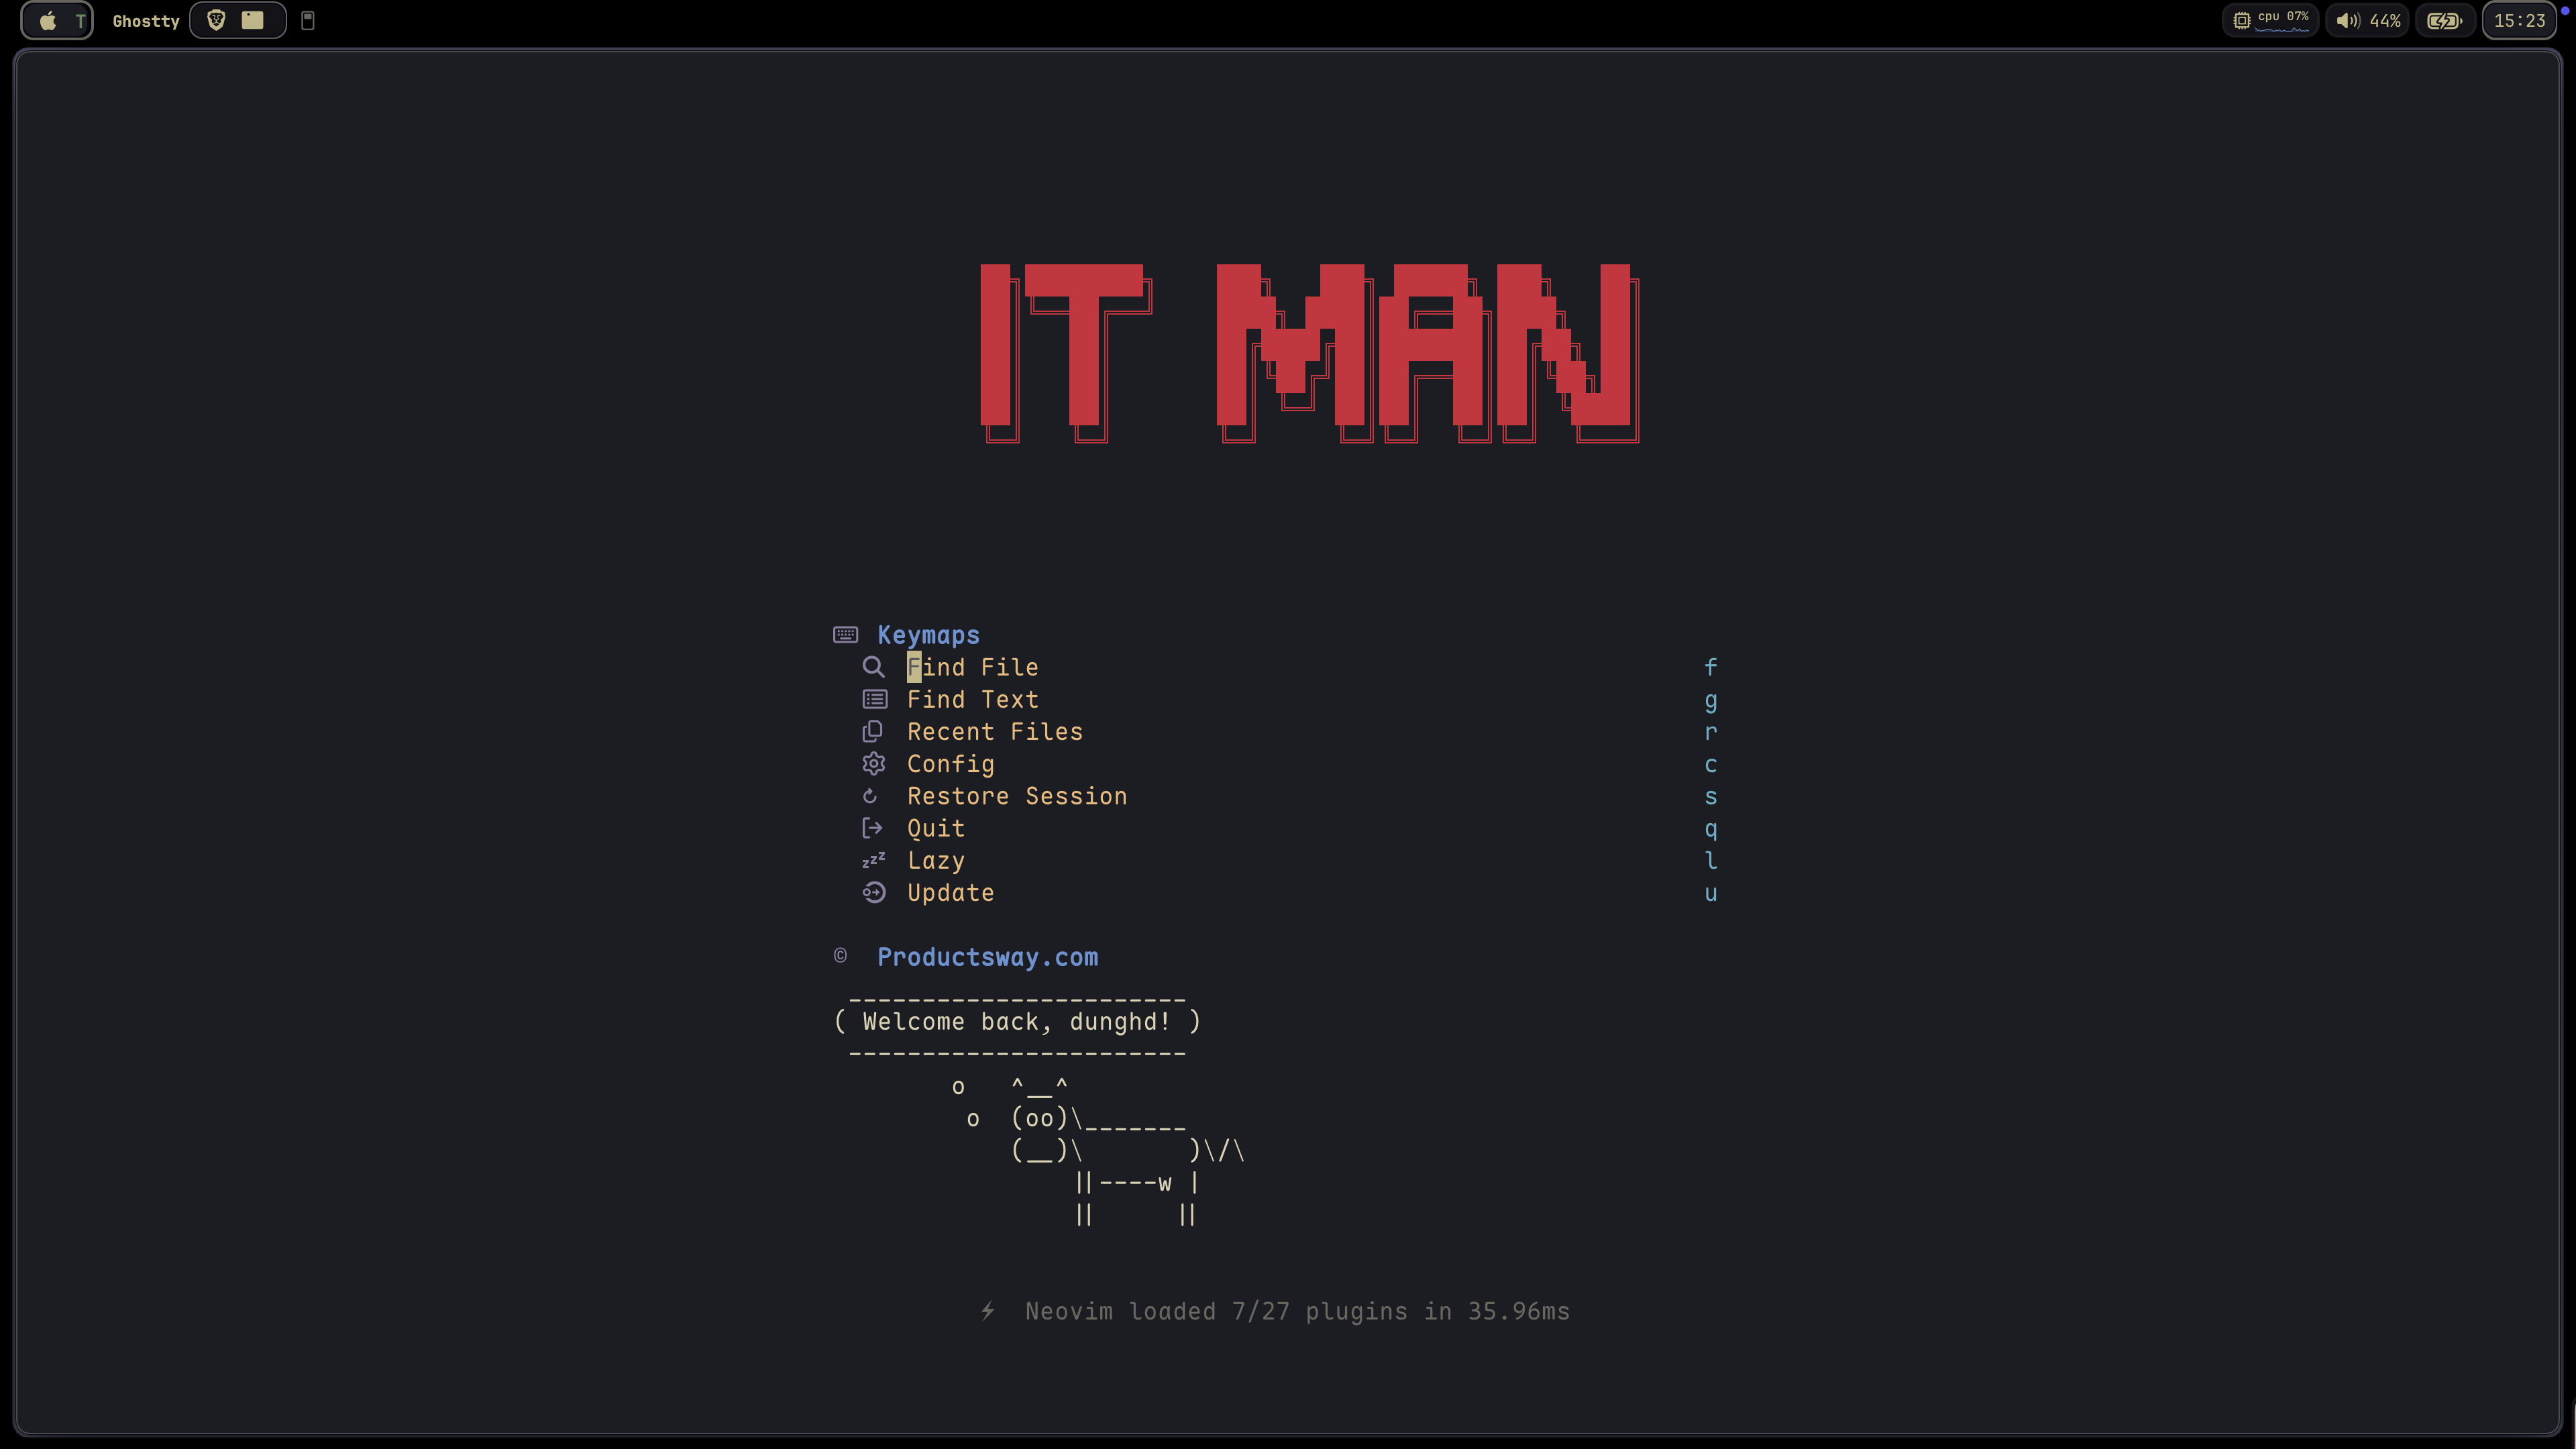
| Key | Description |
|---|---|
f |
Find File |
g |
Find Text |
r |
Recent Files |
c |
Config |
s |
Restore Session |
q |
Quit |
l |
Lazy |
u |
Update |
| Key | Description |
|---|---|
<leader>cz |
Toggle Zen Mode |
<leader>tz |
Toggle Zoom Mode |
| Key | Description |
|---|---|
<esc><esc> |
Enter Normal Mode |
<C-h> |
Go to Left Window |
<C-j> |
Go to Lower Window |
<C-k> |
Go to Upper Window |
<C-l> |
Go to Right Window |
<C-/> |
Hide Terminal |
<C-t> |
Toggle Terminal |
| Key | Description |
|---|---|
<C-space> |
Increment Selection |
<bs> |
Decrement Selection (in visual mode) |
| Key | Description |
|---|---|
zv |
Close all folds except the current one |
zj |
Close current fold when open, open next fold |
zk |
Close current fold when open, open prev fold |
| Key | Description |
|---|---|
<D-s> |
Save File |
<D-c> |
Copy (in visual mode) |
<D-v> |
Paste (in all modes) |
| Key | Description |
|---|---|
<leader>ap |
CopilotChat - Prompt actions |
<leader>am |
CopilotChat - Generate commit message |
<leader>af |
CopilotChat - Fix Diagnostic |
<leader>al |
CopilotChat - Clear buffer and chat history |
<leader>av |
CopilotChat - Toggle |
<leader>a? |
CopilotChat - Select Models |
<leader>aa |
CopilotChat - Select Agents |
| Key | Description |
|---|---|
<leader>cjt |
Run Test Nearest |
<leader>cjT |
Run Test File |
<leader>cjS |
Run Test Suite |
<leader>ctt |
Run File |
<leader>ctT |
Run All Test Files |
<leader>ctr |
Run Nearest |
<leader>ctl |
Run Last |
<leader>cts |
Toggle Summary |
<leader>cto |
Show Output |
<leader>ctO |
Toggle Output Panel |
<leader>ctS |
Stop |
<leader>ctw |
Toggle Watch |
| Key | Description |
|---|---|
<leader>ot |
Run Task |
<leader>oq |
Quick Action |
<leader>or |
Rerun Last Task |
<leader>oo |
Toggle at bottom |
<leader>cp |
Quick Code Runner/Pad |
| Key | Description |
|---|---|
<leader>hA |
Run All requests |
<leader>ha |
Run Api request |
<leader>he |
Run Api request to entry |
<leader>hE |
Run Api request from entry to end |
<leader>hv |
Run Api in verbose mode |
<leader>hV |
Run Api in very verbose mode |
<leader>hr |
Rerun last command |
<leader>hh |
Hurl Runner/Show Last Response |
<leader>hg |
Add global variable |
<leader>hG |
Manage global variable |
<leader>tH |
Toggle Hurl Split/Popup |
<leader>hd |
Debug Info |
# .config/neovide/config.toml
fork = true # Detach from the terminal instead of waiting for the Neovide process to terminate.
frame = "buttonless" # Transparent decorations including a transparent bar.
maximized = true # Maximize the window on startup, while still having decorations and the status bar of your OS visible.
title-hidden = trueClick to expand font recommendations
I recommend using the following repo to get a "Nerd Font" (Font that supports icons)
Click to expand project configuration details
This configuration supports project-specific settings through .nvim-config.lua files. When Neovim starts, it will automatically look for a .nvim-config.lua file in the current working directory and load it if available.
You can quickly create a .nvim-config.lua file using the :ProjectSettings command. This interactive command will:
- Show available plugins and LSP servers
- Let you select which ones to enable
- Create a
.nvim-config.luafile with your selections
Example usage:
:ProjectSettingsAvailable options:
-
Plugins:
no-neck-pain: Additional UI plugincodecompanion: AI code companionavante: Alternative AI assistantmcphub: Minecraft Plugin Hub
-
LSP Servers:
eslint: ESLint language serverlua_ls: Lua language serverbiome: Biome = Eslint + Prettierjson: JSON language serverpyright: Python language servergopls: Go language servertailwindcss: Tailwind CSS language server
When prompted, enter your selections as comma-separated values:
Plugins: no-neck-pain,codecompanion
LSP: eslint,biome
You can also manually create a .nvim-config.lua file:
-- Project-specific Neovim configuration

-- Set TypeScript LSP server
vim.g.lsp_typescript_server = "ts_ls"

-- Enable additional LSP servers
vim.g.lsp_on_demands = {
  "eslint",        -- ESLint language server
}

-- Enable extra plugins
vim.g.enable_extra_plugins = {
  "no-neck-pain",  -- Additional UI plugin
  "nvim-eslint"    -- ESLint integration
}

-- Set any other project-specific settings
vim.opt.tabstop = 2
vim.opt.shiftwidth = 2
This file is not tracked by git, making it perfect for project-specific customizations.
Click to expand extra plugins
This configuration includes several extra plugins that can be enabled on demand through your project-specific configuration. These plugins provide additional functionality without bloating the core configuration.
-
- Distraction-free writing mode with customizable width
- Alternative to zen-mode with a focus on reducing neck strain
- Keymaps:
<leader>cz: Toggle No Neck Pain mode<leader>zu: Increase width<leader>zd: Decrease width
-
- AI code companion with GitHub Copilot integration
- Rich set of features including code explanation, refactoring, and inline documentation
- Supports slash commands for context-aware actions
- Keymaps prefix:
<leader>A - Visual mode selections:
<leader>Ae: Explain selected code<leader>Af: Fix selected code<leader>At: Generate unit tests for selected code<leader>Ar: Refactor selected code<leader>Ad: Add inline documentation<leader>An: Suggest better naming
-
- Alternative AI code assistant using Copilot
- Replaces the standard Copilot implementation
- Provides a more streamlined interface
-
- Minecraft Plugin Hub integration
- Access Minecraft plugins directly from Neovim
- Command:
:MCPHub
To enable any of these plugins, add them to your .nvim-config.lua file:
vim.g.enable_extra_plugins = {
  "no-neck-pain",
  "codecompanion",
  "avante",
  "mcphub"
}
Note that some plugins like avante.nvim will disable conflicting plugins (such as copilot.vim) when enabled.
  rm -rf ~/.config/nvim
  rm -rf ~/.local/share/nvim
  rm -rf ~/.cache/nvim
rm -rf ~/.local/state/nvimClick to expand helpful tips
- Improve key repeat on Mac OSX, need to restart
defaults write NSGlobalDomain KeyRepeat -int 1
defaults write NSGlobalDomain InitialKeyRepeat -int 14- VSCode on Mac
To enable key-repeating, execute the following in your Terminal, log out and back in, and then restart VS Code:
# For VS Code
defaults write com.microsoft.VSCode ApplePressAndHoldEnabled -bool false
# For VS Code Insider
defaults write com.microsoft.VSCodeInsiders ApplePressAndHoldEnabled -bool false
# If necessary, reset global default
defaults delete -g ApplePressAndHoldEnabled
# For Cursor
defaults write com.todesktop.230313mzl4w4u92 ApplePressAndHoldEnabled -bool false
Also increasing Key Repeat and Delay Until Repeat settings in System Preferences -> Keyboard.

- Disable
full stop with double-spaceif you see the delay with<space>-<space>
Click to expand learning resources
- What's New in Neovim 0.11: A detailed overview of the latest features and improvements in Neovim 0.11.
- Neovim 0.11 Built-in Completion Setup: A comprehensive guide for setting up built-in completion in Neovim 0.11+.

![IT Man - Talk #33 NeoVim as IDE [Vietnamese]](https://i.ytimg.com/vi/dFi8CzvqkNE/hqdefault.jpg)

![IT Man - Step-by-Step Guide: Integrating Copilot Chat with Neovim [Vietnamese]](https://i.ytimg.com/vi/By_CCai62JE/hqdefault.jpg)


👤 Dung Huynh Duc
- Website: https://productsway.com/
- Twitter: @jellydn
- Github: @jellydn
Give a ⭐️ if this project helped you!