Entando plugin: Manage User Profile
Installation and configuration of the plugin jpuserprofile
The purpose of this guide is to provide a complete description of the Entando Manage User Profile plugin whose code is jpuserprofile for the Entando platform.
This guide is intended for both administrators and developers who wish to explore the capabilities of the Entando Plugin Manage User Profile and are considering a possible integration into a running production environment or in a Development Environment.
In order to take maximum advantage from the present guide, it is necessary to have basic knowledge of the Java platform, Java Servlet containers, PostgreSQL (or MySQL) DBMS and the Entando platform.
Moreover, it's necessary to have read the Plugin Pattern guide for the installation procedure and an explanation of the standard directory layout.
The Manage User Profile plugin let you associate a profile to the Entando users. Such profiles are composed by a variety of attributes, that can be freely mixed to let a user carry additional information. This plugin was designed with the goal of the simplicity and flexibility in mind: profile can be associated to any Entando user, whatever its source is (local DB, LDAP directory etc ).
This plugin adds three Widgets in the system: Edit Current user, Edit Current User Password, Edit Current User Profile*. Through these a visiting user of the portal can manage his/her profile as well as changing the password.
Though the plugin installation is not difficult at all, we are going to modify the system tables, so a backup of your database is highly recommended. Furthermore, you may be required to customize the scripts to your needs before installation.
For the purpose of the current guide, a few Maven and Ant commands are shown: your IDE has probably the ability to execute those command for you in background.
User Profile plugin is a pure plugin because its installation neither modifies nor alters any system functionality.
jpuserprofile directories are organized following the Maven Standard Directory Layout as shown in the Plugin Pattern.
It is worth noting that the plugin installation is greatly changed from the previous releases (thank you, Maven!).
As always when it comes down to install new things, stop your servlet container before moving on.
Open the pom.xml of your project: locate the <dependencies> tag toward the end of the file, after the <build> tag; if the tag dependencies doesn't exist just create a new one just after the closure of the build tag.
Add the following snippet inside the dependencies:
            <dependency>
                <groupId>org.entando.entando.plugins</groupId>
                <artifactId>entando-plugin-jpuserprofile</artifactId>
                <version>${entando.version}</version><!-- version. Don't remove this comment. -->
                <type>war</type>
            </dependency>
You are done! You can verify the correct installation of the plugin going to the administration area and checking for the new item in the Plugins menu.
From now we will use the name myportal when referring to your deployed Entando application or, in other words, to the artifact ID of the deployed portal.
All Entando plugins can be downloaded from the Maven Central repository, just filter by code and by version.
To install jpuserprofile in a production environment the file entando-plugin-jpuserprofile-3.2.0.war is needed; we will refer to this file as WAR package.
The integration activity must be performed after the servlet container has been stopped.
-
copy the content of the directory
WEB-INF/libof the WAR package intomyportal/WEB-INF/lib/within the server container. -
make sure that the directory
myportal/WEB-INF/pluginsexists, otherwise create it. Copy the content of theWEB-INF/pluginsof the WAR package intomyportal/WEB-INF/plugins/ -
copy the content of the directory
resources/pluginsof the WAR package intomyportal/resources/plugins/within the servlet container.
Now the servlet container can be restarted.
This plugin can be easily configured from the administration interface: basically we use the existing entity manager engine to create a new entity type that describes and contains all the information (attributes) that we want to associate the the system users.
From the left panel Plugins → User Profile → Profile types.

You are shown with the list of the system profiles that you can manage: as usual, each entry in the list can be edited or deleted clicking respectively on its description link or on the remove icon. The sun icon shows that references are up to date, opposed to the moon (not shown in the image above) that informs the user that references have to be refreshed. To update them just click to the moon icon (you may also click on the sun icon though it doesn't have much sense): an example is provided later in this chapter.
To create a new profile just click the New entity Type link.
The page where you can create the profile is composed by two sections, Info and Attributes.

As you can see this Info section works like the one of the Content Management System (provided by the bundled plugin jACMS); We are requested to insert a unique Key that identifies the profile, and a human readable Description (the description field doesn't support multiple languages).
What really interests us is the next section, Attribute: here we select the attributes to use to build the profile.

The Type select contains all the attributes available for the profile; as usual each attribute has its own configuration interfaces not shown here, but consistent with the Content Management interface. You may add attributes at will, with only one limitation: the information inserted support only one language
The result is a list of attributes shown in the picture below:

Management options are carried out by clicking the icons of the correspondent attribute: you can edit, delete and arrange the attribute clicking on the notepad, remove and arrows icons, respectively.
The icon of the sun or moon informs of whether the attribute is mandatory or not and if it can be used as a filter for lists. For example, referring to the image above, we find the “language” attribute mandatory and not suitable as filter for list; “boolean2”, on the contrary is not mandatory but can be used as filter.
You conclude the creation of the new entity clicking on the Save button. This will lead you again to the list of the profile attributes.
As already pointed out, you edit the profile clicking on its description; the edit interface is pretty much the same of the creation interface (in fact they are actually the same code!) but it's worth noting that after the removal of an attribute you might be prompted for references reload when returning:

You click on the moon icon to reload all the references of the “City dweller” profile. You may also click on the “City dweller” link from the list of entities that need to be updated.
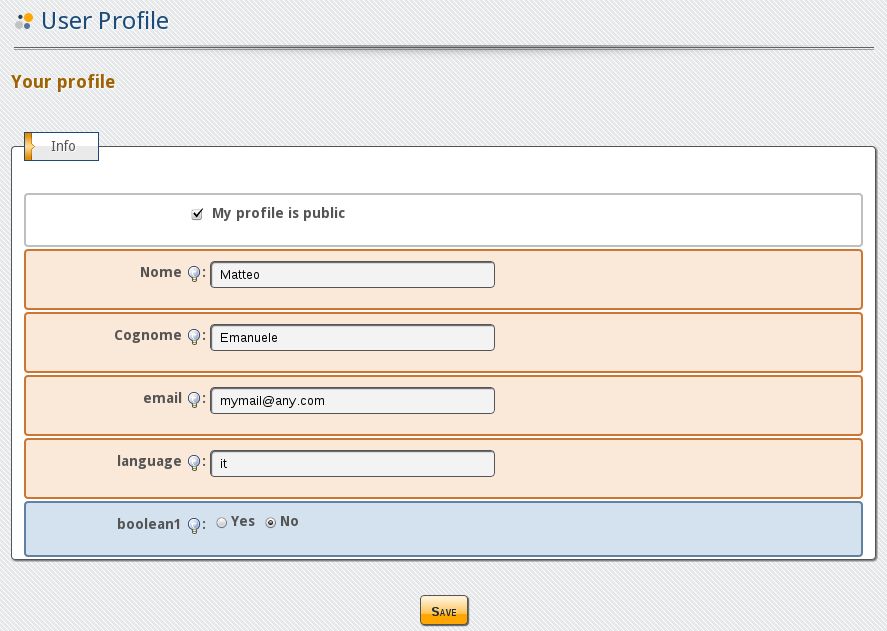
The current user can fill or update his/her profile through the simple interface accessed from the left panel: Plugins → User profile → Your Profile.
Finally, from the administration area you are offered the possibility to search for profiles. You can immediately search by Username or, expanding the Refine your Search section, you may setup a filter for a specific profile.

As administrator you may edit all the profile listed in the result, clicking on the notepad icon; the magnifier icon is used to view (read only) the profile of the current user, in the column labeled A. Finally the presence of a shining sun in the column labeled S indicates whether the user is active or not.
To refine the search you might want to set a filter for a specific profile: this is done by choosing a Profile Type from the select and confirming with the Set button.

On reopening the refine your search section will show all the fields that can be used as filter:
You may appreciate the fact that despite being not mandatory (have a look at the entity creation interface screenshot) both boolean1 and boolean2 are still used as filter.
The three Widgets added to the system allow a visiting user of the portal to manage his/her own profile, account and finally change password.
In the following picture we find the the Widgets Edit Current User Password and the Edit Current User Profile in the same page

The same result can be achieved publishing only the Widget Edit current user, if you don't need to separate the two Widgets.