Syndication Admin Usage
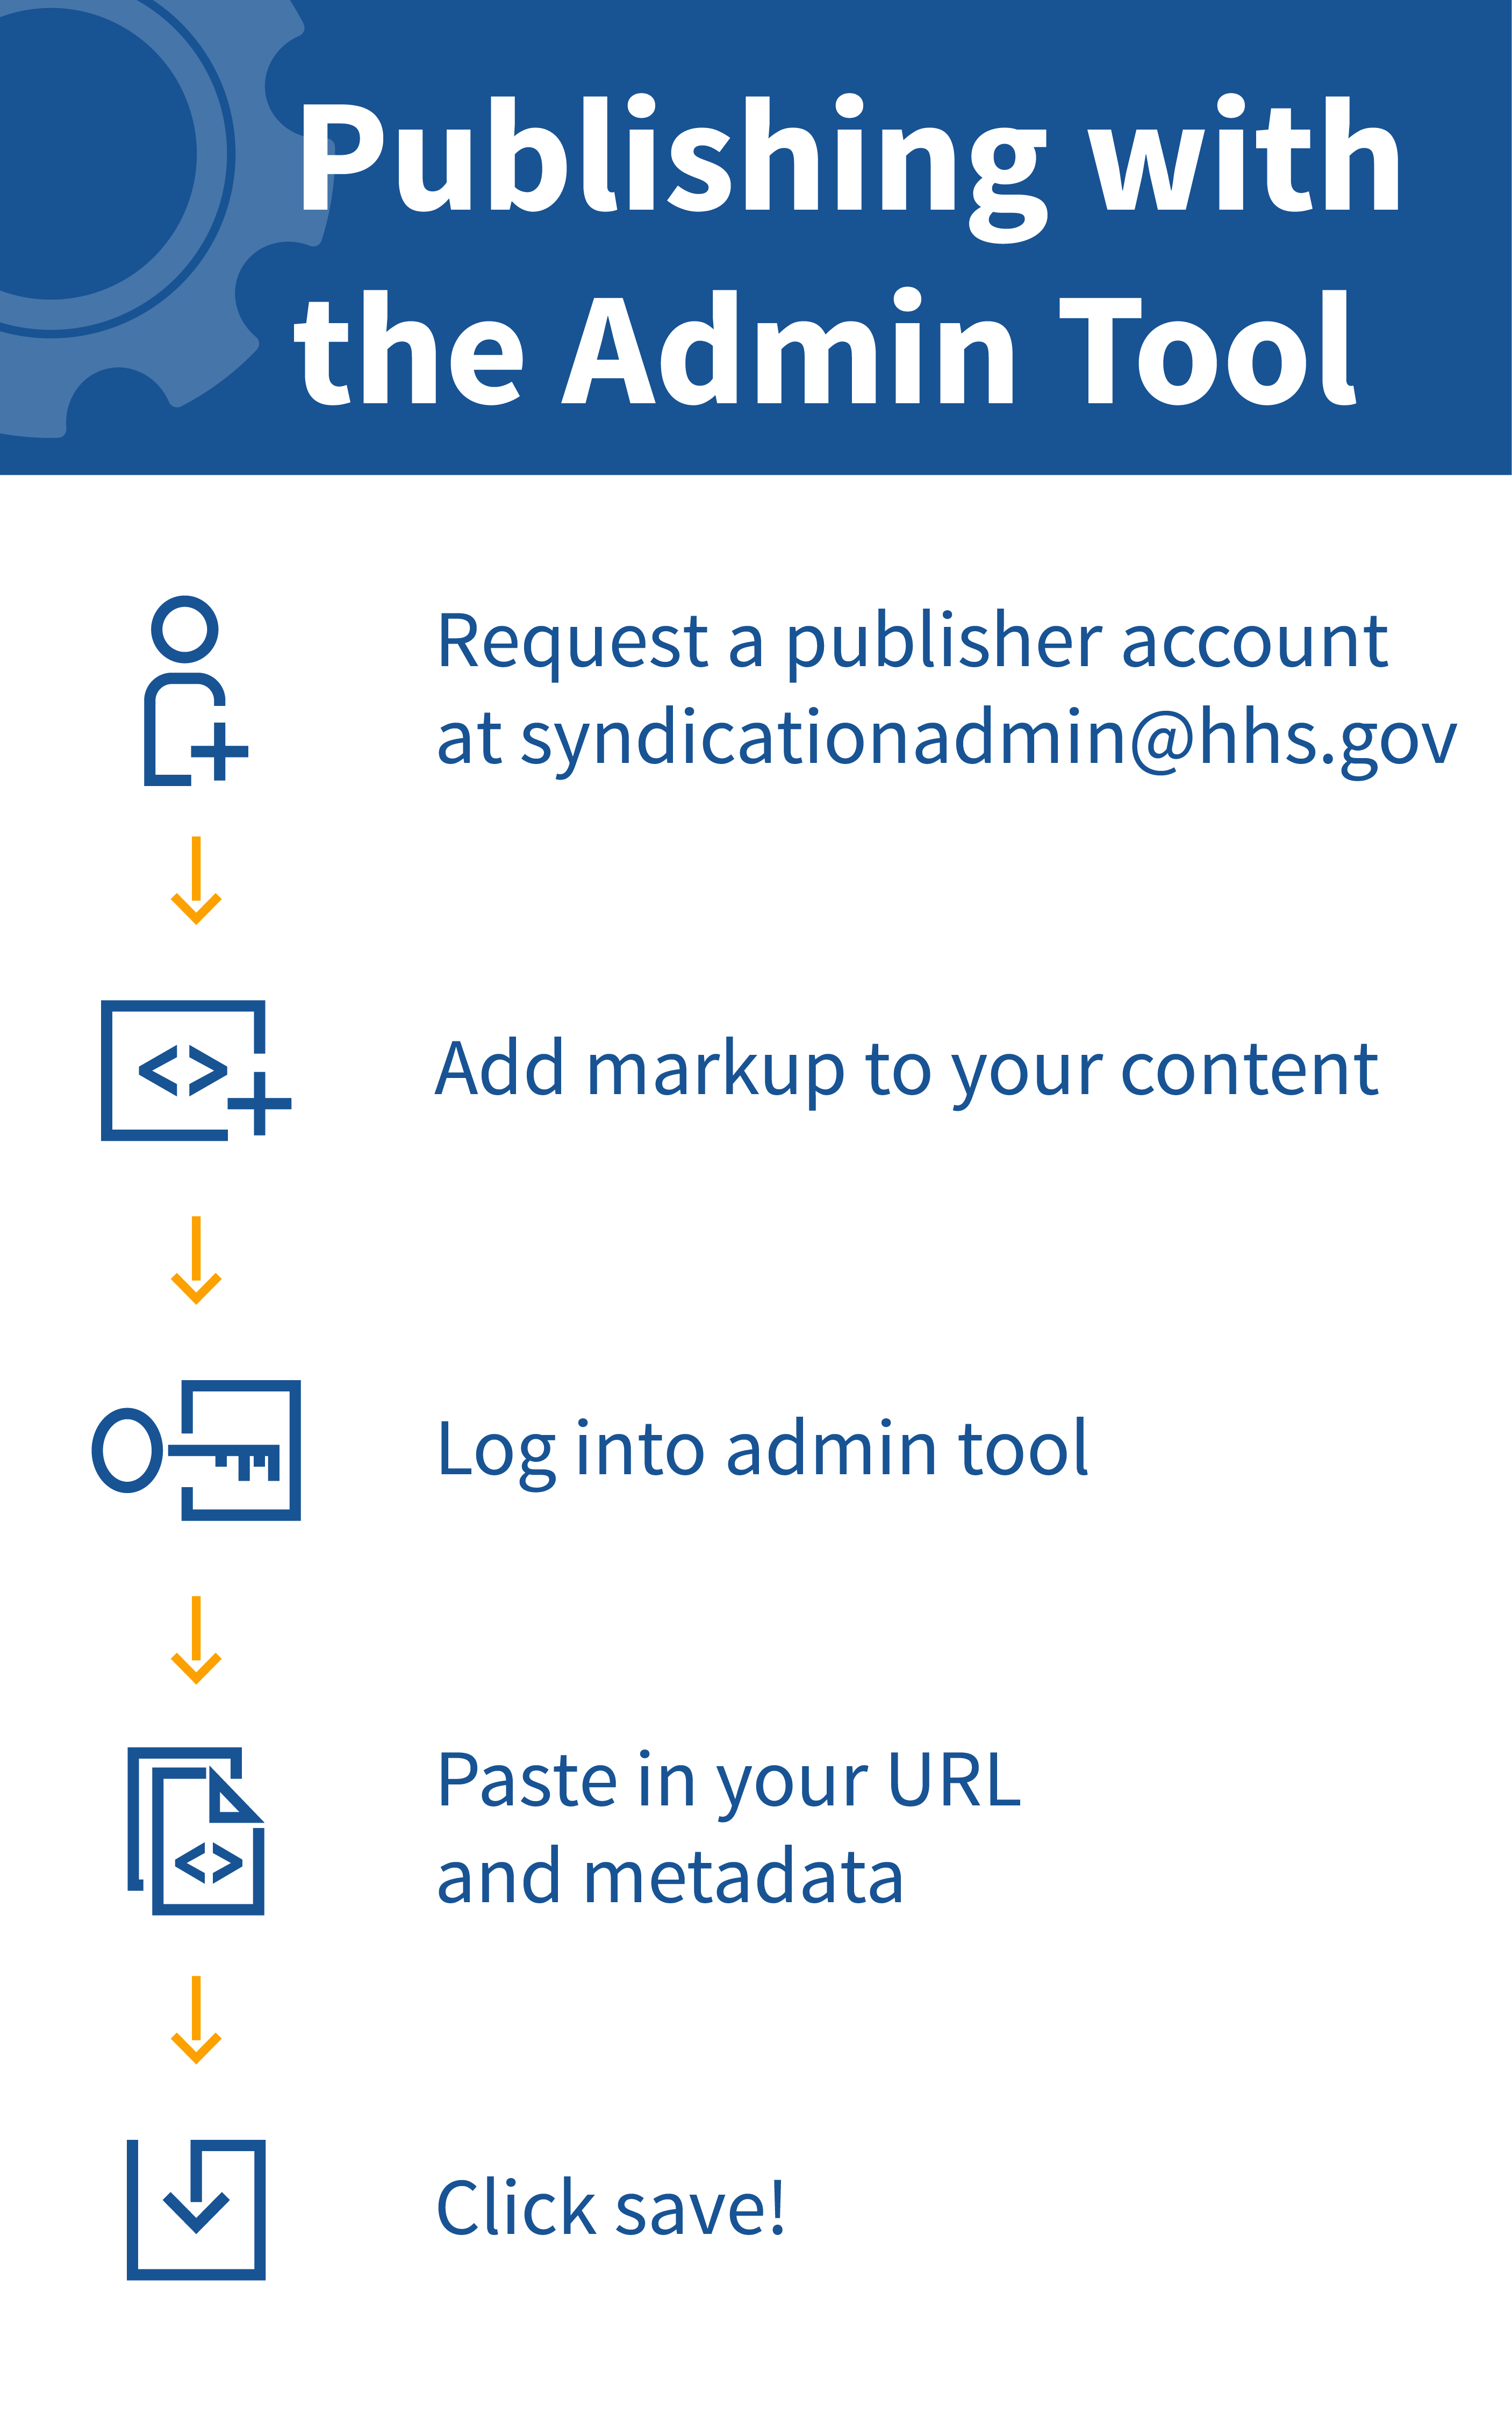
- An active “Publisher” account
What is this? An admin of the syndication system can upgrade your existing storefront account to a “Publisher” account, or create a new publisher account for you. This means your account will be granted access to the syndicationAdmin application, and will also be given a set of API keys. These keys can be used by your CMS to automatically publish updates to our API.
- A public-facing server & webpage
Internal/intranet content will not work with Syndication
- Syndication markup around your content
There are many ways to do this, either with content types or templates in your CMS, or manually by editing the content directly. See examples in Appendix A.
- Some knowledge about the content you are publishing
You should be able to supply tags, descriptions, and organization information as needed.
The HHS Digital Media Content Syndication Services make use of three different environments.
-
Development (http://ctacdev.com/...) - This is a private server operated by CTAC for daily testing of development efforts. If CTAC is working with you to resolve and issue, you might see mention of the Dev environment.
-
Staging (https://stage-xxxx.digitalmedia.hhs.gov) - This is the official HHS syndication staging server. It is a clone of production, usually about 2 weeks old. When a new release of the syndication system is being tested, this is the environment that is used. It is also available for customer/partner use, and we prefer you test new setups in this environment before moving to production. Please note that this server is volatile, it’s data is reset at least once a month, often every two weeks, and it will accumulate arbitrary test data in the mean time. Think of this environment as being disposable, and please do not plan to run live demos from this environment. If you have needs in this regard, please contact us and work with us directly, we can create environments for you if needed.
-
Production (https://xxxx.digitalmedia.hhs.gov) - This is the public facing server that powers all the official syndication services, and is where publishers push their content when it’s ready for consumption by the general public.
The urls for these environments are similar, so please be aware of which environment you are working with!
- Storefront: https://stage-digitalmedia.hhs.gov
- API: https://stage-api.digitalmedia.hhs.gov
- Admin: https://stage-syndicationadmin.digitalmedia.hhs.gov
- Storefront: https://digitalmedia.hhs.gov
- API: https://api.digitalmedia.hhs.gov
- Admin: https://syndicationadmin.digitalmedia.hhs.gov
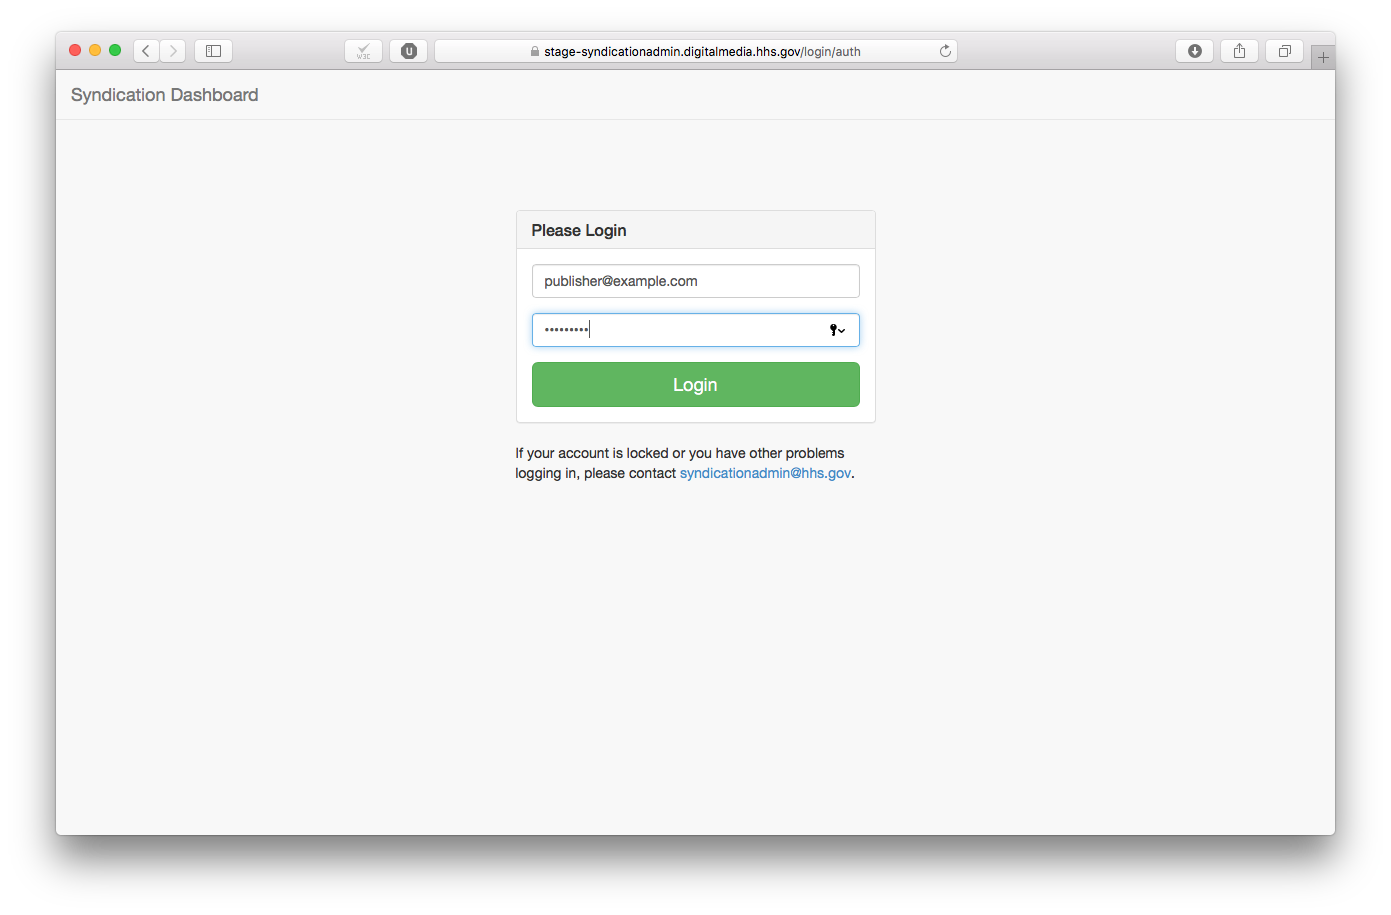
We’ll be using the HHS staging server for this example. You can request access to this by sending an email to syndicationadmin@hhs.gov.
-
Log in using your publisher credentials at https://stage-syndicationadmin.digitalmedia.hhs.gov
-
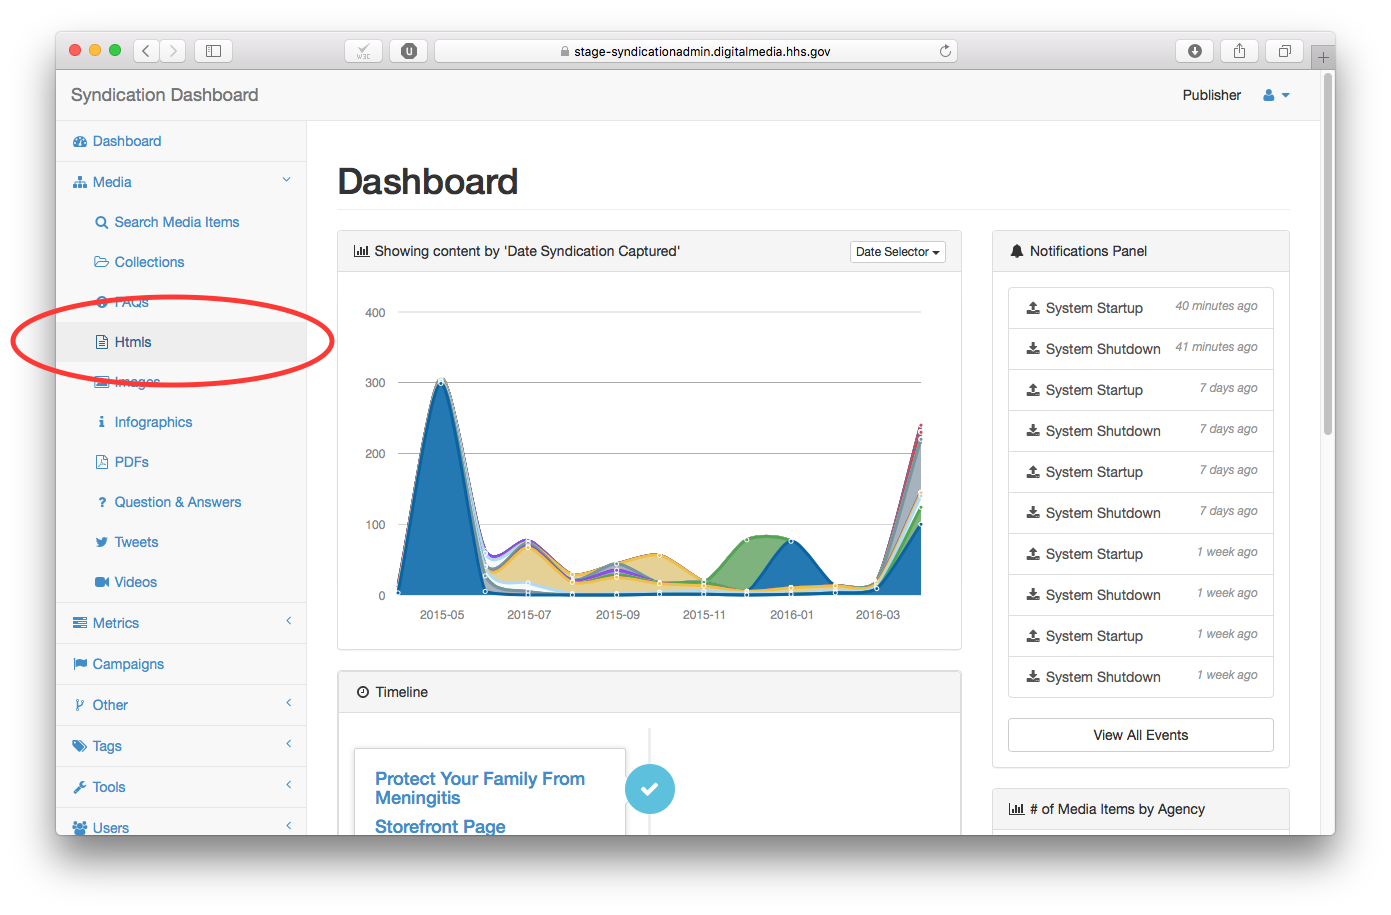
Click on the Media/Htmls link
-
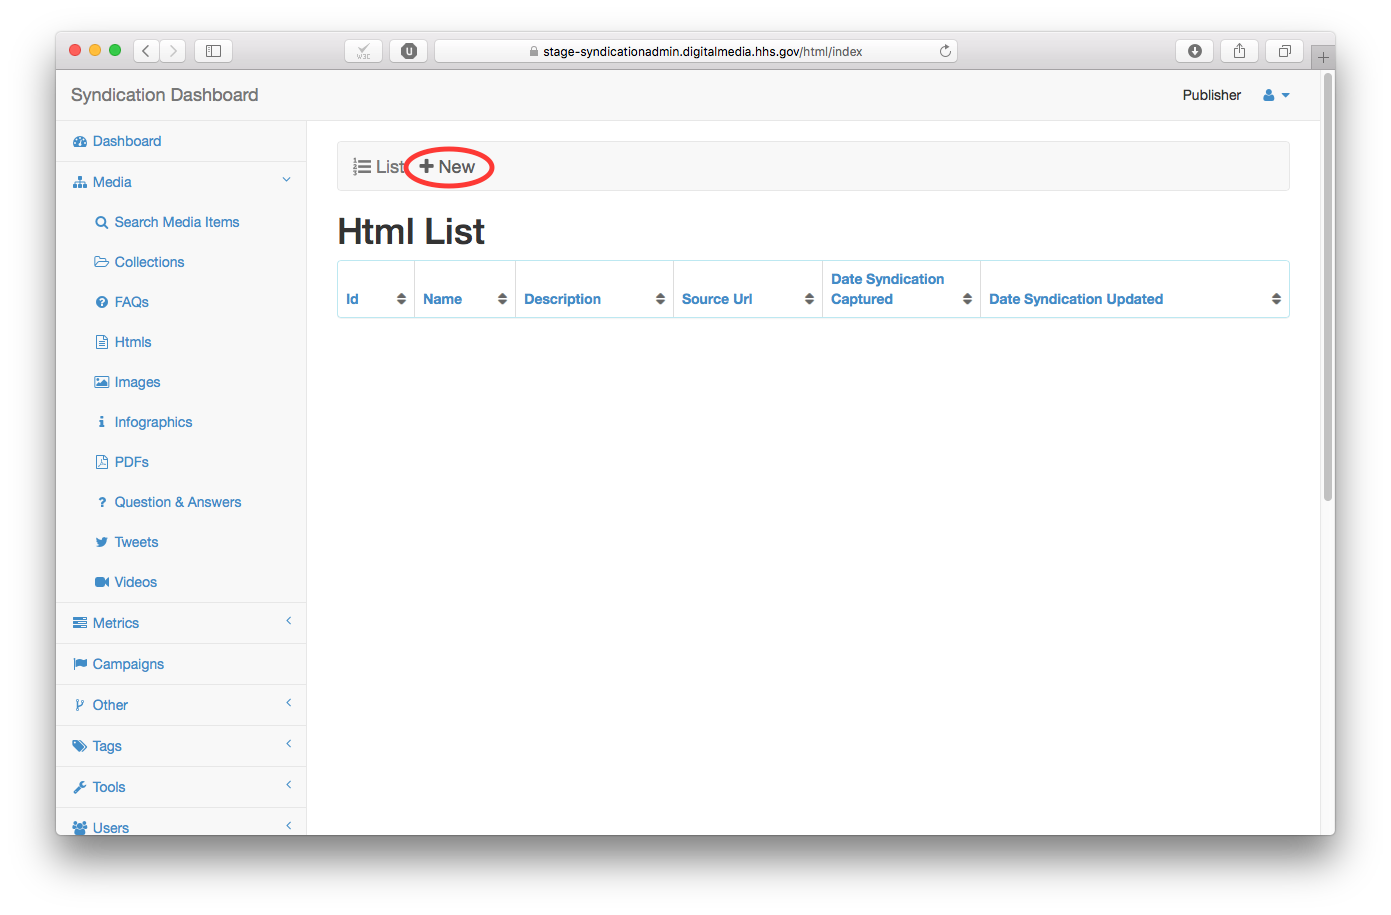
Click “+ New”
-
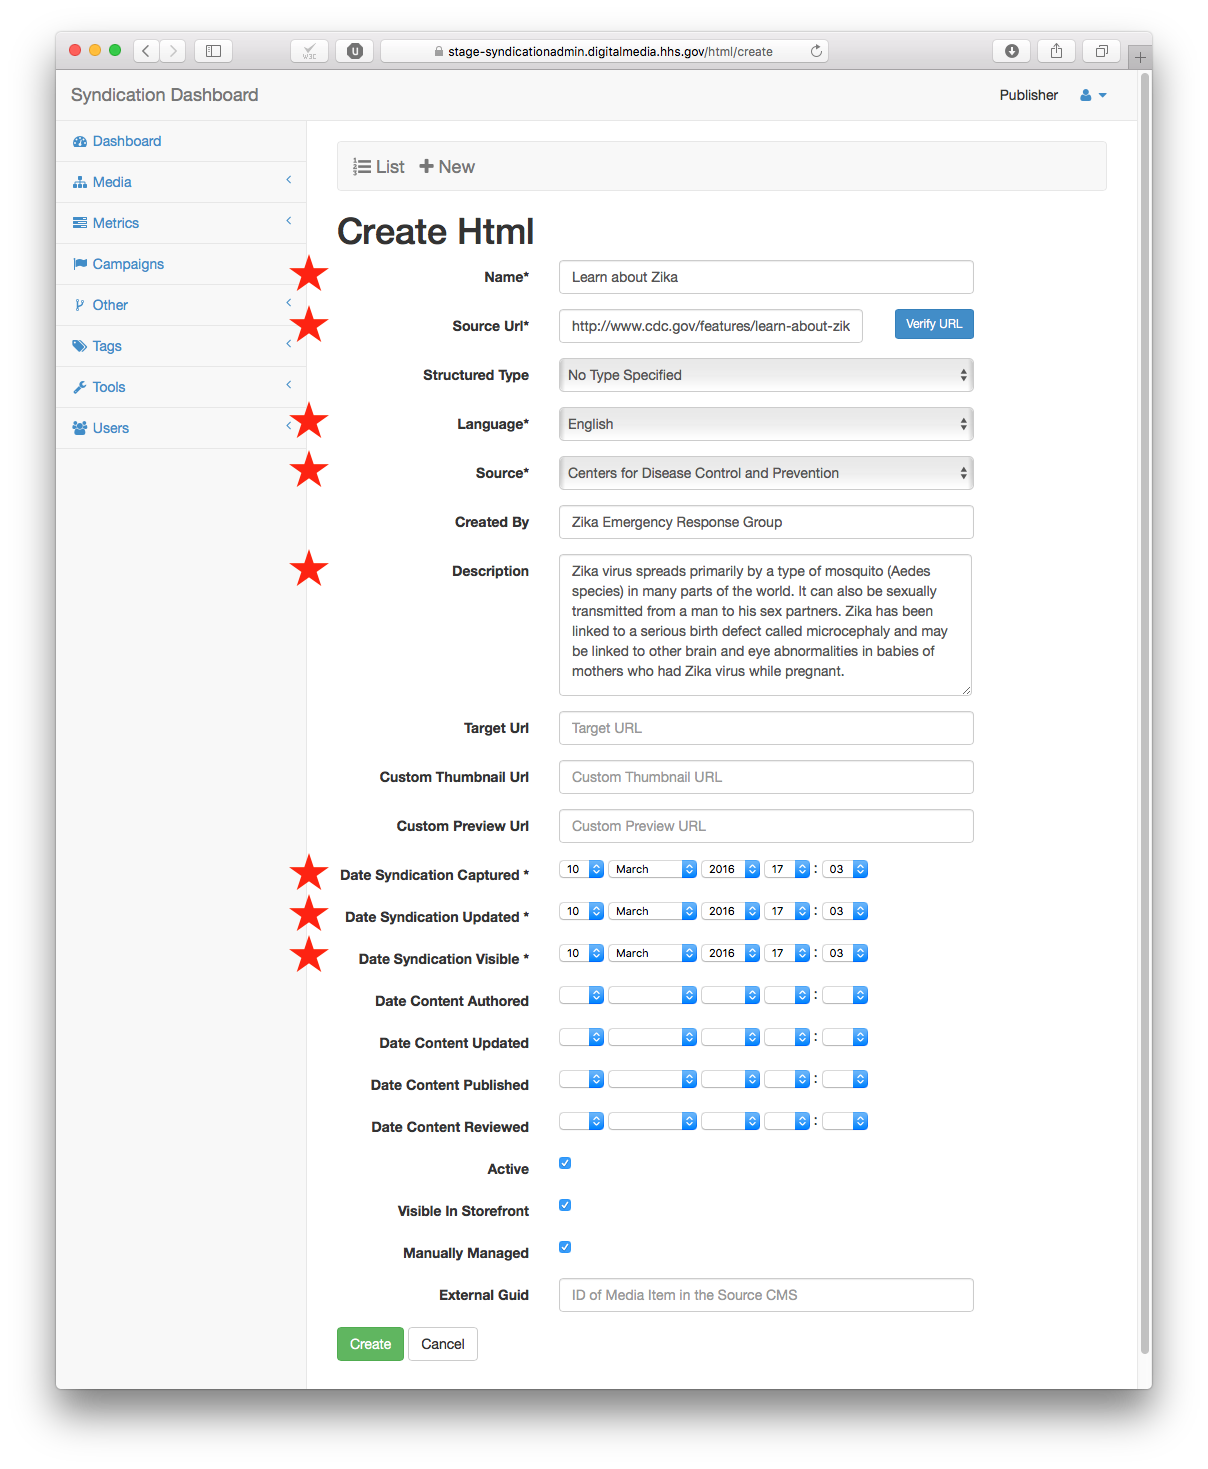
Fill in the metadata for your content. A name, source url, language, and source are required. A Description is strongly recommended. This step will use a CDC article as an example (see screenshot below). Several dates are required too, but these are filled in automatically for you and can be left with their default settings in virtually all cases. All other fields are optional, and their use is described in Appendix B.
-
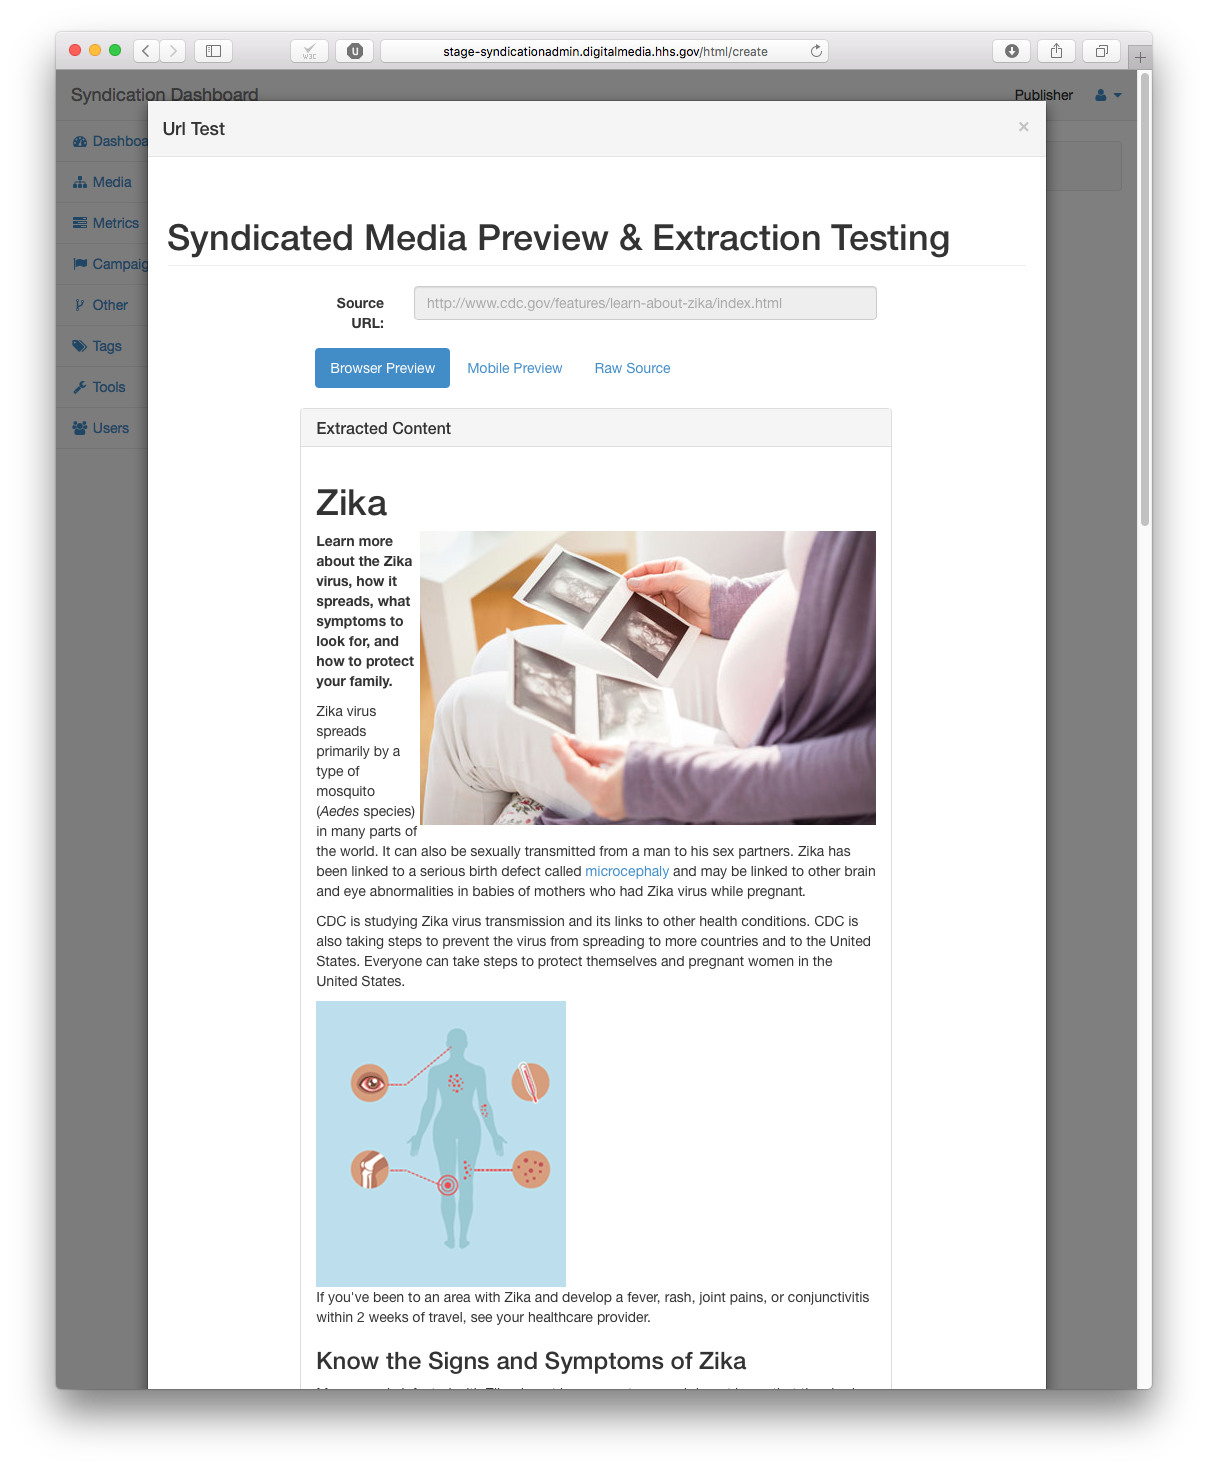
It is strongly recommended you use the “Verify URL” button before saving your content. This will run the content through a content extraction first-pass to ensure the URL is valid, the content is marked up, and it’s for you to verify the content extracted as expected.
-
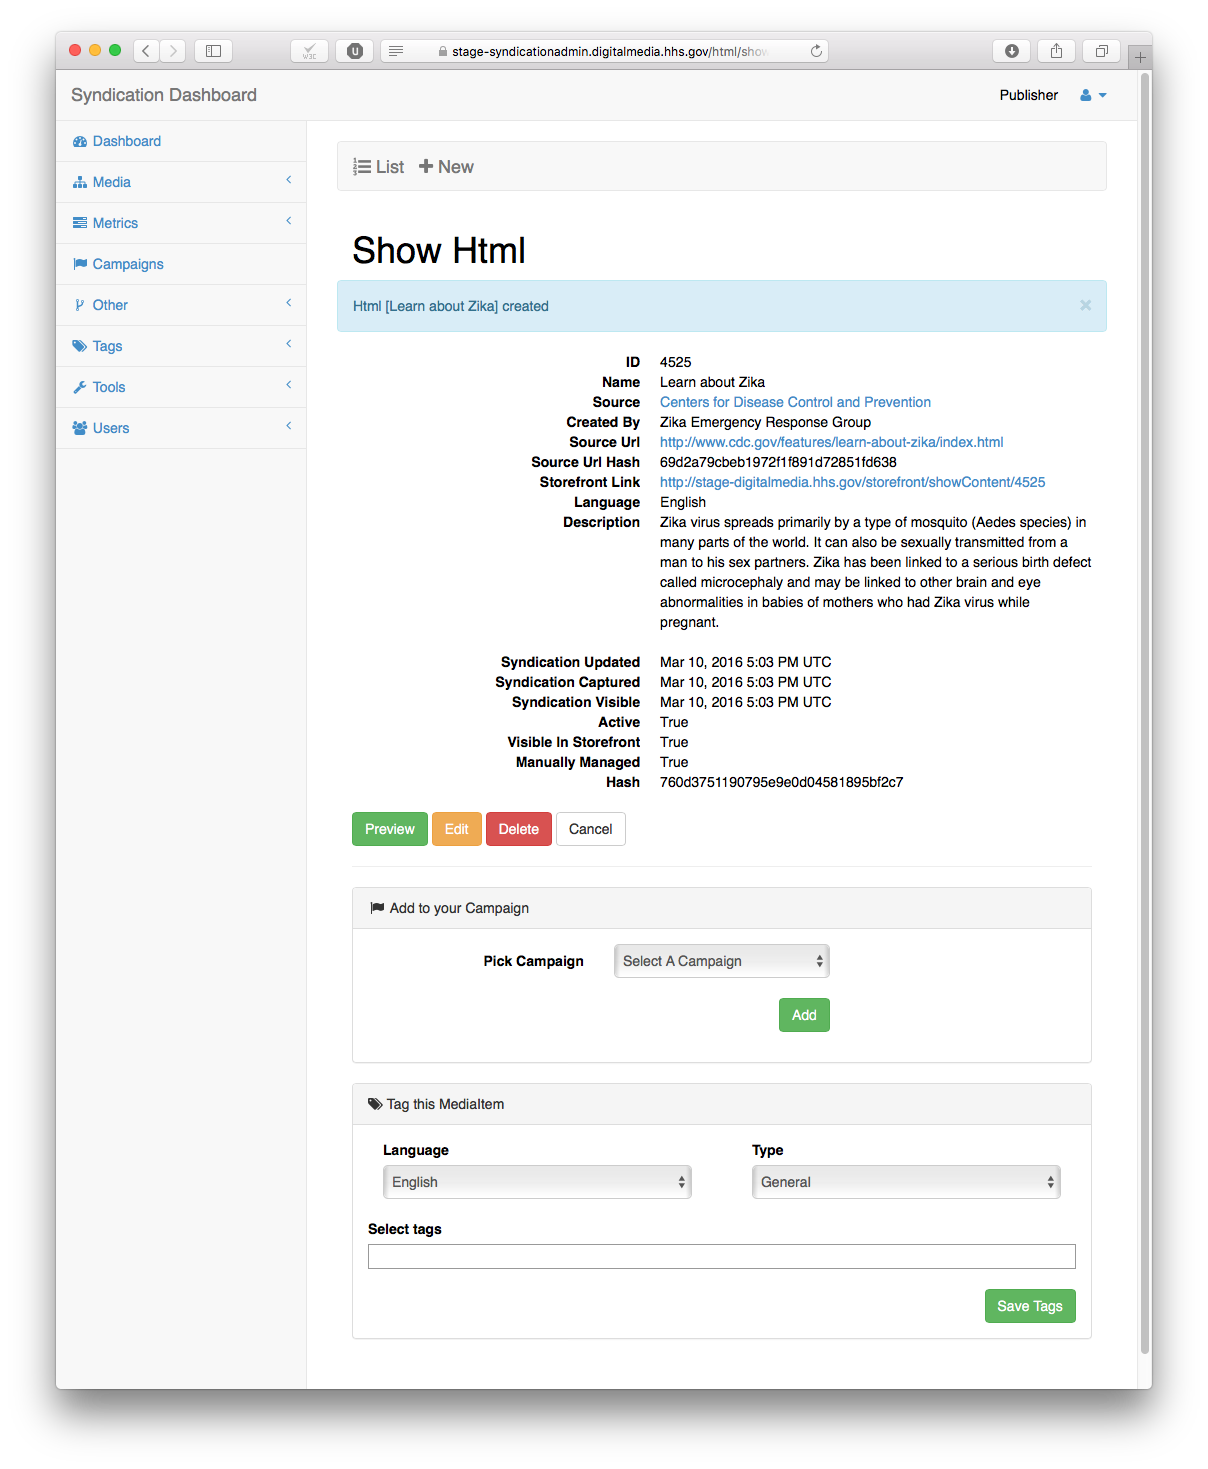
Click the “Create” button on the bottom of of the page to save your content. If there were errors, they should be highlighted in red and you will have the chance to correct them and try again, otherwise, you will see a page like that pictured below when the content is successfully added.
-
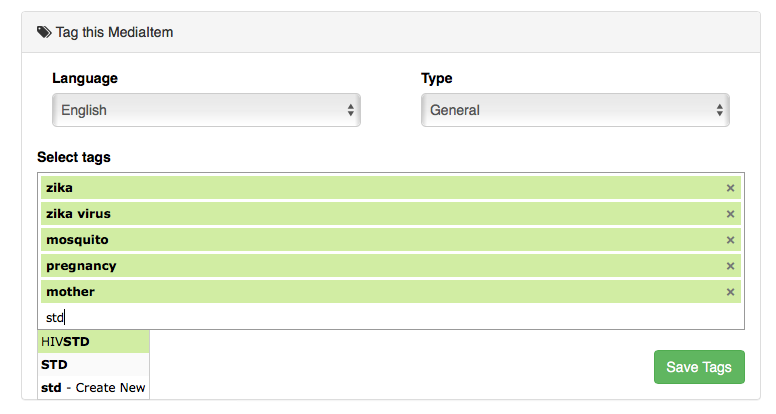
Now you will want to add a few meta tags. The tagging system is a flat list of tags that support multiple languages and types. Pick your language and type, and then start typing the name of the tag you wish to add. If a tag by the same name is already in the system, it will popup and a suggest. Reuse existing tags whenever possible. Tags can be a single word or a short phrase. Avoid sentences and punctuation when tagging. If the tag you wish to use doesn’t exist, pausing a moment after typing will allow you to create a new tag. This new tag will be available for you to use again in the future. Click “Save Tags” when complete.
-
The content is now available in the Syndication Storefront. You can find it’s storefront link listed with the other meta data, or see it on the main page at https://stage-digitalmedia.hhs.gov
Syndication markup is simple and straightforward. It allows the system to identify the exact content that you would like to deliver and extract it from your page. It is a requirement of using the content syndication system at HHS.
The markup exists in the form of a CSS class, and must be applied to a <div>. Other HTML elements are ignored.
<html>
<head>
    <title>My Page for Syndication</title>
    <style>
        …
    </style>
</head>
<body>
    <div class=”navbar”>
        This is the navbar on the page with many links and organizational logos
    </div>

    <div class=”syndicate”>
        <div>
            This is the main content of the article and this represents the content I would like syndicate. It can contain all the normal html elements, however, inline styles and scripts will be stripped! Do not rely on css for readability.
        </div>
    </div>

    <div class=”footer”>
        This is the footer on the page with many more links and other organizational messages
    </div>
</body>
</html>
In the above example, there is a single part of the page that you would like to syndicate. Everything inside the syndicate
The markup exists in the form of a CSS class, and must be applied to a <div>. Other HTML elements are ignored.
This example is very similar to Example 1, except that it shows how multiple syndicate <div>s can be used. Nesting syndicate <div>s is not allowed, but having more than one on a page is fine. The Syndication engine will combine these separate <div>s together during content extraction.
<html>
<head>
    <title>My Page for Syndication</title>
    <style>
        …
    </style>
</head>
<body>
    <div class=”navbar”>
        This is the navbar on the page with many links and organizational logos
    </div>

    <div class=”syndicate”>
        <div>
            This is the first half of the main content of the article and this represents part of the content I would like syndicate. It can contain all the normal html elements, however, inline styles and scripts will be stripped! Do not rely on css for readability.
        </div>
    </div>

    <div>
        This is something I want on my page, but not on my syndicated page.
    </div>

    <div class=”syndicate”>
        <div>
            This is the second half of the content I would like to syndicate. Maybe the first half was a table of contents and an abstract, and this half is the meat of the page.
        </div>
    </div>

    <div>
        This is something else I want on my page, but not on my syndicated page. Maybe an in-line navigation bar, or related items tile or something else that doesn’t make sense from outside my own website.
    </div>

    <div class=”syndicate”>
        <div>
            This is some special attribution, footnotes, additional links, etc… that I do want included for syndication.
        </div>
    </div>

    <div class=”footer”>
        This is the footer on the page with many more links and other organizational messages
    </div>
</body>
</html>
In the above example, the engine would combine the three syndicate <div>s one after the other to form a new page consisting of (as described) the first half, second half, and special attribution.
- Name The name of the content as it will appear on the storefront, in the API, and the admin console
- Source Url Where the content is actually hosted - this must be the real, public facing, openly accessible absolute url to the content, e.g. http://www.cdc.gov/features/learn-about-zika/index.html
- Structured Type If your content supports structured content markup compatible with that found on http://www.schema.org, you can specify your structured type here. At time of writing, the system supports the: BlogPosting, NewsArticle, and Article types
- Language The languages supported by the system are controlled by administrators. If the language you need isn’t on the list, request it by emailing syndicationadmin@hhs.gov
- Source The source agency for the content. The list of agencies is controlled by administrators. If your agency isn’t listed, request it by emailing syndicationadmin@hhs.gov
- Created By You can specify your particular group or division here, something more specific than your agency
- Description This should be a 1-3 sentence description of the content itself. This text is indexed by the syndication search engine
- Target Url If the content requires an additional link that is different than where the content is actually hosted, it can optionally be supplied here. This is a rather specific use case, and is most useful for other media types, such as infographic - where the source is the location of the image, and the target is a web page containing additional information about the topic.
- Custom Thumbnail Url The system will generate thumbnails for content automatically by rendering the extracted content in a virtual browser and taking a screenshot. This may or may not make an attractive image for your content. If you would like to supply your own thumbnail instead, provide a URL to it here (it will override the generated one).
- Custom Preview Url The system will generate preview images (large thumbnails) for content automatically by rendering the extracted content in a virtual browser and taking a screenshot. This may or may not make an attractive image for your content. If you would like to supply your own preview image instead, provide a URL to it here (it will override the generated one).
- Date Syndication Captured The date the content was added to the syndication system
- Date Syndication Updated The last time the content was modified in some way in the syndication engine
- Date Syndication Visible If the content should remain hidden from the storefront until a certain date, it can be set here. Any past dates mean the content will be visible - future dates mean content will be hidden until that date
- Date Content Authored If the authorship of the content is different than the date it was pushed to syndication and that is important for you to show, you can set that date here
- Date Content Updated The date the content was updated, regardless of when updates were made in syndication. For instance, if the content has remained unchanged since 2014, but you added new tags to the content in 2016, the Date Syndication Updated would be 2016, but you could maintain that the content itself is unchanged since Date Content Updated.
- Date Content Published If the date the content was first published (to the web, world, whatever) is something you need to keep track of, you can set it here
- Date Content Reviewed If you have some kind of an internal audit process or legal review or the like, and need to keep track of that date, you can do that here
- Active All content is active by default. If you deactivate it, it essentially disappears from the system without actually getting deleted.
- Visible in Storefront If you need content to exist in the system, and be available via API services, but don’t want it to appear in the HHS storefront, you can disable this checkbox.
- Manually Managed Content added to the system via the syndicationAdmin application will have this box enabled by default. It means the content entered the system by hand, and not from an automatic process. This will flag the content for nightly update checks. If this checkbox is disabled, the content will not try to update itself daily - rather it will wait for real-time updates from your CMS.
- External GUID If you have an external unique identifier, such as a CMS id, a real GUID, or something else, and would like to keep track of that here, you can.