Windows Server and IIS Configuration
- Windows Server 2008 or higher
- IIS 7.0 or higher
- SQL Server 2008 or higher
- Any version except SQL Compact Edition
- .Net Framework 4.5.2 or higher
- Windows Server 2012 or higher
- IIS 8.0 or higher
- SQL Server 2012 Standard Edition or higher
- .Net Framework 4.5.2 or higher
A full discussion of Windows Server and IIS configuration is far beyond the scope of this document, but here are the minimum steps you should perform to ensure your environment is capable of hosting TicketDesk.
-
Make sure your server has all of the windows updates installed.
-
Make sure you've installed the .Net Framework version 4.5.2. Windows Update does not automatically install the .Net Framework 4.5.2 on Windows Server, so you will need to install this manually. .
-
Add the web server role (IIS) through Server Manager, and include the minimum set of role features needed to host ASP.NET MVC web sites. Below is a screenshot showing the minimal server role features needed to host TicketDesk on Windows Server 2012. You may select different options depending on the needs of your environment.

There are two main ways to configure IIS to host a new application. Either host it in a separate IIS Web Site, or host it as a sub-application (virtual directory) within an existing site. Either approach is fine, though hosting as a separate IIS site will provides for better isolation and easier management.
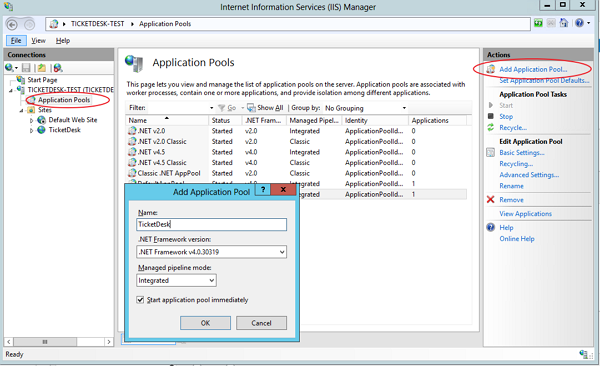
TicketDesk should be hosted in an Application Pool configured for Integrated Mode Pipeline, and the .Net 4.0 framework.
To create a new Application Pool for TicketDesk:
- Open the Internet Information Services (IIS) Manager
- In the connections pane, Expand your server node and click on Application Pools
- In the actions pane, click Add Application Pool
- In the Dialog:
- Type a name for the application pool
- Select .Net Framework 4.0.xxx
- Choose 'Integrated' mode pipeline
By default, your application pool will be configured to run under the ApplicationPoolIdentity user account. Though you can change the application pool to use a domain account, using the application pool identity is the recommended configuration.
Please keep the following in mind when working with application pool identities:
- You can assign file and folder permissions to the ApplicationPoolIdentity on the web server. The user name will be 'IIS AppPool<app pool name>'. For example, if the application pool is named 'TicketDesk', the user is 'IIS AppPool\TicketDesk'. This user name is only valid on the web server.
- The ApplicationPoolIdentity is a member of the local group '\Users'. You can assign permissions to this group instead of directly to the application pool user account.
- When connecting to a remote resource (a UNC fileshare, or SQL server) you will have to grant permissions to the remote resource to the machine account for the web server. This account takes the form of '<machinename>$'. For example: if the web server is part of the 'ExtraSpiffy' domain, and the web server's name is 'SpiffyWeb', then you can grant ACL permissions on remote servers to 'ExtraSpiffy\SpiffyWeb$'. You can use this as a SQL Login if you are using trusted connections.
See this article for more info on application pool identities
If you change the application pool identity to run under a different user account, please make sure the user is a member of the IIS_WPG group on the web server. You will also need to grant the user the 'logon as a service' right in local security policy.
This older article describes the steps, though the tools used will look and behave a bit differently on newer versions of Windows.
(coming soon)
(coming soon)
(coming soon)