Respond to card actions in Teams
Important
Content in this document has been moved to Teams platform documentation. Please do not refer to or update this document.
We appreciate your feedback, please report any issues to us here.
The Adaptive Card action handler feature enables the app to respond to adaptive card actions that triggered by end users to complete a sequential workflow. When user gets an Adaptive Card, it can provide one or more buttons in the card to ask for user's input, do something like calling some APIs, and then send another adaptive card in conversation to response to the card action.
In this tutorial you will learn:
Basic Concepts:
- What are Teams Bots
- Adaptive Card Universal Action
- Sequential Workflow Support in Adaptive Card Universal Action
Get started with Teams Toolkit and TeamsFx SDK:
- How to create a workflow bot
- How to understand the workflow bot project
- How to understand the card action handler
Customize the scaffolded app template:
- How to customize the initialization
- How to customize the installation
- How to customize the command logic
- How to customize your app to add more actions and responses
- How to customize the action response
- How to create user specific view
Connect your app with Graph or other APIs:
- How to access Microsoft Graph from your workflow bot
- How to connect to existing APIs from your workflow bot
Extend workflow bot to other bot scenarios:
- From Teams Toolkit sidebar click
Create a new Teams appor selectTeams: Create a new Teams appfrom command palette.

- Select
Bot.

- Select the
Sequential Workflow in Chatfrom Scenario-based Teams app section.

- Select programming language.

- Enter an application name and then press enter.

- If you prefer interactive mode, execute
teamsfx newcommand, then use the keyboard to go through the same flow as in Visual Studio Code. - If you prefer non-interactive mode, enter all required parameters in one command.
teamsfx new --interactive false --capabilities "workflow-bot" --programming-language "typescript" --folder "./" --app-name myWorkflowBot
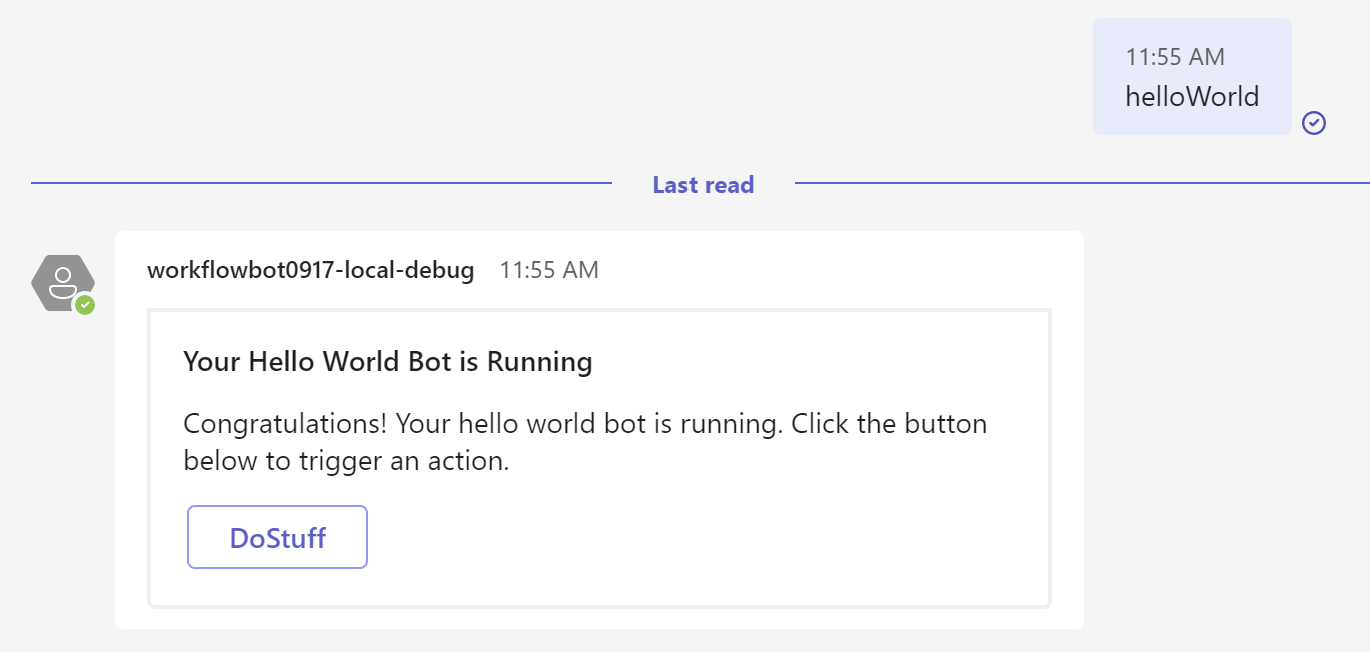
After you successfully created the project, you can quickly start local debugging via F5 in VSCode. Select Debug (Edge) or Debug (Chrome) debug option of your preferred browser. You can send a helloWorld command after running this template and get a response as below:
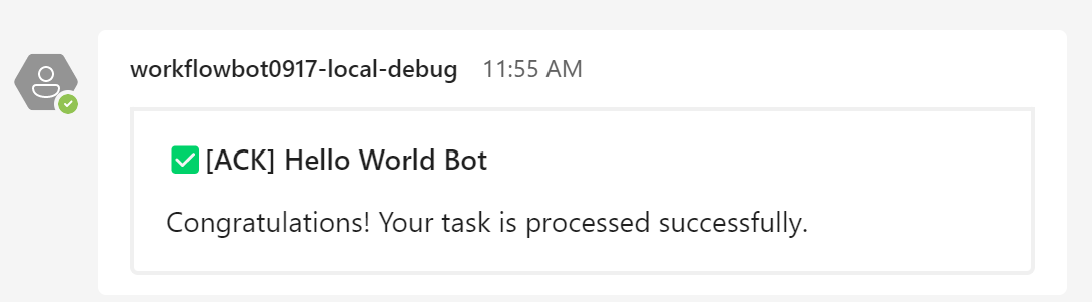
Then you can click the DoStuff button to invoke the action, and you will receive the following updated adaptive card:
The created app is a normal TeamsFx project that will contain following folders:
| Folder / File | Contents |
|---|---|
teamsapp.yml |
Main project file describes your application configuration and defines the set of actions to run in each lifecycle stages |
teamsapp.local.yml |
This overrides teamsapp.yml with actions that enable local execution and debugging |
env/ |
Name / value pairs are stored in environment files and used by teamsapp.yml to customize the provisioning and deployment rules |
.vscode/ |
VSCode files for debugging |
appPackage/ |
Templates for the Teams application manifest |
infra/ |
Templates for provisioning Azure resources |
src/ |
The source code for the application |
The following files under src/ folder provide the business logic for the workflow bot. These files can be updated to fit your business logic requirements. The default implementation provides a starting point to help you get started:
| File | Contents |
|---|---|
src/index.js(ts) |
Application entry point and restify handlers for the Workflow bot |
src/teamsBot.js(ts) |
An empty teams activity handler for bot customization |
src/commands/helloworldCommandHandler.js(ts) |
Implementation that handles responding to a chat command |
src/cardActions/doStuffActionHandler.js(ts) |
Implements the handler for the doStuff button displayed in the Adaptive Card |
src/adaptiveCards/helloworldCommandResponse.json |
Defines the Adaptive Card (UI) that is displayed in response to a chat command |
src/adaptiveCards/doStuffActionResponse.json |
A generated Adaptive Card that is sent to Teams for the response of "doStuff" action |
| File name | Contents |
|---|---|
teamsapp.yml |
Main project file describes your application configuration and defines the set of actions to run in each lifecycle stages |
teamsapp.local.yml |
This overrides teamsapp.yml with actions that enable local execution and debugging |
appPackage/ |
Templates for the Teams application manifest |
infra/ |
Templates for provisioning Azure resources |
Properties/ |
LaunchSetting file for local debug |
Controllers/ |
BotController and NotificationControllers to handle the conversation with user |
Commands/ |
Define the commands and how your Bot will react to these commands |
CardActions/ |
Define the adaptiveCard action handlers to respond to Action.Execute card action |
Models/ |
Adaptive card data models |
Resources/ |
Adaptive card templates |
appsettings.*.json |
The runtime settings |
GettingStarted.txt |
Instructions on minimal steps to wonderful |
Program.cs |
Create the Teams Bot instance |
TeamsBot.cs |
An empty Bot handler |
To simplify the development, the TeamsFx SDK provides an adaptive card action handler (TeamsFxAdaptiveCardActionHandler) to let developers only focus on the development of business logic to respond to the card action without learning the Bot Framework SDK.
The following diagram illustrated how to respond to a adaptive card action with TeamsFx SDK:
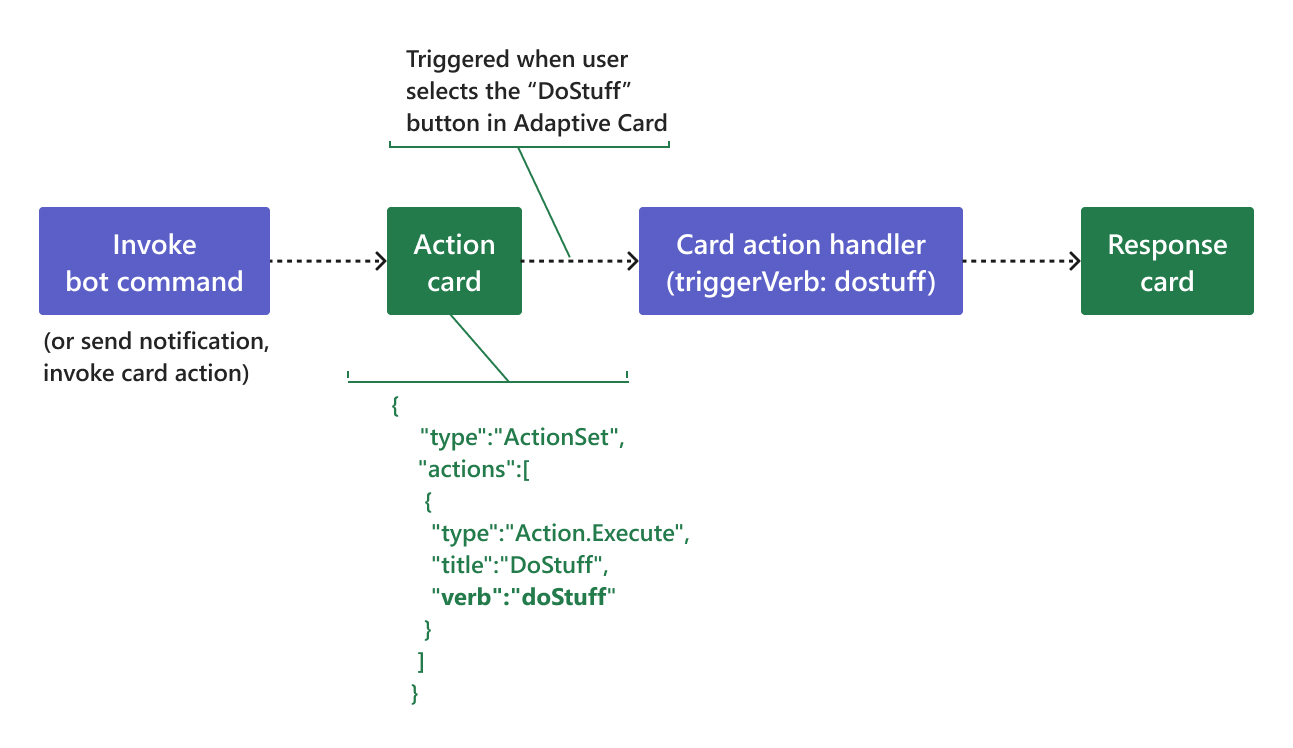
-
Action Card: the card where you define your action that users can invoke (click button). -
Response Card: the card to respond to the action when user invoke it from the action card. -
Card Action Handler: triggered when user invoke the corresponding card action (itstriggerVerbis same as theverbproperty in adaptive card action). And it will send a response card to respond to the action.
To handle card actions with TeamsFx SDK, each card action handler should implement TeamsFxAdaptiveCardActionHandler interface. Below is the interface definition for TeamsFxAdaptiveCardActionHandler:
export interface TeamsFxAdaptiveCardActionHandler {
    /**
     * The verb defined in adaptive card action that can trigger this handler.
     */
    triggerVerb: string;

    /**
     * Specify the behavior for how the card response will be sent in Teams conversation.
     * The default value is `AdaptiveCardResponse.ReplaceForInteractor`, which means the card
     * response will replace the current one only for the interactor.
     */
    adaptiveCardResponse?: AdaptiveCardResponse;

    /**
     * The handler function that will be invoked when the action is fired.
     * @param context The turn context.
     * @param actionData The contextual data that associated with the action.
     */
    handleActionInvoked(context: TurnContext, actionData: any): Promise<InvokeResponse>;
}The default initialization is located in bot/src/internal/initialize.js(ts).
You can update the initialization logic to:
- Set
options.adapterto use your ownBotFrameworkAdapter - Set
options.command.commandsto include more command handlers - Set
options.cardAction.actionsto include more action handlers - Set
options.{feature}.enabledto enable moreConversationBotfunctionality
To learn more, visit additional initialization customizations.
A Teams bot can be installed into a team, or a group chat, or as personal app, depending on difference scopes. You can choose the installation target when adding the App.
-
See Distribute your app for more install options.
-
See Remove an app from Teams for uninstallation.
The default command logic simply returns a hard-coded Adaptive Card. You can customize this logic with your customize business logic. Often your business logic might require you to call your existing APIs.
Teams Toolkit enables you to easily connect to an existing API.
You can use the following 4 steps to add more card action:
- Step 1: add an action to your Adaptive Card
- Step 2: add adaptive card for action response
- Step 3: add action handler
- Step 4: register the action handler
Use universal action Action.Execute to define your action in an adaptive card, which will be rendered as a button in the card.
Here's a sample Action.Executeaction:
{
  "type": "AdaptiveCard",
  "body": [
    ...
    {
      "type": "ActionSet",
      "actions": [
        {
          "type": "Action.Execute",
          "title": "DoSomething",
          "verb": "doSomething"
        }
      ]
    },
    ...
  ]
}
Specifying the type as Action.Execute to define an universal action in the base card. User can click the button to perform some business task in Teams chat. Learn more about Adaptive Card Universal Actions in the documentation.
NOTE: the
verbproperty is required here so that the TeamsFx conversation SDK can invoke the corresponding action handler when the action is invoked in Teams. You should provide a global unique string for theverbproperty, otherwise you may experience unexpected behavior if you're using a general string that might cause a collision with other bot actions.
For each action, you can display a new Adaptive Card as a response to the user. Create a new file doSomethingResponse.json to use as a response for the DoSomething action created in the previous step:
- For TS/JS: create the adaptive card file in
src/adaptiveCards/folder. - For CSharp: create the adaptive card file in
Resources/folder.
{
  "type": "AdaptiveCard",
  "body": [
    {
      "type": "TextBlock",
      "size": "Medium",
      "weight": "Bolder",
      "text": "A sample response to DoSomething."
    }
  ],
  "$schema": "http://adaptivecards.io/schemas/adaptive-card.json",
  "version": "1.4"
}
You can use the Adaptive Card Designer to help visually design your Adaptive Card UI.
You can handle a new action by Adaptive Card with TeamsFx SDK's class TeamsFxAdaptiveCardActionHandler. You need to customize the action in this step, such as calling an API, processing data, or any other action as per your business need.
You can create a new file /src/cardActions/doSomethingActionHandler.js(ts):
/** JavaScript **/
const { AdaptiveCards } = require("@microsoft/adaptivecards-tools");
const { AdaptiveCardResponse, InvokeResponseFactory } = require("@microsoft/teamsfx");
const responseCard = require("../adaptiveCards/doSomethingResponse.json");

class DoSomethingActionHandler {
  triggerVerb = "doSomething";

  async handleActionInvoked(context, message) {
    const responseCardJson = AdaptiveCards.declare(responseCard).render(actionData);
    return InvokeResponseFactory.adaptiveCard(responseCardJson);
  }
}

module.exports = {
  DoSomethingActionHandler,
};
/** TypeScript **/
const { AdaptiveCards } = require("@microsoft/adaptivecards-tools");
const { AdaptiveCardResponse, InvokeResponseFactory } = require("@microsoft/teamsfx");
const responseCard = require("../adaptiveCards/doSomethingResponse.json");
export class DoSomethingActionHandler {
triggerVerb = "doSomething";
async handleActionInvoked(context, message) {
const responseCardJson = AdaptiveCards.declare(responseCard).render(actionData);
return InvokeResponseFactory.adaptiveCard(responseCardJson);
}
}You can handle a new Action.Execute action invoked by implementing the TeamsFx SDK's interface IAdaptiveCardActionHandler. You need to customize the action in this step, such as calling an API, processing data, or any other action as per your business need.
You can create a new file /CardActions/DoSomethingActionHandler.cs:
using MyBotApp.Models;
using AdaptiveCards.Templating;
using Microsoft.Bot.Builder;
using Microsoft.TeamsFx.Conversation;
using Newtonsoft.Json;

namespace MyBotApp.CardActions
{
    public class DoStuffActionHandler : IAdaptiveCardActionHandler
    {
        private readonly string _responseCardFilePath = Path.Combine(".", "Resources", "doSomethingActionResponse.json");

        /// <summary>
        /// A global unique string associated with the `Action.Execute` action.
        /// The value should be the same as the `verb` property which you define in your adaptive card JSON.
        /// </summary>
        public string TriggerVerb => "doSomething";

        /// <summary>
        /// Indicate how your action response card is sent in the conversation.
        /// By default, the response card can only be updated for the interactor who trigger the action.
        /// </summary>
        public AdaptiveCardResponse AdaptiveCardResponse => AdaptiveCardResponse.ReplaceForInteractor;

        public async Task<InvokeResponse> HandleActionInvokedAsync(ITurnContext turnContext, object actionData, CancellationToken cancellationToken = default)
        {
            // Read adaptive card template
            var cardTemplate = await File.ReadAllTextAsync(_responseCardFilePath, cancellationToken);

            // Render adaptive card content
            var cardContent = new AdaptiveCardTemplate(cardTemplate).Expand
            (
                new HelloWorldModel
                {
                    Title = "Hello World Bot",
                    Body = $"Congratulations! Your {TriggerVerb} action is processed successfully!",
                }
            );

            // Send invoke response with adaptive card
            return InvokeResponseFactory.AdaptiveCard(JsonConvert.DeserializeObject(cardContent));
        }
    }
}
Please note:
The
triggerVerbis theverbproperty of your action.The
actionDatais the data associated with the action, which may include dynamic user input or some contextual data provided in thedataproperty of your action.If an Adaptive Card is returned, then the existing card will be replaced with it by default.
You can follow this section to customize the how the response card was sent in Teams chat.
Each adaptive card action handler needs to be registered in the ConversationBot so that it can handle the action invokes.
/** JavaScript / TypeScript **/
const { BotBuilderCloudAdapter } = require("@microsoft/teamsfx");
const ConversationBot = BotBuilderCloudAdapter.ConversationBot;

const conversationBot = new ConversationBot({
  ...
  cardAction: {
    enabled: true,
    actions: [
      new DoStuffActionHandler(),
      new DoSomethingActionHandler()    // newly added doSomething card action handler
    ],
  }
});
/** CSharp **/
...
builder.Services.AddSingleton<DoStuffActionHandler>();
builder.Services.AddSingleton<DoSomethingActionHandler>(); // Register new action handler to the service container
builder.Services.AddSingleton(sp =>
{
var options = new ConversationOptions()
{
Adapter = sp.GetService<CloudAdapter>(),
...
CardAction = new CardActionOptions()
{
Actions = new List<IAdaptiveCardActionHandler>
{
sp.GetService<DoStuffActionHandler>(),
sp.GetService<DoSomethingActionHandler>(), // Register new action handler to ConversationBot
}
}
...
};
return new ConversationBot(options);
});You can use the adaptiveCardResponse property in handler to customize how the bot send the adaptive card to users. There're 3 options to customize:
-
AdaptiveCardResponse.ReplaceForInteractor: this is the default behavior. The response card will be replaced the current one (the card where the button is defined) for the interactor who trigger the action. And user users in the conversation still view the original action card.
-
AdaptiveCardResponse.ReplaceForAll: The response card will be replaced the action card, and all users in the chat can view this response card.
-
AdaptiveCardResponse.NewForAll: The response card will be sent as a separate message in the conversation that won't replace the action card. And all users in the chat view this card response.
Instead of using adaptive card for card action response, you can simply respond with a text message using InvokeResponseFactory.textMessage:
async handleActionInvoked(context: TurnContext, actionData: any): Promise<InvokeResponse> {
    return InvokeResponseFactory.textMessage("This is a sample card action response!");
}
The response message will be rendered in Teams as below:

For some case you may want to return error response to the client. Then you can leverage the InvokeResponseFactory.errorResponse to build your invoke response, for example:
async handleActionInvoked(context: TurnContext, actionData: any): Promise<InvokeResponse> {
    return InvokeResponseFactory.errorResponse(StatusCodes.BAD_REQUEST, "You input is invalid!");
}
The response message will be rendered in Teams as below:

Note: for more details about the invoke response format, you can refer to this document.
You can edit the file src/adaptiveCards/helloworldCommand.json to customize the Adaptive Card to your preference. The file src/cardModels.ts defines a data structure that is used to fill data for the Adaptive Card.
The binding between the model and the Adaptive Card is done by name matching (for example,CardData.title maps to ${title} in the Adaptive Card). You can add, edit, or remove properties and their bindings to customize the Adaptive Card to your needs.
You can also add new cards if appropriate for your application. Please follow this sample to see how to build different types of adaptive cards with a list or a table of dynamic contents using ColumnSet and FactSet.
Earlier if Adaptive Cards were sent in a Teams channel / group chat, all users would see the exact same card content. With the introduction of refresh model for Adaptive Cards Universal Action, User Specific Views can be provided to users. In this way, the same Adaptive Card can now refresh to a User Specific Adaptive Card. It provides powerful scenarios like approvals, poll creator controls, ticketing, incident management, and project management cards.
The following diagram illustrated how to provide user-specific view with refresh model:
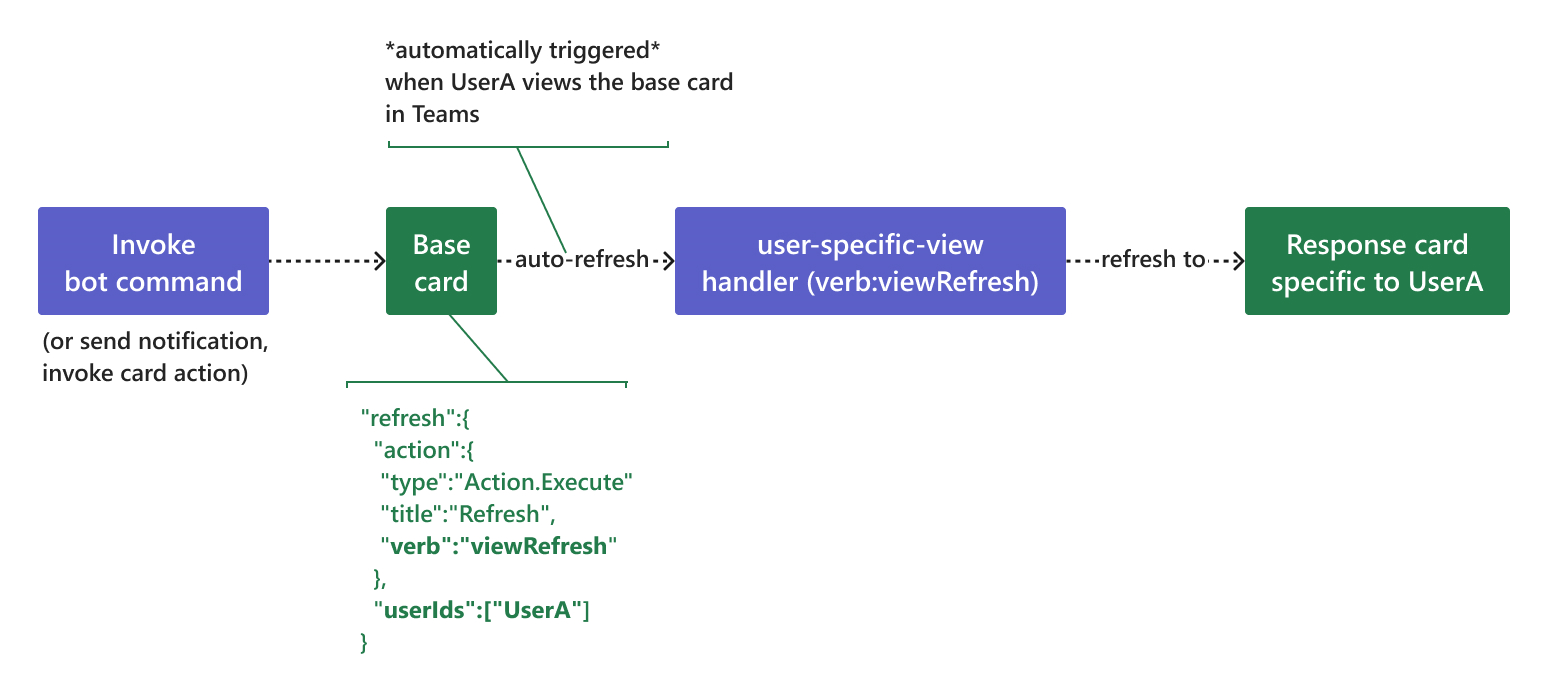
-
Base card: The bot sends the message with the base version of the card. This base card can be sent as a bot notification, or command response, or any card action response. All members of the conversation can view the same. The base card will be automatically refreshed to the users defined inuserIdsin therefreshproperty of the base card. -
Refresh behavior: Teams clients will automatically trigger a refresh when a user views the message and the last refresh response is older than a minute. The user-specific view handler will be invoked to return a card view (Response Card) for specific user (UserA). And for other users in the conversation, they still view the base card.
The following gif illustrated how user-specific views shows in Teams:

Below are the steps to implement this pattern with TeamsFx SDK.
- Step 1: enable refresh in a base adaptive card
- Step 2: add use-specific adaptive cards
- Step 3: add card action handler to refresh views
- Step 4: register the action handler
The user-specific views are refreshed from a base card, when response card is refreshed from the base card, as illustrated in the auto-refresh user-specific view. You need to enable auto-refresh on the base card. There are two options to achieve this:
Option 1: enable user-specific view refresh with SDK
The base card can be sent as a command response or a card action response. So you can enable user-specific view refresh in a handleCommandReceived of a command handler, or in a handleActionInvoked of a card action handler where the base card iss returned.
Below is a sample that a return a case card as a command response that can auto-refresh to specific user (e.g. the command sender).
You can use the refresh(refreshVerb, userIds, data) method from the @microsoft/adaptivecards-tools library to inject a refresh section into your base card and need to provide the following info to define the refresh section:
-
userIds: a set of user MRIs for who can trigger auto refresh. For more information on how to add in userIds list in refresh section of Adaptive Card, see fetch roster or user profile. -
verb: a string to identify the refresh action. -
data: an optional data to associated with the refresh action.
import baseCard from "../adaptiveCards/baseCard.json";
import { AdaptiveCards } from "@microsoft/adaptivecards-tools";

export class HelloWorldCommandHandler implements TeamsFxBotCommandHandler {
  triggerPatterns: TriggerPatterns = "helloWorld";

  async handleCommandReceived(
    context: TurnContext,
    message: CommandMessage
  ): Promise<string | Partial<Activity> | void> {
    const refreshVerb = "userViewRefresh";        // verb to identify the refresh action
    const userIds = [ context.activity.from.id ]; // users who will be refreshed
    const data = { key: "value"};                 // optional data associated with the action

    const responseCard = AdaptiveCards
        .declare(baseCard)
        .refresh(refreshVerb, userIds, data)
        .render(cardData);

    return MessageFactory.attachment(CardFactory.adaptiveCard(responseCard));
  }
}
Option 2: enable user-specific view refresh in your adaptive card
Here's the sample refresh action defined in baseCard.json:
{
  "type": "AdaptiveCard",
  "refresh": {
    "action": {
      "type": "Action.Execute",
      "title": "Refresh",
      "verb": "userViewRefresh" ,
      "data": {
        "key": "value"
      }
    },
    "userIds": [
      "${userID}"
    ]
  },
  "body": [
    ...
  ],
  ...
}
You need to replace ${userID} with user MRI in code when rendering your card content.
You need to design the user-specific Adaptive Card to refresh a specific response card such as refreshResponse.json for userA shown in the diagram for refresh behavior.
- For TS/JS: create the adaptive card file in
src/adaptiveCards/folder. - For CSharp: create the adaptive card file in
Resources/folder.
{
  "type": "AdaptiveCard",
  "body": [
    {
      "type": "TextBlock",
      "size": "Medium",
      "weight": "Bolder",
      "text": "This is a user-specific view"
    }
  ],
  "$schema": "http://adaptivecards.io/schemas/adaptive-card.json",
  "version": "1.4"
}Add an action handler that implements TeamsFxAdaptiveCardActionHandler to process the refresh invoke activity which is automatically triggered in Teams. You can create a new file /src/cardActions/refreshActionHandler.js(ts):
/** JavaScript **/
const { AdaptiveCards } = require("@microsoft/adaptivecards-tools");
const { AdaptiveCardResponse, InvokeResponseFactory } = require("@microsoft/teamsfx");
const responseCard = require("../adaptiveCards/refreshResponse.json");

class RefreshActionHandler {
  triggerVerb = "userViewRefresh";

  async handleActionInvoked(context: TurnContext, actionData: any): Promise<InvokeResponse> {
      /**
       * If you have multiple userIds defined in your refresh action, for example: userIds: [ "<UserA>", "<userB>" ] ,
       * and you can return different card response for those users respectively with the following code sample.

        const currentUserId = context.activity.from.id;
        switch (currentUserId) {
          case "<userA's id>":
            const card1 = AdaptiveCards.declare(card1).render(actionData);
            return InvokeResponseFactory.adaptiveCard(card1);
          case "<userB's id>":
            const card1 = AdaptiveCards.declare(card2).render(actionData);
            return InvokeResponseFactory.adaptiveCard(card2);
        }
     */
      const responseCardJson = AdaptiveCards.declare(responseCard).render(actionData);
      return InvokeResponseFactory.adaptiveCard(responseCardJson);
    }
}

module.exports = {
  RefreshActionHandler,
};
/** TypeScript **/
const { AdaptiveCards } = require("@microsoft/adaptivecards-tools");
const { AdaptiveCardResponse, InvokeResponseFactory } = require("@microsoft/teamsfx");
const responseCard = require("../adaptiveCards/refreshResponse.json");
export class RefreshActionHandler {
triggerVerb = "userViewRefresh";
async handleActionInvoked(context: TurnContext, actionData: any): Promise<InvokeResponse> {
/**
* If you have multiple userIds defined in your refresh action, for example: userIds: [ "<UserA>", "<userB>" ] ,
* and you can return different card response for those users respectively with the following code sample.
const currentUserId = context.activity.from.id;
switch (currentUserId) {
case "<userA's id>":
const card1 = AdaptiveCards.declare(card1).render(actionData);
return InvokeResponseFactory.adaptiveCard(card1);
case "<userB's id>":
const card1 = AdaptiveCards.declare(card2).render(actionData);
return InvokeResponseFactory.adaptiveCard(card2);
}
*/
const responseCardJson = AdaptiveCards.declare(responseCard).render(actionData);
return InvokeResponseFactory.adaptiveCard(responseCardJson);
}
}You can handle a new refresh action by implementing the TeamsFx SDK's interface IAdaptiveCardActionHandler. You need to customize the action in this step, such as calling an API, processing data, or any other action as per your business need.
You can create a new file /CardActions/RefreshActionHandler.cs:
using MyBotApp.Models;
using AdaptiveCards.Templating;
using Microsoft.Bot.Builder;
using Microsoft.TeamsFx.Conversation;
using Newtonsoft.Json;

namespace MyBotApp.CardActions
{
    public class RefreshActionHandler : IAdaptiveCardActionHandler
    {
        private readonly string _responseCardFilePath = Path.Combine(".", "Resources", "refreshActionResponse.json");

        /// <summary>
        /// A global unique string associated with the `Action.Execute` action.
        /// The value should be the same as the `verb` property which you define in your adaptive card JSON.
        /// </summary>
        public string TriggerVerb => "userViewRefresh";

        /// <summary>
        /// Indicate how your action response card is sent in the conversation.
        /// By default, the response card can only be updated for the interactor who trigger the action.
        /// </summary>
        public AdaptiveCardResponse AdaptiveCardResponse => AdaptiveCardResponse.ReplaceForInteractor;

        public async Task<InvokeResponse> HandleActionInvokedAsync(ITurnContext turnContext, object actionData, CancellationToken cancellationToken = default)
        {
            // Read adaptive card template
            var cardTemplate = await File.ReadAllTextAsync(_responseCardFilePath, cancellationToken);

            // Render adaptive card content
            var cardContent = new AdaptiveCardTemplate(cardTemplate).Expand
            (
                new HelloWorldModel
                {
                    Title = "Hello World Bot",
                    Body = $"Congratulations! You're refreshed to a user-specific view!",
                }
            );

            // Send invoke response with adaptive card
            return InvokeResponseFactory.AdaptiveCard(JsonConvert.DeserializeObject(cardContent));
        }
    }
}Register the refresh action handler in bot/src/internal/initialize.js(ts):
/** JavaScript / TypeScript **/
const { BotBuilderCloudAdapter } = require("@microsoft/teamsfx");
const ConversationBot = BotBuilderCloudAdapter.ConversationBot;

const conversationBot = new ConversationBot({
  ...
  cardAction: {
    enabled: true,
    actions: [
      new DoStuffActionHandler(),
      new RefreshActionHandler()    // newly added doSomething card action handler
    ],
  }
});
/** CSharp **/
...
builder.Services.AddSingleton<DoStuffActionHandler>();
builder.Services.AddSingleton<RefreshActionHandler>(); // Register new action handler to the service container
builder.Services.AddSingleton(sp =>
{
var options = new ConversationOptions()
{
Adapter = sp.GetService<CloudAdapter>(),
...
CardAction = new CardActionOptions()
{
Actions = new List<IAdaptiveCardActionHandler>
{
sp.GetService<DoStuffActionHandler>(),
sp.GetService<RefreshActionHandler>(), // Register new action handler to ConversationBot
}
}
...
};
return new ConversationBot(options);
});If you are responding to a command that needs access to Microsoft Graph, you can leverage single sign on to leverage the logged-in Teams user token to access their Microsoft Graph data. Read more about how Teams Toolkit can help you add SSO to your application.
Often you need to connect to existing APIs in order to retrieve data to send to Teams. Teams Toolkit makes it easy for you to configure and manage authentication for existing APIs.
For more information, click here.
The notification feature adds the ability for your application to send Adaptive Cards in response to external events. For example, when a message is posted to Event Hub your application can respond and send an appropriate Adaptive Card to Teams.
To add the notification feature:
-
Go to
bot\src\internal\initialize.js(ts) -
Update your
conversationBotinitialization to enable notification feature:const conversationBot = new ConversationBot({ ... cardAction: { enabled: true, actions: [ new Handler1() ], }, notification: { enabled: true } });
-
To quickly add a sample notification triggered by a HTTP request, you can add the following sample code in
bot\src\index.js(ts):server.post("/api/notification", async (req, res) => { for (const target of await conversationBot.notification.installations()) { await target.sendMessage("This is a sample notification message"); } res.json({}); });
-
Uninstall your previous bot installation from Teams, and press
F5to start your application. -
Send a notification to the bot installation targets (channel/group chat/personal chat) by using a your favorite tool to send a HTTP POST request to
https://localhost:3978/api/notification.
To learn more, refer to the notification document.
The default workflow bot comes with command and response, you can follow this document to add more command and responses.