v5 migration guide
Microsoft Azure is retiring the classic Application Insights in Azure Monitor on 29 February 2024. Please refer to this article for more details. The below steps will help you create a new Log Analytics workspace within the existing resource group where Company Communicator has been deployed and migrate to the workspace-based App Insights. If you have deployed Company Communicator v5.5 or below within your tenant, please follow the below steps to migrate to the workspace-based App Insights:
Note: This approach applies only if your tenant is Commercial or GCC.This will not work for GCC-H or DoD tenants.
Install Azure CLI to upgrade classic app insight to workplace based app insight. Please refer this link.
Download the whole solution folder from GitHub
-
Unzip the Content to a folder. (say companyCommunicator)
-
Open a PowerShell window in administrator mode and navigate to the folder where you unzipped the content.
-
Navigate to Deployment folder.
cd microsoft-teams-apps-company-communicator-main\Deployment -
Run the below command. This will allow you to run applicationinsights-migration.ps1. By default, the execution policy is restricted. You may change it to back restricted after deployment is completed.
Set-ExecutionPolicy -ExecutionPolicy RemoteSigned -
Run the below command to unblock the deployment script.
Unblock-File -Path .\applicationinsights-migration.ps1
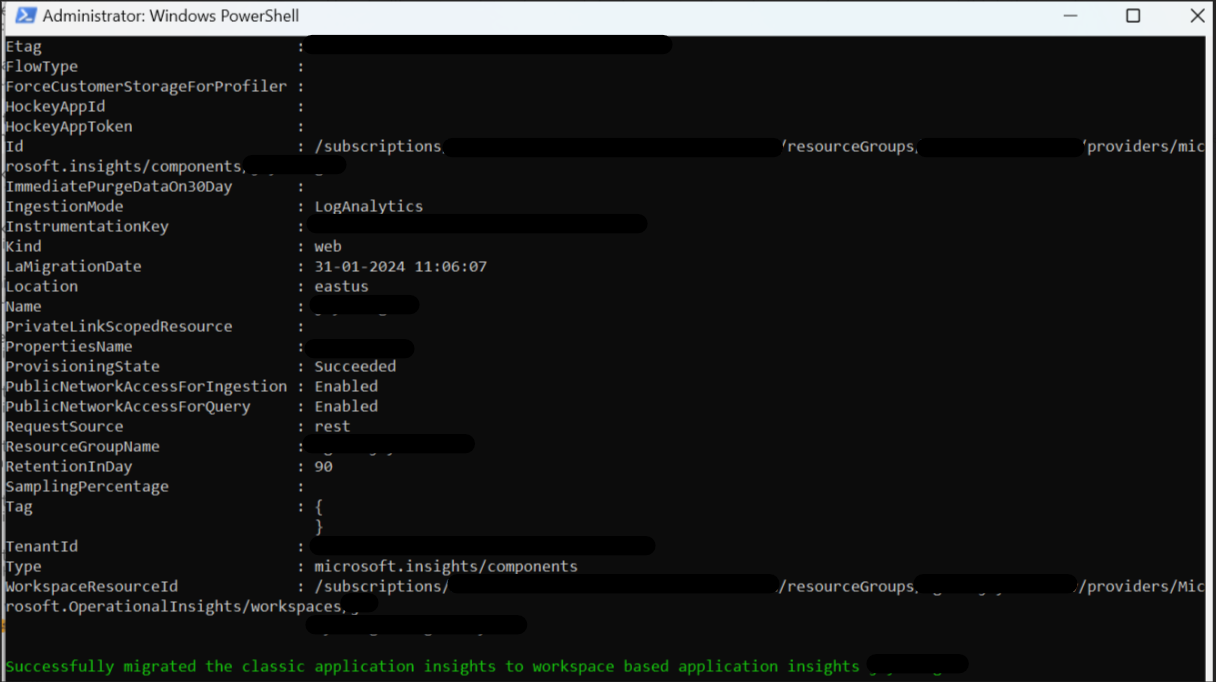
- Execute the
applicationinsights-migration.ps1script in the PowerShell window:.\applicationinsights-migration.ps1 - During execution of script you will be asked to provide below input parameters,
- Subscription Id : Please enter the subscription id of the resources where Company Communicator deployed.
- Resource Group Name : Please enter the resource group name where the previous resources were created.
- Base Resource Name : Please enter the base resource name used in the previous deployment. Base resource name is same as the app service name.
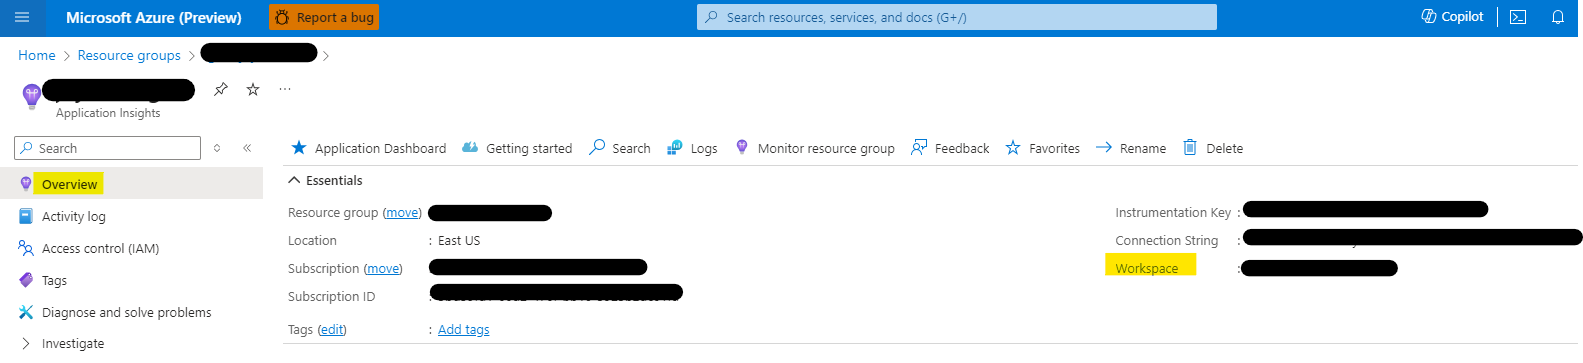
- Go to portal.azure.com. Navigate to resource group where all CC resources are deployed.
- Click on the App Insights -> Click on Overview
Note: This approach applies to Commercial, GCC, GCC-H & DoD tenants.
For the migration of classic app insights to workspace-based app insights has a prerequisite of creating a new log analytics workspace resource. Please follow the below steps to create a new log analytics workspace resource and migrate to workspace-based app insights.
- Go to portal.azure.com. Navigate to resource group where all CC resources are deployed.
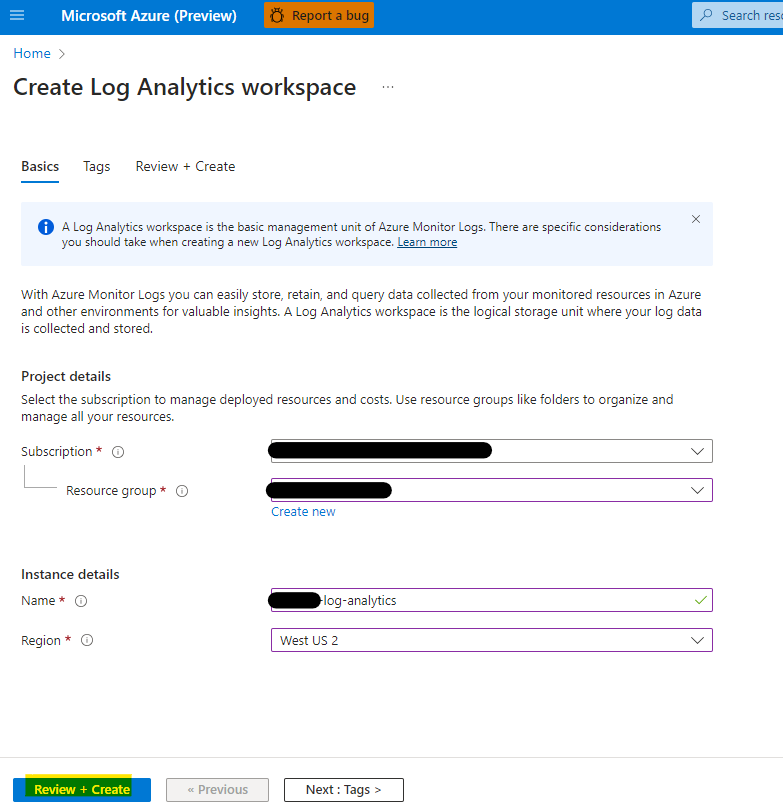
- Click on Create -> Search for Log Analytics workspace -> Click on Create
- Enter the below details and click on Review + Create
- Subscription : Select the subscription where all CC resources are deployed.
- Resource Group : Select the resource group where all CC resources are deployed.
- Workspace Name : Enter the name of the workspace (preferably same as the "[BaseResourceName]-log-analytics")
- Region : Select the region where all CC resources are deployed.
- Pricing tier : A default pricing tier of pay-as-you-go (Per GB 2018) is applied. No charges will be incurred until you start collecting enough data.
-
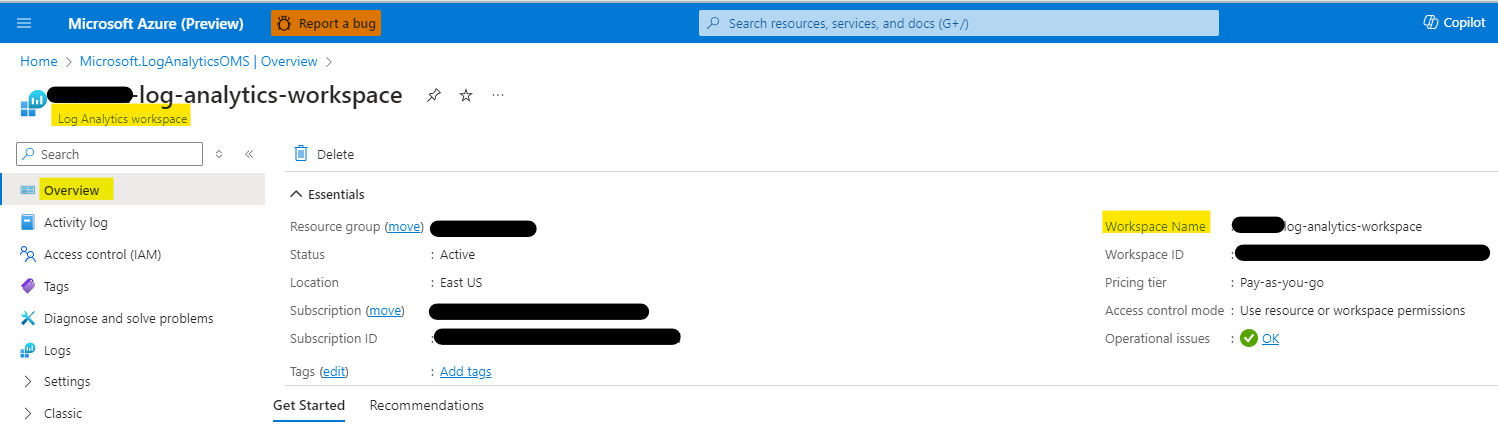
The log analytics workspace resource will be created. Please note down the workspace name from the overview page of the resource
-
Note: Please make sure that the workspace name is same as the "[BaseResourceName]-log-analytics"
-
Now, browse to the application insights resource within CC deployed resource group.
-
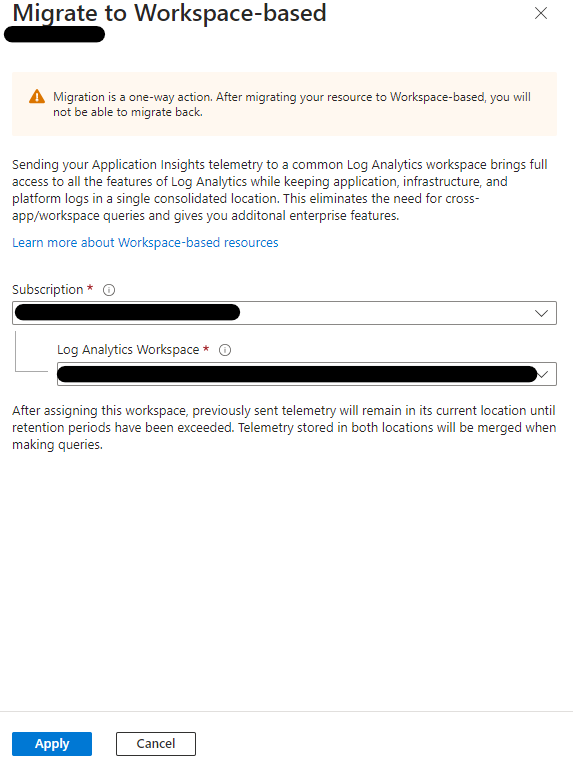
Browse to properties from left hand side menu and click on Migrate to Workspace-based.
-
Select the option of Migrate to Worksapce-based.
-
Select the subscription and the workspace name of the newly created log analytics workspace resource.
-
Click on Apply
-
The application insights resource will be migrated to workspace-based app insights.
If you have CC v5.0, v5.1 or v5.2 deployed and plan to migrate to the latest version, please perform the following steps:
-
Download the whole solution folder from GitHub
-
Unzip the Content to a folder. (say companyCommunicator)
-
Open a PowerShell window in administrator mode and navigate to the folder where you unzipped the content.
-
Navigate to Deployment folder.
cd microsoft-teams-apps-company-communicator-main\Deployment -
Run the below command. This will allow you to run dotnet6-migration.ps1. By default, the execution policy is restricted. You may change it to back restricted after deployment is completed.
Set-ExecutionPolicy -ExecutionPolicy RemoteSigned -
Run the below command to unblock the deployment script.
Unblock-File -Path .\dotnet6-migration.ps1
- Open a PowerShell window in administrator mode and navigate to Deployment folder
cd microsoft-teams-apps-company-communicator-main\Deployment - Execute the
dotnet6-migration.ps1script in the Powershell window:.\dotnet6-migration.ps1 - During execution of script you will be asked to provide below input parameters,
- Subscription Id : Please enter the subscription id of the resources where Company Communicator deployed.
- Resource Group Name : Please enter the resource group name where the previous resources were created.
- Base Resource Name : Please enter the base resource name used in the previous deployment. Base resource name is same as the app service name.

- Go to portal.azure.com. Navigate to resource group where all CC resources are deployed.
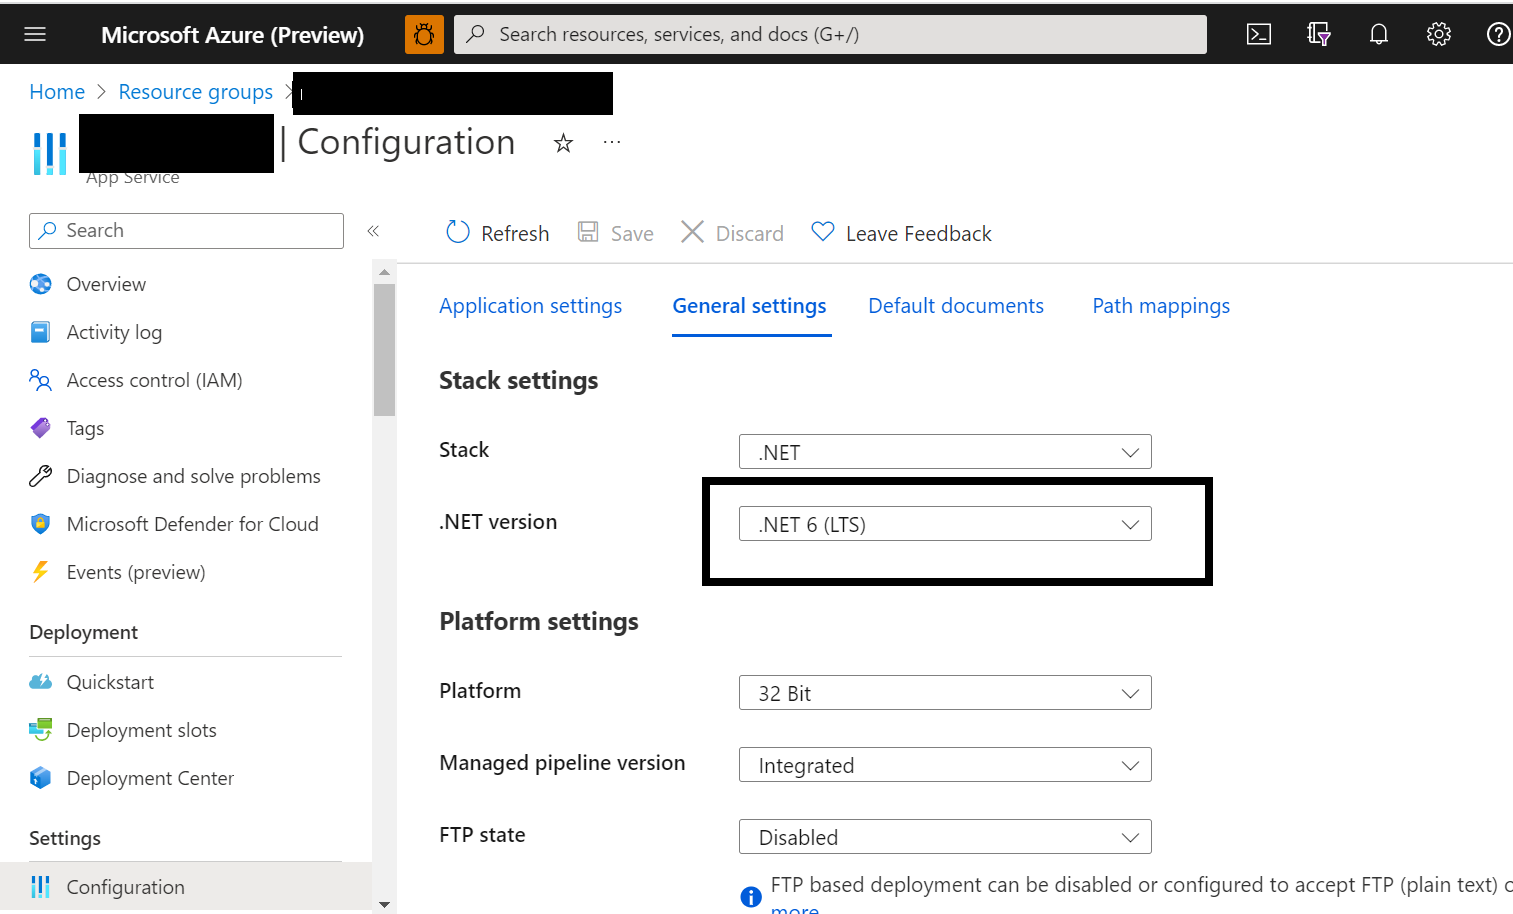
- Click on the App service -> Click on Configuration -> Click on General Settings
- Check and confirm the .NET version to be .NET 6 (LTS)
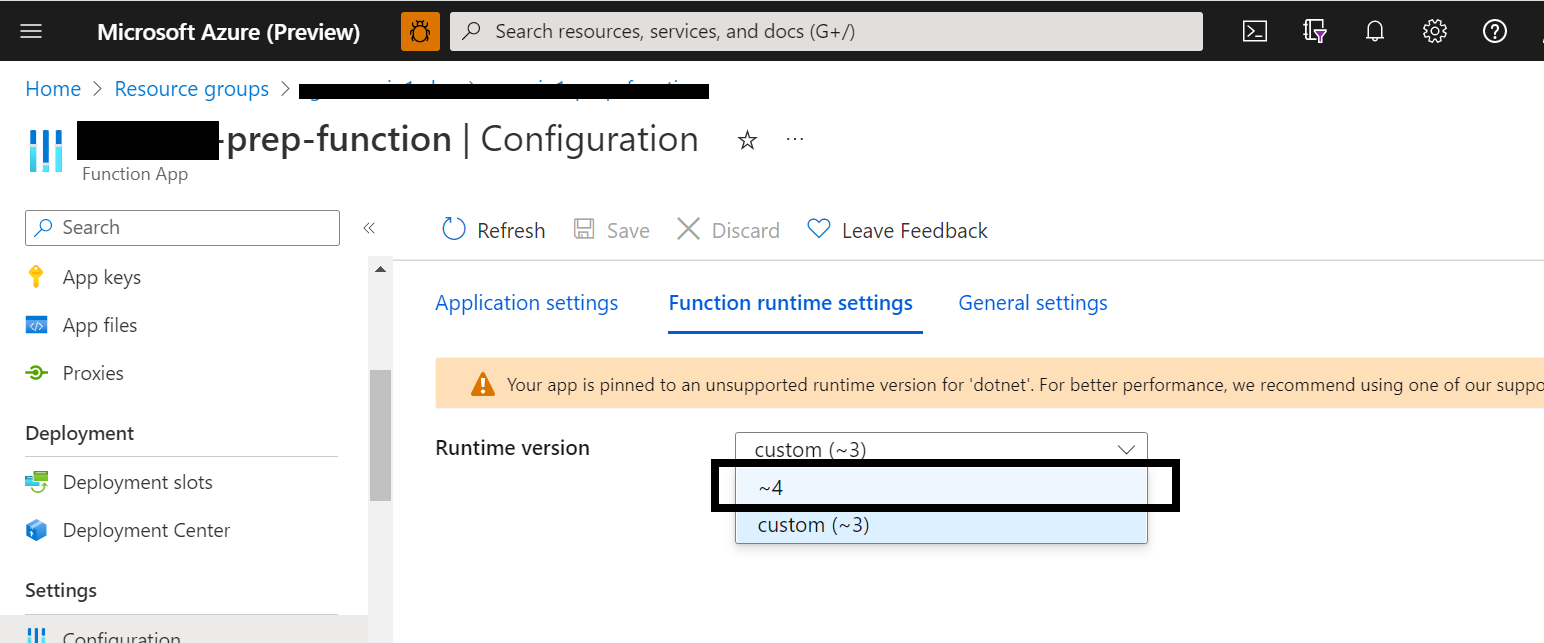
- Click on *-prep-function -> Click on Configuration -> Click on Function runtime settings.
- Select the runtime version to be ~4. Similary select for *-function and *-data-function.
-
Go to app service --> Configuration--> Click on New application setting and add below name and values. You can update the value for the header text and the header image as per your organization needs.
- REACT_APP_HEADERTEXT : Company Communicator
- REACT_APP_HEADERIMAGE : https://raw.githubusercontent.com/OfficeDev/microsoft-teams-company-communicator-app/main/Source/CompanyCommunicator/ClientApp/src/assets/Images/mslogo.png
- REACT_APP_AUTHORIZED_USERS_EMAIL : Semicolon-delimited list of the user principal names (UPNs) allowed to delete historical messages.
- DisableDeleteUpnCheck : True or False to enable to delete historical messages feature.
- AuthorizedDeleteUpns : Semicolon-delimited list of the user principal names (UPNs) allowed to delete historical messages.
- DataFunctionUrl :
Commercial Tenant - https://[BASE_RESOURCE_NAME]-data-function.azurewebsites.net/api/CompanyCommunicatorDataCleanUpFunction
GCCH/DoD Tenant - https://[BASE_RESOURCE_NAME]-data-function.azurewebsites.us/api/CompanyCommunicatorDataCleanUpFunction
-
Verify the WEBSITE_NODE_DEFAULT_VERSION value should be 16.13.0. Please update it to 16.13.0 if any other value is shown.
-
Save the configuration.
-
Restart the app service and sync to the latest changes.
-
For all azure functions verify if the WEBSITE_NODE_DEFAULT_VERSION to be 16.13.0. Please update it if any other value is shown and sync the changes.
-
Restart the functions.
-
Sign out from teams and sign in again to see the latest changes.
If you have the CCv4 deployed and plan to migrate from CCv4 to CCv5, perform the following steps:
Copy all the parameters from the previous deployment (CCv4), and make sure you have the following:
- Name of the Azure subscription.
- Name of the Azure resource group.
- Base resource name.
- Bot tenant ID.
- User bot client ID.
- User bot client secret.
- Author bot client ID.
- Author bot client secret.
- Sender UPN list.
We will use them in the next steps.
Please refer step 2 in the Deployment guide for more details about the above values.
-
Register an Azure AD application in your tenant's directory where app is being used.
-
Log in to the Azure Portal for your subscription, and go to the App registrations blade.
-
Go to App Registrations page here and open the User Bot Azure AD app from the application list.
-
Under Manage, click on Branding.
-
Add
Usersat the end of existing Name. -
Click Save to commit your changes.
-
-
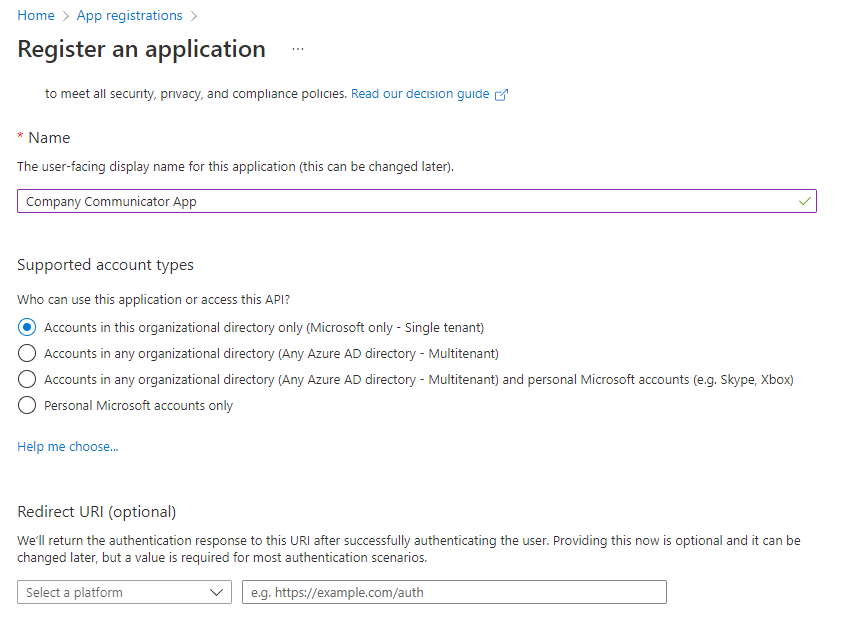
Click New registration to create an Azure AD application.
-
Name: Name of your Teams App - if you are following the template for a default deployment, we recommend "Company Communicator App".
-
Supported account types: Select "Accounts in this organizational directory only(Default Directory only - Single tenant)".
-
Leave the "Redirect URI" field blank for now.
-
-
Click Register to complete the registration.
-
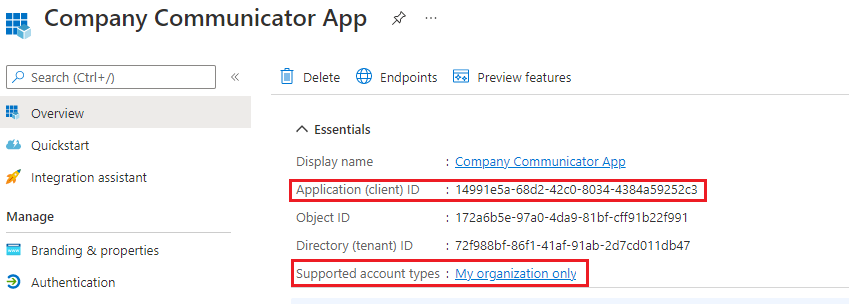
When the app is registered, you'll be taken to the app's "Overview" page. Copy the Application (client) ID; we will need it later. Verify that the "Supported account types" is set to My organization only.
-
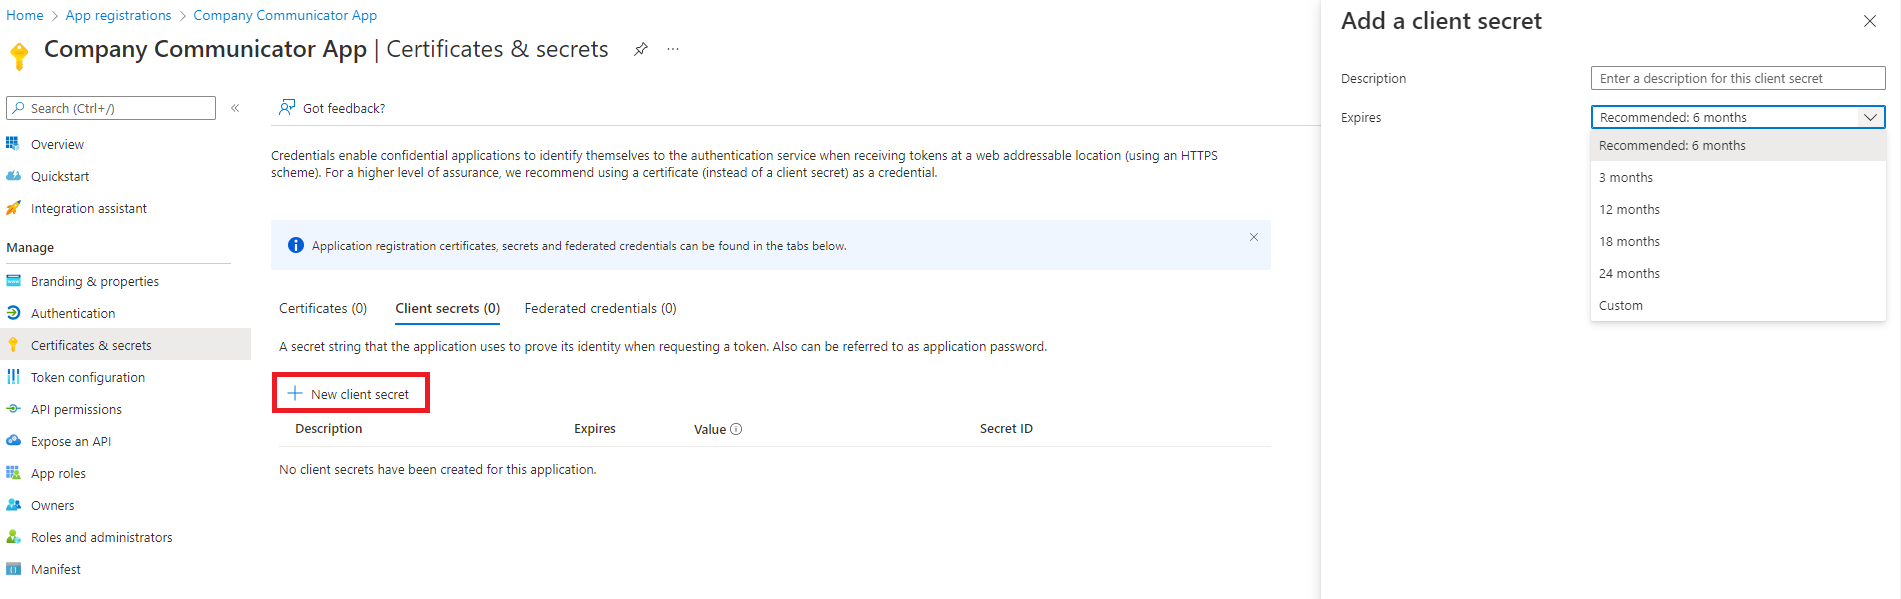
On the side rail in the Manage section, navigate to the "Certificates & secrets" section. In the Client secrets section, click on "+ New client secret". Add a description for the secret, and choose when the secret will expire. Click "Add".
-
Once the client secret is created, copy its Value; we will need it later.
-
Go to App Registrations page here and open the author app you created in Company Communicator v4(in Step 1).
-
Under Manage, click on Authentication to bring up authentication settings.
-
Delete the entry to Redirect URIs.
-
Under Implicit grant, un-check ID tokens.
-
Click Save to commit your changes.
-
-
Back under Manage, click on Expose an API.This step is to remove the registered domain from current registration so that it can be migrated to graph app registration. Please follow the below steps as per the order mentioned.
-
First, delete the list of Authorized client applications.
-
Then, click on the scope defined and disable the scope. Click on Save to commit your changes.
-
Now, click on the scope defined and then click on Delete.
-
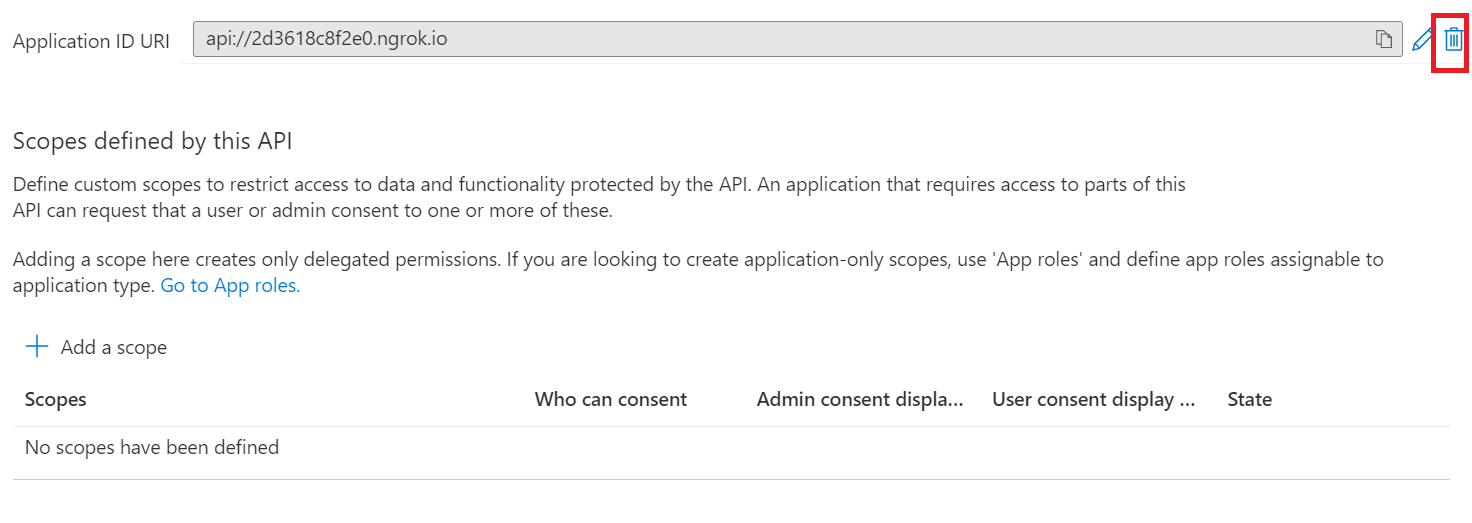
Then, to delete the Application ID URI there are multiple steps involved. The steps will involve delete and update operation to completely remove the Application ID URI from the current Azure AD object Id.
-
Delete the Application ID URI.
-
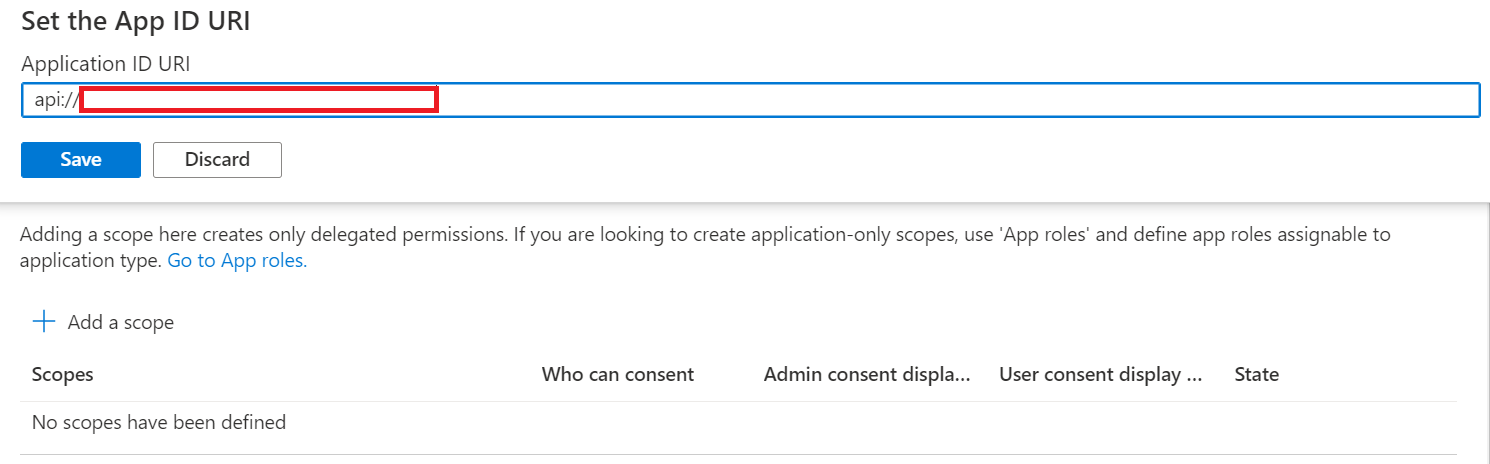
Click on the Set Application ID URI and then Click on Save.
-
Click Save to commit your changes.
-
-
Back under Manage, click on Manifest.
- In the editor that appears, find the
optionalClaimsproperty in the JSON Azure AD application manifest, and replace it with the following block:
"optionalClaims": null,- Click Save to commit your changes.
- In the editor that appears, find the
-
Select API Permissions blade from the left hand side.
-
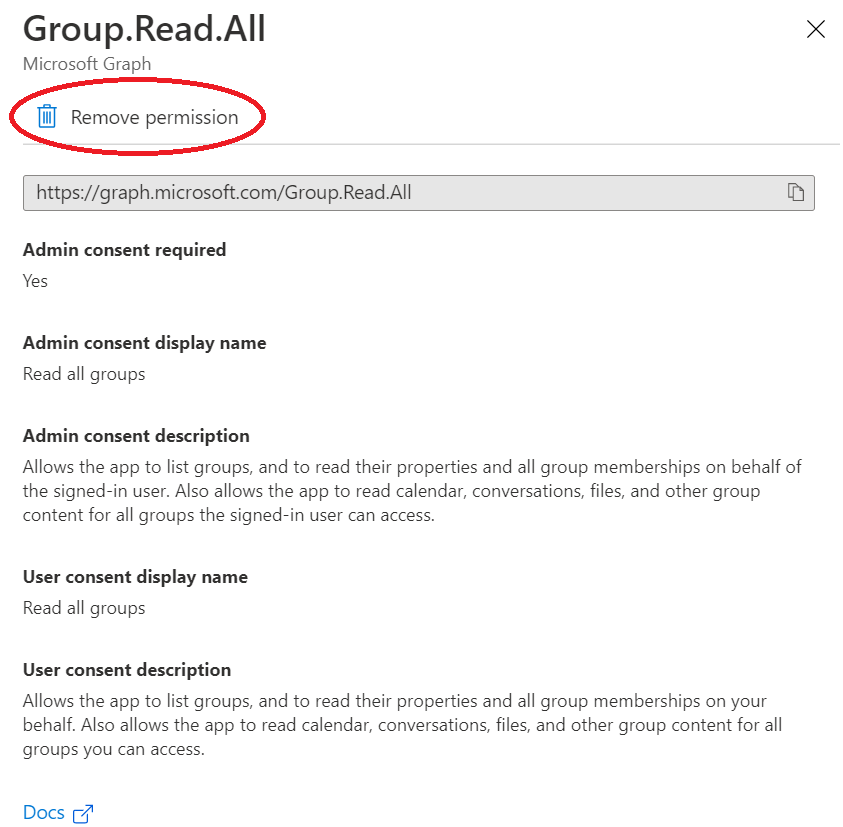
Click on Group.Read.All permission and then click on remove permission.
-
Repeat the same for other permissions. Note: Do not delete the User.Read permission.
-
-
Click on the Deploy to Azure button below.

-
When prompted, log in to your Azure subscription.
Please use the same subscription being used for your Company Communicator v4 deployment (from step 1).
-
Azure will create a "Custom deployment" based on the Company Communicator ARM template and ask you to fill in the template parameters.
Note: Please ensure that you don't use underscore (_) or space in any of the field values otherwise the deployment may fail.
-
Select a subscription and a resource group.
Please use the same
subscription,resource groupbeing used for your Company Communicator v4 deployment. (from step 1) -
Enter a Base Resource Name, which the template uses to generate names for the other resources.
Please use the same
Base resource namebeing used for your Company Communicator v4 deployment. (from step 1) -
Update the following fields in the template:
-
User Client ID: The application (client) ID of the Microsoft Teams user bot app. (from Step 1)
-
User Client Secret: The client secret of the Microsoft Teams user bot app. (from Step 1)
-
Tenant Id: The tenant ID. (from Step 1)
-
Author Client ID: The application (client) ID of the Microsoft Teams author bot app. (from Step 1)
-
Author Client Secret: The client secret of the Microsoft Teams author bot app. (from Step 1)
-
Microsoft Graph App Client ID: The application (client) ID of the Microsoft Graph Azure AD app. (from Step 2)
-
Microsoft Graph App Secret: The client secret of the Microsoft Graph Azure AD app. (from Step 2)
-
Proactively Install User App [Optional]: Default value is
true. You may set it tofalseif you want to disable the feature. -
User App ExternalId [Optional]: Default value is
148a66bb-e83d-425a-927d-09f4299a9274. This MUST be the sameidthat is in the Teams app manifest for the user app. -
Header Text [Optional]: Default value is
Company Communicator. This is the banner text that will appear starting v5.2 and later, you will have the option to modify later. -
Header Logo Url [Optional]: Default image is Microsoft logo. You will have the option to modify later.
-
Hosting Plan SKU [Optional]: The pricing tier for the hosting plan. Default value is
Standard. You may choose between Basic, Standard and Premium. -
Hosting Plan Size [Optional]: The size of the hosting plan (small - 1, medium - 2, or large - 3). Default value is
2.Note: The default value is 2 to minimize the chances of an error during app deployment. After deployment you can choose to change the size of the hosting plan.
-
Service Bus Web App Role Name Guid [Optional]: Default value is
958380b3-630d-4823-b933-f59d92cdcada. This MUST be the sameidper app deployment.Note: Make sure to keep the same values for an upgrade. Please change the role name GUIDs in case of another Company Communicator Deployment in same subscription.
-
Service Bus Prep Func Role Name Guid [Optional]: Default value is
ce6ca916-08e9-4639-bfbe-9d098baf42ca. This MUST be the sameidper app deployment. -
Service Bus Send Func Role Name Guid [Optional]: Default value is
960365a2-c7bf-4ff3-8887-efa86fe4a163. This MUST be the sameidper app deployment. -
Service Bus Data Func Role Name Guid [Optional]: Default value is
d42703bc-421d-4d98-bc4d-cd2bb16e5b0a. This MUST be the sameidper app deployment. -
Storage Account Web App Role Name Guid [Optional]: Default value is
edd0cc48-2cf7-490e-99e8-131311e42030. This MUST be the sameidper app deployment. -
Storage Account Prep Func Role Name Guid [Optional]: Default value is
9332a9e9-93f4-48d9-8121-d279f30a732e. This MUST be the sameidper app deployment. -
Storage Account Data Func Role Name Guid [Optional]: Default value is
5b67af51-4a98-47e1-9d22-745069f51a13. This MUST be the sameidper app deployment. -
DefaultCulture [Optional]: By default the application uses
en-USlocale. You can choose the locale from the list, if you wish to use the app in different locale.Also, you may add/update the resources for other locales and update this configuration if desired. -
SupportedCultures [Optional]: This is the list of locales that application supports currently.You may add/update the resources for other locales and update this configuration if desired.
Note: Make sure that the values are copied as-is, with no extra spaces. The template checks that GUIDs are exactly 36 characters.
Note: If your Azure subscription is in a different tenant than the tenant where you want to install the Teams App, please update the
Tenant Idfield with the tenant where you want to install the Teams App. -
-
Update the "Sender UPN List", which is a semicolon-delimited list of users (Authors) who will be allowed to send messages using the Company Communicator.
- For example, to allow Megan Bowen (meganb@contoso.com) and Adele Vance (adelev@contoso.com) to send messages, set this parameter to
meganb@contoso.com;adelev@contoso.com. - You can change this list later by going to the App Service's "Configuration" blade.
- For example, to allow Megan Bowen (meganb@contoso.com) and Adele Vance (adelev@contoso.com) to send messages, set this parameter to
-
If you wish to change the app name, description, and icon from the defaults, modify the corresponding template parameters.
-
If you wish to change the header/banner text and logo, refer to FAQ in the Wiki.
-
Agree to the Azure terms and conditions by clicking on the check box "I agree to the terms and conditions stated above" located at the bottom of the page.
-
Click on "Purchase" to start the deployment.
-
Wait for the deployment to finish. You can check the progress of the deployment from the "Notifications" pane of the Azure Portal. It may take up to an hour for the deployment to finish.
If the deployment fails, see this section of the Troubleshooting guide.
-
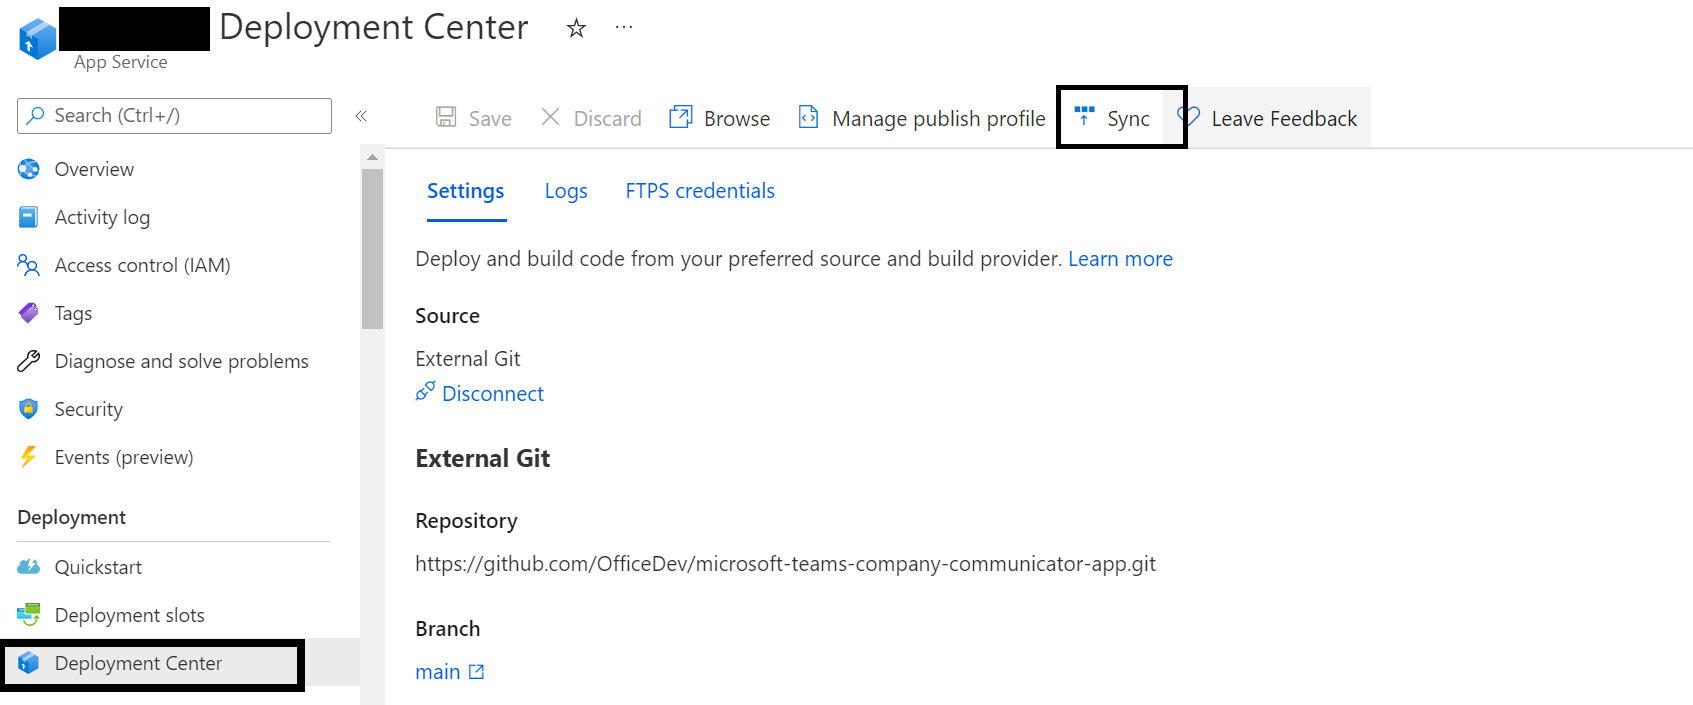
Then go to the "Deployment Center" section of the app service. Click on the "Sync" to update the existing app service to the latest code in the GitHub repository.
-
Please repeat the above step (step 11) for the function apps.
-
Once the deployment is successfully completed, go to the deployment's "Outputs" tab, and note down the follwing values. We will need them later.
-
authorBotId: This is the Microsoft Application ID for the Company Communicator app. For the following steps, it will be referred to as
%authorBotId%. -
userBotId: This is the Microsoft Application ID for the Company Communicator app. For the following steps, it will be referred to as
%userBotId%. -
appDomain: This is the base domain for the Company Communicator app. For the following steps, it will be referred to as
%appDomain%.
-
authorBotId: This is the Microsoft Application ID for the Company Communicator app. For the following steps, it will be referred to as
-
Note that you have the
%authorBotId%,%userBotId%and%appDomain%values from the previous step (Step 2).If do not have these values, refer this section of the Troubleshooting guide for steps to get these values.
-
Go to App Registrations page here and open the Microsoft Graph Azure AD app you created (in Step 2) from the application list.
-
Under Manage, click on Authentication to bring up authentication settings.
-
Add a new entry to Redirect URIs:
- Type: Web
-
Redirect URI: Enter
https://%appDomain%/signin-simple-endfor the URL e.g.https://appName.azurefd.net/signin-simple-end
-
Under Implicit grant, check ID tokens.
-
Click Save to commit your changes.
-
-
Back under Manage, click on Expose an API.
-
Click on the Set link next to Application ID URI, and change the value to
api://%appDomain%e.g.api://appName.azurefd.net. -
Click Save to commit your changes.
-
Click on Add a scope, under Scopes defined by this API. In the flyout that appears, enter the following values:
- Scope name: access_as_user
- Who can consent?: Admins and users
- Admin and user consent display name: Access the API as the current logged-in user
- Admin and user consent description: Access the API as the current logged-in user
-
Click Add scope to commit your changes.
-
Click Add a client application, under Authorized client applications. In the flyout that appears, enter the following values:
-
Client ID:
5e3ce6c0-2b1f-4285-8d4b-75ee78787346 -
Authorized scopes: Select the scope that ends with
access_as_user. (There should only be 1 scope in this list.)
-
Client ID:
-
Click Add application to commit your changes.
-
Repeat the previous two steps, but with client ID =
1fec8e78-bce4-4aaf-ab1b-5451cc387264. After this step you should have two client applications (5e3ce6c0-2b1f-4285-8d4b-75ee78787346and1fec8e78-bce4-4aaf-ab1b-5451cc387264) listed under Authorized client applications.
-
-
Back under Manage, click on Manifest.
- In the editor that appears, find the
optionalClaimsproperty in the JSON Azure AD application manifest, and replace it with the following block:
"optionalClaims": { "idToken": [], "accessToken": [ { "name": "upn", "source": null, "essential": false, "additionalProperties": [] } ], "saml2Token": [] }, - In the editor that appears, find the
-
Click Save to commit your changes.
Continuing from the Azure AD author app registration page where we ended Step 3.
-
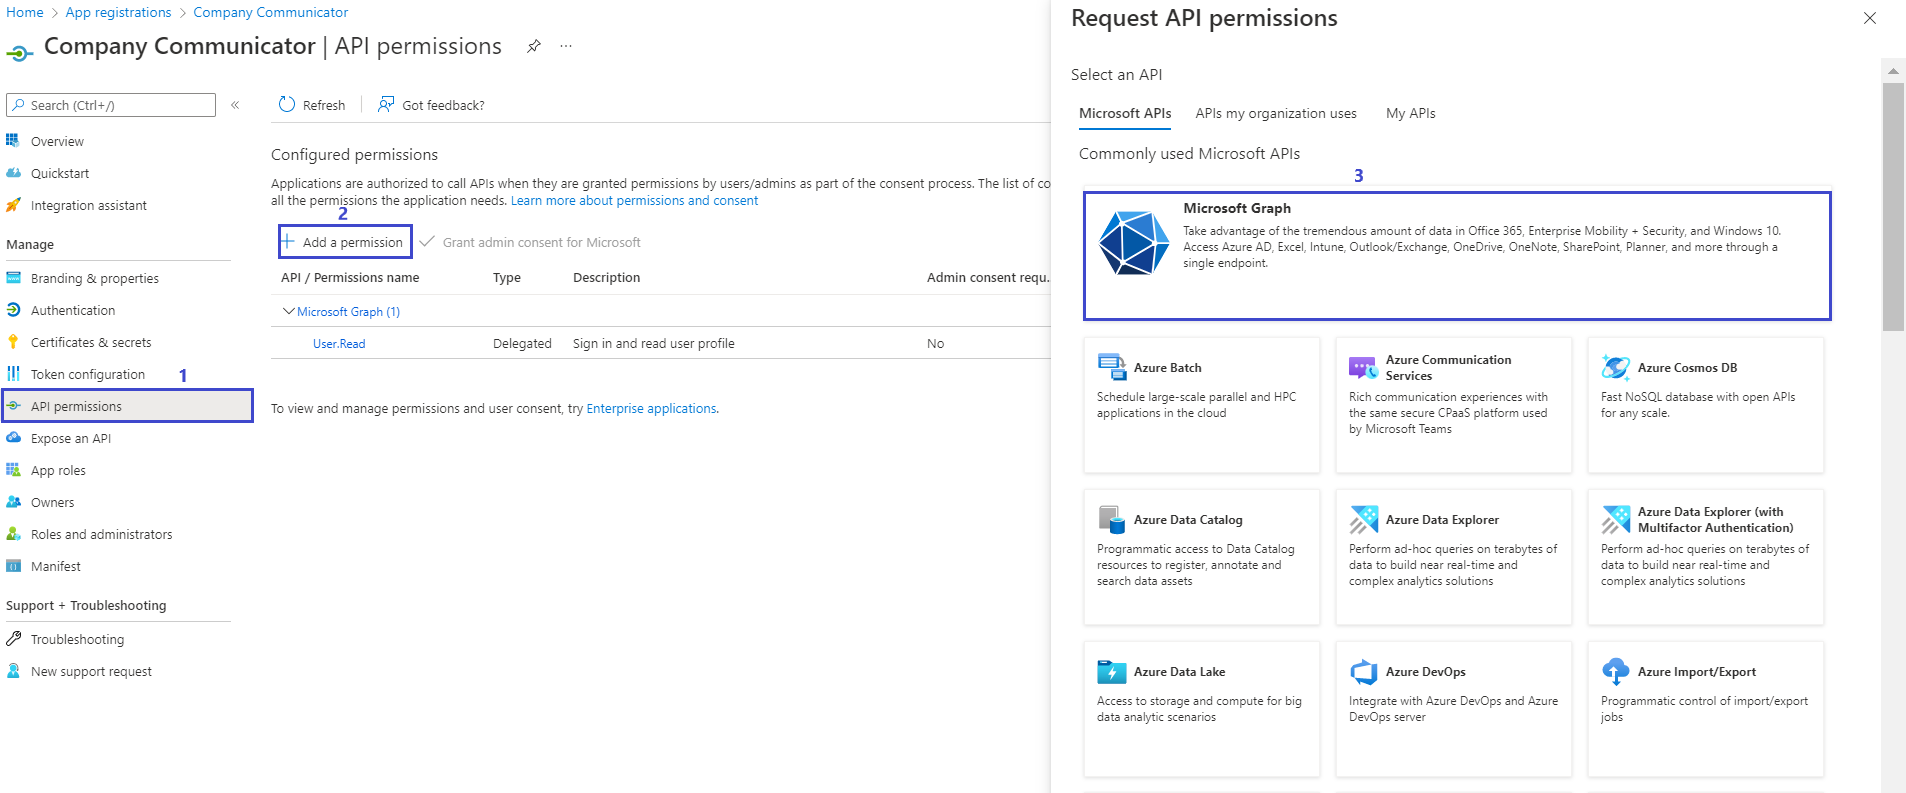
Select API Permissions blade from the left hand side.
-
Click on Add a permission button to add permission to your app.
-
In Microsoft APIs under Select an API label, select the particular service and give the following permissions,
-
Under Commonly used Microsoft APIs,
-
Select “Microsoft Graph”, then select Delegated permissions and check the following permissions,
- GroupMember.Read.All
- AppCatalog.Read.All
-
then select Application permissions and check the following permissions,
- GroupMember.Read.All
- User.Read.All
- TeamsAppInstallation.ReadWriteForUser.All
-
Click on Add Permissions to commit your changes.

Please refer to Solution overview for more details about the above permissions.
-
-
If you are logged in as the Global Administrator, click on the “Grant admin consent for %tenant-name%” button to grant admin consent, else inform your Admin to do the same through the portal.
Alternatively you may follow the steps below:- Prepare link - https://login.microsoftonline.com/common/adminconsent?client_id=%appId%. Replace the
%appId%with theApplication (client) IDof Microsoft Graph Azure AD app (from above). - Global Administrator can grant consent using the link above.
- Prepare link - https://login.microsoftonline.com/common/adminconsent?client_id=%appId%. Replace the
Company communicator app comes with 2 applications – Author, User. The Author application is intended for employees who create and send messages in the organization, and the User application is intended for employees who receive the messages.
Create two Teams app packages: one to be installed to an Authors team and other for recipients to install personally and/or to teams.
-
Make sure you have cloned the app repository locally.
-
Open the
Manifest\manifest_authors.jsonfile in a text editor. -
Change the placeholder fields in the manifest to values appropriate for your organization.
-
developer.name(What's this?) developer.websiteUrldeveloper.privacyUrldeveloper.termsOfUseUrl
-
-
Change the
<<appDomain>>placholder in the configurationUrl setting to be the%appDomain%value e.g. "https://appName.azurefd.net/configtab". -
Change the
<<botId>>placeholder in the botId setting to be the%authorBotId%value - this is your author Azure AD application's ID from above. This is the same GUID that you entered in the template under "Author Client ID". Please note that there are two places in the manifest (for authors) where you will need to update Bot ID. -
Change the
<<appDomain>>placeholder in the validDomains setting to be the%appDomain%value e.g. "appName.azurefd.net". -
Change the
<<botId>>placeholder in the id setting of the webApplicationInfo section to be the%authorBotId%value. Change the<<appDomain>>placeholder in the resource setting of the webApplicationInfo section to be the%appDomain%value e.g. "api://appName.azurefd.net". -
Copy the
manifest_authors.jsonfile to a file namedmanifest.json. -
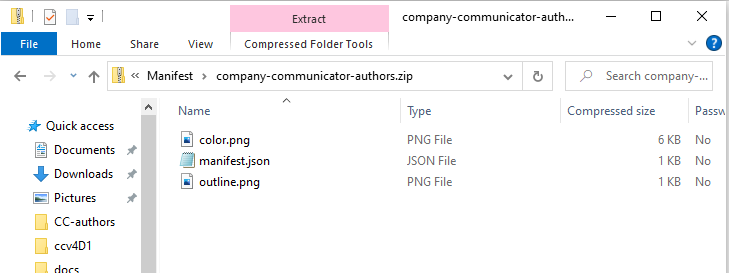
Create a ZIP package with the
manifest.json,color.png, andoutline.png. The two image files are the icons for your app in Teams.- Name this package
company-communicator-authors.zip, so you know that this is the app for the author teams. - Make sure that the 3 files are the top level of the ZIP package, with no nested folders.
- Name this package
-
Delete the
manifest.jsonfile.
Repeat the steps above but with the file Manifest\manifest_users.json and use %userBotId% for <<botId>> placeholder. Note: you will not need to change anything for the configurationUrl or webApplicationInfo section because the recipients app does not have the configurable tab. Name the resulting package company-communicator-users.zip, so you know that this is the app for the recipients.
-
Delete the v4.x apps and re-upload the latest v.5 manifest. Install the authors app (the
company-communicator-authors.zippackage) to your team of message authors.- Note that even if non-authors install the app, the UPN list in the app configuration will prevent them from accessing the message authoring experience. Only the users in the sender UPN list will be able to compose and send messages.
- If your tenant has sideloading apps enabled, you can install your app by following the instructions here.
-
Add the configurable tab to the team of authors, so that they can compose and send messages.
-
Upload the User app to your tenant's app catalog so that it is available for everyone in your tenant to install.
IMPORTANT: Proactive app installation will work only if you upload the User app to your tenant's app catalog.
- Install the User app (the
company-communicator-users.zippackage) to the users and teams that will be the target audience.
If
proactiveAppInstallationis enabled, you may skip this step. The service will install the app for all the recipients when authors send a message.
If you have performed all the steps, migration completes after successful deployment.
Note: If latest changes doesn't reflect after upgrading the app, please sign out and sign in again to the teams client or clear the teams cache with the steps mentioned here.