Guide
This a guide of DecoyFinder's main features and how to use it. If you miss some information here (be it more examples, documenting a feature X, documenting what does exactly that button/option do, etc.) you can take a look at the built-in tooltip explanations in DecoyFinder, just hover your pointer over the option or button you want information about and wait for it to appear. If after that you still have any questions or any suggestions regarding DecoyFinder or this document, feel free to email them to adrian dot cereto at urv dot cat

The interface is divided in three tabs:
-
Find tab: This is the main tab, where input sources and the output file name must be introduced. It consists of two list widgets:
- The left one (Known Active Ligands) is for a list of input files containing active ligands for a given target
- The right one (Sources of New Decoys) for a list of files or sources in which the decoy molecules will be searched (currently it supports local files and ZINC database subsets).
- If you check the Add new decoys checkbox at the top of the tab, a third column,named Existing Decoy Files, will appear between the 2 previously described. This list is for files containing only known decoy molecules for the target, so these decoys will be taken into account for similarity comparisons and they will be included in the output file. This automatically checked and populated when resuming interrupted or unsuccessful searches.
-
Run Statistics tab: Once a search is finnished or interrupted, this tab is populated and shown. There are presented some data about the active ligands: the calculated values of their descriptors and the number of decoys found for each ligand. All these information and more (like all the values of all options for the performed search) can be found at the CSV file indicated in the line above the table.
-
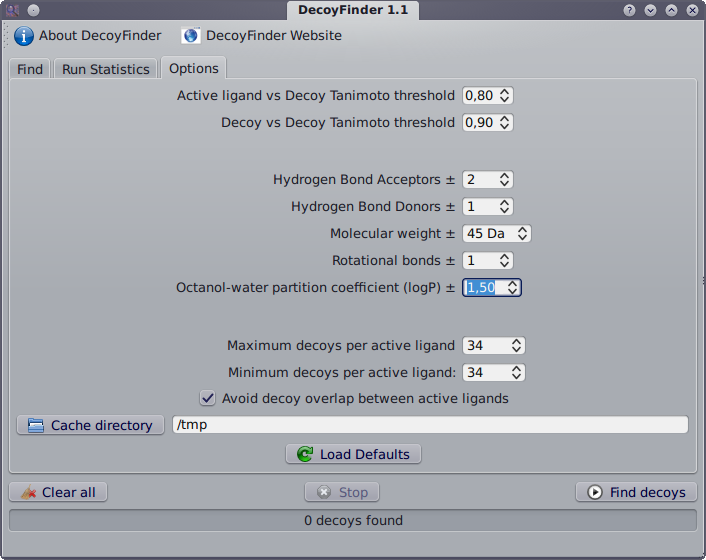
Options tab: The values for different settings related to the search can be set here. Here can also be set the path to the cache directory for ZINC downloads (by default the temporary directory provided by your platform)
At the bottom of the window there is a tab-independent region consisting of three buttons, a progress bar and a status bar. The buttons are:
- Clear all: clears all the lists and run statistics. Useful for starting over or when trying with a different set of ligands.
- Stop: Stops the currently running search. Results will be saved. Only enabled when a search is running.
- Find decoys: starts a search using the provided files and options.
Requisites: you need DecoyFinder installed (see instructions and download links here) and you must have a file with a set of ligands for which you want to find decoys. If you do not have such a file at hand, one is provided here. You also need a rather good internet connection if you want to try to download files from ZINC.
-
Start DecoyFinder. Do so by the standard means of your platform (Double click a desktop icon, from an entry in a menu or directly executing decoy_finder.py)
-
In the Find tab, in the Known Active Ligands section, click the Add button and select the file(s) containing a set of active ligands for a single target.
-
Now, in the Sources of new Decoys section, choose which source to use from the dropdown box and then click the Add button. If you choose Select local files, a file dialogue will be opened to select the files. If you choose a ZINC slice, the upper dropdown box will enable you to select which ZINC subset to use. A list and explanation of the ZINC subsets can be found here
-
Choose the output file name. You can enter it manually in the box at the bottom of the tab, or click the button Output file left to it to select where to save it.
-
Now it is time to go to the Options tab. Tune the values there to your needs or taste. Wider ranges for physical parameters will result in a probably faster search, but decoys may be less similar to active ligands.

-
Start the search. Click the Find decoys button in the lower right part of the window. This may take a while. If you are using ZINC as a source of potential decoys, it may seem that DecoyFinder freezes for a couple of minutes after starting the search. Don't worry, it's downloading a file from ZINC, and depending on your internet connection it can take a while. Also, depending on the size of your ligand set, how restrictive are the values for your search and your luck, it may take from hours to days to find all required decoys. That is why there is a Stop button.
-
Once arrived to this point, there are three possibilities:
7.1 The search stops because all wanted decoys were found. Congratulations! If you see something like "73 of 204 decoys found" that means that within those 73 decoys found there are molecules which fit as decoys for more than one ligand. Reasons for that are that you have very similar ligands in your set, or that your search criteria are too loose (too high values). In the run statistics tab you can see if your ligands have similar descriptor values.

7.2 The search stops because you decided to stop it.
7.3 The search stops because the decoy sources where exhausted but not enough decoys were found

In cases 7.2 and 7.3, all found decoys will be saved to the output file and the user will be prompted to Retry or Abort the search .
- Abort means that you are happy with the results so far and you don't want to continue looking for decoys .
- Retry brings you back to the Find tab with the same settings, but with the output file containing the so far found decoys added to the Existing Decoy files section, so you can now tune the search options (lower requirements, try a different source of decoys) and reuse the already found decoys from the previous try. This means repeating steps 3 - 6.

-
Enjoy your new decoy set for your target.