Widget Store
With the arrival of AppManager 4.0.0.0 features to allow developers to share widgets across different Site Collections are now available. The Widget Store is a portal on the AppManager that allows Akumina and Partners to make available new widgets for use on sites using the Akumina Framework. The Widget Import-Export Feature allows developers to export and import widgets within AppManager. When exporting a widget, a Widget Package .zip file is created. This file can be imported to the Widget Store on any AppManager with version 4.0.0.0 or higher and contains the following information about a widget.
- Widget Definition Properties (defined as json)
- Widget Instances built with the Widget Definition (defined as json)
- Widget Definition javascript
- All Views associated with the Widget
- CSS associated with the Widget
This is a simple process.
- In the Management Apps tab of AppManager, click on the Widget Manager. In the Manage Widgets window, click Widget Store.
- Find the Widget you want to add to your site. Click Install.
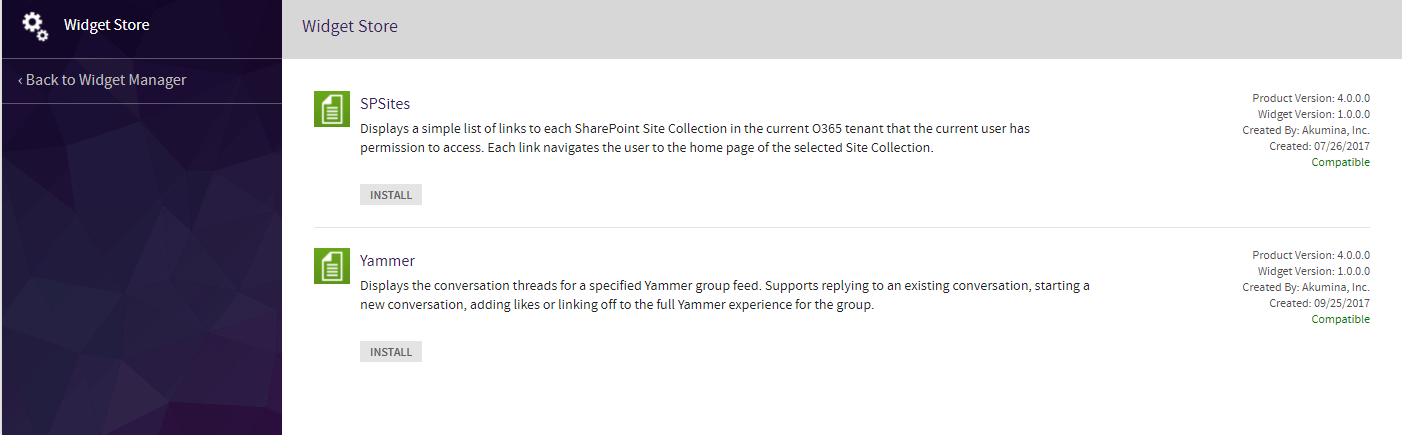
- Navigate back to the Manage Widgets window. Your Widget will be installed there.
For the sake of example, we will export the custom HelloWorldWidget defined in this article. The same process also works with any widget defined within the Widget Manager
- Copy the (Widget Definition)[https://github.com/akumina/AkuminaTraining/wiki/Building-A-Custom-Widget:-Hello-World-Widget#widget-definition] from your digitalworkplace.custom.js into a new file within a text editor. Save this file as HelloWorldWidget.js.
- Upload HelloWorldWidget.jsto the /Style Library/DigitalWorkPlace/JS/widgets/ directory.
- Create a new file within a text editor. Save this file as HelloWorldWidget.css.
- Upload HelloWorldWidget.css to the /Style Library/DigitalWorkPlace/CSS/ directory.
- In the Management Apps tab of AppManager, click on the Widget Manager. In the Manage Widgets window, find HelloWorld and click the Edit button. Ensure the WidgetJS and WidgetCSS fields have the values defined in the Properties specific for Export section. Click Export Widget.
- In the following Export Widget Pop Up, click Download. A zip file will be downloaded.
Within the Edit Widget view the WidgetJS and WidgetCSS classes will be found at the bottom of the view. These currently require JSON objects detailing the Name and WidgetFileUrl of associated javscript and css files.
[{ "Name": "HelloWorldJS", "WidgetFileUrl": "/Style%20Library/DigitalWorkPlace/JS/widgets/HelloWorldWidget.js"}]
[{ "Name": "HelloWorldCSS", "WidgetFileUrl": "/Style%20Library/DigitalWorkPlace/CSS/HelloWorldWidget.css"}]
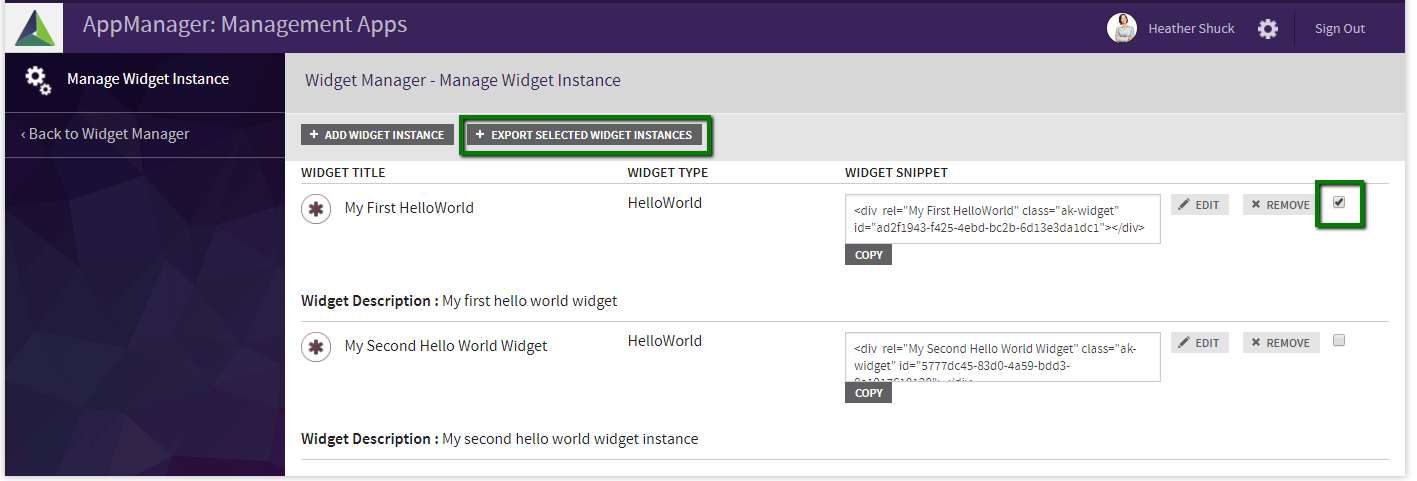
When a Widget is exported all of its instances are are encoded in the Widget Instances JSON attached to the package. However, the Widget Export feature also supports exporting a widget with a subset of the Widget Instances. To do so, follow the steps below.
- Go through steps 1-5 of the How to Export section.
- In the Manage Widgets window, find HelloWorld and click its View Instances button. Click + Export Selected Widget Instances. A zip file will be downloaded.
In this example we will import the Widget exported in the previous section.
- In the Management Apps tab of AppManager, click on the View Manager. Click + Import Widget.
- Click Choose File. Choose the HelloWorld.zip file created earlier. Click Import Zip.
- Navigate back to the Manage Widgets view. Your HelloWorld widget will be installed as a widget. If you click on its View Instances button you will find the Widget Instances imported as well.
- Building a Custom Widget: Overview
- Building A Custom Widget: Hello World Widget
- Building A Custom Widget that accesses SharePoint Lists
- Building A Generic List Control Widget
- Custom Widget: SP Sites List
- Building A Custom Widget: Angular Stock Ticker Widget
- Building A Custom Widget: Flickr Image Library
- Building A Custom Widget: Stock Ticker Widget
- Building A Custom Widget that Accesses a List
- Building A Custom Widget: Yammer Widget
- What's in the Core Site?
- Troubleshooting in the Core Site
- Building your first widget
- Building a Custom Masterpage
- Building a Page Layout
- Applying Custom Styles
- Widget Manager: Overview
- Widget Manager: Retrieving View Icons
- Widget Manager: Adding an Existing Widget to a Page
- Widget Manager: Creating a Custom View for an Existing Widget
- Building a Customdataload Callback: Accessing a List
- Building A Customdataload Callback: Accessing a List from a Different Site
- Building A Customdataload Callback: Hello World
- Building a Customdataload Callback: Overview
- Building A Customdataload Callback: Third Party Data
- Changing the Loading View of a Widget
- Multilingual widget instances
- Search: Displaying search results with the GenericSearchList widget
- Upgrading Widget Snippets: Overview
- Upgrading Widget Snippets: Updating a Custom Built Widget Snippet
- Upgrading Widget Snippets: Updating an OOB Widget Snippet
- View Creation: Handlebars
- View Manager: Creating a Custom View
- Widget Development Process: Widget Decision Tree
- Widget Development Process: Widget Design Use Cases
- Eventing: OOB Digital Workplace Events
- Eventing: Overview
- Framework Integration Points
- Framework: ConfigurationContext
- Framework: UserContext
- Generating a HAR file for troubleshooting performance
- Getting List Items with JSOM
- Masterpage: Enabling a Custom Masterpage to work with the Akumina Widget Framework
- Multilingual tokens
- Multilingual: Akumina Framework language awareness
- Page Life Cycle: Overview
- Page Life Cycle framework: execution steps
- Page Life Cycle: Accessing a List
- Page Life Cycle: Accessing a List (3.3.0.0)
- Page Life Cycle: Accessing UserContext
- Page Life Cycle: Accessing UserContext (3.3.0.0)
- Page Life Cycle: Adding Custom Steps
- Page Life Cycle: Adding Custom Steps (3.3.0.0)
- Page Life Cycle: Akumina Foundation Shipped Site Steps
- Page Life Cycle: Appending Additional Markup
- Page Life Cycle: Appending Additional Markup (3.3.0.0)
- Page Life Cycle: Core Steps
- Page Life Cycle: Hello World Step
- Page Life Cycle: Hello World Step (3.3.0.0)
- Page Life Cycle: Optimizing Page Load Performance
- People Sync: Overview
- People Sync: Adding Attributes to the People Directory View
- People Sync: Creating a Custom Data Source
- People Sync: Custom User Processor
- Using the Debug Panel
- AppManager: Enabling Load Balancing
- Deployment Manager: Overview
- Deployment Manager: Adding A Custom Site Definition
- Deployment Manager: Core Step Classes
- Deployment Manager: Custom Site Definition Components
- Deployment Manager: Custom Site Definition XML
- Deployment Manager: Custom Subsite Definitions
- Deployment Manager: Sample Step Code
- Deployment Manager: Supported Tokens
- Performance Considerations
- Production Settings: Disabling debug mode
- Akumina Foundation Site
- Akumina Multilingual vs Variations
- Caching: Modifying Site Caching
- Caching: Modifying Widget Caching Settings
- Managing Widget Load Priority
- Theme: Adding a New Rail Icon
- Theme: Changing the Theme of an Akumina Foundation Site
- Theme: Customizing Rail Icons
- Theme: Modifying an Akumina Foundation Theme