Exporter: Getting started
Once you are done with a scene, you need to use the exporter to be able to create a file that is readable by the Browser. If you have not installed the 3ds max EAD Exporter yet, check this text. When you have it installed, you can continue here.
EAD Exporter
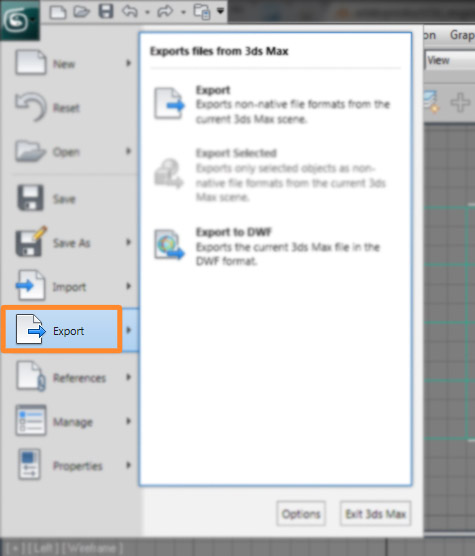
When you have your 3D POI and you need to export it, it is really easy. First, make sure that you have nothing selected (this is done to avoid problems exporting); then go to the main menu and press the 3ds max logo at the top left corner of the interface. Look for the “Export” option, and click it:
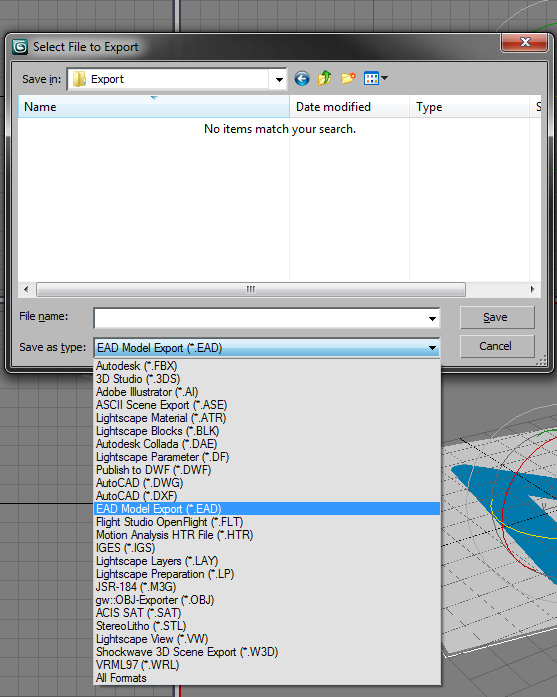
A new window will appear. Here you can set a name for the file the exporter will create (in this case plane_animation), and select the format from the dropdown list. Select “EAD Model Export (*.EAD)” from the list, and press the Save Button:
After pressing save, a little window will show up, these are the parameters that the .EAD will take in consideration to export:
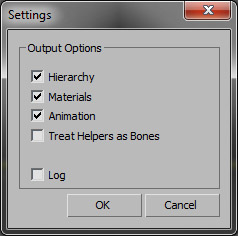
- Hierarchy will export the models, objects and relations between them.
- Materials will export the materials that are applied to the objects, with the parameters, texture names etc.
- Animation will export the animation information of the objects in the scene.
These are the three options that you need to activate before export.
Click OK, and an .EAD file will be created in the selected location of your computer. Now you have exported your 3D POI.
NOTE: Currently there is a bug that may cause corruption of the .EAD files when the Animation option is kept
unselected. A workaround if you want to export a model alone is to set the time range of only 1 frame, and export
the file including animation, even if the object has no animation at all.
Here you will learn how to create a basic scene with a simple animated model and textures in order to export it later. You need to be familiar with 3Ds Max for more complex scenes, but this tutorial will use very basic commands, so you should be able to follow it without previous experience with the software.
We’ll create a plane, the very basic figure in 3D, and also the easiest one to add textures. Once you start max you should see something similar to this screen:
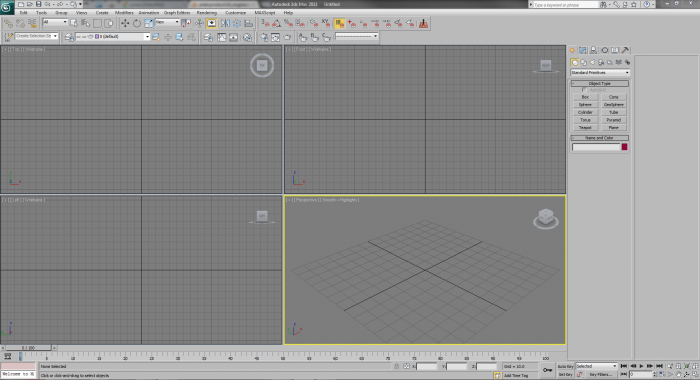
You may see something slightly different, depending on the startup workspace that you use. In this tutorials, the shown interface scheme will be “ModularToolbarsUI” (You can find it in the Customize menu).
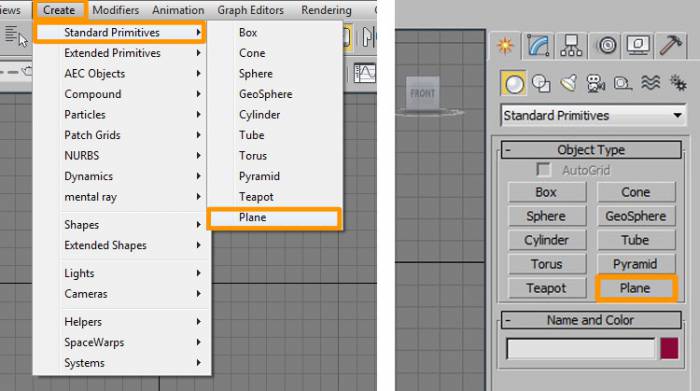
You can create a plane from the “Create” top menu, or from the right panel:
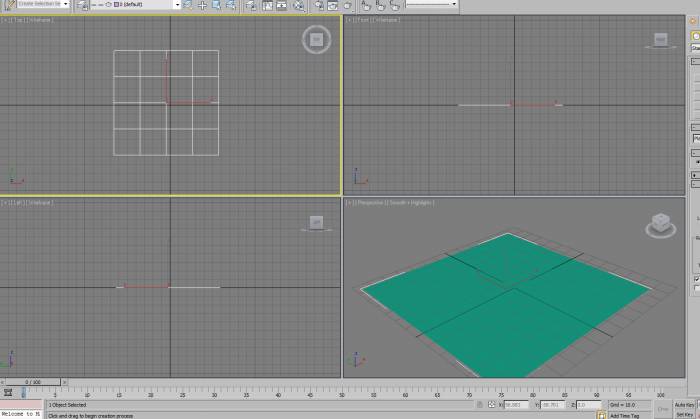
Now, click and drag the cursor over the grid to give the size to your new plane. If you press Ctrl while dragging, it will remain always as a square shape. As we want it to stay on the “ground”, let’s create it from the top view, usually the one at the top right corner.
We have created a plane, but it is almost sure that we did not create it exactly in the center of the scene, and this is quite important, as the center of the scene (0,0,0) will be the pivot point of the scene when we render it using the engine in the devices.
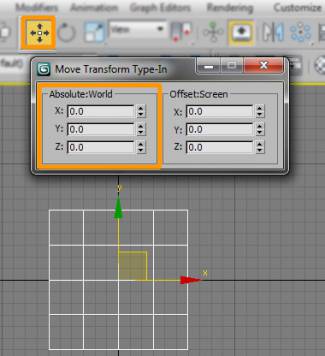
To align it to the center, look for the “Select and Move” tool in the main menu buttons. If you click on it, you will activate the select and move mode, allowing you to move objects by dragging the handles. In this case, we want to write down the exact values for the plane’s position, so right click on the “Select and Move” button, and a popup will show up. Insert the “0” value on X, Y and Z of the “Absolute:World” field. This will align the plane exactly to the center of the scene.
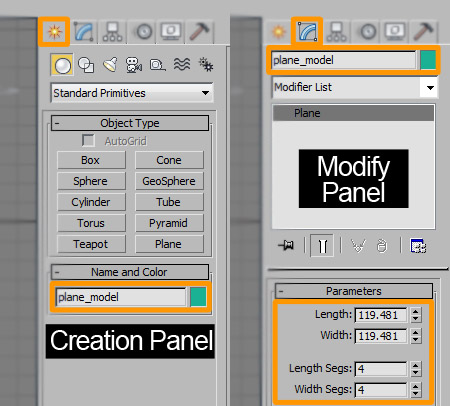
It is also very important to name correctly our objects in the scene, so later, in the engine, we know what is each object just by looking at its name. This is specially useful in big and complex scenes. It is possible to name objects in a lot of different ways, but these are probably the easiest and most accessible ones: from the right panel menus. Both from the “Creation Panel” and from the “Modify Panel”, it is possible to change an object’s name and color in the viewport. From the “Modify Panel”, it is even possible to modify different parameters of the selected object, in this case, a plane primitive, so it allows us to give it a size and a number of divisions.
You can also right click over an object, go to “Object Properties”, and together with some other options, you will find how to change the name and color of the object.
Now we have our plane in the scene, we want to add a material with a texture to it. As texture, you can use whatever image you have in your computer. Most used and widely supported formats are .jpeg, .png or .tga. In this example, we will use the Aumentia logo image.
It is an image with a size of 512×512 pixels, a common size for mobile platforms textures. You can use images with random sizes as well but it is recommended to use power of two values in squared images (128, 256, 512, 1024, 2048…).
To create and apply a material, we need to open the “Material Editor”. In latest versions of 3Ds Max there are two different editors. One of them is for more advanced users, and it is a node-like editor. Here we will use the other one, which is simpler for basic materials, such as the one we want to create for this scene.
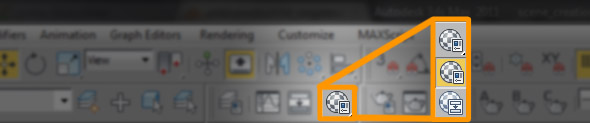
Notice this button at the main menu. If you keep it pressed, it will display the two options for the “Material Editor”, select the one that is highlighted in yellow in the image above. It should launch this window:
In this Editor we can modify all the aspects and parameters of a Material.
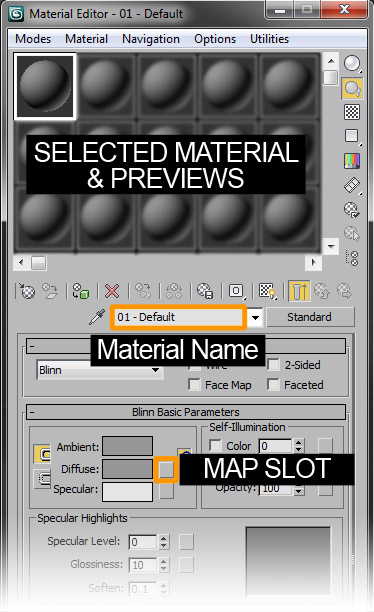
A Material is what gives a 3D object an appearance, shininess, color, reflections… everything. In this basic case, we just want to apply a texture to it, nothing fancy. First, name the material something like “Plane_Material”. Same as with models, it is very important to have intuitive names for everything we create in the scene.
The “Diffuse” channel is the color of a material. So we need to click on its “Map Slot” button marked in the picture to be able to add an image to that channel.
Each channel controls an aspect of the material. An advanced user would need control for more channels, but we will keep it simple this time.
After clicking in the Diffuse Map Slot, another window will show up, with several options to create maps. The one we want is the first one: Bitmap. Double click that option, and from the popup, select the file in your computer that you want to use as the diffuse texture.
Once this is done, the material editor will show the parameters of that particular slot, and not the general material options anymore. It is a little difficult to get, but we can think about parent/child relations between a material and its slots. We can easily navigate up to the parent, or click the slot again to see the child. Let’s take a look at some buttons that will make our life easier in the Material Editor:
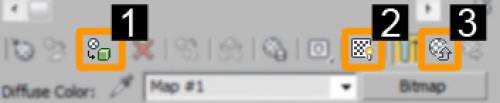
- Assigns the current material to the selected object/objects. Press this button to apply the material to the plane.
- Shows the current slot/material on the object in the 3D Viewport. It is recommended that you do the point 3 before activating this one, so you’ll see the “complete” material, not only the current slot.
- Navigates to the parent of the current slot. In the current one it will lead you to the general material options.
That is it, now we are going to give this plane a little and simple animation, just for you to understand how it works. We will make it rotate around itself continuously.
Select the button at the right of the “Select and Move” one, with the rotation symbol. You can also press E on your keyboard: W, E and R let you switch between translating, rotating and scaling modes.
At the bottom of the screen, there is the timeline. Look for the “Auto Key” button, and activate it, everything will become red, to let you know that if you move something, the software will store keyframes. Before moving the object, let’s slide the timeline marker to the last frame:

Now, we need to click and drag the rotate handles to make the plane rotate almost 360 degrees. It is possible to use snapping options to make specific rotations like this one, or we can right click the rotation button to do the same we did to align the plane to the center of the world, but here we will do it manually in this case. Over the rotation gizmo you will see a tooltip while rotating letting you know how much you are rotating it.
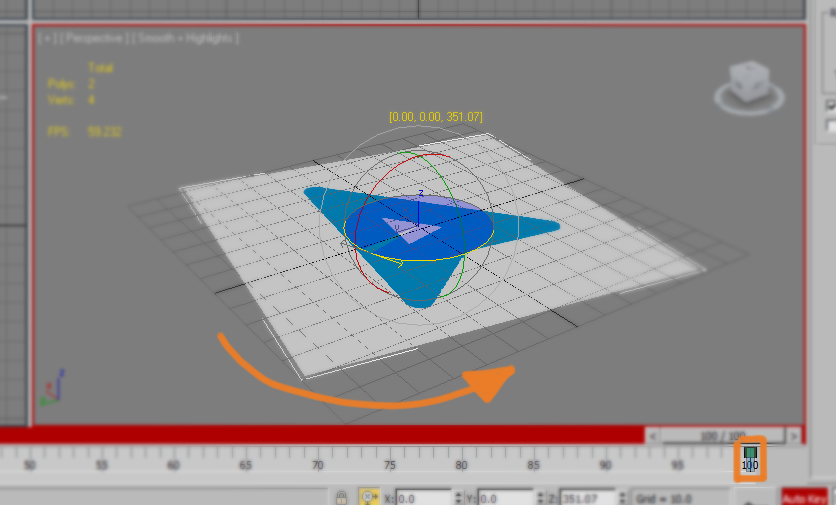
Automatically, when you release the rotation handles, two keyframes will be stored for the plane, at frames 0 and 100. This is the effect of “AutoKey”, it records automatically the transforms in objects. As we’re done with the animation, you can disable it already, to prevent inserting more keyframes accidentally.
Now, if you press play, the plane will rotate again and again (as the animation will be looped). And we’re done with this scene. Now we just need to export it.