Halfedge Mesh
Scotty3D uses a variety of geometric data structures, depending on the task. Some operations (e.g., ray tracing) use a simple list of triangles that can be compactly encoded and efficiently cached. For more sophisticated geometric tasks like mesh editing and sampling, a simple triangle list is no longer sufficient (or leads to unnecessarily poor asymptotic performance). Most actions in MeshEdit mode therefore use a topological data structure called a halfedge mesh (also known as a doubly-connected edge list), which provides a good tradeoff between simplicity and sophistication.
The basic idea behind the halfedge data structure is that, in addition to the usual vertices, edges, and faces that make up a polygonal mesh, we also have an entity called a halfedge that acts like "glue" connecting the different elements. It is this glue that allow us to easily "navigate" the mesh, i.e., easily access mesh elements adjacent to a given element.
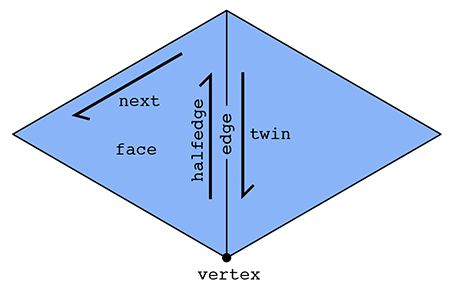
In particular, there are two halfedges associated with each edge (see picture above). For an edge connecting two vertices i and j, one of its halfedges points from i to j; the other one points from j to i. In other words, we say that the two halfedges are oppositely oriented. On of the halfedges is associated with the face to the "left" of the edge; the other is associated with the face to the "right." Each halfedge knows about the opposite halfedge, which we call its twin. It also knows about the next halfedge around its face, as well as its associated edge, face, and vertex.
In contrast, the standard mesh elements (vertices, edges, and faces) know only about one of their halfedges. In particular:
- a vertex knows about one of its "outgoing" halfedges,
- an edge knows about one of its two halfedges, and
- a face knows about one of the many halfedges circulating around its interior.
In summary, we have the following relationships:
| Mesh Element | Pointers |
|---|---|
| Vertex | halfedge (just one) |
| Edge | halfedge (just one) |
| Face | halfedge (just one) |
| Halfedge | next, twin, vertex, edge, face |
This list emphasizes that it is really the halfedges that connect everything up. An easy example is if we want to visit all the vertices of a given face. We can start at the face's halfedge, and follow the "next" pointer until we're back at the beginning. A more interesting example is visiting all the vertices adjacent to a given vertex v. We can start by getting its outgoing halfedge, then its twin, then its next halfedge; this final halfedge will also point out of vertex v, but it will point toward a different vertex than the first halfedge. By repeating this process, we can visit all the neighboring vertices:
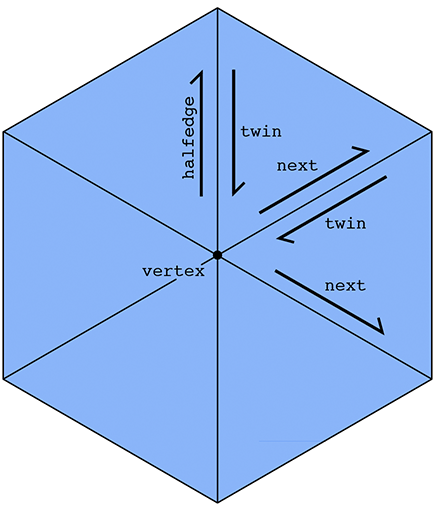
In some sense, a halfedge mesh is kind of like a supercharged linked list. For instance, the halfedges around a given face (connected by next pointers) form a sort of "cyclic" linked list, where the tail points back to the head.
A nice consequence of the halfedge representation is that any valid halfedge mesh must be manifold and orientable. Scotty3D will therefore only produce manifold, oriented meshes as output (and will complain if the input does not satisfy these criteria).
The Scotty3D skeleton code already provides a fairly sophisticated implementation of the half edge data structure, in the HalfedgeMesh class (see halfEdgeMesh.h and halfEdgeMesh.cpp). Although the detailed implementation may appear a bit complicated, the basic interface is not much different from the abstract description given above. For instance, suppose we have a face f and want to print out the positions of all its vertices. We would write a routine like this:
void printVertexPositions(FaceCIter f) {
  HalfEdgeCIter h = f->halfedge(); // get the first halfedge of the face
  do {
    VertexCIter v = h->vertex();   // get the vertex of the current halfedge
    cout << v->position << endl;   // print the vertex position
    h = h->next();                 // move to the next halfedge around the face
  } while (h != f->halfedge());    // keep going until we're back at the beginning
}
Notice that we refer to a face as a FaceCIter rather than just a Face. You can think of an Iter as a kind of pointer; the letter C indicates that this pointer is "constant", i.e., for this particular algorithm, we will not change the value pointed to by f. Note that members of an iterator are accessed with an arrow -> rather than a dot ., just as with pointers. (A more in-depth explanation of some of these details can be found in the inline documentation.) Similarly, to print out the positions of all the neighbors of a given vertex we could write a routine like this:
void printNeighborPositions(VertexCIter v) {
  HalfEdgeCIter h = v->halfedge();    // get one of the outgoing halfedges of the vertex
  do {
    HalfEdgeCIter h_twin = h->twin(); // get the vertex of the current halfedge
    VertexCIter vN = h_twin->vertex();// vertex is 'source' of the half edge.
                                      // so h->vertex() is v,
                                      // whereas h_twin->vertex() is the neighbor vertex.
    cout << vN->position << endl;     // print the vertex position
    h = h_twin->next();               // move to the next outgoing halfedge of the vertex.
  } while(h != v->halfedge());        // keep going until we're back at the beginning
}
To iterate over all the vertices in a halfedge mesh, we could write a loop like this:
for(VertexCIter v = mesh.verticesBegin(); v != mesh.verticesEnd(); v++) {
  printNeighborPositions(v); // do something interesting here
}
Internally, the lists of vertices, edges, faces, and halfedges are stored as linked lists, which allows us to easily add or delete elements to our mesh. For instance, to add a new vertex we can write
VertexIter v = mesh.newVertex();
Likewise, to delete a vertex we can write
mesh.deleteVertex(v);
Note, however, that one should be very, very careful when adding or deleting mesh elements. New mesh elements must be properly linked to the mesh -- for instance, this new vertex must be pointed to one of its associated halfedges by writing something like
v->halfedge() = h;
Likewise, if we delete a mesh element, we must be certain that no existing elements still point to it; the halfedge data structure does not take care of these relationships for you automatically. In fact, that is exactly the point of this assignment: to get some practice directly manipulating the halfedge data structure. Being able to perform these low-level manipulations will enable you to write useful and interesting mesh code far beyond the basic operations in this assignment. The HalfedgeMesh class provides a helper function called checkConsistency that checks whether the mesh iterators are valid. You might find it worthwhile calling this function to debug your implementation (please note that the checks are non-exhaustive, passing them does not necessarily imply that your is 100% correct).
Finally, the boundary of the surface (e.g., the ankles and waist of a pair of pants) requires special care in our halfedge implementation. At first glance, it would seem that the routine printNeighborPositions() above might break if the vertex v is on the boundary, because at some point we worry that we have no twin() element to visit. Fortunately, our implementation has been designed to avoid this kind of catastrophe. In particular, rather than having an actual hole in the mesh, we create a "virtual" boundary face whose edges are all the edges of the boundary loop. This way, we can iterate over boundary elements just like any other mesh element. If we ever need to check whether an element is on the boundary, we have the methods.
Vertex::isBoundary()
Edge::isBoundary()
Face::isBoundary()
Halfedge::isBoundary()
These methods return true if and only if the element is contained in the domain boundary. Additionally, we store an explicit list of boundary faces, which we can iterate over like any other type of mesh element:
for(FaceCIter b = mesh.boundariesBegin(); b != mesh.boundariesEnd(); b++) {
  // do something interesting with this boundary loop
}
These virtual faces are not stored in the usual face list, i.e., they will not show up when iterating over faces. The figure below should help to further explain the behavior of HalfedgeMesh for surfaces with boundary:

Dark blue regions indicate interior faces, whereas light blue regions indicate virtual boundary faces. A vertex, edge, or halfedge is considered to be part of the boundary if it is contained entirely in a boundary face. For instance, in the figure above the region b is a virtual boundary face, which means that vertex v', edge e', and halfedge h' are all part of the boundary; their isBoundary() methods will return true. In contrast, vertex v, edge e, face f, and halfedge h are not part of the boundary, and their isBoundary() methods will return false. Notice also that the boundary face b is a polygon with 12 edges.
Note: the edge degree and face degree of a boundary vertex is not the same! Notice, for instance, that vertex v' is contained in three edges but only two interior faces. By convention, Vertex::degree() returns the face degree, not the edge degree. The edge degree can be computed by finding the face degree, and adding 1 if the vertex is a boundary vertex.
Please refer to the inline comments (e.g. of src/halfEdgeMesh.h) for further details about the HalfedgeMesh data structure.

- Task 1: Camera Rays
- Task 2: Intersecting Primitives
- Task 3: BVH
- Task 4: Shadow Rays
- Task 5: Path Tracing
- Task 6: Materials
- Task 7: Environment Light
Notes:
- Task 1: Spline Interpolation
- Task 2: Skeleton Kinematics
- Task 3: Linear Blend Skinning
- Task 4: Physical Simulation
Notes: