Casual Game Programming
While game developers have traditionally used C/OpenGL to get every bit of performance out of a device, Java offers a unique opportunity for casual game developers. In this section we will build a simple card game in Java that can run unchanged on iOS, Android etc.
Casual games are often the most influential games of all, they cross demographics such as the ubiquitous solitaire or even the chart topping Angry birds. Putting them in the same game category as 3D FPS games doesn’t always make sense.
Yes, framerates are important but ubiquity, social connectivity & gameplay are even more important for this sub genre of the game industry. The mobile aspect highlights this point further, the way app stores are built releasing often puts your game at an advantage over its competitor’s. Yet releasing to all platforms and all screen sizes becomes an issue soon enough.
Typically a game is comprised of a game loop which updates UI status based on game time and renders the UI. However, with casual games constantly rendering is redundant and with mobile games it could put a major drain on the battery life. Instead we will use components to build the game elements and let Codename One do the rendering for us.
We will create a poker game for 1 player that doesn’t include the betting process or any of the complexities such as AI, card evaluation or validation. This allows us to fit the whole source code in 270 lines of code (more due to comments). I also chose to simplify the UI for touch devices only, technically it would be pretty easy to add keypad support but it would complicate the code and require additional designs (for focus states).
|
Tip
|
You can see the game running on the simulator at http://www.youtube.com/watch?v=4IQGBT3VsSQ |
The game consists of two forms: Splash screen and the main game UI.
In mobile device programming every pixel is crucial because of the small size of the screen, however we can’t shrink down our graphics too much because it needs to be "finger friendly" (big enough for a finger) and readable. There is great disparity in the device world, even within the iOS family the retina iPad has more than twice the screen density of the iPad mini. This means that an image that looks good on the iPad mini will seem either small or very pixelated on an iPad, on the other hand an image that looks good on the iPad would look huge (and take up too much RAM) on the iPad mini. The situation is even worse when dealing with phones and Android devices.
Thankfully there are solutions, such as using multiple images for every density (DPI). However, this is tedious for developers who need to scale the image and copy it every time for every resolution. Codename One has a feature called MultiImage which implicitly scales the images to all the resolutions on the desktop and places them within the res file, in runtime you will get the image that matches your devices density.
There is a catch though… MultiImage is designed for applications where we want the density to determine the size. So an iPad will have the same density as an iPhone since both share the same amount of pixels per inch. This makes sense for an app since the images will be big enough to touch and clear. Furthermore, since the iPad screen is larger more data will fit on the screen!
However, game developers have a different constraint when it comes to game elements. In the case of a game we want the images to match the device resolution and take up as much screen real estate as possible, otherwise our game would be constrained to a small portion of the tablet and look small. There is a solution though, we can determine our own DPI level when loading resources and effectively force a DPI based on screen resolution only when working with game images!
To work with such varied resolutions/DPI’s and potential screen orientation changes we need another tool in our arsenal: layout managers.
If you are familiar with AWT/Swing this should be pretty easy, Codename One allows you to codify the logic that flows Components within the UI. We will use the layout managers to facilitate that logic and preserve the UI flow when the device is rotated.
To save some time/effort we suggest using the ready made resource files linked in the On The Web section below. I suggest skipping this section and moving on to the code, however for completeness here is what we did to create these resources:
You will need a gamedata.res file that contains all the 52 cards as multi images using the naming convention of ‘rank suite.png’ example: 10c.png (10 of clubs) or ad.png (Ace of diamonds).
To accomplish this we can create 52 images of roughly 153x217 pixels for all the cards then use the designer tool and select “Quick Add MultiImages” from the menu. When prompted select HD resolution. This effectively created 52 multi-images for all relevant resolutions.
You can also modify the default theme that ships with the application in small ways to create the white over green color scheme. Open it in the designer tool by double clicking it and select the theme.
Then press Add and select the Form entry with background NONE, background color 6600 and transparency 255.
Add a Label style with transparency 0 and foreground 255 and then copy the style to pressed/selected (since its applied to buttons too).
Do the same for the SplashTitle/SplashSubtitle but there also set the alignment to CENTER, the Font to bold and in the case of SplashTitle to Large Font as well.
The first step is creating the splash animation as you can see in the screenshots in figure 2.
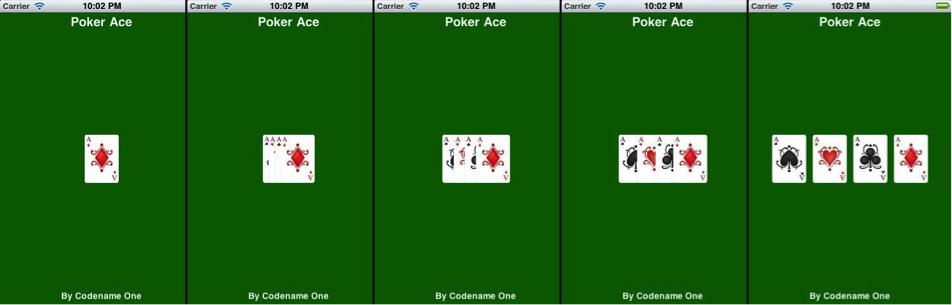
The animation in the splash screen and most of the following animations are achieved using the simple tool of layout animations. In Codename One components are automatically arranged into position using layout managers, however this isn’t implicit unless the device is rotated. A layout animation relies on this fact, it allows you to place components in a position (whether by using a layout manager or by using setX/setY) then invoke the layout animation code so they will slide into their “proper” position based on the layout manager rules.
You can see how we achieved the splash screen animation of the cards sliding into place in Listing 1 within the showSplashScreen() method. After we change the layout to a box X layout we just invoke animateHierarchy to animate the cards into place.
Notice that we use the callSerially method to start the actual animation. This call might not seem necessary at first until you try running the code on iOS. The first screen of the UI is very important for the iOS port which uses a screenshot to speed startup. If we won’t have this callSerially invocation the screenshot rendering process will not succeed and the animation will stutter.
We also have a cover transition defined here; it’s just a simple overlay when moving from one form to another.
Initially when entering the game form we have another animation where all the cards are laid out as you can see in Game form startup animation and deal animation. We then have a long sequence of animation where the cards unify into place to form a pile (with a cover background falling on top) after which dealing begins and cards animate to the rival (with back only showing) or to you with the face showing. Then the instructions to swap cards fade into place.
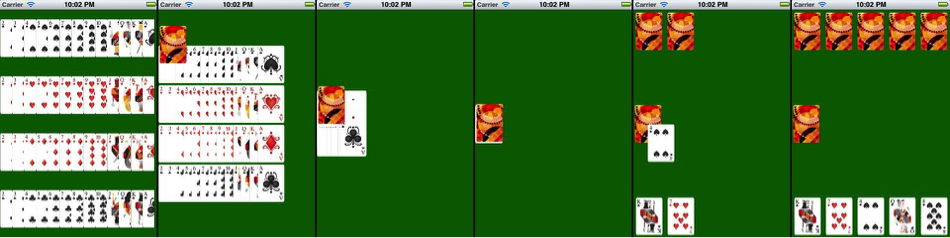
This animation is really easy to accomplish although it does have several stages. In the first stage we layout the cards within a grid layout (13x4), then when the animation starts (see the UITimer code within showGameUI()) we just change the layout to a layered layout, add the back card (so it will come out on top based on z-ordering) and invoke animate layout.
Notice that here we use animateLayoutAndWait, which effectively blocks the calling thread until the animation is completed. This is a VERY important and tricky subject!
Codename One is for the most part a single threaded API, it supports working on other threads but it is your responsibility to invoke everything on the EDT (Event Dispatch Thread). Since the EDT does the entire rendering, events etc. if you block it you will effectively stop Codename One in its place! However, there is a trick: invokeAndBlock is a feature that allows you to stop the EDT and do stuff then restore the EDT without “really” stopping it. Its tricky, I won’t get into this in this article (this subject deserves an article of its own) but the gist of it is that you can’t just invoke Thread.sleep() in a Codename One application (at least not on the EDT) but you can use clever methods such as Dialog.show(), animateLayoutAndWait etc. and they will block the EDT for you. This is really convenient since you can just write code serially without requiring event handling for every single feature.
Now that we got that out of the way, the rest of the code is clearer. Now we understand that animateLayoutAndWait will literally wait for the animation to complete and the next lines can do the next animation. Indeed after that we invoke the dealCard method that hands the cards to the players. This method is also blocking (using and wait methods internally) it also marks the cards as draggable and adds that drag and drop logic which we will later use to swap cards.
Last but not least in the animation department, we use a method called replace to fade in a component using a transition.
To handle the dealing we added an action listener to the deck button, this action listener is invoked when the cards are dealt and that completes the game.
public class Poker {
    private static final char SUITE_SPADE = 's';
    private static final char SUITE_HEART = 'h';
    private static final char SUITE_DIAMOND = 'd';
    private static final char SUITE_CLUB = 'c';

    private Resources cards;
    private Form current;
    private final static Card[] deck;

    static {
        // we initialize constant card values that will be useful later on in the game
        deck = new Card[52];
        for(int iter = 0 ; iter < 13 ; iter++) {
            deck[iter] = new Card(SUITE_SPADE, iter + 2);
            deck[iter + 13] = new Card(SUITE_HEART, iter + 2);
            deck[iter + 26] = new Card(SUITE_DIAMOND, iter + 2);
            deck[iter + 39] = new Card(SUITE_CLUB, iter + 2);
        }
    }

    /**
     * We use this method to calculate a "fake" DPI based on screen resolution rather than its actual DPI
     * this is useful so we can have large images on a tablet
     */
    private int calculateDPI() {
        int pixels = Display.getInstance().getDisplayHeight() * Display.getInstance().getDisplayWidth();
        if(pixels > 1000000) {
            return Display.DENSITY_HD;
        }
        if(pixels > 340000) {
            return Display.DENSITY_VERY_HIGH;
        }
        if(pixels > 150000) {
            return Display.DENSITY_HIGH;
        }
        return Display.DENSITY_MEDIUM;
    }

    /**
     * This method is invoked by Codename One once when the application loads
     */
    public void init(Object context) {
        try{
            // after loading the default theme we load the card images as a resource with
            // a fake DPI so they will be large enough. We store them in a resource rather
            // than as files so we can use the MultiImage functionality
            Resources theme = Resources.openLayered("/theme");
            UIManager.getInstance().setThemeProps(theme.getTheme(theme.getThemeResourceNames()[0]));
            cards = Resources.open("/gamedata.res", calculateDPI());
       } catch(IOException e) {
            e.printStackTrace();
       }
    }

    /**
     * This method is invoked by Codename One once when the application loads and when it is restarted
     */
    public void start() {
        if(current != null){
            current.show();
            return;
        }
        showSplashScreen();
    }

    /**
     * The splash screen is relatively bare bones. Its important to have a splash screen for iOS
     * since the build process generates a screenshot of this screen to speed up perceived performance
     */
    public void showSplashScreen() {
        final Form splash = new Form();

        // a border layout places components in the center and the 4 sides.
        // by default it scales the center component so here we configure
        // it to place the component in the actual center
        BorderLayout border = new BorderLayout();
        border.setCenterBehavior(BorderLayout.CENTER_BEHAVIOR_CENTER_ABSOLUTE);
        splash.setLayout(border);

        // by default the form's content pane is scrollable on the Y axis
        // we need to disable it here
        splash.setScrollable(false);
        Label title = new Label("Poker Ace");

        // The UIID is used to determine the appearance of the component in the theme
        title.setUIID("SplashTitle");
        Label subtitle = new Label("By Codename One");
        subtitle.setUIID("SplashSubTitle");

        splash.addComponent(BorderLayout.NORTH, title);
        splash.addComponent(BorderLayout.SOUTH, subtitle);
        Label as = new Label(cards.getImage("as.png"));
        Label ah = new Label(cards.getImage("ah.png"));
        Label ac = new Label(cards.getImage("ac.png"));
        Label ad = new Label(cards.getImage("ad.png"));

        // a layered layout places components one on top of the other in the same dimension, it is
        // useful for transparency but in this case we are using it for an animation
        final Container center = new Container(new LayeredLayout());
        center.addComponent(as);
        center.addComponent(ah);
        center.addComponent(ac);
        center.addComponent(ad);

        splash.addComponent(BorderLayout.CENTER, center);

        splash.show();
        splash.setTransitionOutAnimator(CommonTransitions.createCover(CommonTransitions.SLIDE_VERTICAL, true, 800));

        // postpone the animation to the next cycle of the EDT to allow the UI to render fully once
        Display.getInstance().callSerially(new Runnable() {
            public void run() {
                // We replace the layout so the cards will be laid out in a line and animate the hierarchy
                // over 2 seconds, this effectively creates the effect of cards spreading out
                center.setLayout(new BoxLayout(BoxLayout.X_AXIS));
                center.setShouldCalcPreferredSize(true);
                splash.getContentPane().animateHierarchy(2000);

                // after showing the animation we wait for 2.5 seconds and then show the game with a nice
                // transition, notice that we use UI timer which is invoked on the Codename One EDT thread!
                new UITimer(new Runnable() {
                    public void run() {
                        showGameUI();
                    }
                }).schedule(2500, false, splash);
            }
        });
    }

    /**
     * This is the method that shows the game running, it is invoked to start or restart the game
     */
    private void showGameUI() {
        // we use the java.util classes to shuffle a new instance of the deck
        final List<Card> shuffledDeck = new ArrayList<Card>(Arrays.asList(deck));
        Collections.shuffle(shuffledDeck);

        final Form gameForm = new Form();
        gameForm.setTransitionOutAnimator(CommonTransitions.createCover(CommonTransitions.SLIDE_VERTICAL, true, 800));
        Container gameFormBorderLayout = new Container(new BorderLayout());

        // while flow layout is the default in this case we want it to center into the middle of the screen
        FlowLayout fl = new FlowLayout(Component.CENTER);
        fl.setValign(Component.CENTER);
        final Container gameUpperLayer = new Container(fl);
        gameForm.setScrollable(false);

        // we place two layers in the game form, one contains the contents of the game and another one on top contains instructions
        // and overlays. In this case we only use it to write a hint to the user when he needs to swap his cards
        gameForm.setLayout(new LayeredLayout());
        gameForm.addComponent(gameFormBorderLayout);
        gameForm.addComponent(gameUpperLayer);

        // The game itself is comprised of 3 containers, one for each player containing a grid of 5 cards (grid layout
        // divides space evenly) and the deck of cards/dealer. Initially we show an animation where all the cards
        // gather into the deck, that is why we set the initial deck layout to show the whole deck 4x13
        final Container deckContainer = new Container(new GridLayout(4, 13));
        final Container playerContainer = new Container(new GridLayout(1, 5));
        final Container rivalContainer = new Container(new GridLayout(1, 5));

        // we place all the card images within the deck container for the initial animation
        for(int iter = 0 ; iter < deck.length ; iter++) {
            Label face = new Label(cards.getImage(deck[iter].getFileName()));

            // containers have no padding or margin this effectively removes redundant spacing
            face.setUIID("Container");
            deckContainer.addComponent(face);
        }

        // we place our cards at the bottom, the deck at the center and our rival on the north
        gameFormBorderLayout.addComponent(BorderLayout.CENTER, deckContainer);
        gameFormBorderLayout.addComponent(BorderLayout.NORTH, rivalContainer);
        gameFormBorderLayout.addComponent(BorderLayout.SOUTH, playerContainer);
        gameForm.show();

        // we wait 1.8 seconds to start the opening animation, otherwise it might start while the transition is still running
        new UITimer(new Runnable() {
            public void run() {
                // we add a card back component and make it a drop target so later players
                // can drag their cards here
                final Button cardBack = new Button(cards.getImage("card_back.png"));
                cardBack.setDropTarget(true);

                // we remove the button styling so it doesn't look like a button by using setUIID.
                cardBack.setUIID("Label");
                deckContainer.addComponent(cardBack);

                // we set the layout to layered layout which places all components one on top of the other then animate
                // the layout into place, this will cause the spread out deck to "flow" into place
                // Notice we are using the AndWait variant which will block the event dispatch thread (legally) while
                // performing the animation, normally you can't block the dispatch thread (EDT)
                deckContainer.setLayout(new LayeredLayout());
                deckContainer.animateLayoutAndWait(3000);


                // we don't need all the card images/labels in the deck, so we place the card back
                // on top then remove all the other components
                deckContainer.removeAll();
                deckContainer.addComponent(cardBack);

                // Now we iterate over the cards and deal the top card from the deck to each player
                for(int iter = 0 ; iter < 5 ; iter++) {
                    Card currentCard = shuffledDeck.get(0);
                    shuffledDeck.remove(0);
                    dealCard(cardBack, playerContainer, cards.getImage(currentCard.getFileName()), currentCard);
                    currentCard = shuffledDeck.get(0);
                    shuffledDeck.remove(0);
                    dealCard(cardBack, rivalContainer, cards.getImage("card_back.png"), currentCard);
                }

                // After dealing we place a notice in the upper layer by fade in. The trick is in adding a blank component
                // and replacing it with a fade transition
                TextArea notice = new TextArea("Drag cards to the deck to swap\ntap the deck to finish");
                notice.setEditable(false);
                notice.setFocusable(false);
                notice.setUIID("Label");
                notice.getUnselectedStyle().setAlignment(Component.CENTER);
                gameUpperLayer.addComponent(notice);
                gameUpperLayer.layoutContainer();

                // we place the notice then remove it without the transition, we need to do this since a text area
                // might resize itself so we need to know its size in advance to fade it in.
                Label temp = new Label(" ");
                temp.setPreferredSize(new Dimension(notice.getWidth(), notice.getHeight()));
                gameUpperLayer.replace(notice, temp, null);

                gameUpperLayer.layoutContainer();
                gameUpperLayer.replace(temp, notice, CommonTransitions.createFade(1500));

                // when the user taps the card back (the deck) we finish the game
                cardBack.addActionListener(new ActionListener() {
                    public void actionPerformed(ActionEvent evt) {
                        // we clear the notice text
                        gameUpperLayer.removeAll();

                        // we deal the new cards to the player (the rival never takes new cards)
                        while(playerContainer.getComponentCount() < 5) {
                            Card currentCard = shuffledDeck.get(0);
                            shuffledDeck.remove(0);
                            dealCard(cardBack, playerContainer, cards.getImage(currentCard.getFileName()), currentCard);
                        }

                        // expose the rivals deck then offer the chance to play again...
                        for(int iter = 0 ; iter < 5 ; iter++) {
                            Button cardButton = (Button)rivalContainer.getComponentAt(iter);

                            // when creating a card we save the state into the component itself which is very convenient
                            Card currnetCard = (Card)cardButton.getClientProperty("card");
                            Label l = new Label(cards.getImage(currnetCard.getFileName()));
                            rivalContainer.replaceAndWait(cardButton, l, CommonTransitions.createCover(CommonTransitions.SLIDE_VERTICAL, true, 300));
                        }

                        // notice dialogs are blocking by default so its pretty easy to write this logic
                        if(!Dialog.show("Again?", "Ready to play Again", "Yes", "Exit")) {
                            Display.getInstance().exitApplication();
                        }

                        // play again
                        showGameUI();
                    }
                });
            }
        }).schedule(1800, false, gameForm);
    }

    /**
     * A blocking method that creates the card deal animation and binds the drop logic when cards are dropped on the deck
     */
    private void dealCard(Component deck, final Container destination, Image cardImage, Card currentCard) {
        final Button card = new Button();
        card.setUIID("Label");
        card.setIcon(cardImage);

        // Components are normally placed by layout managers so setX/Y/Width/Height shouldn't be invoked. However,
        // in this case we want the layout animation to deal from a specific location. Notice that we use absoluteX/Y
        // since the default X/Y are relative to their parent container.
        card.setX(deck.getAbsoluteX());
        int deckAbsY = deck.getAbsoluteY();
        if(destination.getY() > deckAbsY) {
            card.setY(deckAbsY - destination.getAbsoluteY());
        } else {
            card.setY(deckAbsY);
        }
        card.setWidth(deck.getWidth());
        card.setHeight(deck.getHeight());
        destination.addComponent(card);

        // we save the model data directly into the component so we don't need to keep track of it. Later when we
        // need to check the card type a user touched we can just use getClientProperty
        card.putClientProperty("card", currentCard);
        destination.getParent().animateHierarchyAndWait(400);
        card.setDraggable(true);

        // when the user drops a card on a drop target (currently only the deck) we remove it and animate it out
        card.addDropListener(new ActionListener() {
            public void actionPerformed(ActionEvent evt) {
                evt.consume();
                card.getParent().removeComponent(card);
                destination.animateLayout(300);
            }
        });
    }

    public void stop() {
        current = Display.getInstance().getCurrent();
    }

    public void destroy() {
    }


    static class Card {
        private char suite;
        private int rank;

        public Card(char suite, int rank) {
            this.suite = suite;
            this.rank = rank;
        }

        private String rankToString() {
            if(rank > 10) {
                switch(rank) {
                    case 11:
                        return "j";
                    case 12:
                        return "q";
                    case 13:
                        return "k";
                    case 14:
                        return "a";
                }
            }
            return "" + rank;
        }

        public String getFileName() {
            return rankToString() + suite + ".png";
        }
    }
}