Lessons for Android Fundamentals
- Activities and Fragments
- RecyclerView
- Architectural Design Patterns
- MVVM
- Fragment Navigation
- View Binding
- ViewModels
- Repository
- Coroutines
- Room Database Library
- Retrofit library
- RxJava
- Flows
- Clean Architecture
- Use Cases
- Useful
- Gradle
- Dagger Theory
- Dagger Implementations
- Testing
- Regression Testing
An activity is a screen in an android application which has its own layout, lifecycle conisting of various states.
A Fragment represents a reusable portion of your app's UI. A fragment defines and manages its own layout, has its own lifecycle, and can handle its own input events.
An activity lifecycle consists of the different states an activity goes through based on various inputs from the user.
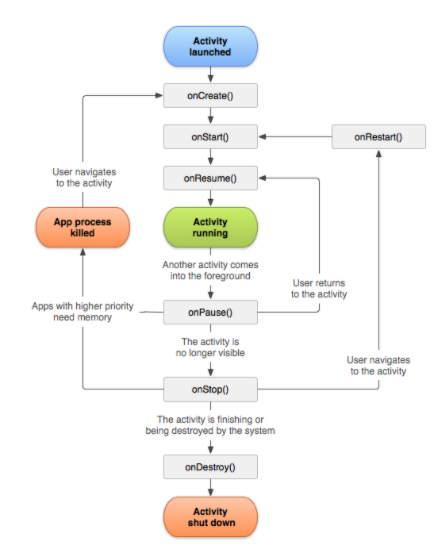
Fig 1: Activity Lifecycle
onCreate() : The onCreate() method is where you should do any one-time initializations for your activity. For example, in onCreate() you inflate the layout, define click listeners, or set up data binding. This is the first method that is called and is called once during the activity's lifecycle.
onStart() : The onStart() method is called right after the onCreate(). After this method is complete the user can see the activity on the screen. This is also called when you are bringing the activty back to the screen after it was not visible to the user, after onStop().
onResume(): This is called right after onStart() This is also called when you are making the activity active again after it was rendereced inactive due to another android component on the screen.
onPause(): This is called when the activity is visible to the user but is inactive. You can go from this state to onResume() directly when the activity is made active again.
onStop(): This is called when the activity is no longer visible to the user but is also not destroyed. The lifecycle goes from this state to onStart() when the activity is made visible again an example of this state being initiated is when the user minimizes the app.
onDestroy(): This is called when the activity is getting destroyed. For example when one closes the app.
onRestart(): This is called when the activity goes from the onStop() state to the onStart() state.
A fragment is a reusable component in android which has its own lifecycle and layout. We can have multiple fragments inside of one activity.
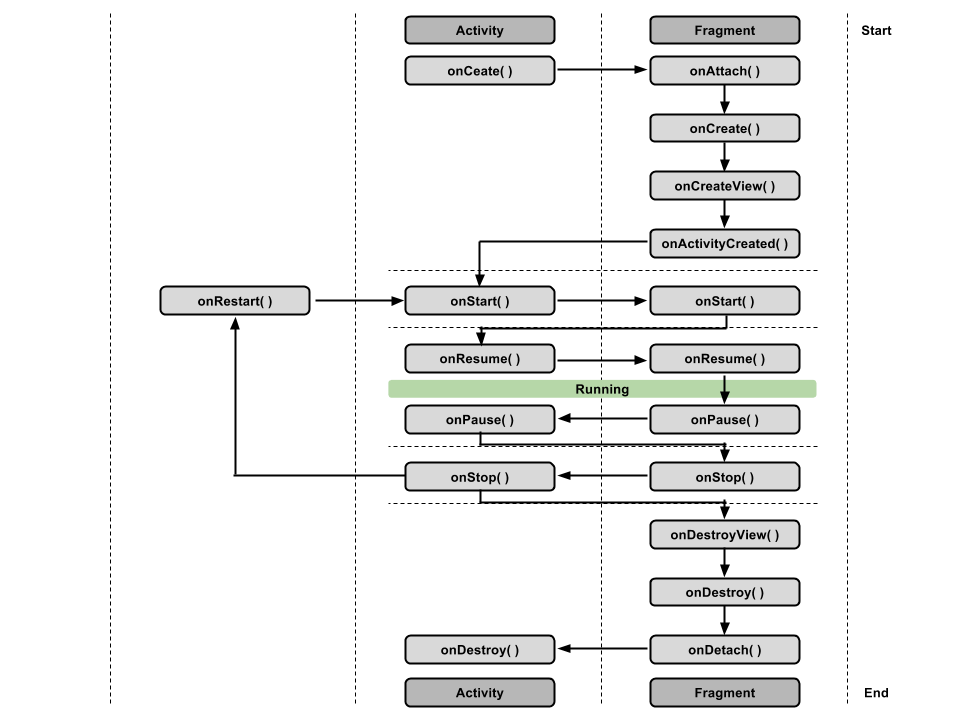
Fig 2: Relationship Between Activity and Fragment Lifecycles
onAttach(): Called when the fragment is associated with its owner activity.
onCreate(): Similarly to onCreate() for the activity, onCreate() for the fragment is called to do initial fragment creation (other than layout).
onCreateView(): Called to inflate the fragment's layout.
onViewCreated(): Called immediately after onCreateView() has returned, but before any saved state has been restored into the view.
onStart(): Called when the fragment becomes visible; parallel to the activity's onStart().
onResume(): Called when the fragment gains the user focus; parallel to the activity's onResume().
onPause(): Called when the fragment loses the user focus; parallel to the activity's onPause().
onStop(): Called when the fragment is no longer visible on screen; parallel to the activity's onStop().
onDestroyView(): Called when the fragment's view is no longer needed, to clean up the resources associated with that view.
Displaying a list or grid of data is one of the most common UI tasks on Android. To facilitate such feature a RecylerView widget is used.
RecylerView is able to facilitate showing a large list in a very efficient manner. It is efficient because:
-
RecylerView only does work to draw items which are currently on screen
-
If an item is off screen the item is filled with the new content which is now visible and has the old content removed. Effectively recycling the holder of the item.
-
When an item changes, RecyclerView has the ability to change that one item instead of redrawing the entire list
The RecyclerView uses an adapater to transform app data into something the RecyclerView can display without changing how the app stores and processes the data.
To display data in a RecylerView the following is needed:
- Data to display
- RecyclerView instance in layout file to be a container for views
- A layout file for each item of data.
- A layout manager which handles the organization of UI copmponents in a view
- A view holder which extends the
ViewHolderclass. It contains the view information for displaying one item from the item's layout. View holders have the information that the recyclerView uses to move information efficiently around the screen - An adapter which adapts the data to be displayed in a
ViewHolder. The RecyclerView uses the adapter to figure out how to display the data on the screen
Dependency in the module build.gradle
implementation 'androidx.recyclerview:recyclerview:1.0.0'RecyclerView Instance in Layout file with LayoutManager attribute
    <androidx.recyclerview.widget.RecyclerView
        android:id="@+id/recycler_view"
        android:layout_width="0dp"
        android:layout_height="0dp"
        app:layout_constraintStart_toStartOf="parent"
        app:layout_constraintEnd_toEndOf="parent"
        app:layout_constraintBottom_toTopOf="@id/edit_text"
        app:layout_constraintTop_toTopOf="parent"
        app:layoutManager="androidx.recyclerview.widget.LinearLayoutManager"/>
Layout for item
<?xml version="1.0" encoding="utf-8"?>
<androidx.constraintlayout.widget.ConstraintLayout xmlns:android="http://schemas.android.com/apk/res/android"
    xmlns:app="http://schemas.android.com/apk/res-auto"
    xmlns:tools="http://schemas.android.com/tools"
    android:layout_width="match_parent"
    android:layout_height="wrap_content">

    <TextView
        android:id="@+id/tvTitle"
        android:layout_width="0dp"
        android:layout_height="wrap_content"
        android:textSize="24dp"
        android:text="To do Item"
        android:layout_marginTop="16dp"
        android:layout_marginStart="16dp"
        android:layout_marginEnd="16dp"
        app:layout_constraintEnd_toStartOf="@id/checkBox"
        app:layout_constraintStart_toStartOf="parent"
        app:layout_constraintTop_toTopOf="parent" />

    <CheckBox
        android:id="@+id/checkBox"
        android:layout_marginEnd="16dp"
        android:layout_marginTop="8dp"
        android:layout_width="wrap_content"
        android:layout_height="wrap_content"
        app:layout_constraintEnd_toEndOf="parent"
        app:layout_constraintTop_toTopOf="parent" />
</androidx.constraintlayout.widget.ConstraintLayout>
ViewHolder for items as an inner class in the adapter
inner class ToDoViewHolder(itemView: View): RecyclerView.ViewHolder(itemView)An adapter which adapts the data for the RecyclerView to be displayed
import android.view.LayoutInflater
import android.view.View
import android.view.ViewGroup
import androidx.recyclerview.widget.RecyclerView
import kotlinx.android.synthetic.main.to_do_item.view.*

class TodoAdapter(var items: List<Todo>):RecyclerView.Adapter<TodoAdapter.ToDoViewHolder>() {

    inner class ToDoViewHolder(itemView: View): RecyclerView.ViewHolder(itemView)

    // Inflate the View
    override fun onCreateViewHolder(parent: ViewGroup, viewType: Int): ToDoViewHolder {
        val view = LayoutInflater.from(parent.context).inflate(R.layout.to_do_item, parent, false)
        return ToDoViewHolder(view)
    }

    override fun onBindViewHolder(holder: ToDoViewHolder, position: Int) {
        holder.itemView.apply {
            tvTitle.text = items[position].title
            checkBox.isChecked = items[position].isChecked
        }
    }

    override fun getItemCount(): Int {
        return items.size
    }
}
Set the adapter to the RecyclerView inside of an activity or fragment
        var toDoList = mutableListOf<Todo>(
            Todo("Get groceries", false),
            Todo("Finish android fundamentals Codelabs", true),
            Todo(";)", false),
            )

        val adapter = TodoAdapter(toDoList)
        binding.recyclerView.adapter = adapter
DiffUtil is a utility class whih compares differences between two lists and provides a list of update operations to convert one list into another list. It uses Eugene Myers difference alogorithm to accomplish this.
The advanatage to using diffUtils is that only the views for which the data has changed will be redrawn and the other views in the recylcerview will remain the same.
This is an alternative to notifyDataSetChanged() which is not efficient as it updates all the views in the recyclerview.
class ListDiffUtil(private val oldList: List<Person>, private val newList: List<Person>): DiffUtil.Callback() {
    override fun getOldListSize() = oldList.size

    override fun getNewListSize() = newList.size

    override fun areItemsTheSame(oldItemPosition: Int, newItemPosition: Int) = oldList[oldItemPosition].id == newList[newItemPosition].id

    override fun areContentsTheSame(oldItemPosition: Int, newItemPosition: Int): Boolean {
        if (oldList[oldItemPosition].id != newList[newItemPosition].id
            || oldList[oldItemPosition].age != newList[newItemPosition].age
            || oldList[oldItemPosition].name != newList[newItemPosition].name) {
            return false
        }
        return true
    }
}The purpose of architecural design patterns is to assist in 4 main categories: Robustness, Testability, Modularity, Extensibility.
- Robustness: This refers to the ability to quickly make small changes to design, suggested by product to existing features in the application
- Testability: This refers to having the ability to unit test both the UI and business logic of the application. having thew ability to tes both the UI and business logic allows us to build more stable applications. MVP and MVVM are great for unit testing both business and UI logic. MVC, allows us an easy way to test business logic but not UI logic.
- Modularity: This allows us to keep each individual class much smaller and more strictly follow the single-purpose principle which also makes the code more readable.
- Extensability: Following a proper architectural design pattern will also allow us to easily extend the applications and build new features. As new features will not adversely affect old features, due to sepearion of concerns.
There are three main types of architectural design patterns in Android:
- MVC
- MVP
- MVVM
| MVC | MVP | MVVM | |
|---|---|---|---|
| Architecture |  |
 |
 |
| View | The XML elements refer to the views. The View is unaware of the controller. | Activity or Fragment is the View. The View holds a reference of the presenter but va an interface. | Activity or Fragment is the View. The View holds an instabnce of the ViewModel. |
| Model | Model does not contain reference to view or controller making it easily unit testable | The presenter has reference to the model but the model has no reference to the presenter | Model does not contain reference to ViewModel or View. The repository is responsible of getting the data or updaing the data in the model. Any change in model is updated via LiveData/State Flows |
| Controller/Presenter/ViewModel | Controller is the Activity in the architectural pattern and is tightly coupled with the view making the ui-logic difficult to test | The presenter is instatiated with an instance of the view. The presenter and the view communicate via an interface. This makes the UI logic in the presenter testable. The View has an instance of the presenter. | The view has an instnce of the ViewModel. The ViewModel is observed on the view. The ViewModel has an instance of the repository. The UI-Logic inside the viewmodel can also be unit-tested very well due to this loose coupling. |
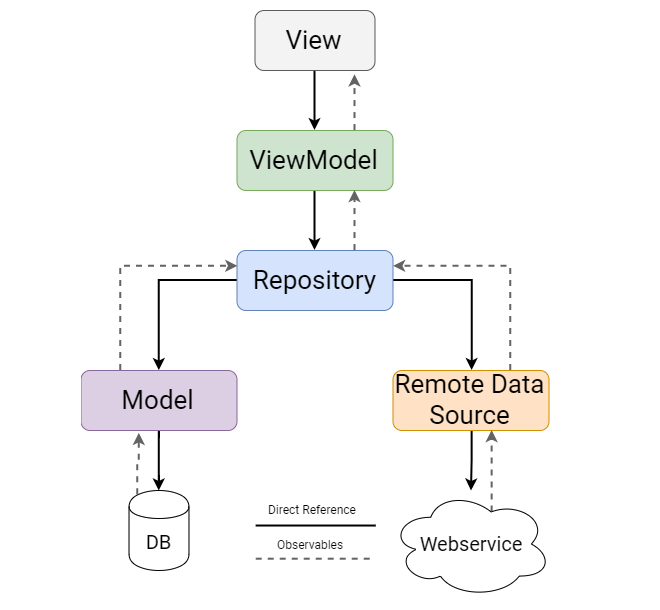
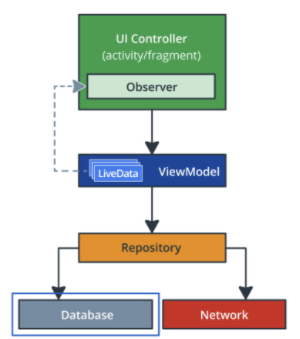
The following is the basic structure of Model View ViewModel architecture
A Fragment represents a portion of the User Interface inside of an activity which is resuable. It has its own layout and its own lifectycle. One can also add or remove fragments inside of an Activity.
To make a Fragment compile one has to create a binding object inflate the Fragment's view
package com.example.android.navigation

import android.os.Bundle
import androidx.fragment.app.Fragment
import android.view.LayoutInflater
import android.view.View
import android.view.ViewGroup
import androidx.databinding.DataBindingUtil
import com.example.android.navigation.databinding.FragmentTitleBinding

class TitleFragment : Fragment() {

    override fun onCreateView(inflater: LayoutInflater, container: ViewGroup?,
                              savedInstanceState: Bundle?): View? {
        val binding = DataBindingUtil.inflate<FragmentTitleBinding>(inflater, R.layout.fragment_title, container, false)
        return binding.root
    }
}
To facilitate navigation developer needs the following variable for the navigation library in the project level gradle file
buildscript {
    ext {
        ...
        navigationVersion = "2.3.0"
        ...
    }
    ...
}
Add the following dependency to the module level gradle file
dependencies {
    ....
    //Navigation Library
    implementation "androidx.navigation:navigation-fragment-ktx:$navigationVersion"
    implementation "androidx.navigation:navigation-ui-ktx:$navigationVersion"
  ...
}
Create the navigation graph by right clicking on res > Android Resource File > selecting Navigation form Android Resource type
The navigation host fragment is often called the NavHostFragment and facilitates the launching and removing of fragments directed by the navigation graph.
It is defined in the layout file of one of the activities in the following manner
<layout xmlns:android="http://schemas.android.com/apk/res/android"
    xmlns:app="http://schemas.android.com/apk/res-auto">

        <LinearLayout
            android:layout_width="match_parent"
            android:layout_height="match_parent"
            android:orientation="vertical">

            <!-- TODO (04) Add a fragment tag for the titleFragment in the LinearLayout
                 Use @+id/titleFragment for the android:id
                 Use com.example.android.navigation.TitleFragment for the android:name
                 Use match_parent for the layout_height and layout_width -->
            <fragment
                android:id="@+id/myNavHostFragment"
                android:name="androidx.navigation.fragment.NavHostFragment"
                android:layout_width="match_parent"
                android:layout_height="match_parent"
                app:navGraph = "@navigation/navigation"
                app:defaultNavHost="true" />

        </LinearLayout>

</layout>
In order to navigate to a different fragment from the current fragment one has to add the follow dependencies to the project-level build.gradle file
// Project level build.gradle
buildscript {
    repositories {
        google()
    }
    dependencies {
        classpath("androidx.navigation:navigation-safe-args-gradle-plugin:$nav_version")
    }
}
We will also need to add the following plugin to the module-level build.gradle file
// Module level build.gradle.
plugins {
    id 'androidx.navigation.safeargs'
}
The following code is how to navigate to SecondFragment from ListFragment
   val action = ListFragmentDirections.actionListFragmentToSecondFragment()
Navigation.findNavController(view).navigate(action)How to turn view binding on in the module level build.gradle
android {
    ...
    buildFeatures {
        viewBinding = true
    }
}The VeiwModel class allows one ot store and manage UI related data in a lifecycle conscious way. It allows the data to survive device configuration changes such as keyboard availiability and screen rotations.
The ViewModelProvider class is used to instantiate ViewModel object that survives configuration changes. This factory may or may not contain constructor parameters.
If the ViewModel is created inside of the UI controller without the ViewModelProvider, when there is a deivice configuration change like a screen rotation where the UI Controller is destroyed the repective Viewmodel will also be destryoed.
Instantiating a ViewModel using a ViewModelProvider ensures that the ViewModel is created in association with the given lifecycle scope of the UI Controller.
Example:
viewModel = ViewModelProvider(this).get(GameViewModel::class.java)The ViewModel should never contain references to fragments, activities, or views, because activities, fragments, and views do not survive configuration changes. The ViewModel is destroyed when the respective UI-Controller is finished.
In order to understand what ViewModelFactory is we have to first understand the factory method pattern. This pattern is a creational design pattern that uses factory methods to create objects that is an instance of the same class.
Sometimes you need the data right when the viewModel is initialized. We use a ViewModelFactory to create a parameterized consructor for the viewModel using viewModelFactory
Inside of UI-Controller (Activity or Fragment)
Example: ViewModelFactory
class ScoreViewModelFactory(private val finalScore: Int): ViewModelProvider.Factory {

    override fun <T : ViewModel?> create(modelClass: Class<T>): T {
        if (modelClass.isAssignableFrom(ScoreViewModel::class.java)) return ScoreViewModel(finalScore) as T
        throw  IllegalArgumentException("Unknown ViewModel class")
    }

}
Example: Instantiating ViewModel inside of UI-Controller
viewModelFactory = ScoreViewModelFactory(ScoreFragmentArgs.fromBundle(requireArguments()).score)
viewModel = ViewModelProvider(this,viewModelFactory).get(ScoreViewModel::class.java)
binding.scoreText.text = viewModel.score.toString()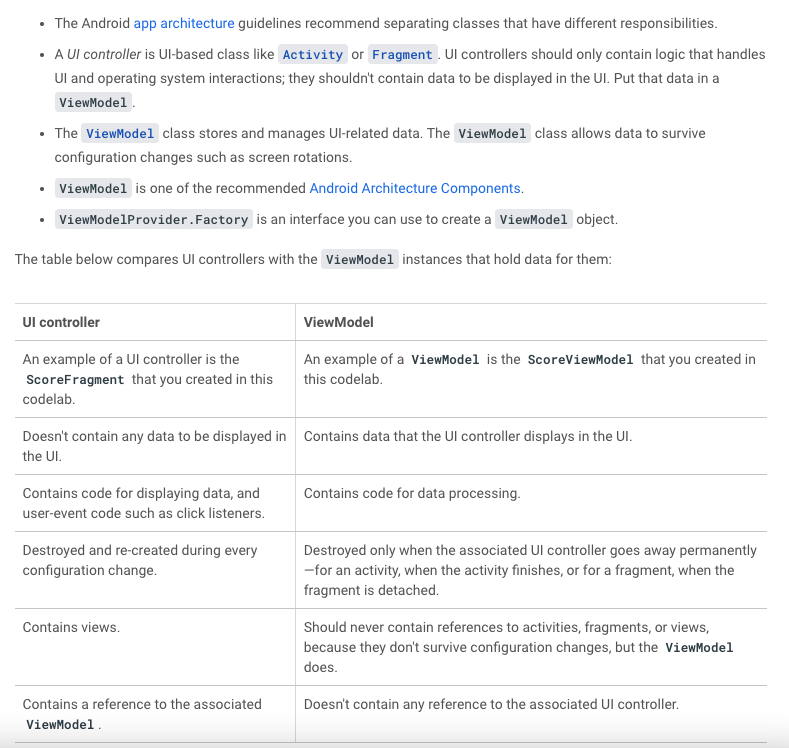
Source: ViewModels Codelabs
The repositoy class abstracts access to multiple data sources.
In order to understand coroutines we have to first understand how our applications work from an Operating systems standpoint first. When we launch our application, we launch an instance of our program. We call this instance a process. The process is executed by a thread.
This thread in Android is often referred to as the main thread. A thread can be thought of as an infinite loop that is constantly running and executing multiple tasks.
One of major tasks that the Main thread or UI thread runs is drawing of the UI. In fact the main thread draws the UI of your application 60 times per second. This thread along with drawing the uUI can perform other inexpensive opertaions such as logical or mathematical operations. However, some operations such as a network call or a database query can take an unexpected period of time. Waiting for this type of operations will cause your application to freeze.
To prevent this we have to create a new paradigm of programming called asynchronous programming. Asynchronous programming allows these expensive operations to take place in a manner such that the main thread is not blocked.
Running a long running task such as reading an entity from a database or making a call to the internet can cause delays in the application and disrupt the user experience if they are run on the main thread. To overcome this issue coroutines are used.
-
Coroutines are asynchronous: Coroutine run independently to the main execution steps of the program. This is acheived by running the expernsive operation in a background thread.
-
Coroutines are non-blocking: Coroutines are non-blocking meaning the main or UI-thread is not stopped while coroutines are running.
-
Coroutines use suspend functions to make asynchronous code sequential
Coroutiners can suspend execution without blocking, the execution. The main difference being that when a thread is suspended other work can happen whereas when a thread is blocked all work on the thread is stopped.

To use coroutines in Kotlin three components are needed:
- A job
- A dispatcher
- A scope
Job: Basically, a job is anything that can be canceled. Every coroutine has a job, and you can use the job to cancel the coroutine. Jobs can be arranged into parent-child hierarchies. Canceling a parent job immediately cancels all the job's children, which is a lot more convenient than canceling each coroutine manually.
Dispatcher: The coroutine dispatcher determines what thread or threads the corresponding coroutine uses for its execution. The coroutine dispatcher can confine coroutine execution to a specific thread, dispatch it to a thread pool, or let it run unconfined. There are three types of dispatcher based upon the type of operation being executed by the coroutine.
- Default: CPU intensive tasks such as sorting a large list
- Main: Lightweight work such as UI functions or update LiveData
- IO: Network or database calls
Scope: Scope in Kotlin's coroutines can be defined as the restrictions within which the Kotlin coroutines are being executed. Scopes help to predict the lifecycle of the coroutines.
The general pattern for using coroutines to retrieve data froma a databse is as follows:
- create a method with a scope for the operation
- call a suspend function which does calls a query from the DAO
private fun  performOperation() {
	viewModelScope.launch {
		suspendfunction()
	}
}

private suspend fun suspendFunciton(){
	longRunningOperation()
}
Source: Coroutines and Room
What is Room?
Room is a database library that is part of the Android Jetpack libraries. It is an abstraction on top of SQLite database. Room simplifies the process of setting up configuring and interacting with the database. Room also provides the ability for your app to interact with the database using ordinary function calls. It has a query syntax allowing you to search data.
The following diagram provides information on which section of the your application, Room operates in:
Entity: An entity represents an object along with its properties which is to be stored in a database. Each instance of an entity describes a table in a database. The properties of an entity represent the columns of the table.
Queries: A query is a request for information from a database table or from a combination of tables. Queries can be of 4 types: Creating, Reading, Updating and Deleting.
Room converts kotlin data classes into entities which can be stred in SQLite database tabels and create functions which can be used to make queries.
Each entity is defined as an anotatted data class and interactions with that entity is done via an anotated interface called a data access object or DAO.
How to declare an entity:
import androidx.room.Entity

@Entity(tableName = "daily_sleep_quality_table")
data class SleepNight(
    // A primary key is the column or columns that contain values that uniquely identify each row in a table
    @PrimaryKey(autogenerate = true)
    var nightID: Long = 0L,
    val startTimeMilli: Long = System.currentTimeMillis(),
    var endTimeMilli: Long = startTimeMilli,
    var sleepQuality: Int = -1
)
DAO provides methods to create, read, update and delete entities in a database.
When using Room database, the database is queried using Kotlin fucntions. These Kotlin function map to SQL queries. the developer has to define this mapping in the DAO using annotations and Room creates the necessary code needed to complete the mapping.
Example:
import androidx.lifecycle.LiveData
import androidx.room.Dao
import androidx.room.Insert
import androidx.room.Query
import androidx.room.Update

@Dao
interface SleepDatabaseDao{
    @Insert
    suspend fun insert(night: SleepNight)

    @Update
    suspend fun query(night: SleepNight)

    @Query("SELECT * from daily_sleep_quality_table WHERE nightID = :key")
    suspend fun get(key: Long): SleepNight?

    @Query("DELETE from daily_sleep_quality_table")
    fun clear()

    @Query("SELECT * from daily_sleep_quality_table ORDER BY nightID DESC LIMIT 1")
    suspend fun getTonight(): SleepNight?

    @Query("SELECT * from daily_sleep_quality_table ORDER BY nightID")
    suspend fun getAllNights(): LiveData<List<SleepNight>>

}
Example:
Template script to create database
import android.content.Context
import androidx.room.Database
import androidx.room.Room
import androidx.room.RoomDatabase

@Database(entities = [SleepNight::class], version = 1, exportSchema = false)
abstract class SleepDatabase : RoomDatabase() {

    abstract val sleepDatabaseDao: SleepDatabaseDao

    companion object {

        @Volatile //Write's to this database is immediately made available to other threads
        private var INSTANCE: SleepDatabase? = null

        fun getInstance(context: Context): SleepDatabase {
            synchronized(this) { // protected from concurrent execution by multiple threads
                var instance = INSTANCE

                if (instance == null) {
                    instance = Room.databaseBuilder(
                        context.applicationContext,
                        SleepDatabase::class.java,
                        "sleep_history_database"
                    )
                        .fallbackToDestructiveMigration()
                        .build()
                    INSTANCE = instance
                }
                return instance
            }
        }
    }
}

Clean architecture allows us to separate our app into layers which deal with data fetching, data-manipulation and data visualizing separately. MVVM is generally part of the presentation layer.
The following Diagram is a diagram of a layered architecture that follows the Clean Architecture principles and is usually used in Android development:

The data layer consists of application data and business logic. The business logic determines how data for the application should be created, stored and changed. The data layer is made of repositories which can interact with one or more data sources.
The data layer consists of repositories and data sources.
Data sources provides the data that the app needs to function. They can present data from the network, local database or even from memory. They have the reponsibility of dealing with only one ource of data or one unit of business logic such as articles, movies, or books.
The repositories are responsible for exposing the datya to the rest of the app but thety are also respobsioble for centralizing changes, resolving conflicts between multiple data sources abnd containing business logic.
One repositoy should deal with one data type only. So, payments should have payments repository and movies should have a seperate repository.
The entry point to the data layer is always the repository.
The data exposed by the data layer should be immutable so other classes cannot tamper with it. This would risk putting the valeues being received in an inconsistent state.
Immutable data can also be safely handled by multiple threads.
Gradle is a build automation tool. A build automation tool is used to automate the creation of applications. The building process includes compiling, linking, and packaging the code. The process becomes more consistent with the help of build automation tools. It takes all the configurations stated in the project and app level build.gradle files and executes gradle tasks in the correct order to put everything together in an executable or apk file.
There are mainly two types of Gradle files in Android App: Project Level Gradle and Module Level Gradle.
The project level gradle file has configuration specific to our project. The app level build gradle file has Configuration specific to the app itself.
There are two different versions of Gradle:
- Gradle Groovy
- Gradle Kotlin DSL (Domain-specific language)
Every Android project has a gradlew file which is a binary file which is executable.
gradlew file ensures the specific version of gradle that is to be installed and runs the specific tasks.
Everything gradle can do is considered a task. and the gradlew file can be used to run specifc tasks ./gradlew build will build an app specified in the project.
Implementing dependency injection provides you with the following advantages:
- Reusability of code.
- Ease of refactoring.
- Ease of testing.
What is dependency inject and why do we need Dagger?
Dependency injection is simply a way of providing a class all of the classes it requires to instantiate itself and function properly. This can howveer lead to a lot of boilerplate code being written since a class can depend on other classes, which can further depend on other classes. We can use the factory pattern to instantiate classes but that can also lead to a lot of boilerplate code. To prevent this from happening we need a library which can automate the process of provdong a class with its dependencies for us. This libarray is called Dagger.
Dagger is responsible for creating the application graph of an application which is all the classes of its app and its dependenices.
Dagger is a library which generates code to initialize classes by instantiating and providing all of its dependencies. It allows the developer to use a class without worrying about initializing all of its dependencies explicitly.
In the app level build.gradle file add the following:
plugins {
   id 'com.android.application'
   id 'kotlin-android'
   id 'kotlin-android-extensions'
   id 'kotlin-kapt' //annotation processing is supported in Kotlin using kotlin-kapt
}

...

dependencies {
    ...
    def dagger_version = "2.40"
    implementation "com.google.dagger:dagger:$dagger_version" //contains all the annotations
    kapt "com.google.dagger:dagger-compiler:$dagger_version" // contains the annotation processor which generates code for us
}
Dagger is implemented using Java's annotation processor and generates code at compile time using an annotation processor, which are supported in Kotlin with the kapt compiler plugin.
The library implementation "com.google.dagger:dagger:$dagger_version" consists of all the annotations which can be used in the application and the dagger-compiler is the annotation processor that will generate the code for us.
@Inject: Dagger needs to know how to create the instances of the classes in the application graph. One way to do this is to annotate the class constructor with the @Inject annotation.
// @Inject tells Dagger how to provide instances of this type
// Dagger also knows that UserManager is a dependency
class RegistrationViewModel @Inject constructor(val userManager: UserManager) {
    ...
}
In the snippet above the @Inject annotation tells dagger how ti create the RegistrationViewModel and that RegistrationViewModel has a dependency which is of type UserManager. To add an annotation to a constructor in Kotlin one has to add the keyword constructor and instrodue the annotation just before it.
Dagger however doesn't know how to create instances of UserManager so the same has to be done to the constructor of the UserManager.
class UserManager @Inject constructor(private val storage: Storage) {
    ...
}
Storage however is an interface so we have to tell dagger how to instantiate it in a different manner.
Certain classes however, are instatiated by the the system such as Activities and Fragments so we cannot add @Inject to its constructor instead we must use field injection.
When the @Inject annotation is used with a field it is telling dagger that it needs to populate the field with instances of its type.
Components in Dagger decide how objects need to be instantiated and in which order objects need to be instantiated. In the diagram above AuthComponent and MainComponent are sub-components of AppComponent. Components also consist of their own scopes which ensures objects are instantiated and retained only for the lifetime that they are needed and not for too long, therefore attenuating overhead.
@Component
We want dagger to create the graph of dependencies and be able to give us these dependecies from the graph.To make dagger do it we need to create an interface and annotate it with @Component. Inside the interace we let dagger know that RegistrationActivity requests injection.
import com.example.android.dagger.registration.RegistrationActivity
import dagger.Component

// Definition of a Dagger component
@Component
interface AppComponent {
    // Classes that can be injected by this Component
    fun inject(activity: RegistrationActivity)
}
With the inject(activity: RegistrationActivity) method in the @Component interface, we're telling Dagger that RegistrationActivity requests injection and that it has to provide the dependencies which are annotated with @Inject (i.e. RegistrationViewModel as we defined in the previous step)
Modules in Dagger are units which consists of the dependencies and the locations where dependencies need to be injected @ContributesAndroidInjector states to Dagger where dependencies need to be injected and @Provides annotation tells Dagger what is the dependency. Modules are directed to components which control which dependencies need to go where.
@Module
Similar yo Components, modules tell dagger how to provide instances of a certain type. Dependencies are defined using @Provides and @Binds annotation.
The @Binds annotation is used to tell dagger the implementation it needs to create an instance of the Storage interface. In order to use the @Binds annotation we have to create an abstract method which ultimately also means that the class also has to be defined as abstract. The parameter of the method is the implementation of the interface. The following snippet defines how to use the @Binds annotation to tell dagger how to instantiate an inter=face with a specific implmementation.
import com.example.android.dagger.storage.SharedPreferencesStorage
import com.example.android.dagger.storage.Storage
import dagger.Binds
import dagger.Module

@Module
abstract class StorageModule {

    @Binds
    abstract fun provideStorage(storage: SharedPreferencesStorage): Storage
}
The application graph however, needs to know about the StorageModule we do this inside of the AppComponent in the following manner.
// Definition of a Dagger component that adds info from the StorageModule to the graph
@Component(modules = [StorageModule::class])
interface AppComponent {

    // Classes that can be injected by this Component
    fun inject(activity: RegistrationActivity)
}
However our SharedPreferencesStorage needs an instance of Context. Context is provided by the Android sysdtem and therfore is created outside of the graph. To provide dependencies created outside of the graph we need to use @BindsInstance.
The following is the dependency graph.
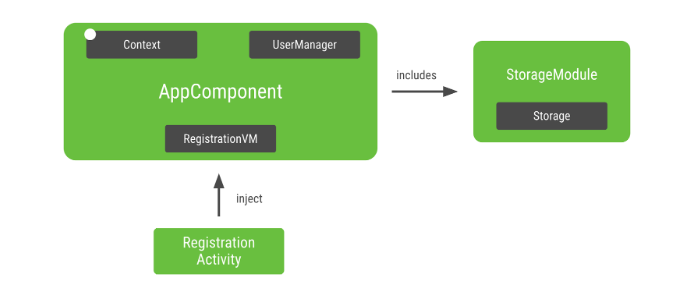
In android the Dagger graph generally lives inside thre APplication class since you want to graph to bne in memory as long as the app is running. This way the grah is attached to the app's lifecycle. In our case we also want to have the application Context available in the graph.
open class MyApplication : Application() {

    // Instance of the AppComponent that will be used by all the Activities in the project
    val appComponent: AppComponent by lazy {
        // Creates an instance of AppComponent using its Factory constructor
        // We pass the applicationContext that will be used as Context in the graph
        DaggerAppComponent.factory().create(applicationContext)
    }

    open val userManager by lazy {
        UserManager(SharedPreferencesStorage(this))
    }
}
The following line inside RegistrationActivity requests dagger to populate the dependencies of RegistrationActivity.
// Request Dagger to inject dependencies
(application as MyApplication).appComponent.inject(this)Instead of an object existing for the lifetime of the application and creating unnecessary overhead. Scoping allows us to create objects which are alive for certain parts of the application.
A common type of scope is @Singleton scope which means objects instantiated using this scope will be alive for the lifetime of the application.
By annotating a component with a scope we state to Dagger that, that component owns that respective scope.
In order to use the same instance of a class as dependency every time we can use something called scoping. Sometimes, you might want to provide the same instance of a dependency in a Component for multiple reasons:
- You want other types that have this type as dependency to share the same instance (e.g. UserManager in our case).
- An object is very expensive to create and you don't want to create a new instance every time it's declared as dependency (e.g. a Json parser).
To scope a Component with @Singleton, all the classes also annotated with @Singleton will be scoped to its lifetime.
For example:
// Definition of a Dagger component
@Singleton
@Component(modules = [StorageModule::class])
interface AppComponent {
and
@Singleton
class UserManager @Inject constructor(private val storage: Storage) {
...
UserManager is now singleton scoped.
We want the registration Fragments to reuse the same ViewModel coming from the Activity, but if the Activity changes, we want a different instance. We need to scope RegistrationViewModel to RegistrationActivity, for that, we can create a new Component for the registration flow and scope the ViewModel to that new registration Component. To achieve this we use Dagger subcomponents.
Subcomponents are components that inherit and extend the object graph of a parent component. Thus, all objects provided in the parent component will be provided in the subcomponent too. In this way, an object from a subcomponent can depend on an object provided by the parent component.
In order to declare a Subcomponent first we have to create an interface and annotate it with @Subcomponent and state the classes into which it will inject.
import com.example.android.dagger.registration.RegistrationActivity
import com.example.android.dagger.registration.enterdetails.EnterDetailsFragment
import com.example.android.dagger.registration.termsandconditions.TermsAndConditionsFragment
import dagger.Subcomponent

@Subcomponent
interface RegistrationComponent {

    @Subcomponent.Factory
    interface Factory {
        fun create(): RegistrationComponent
    }
    // CLasses which can be injected by this component
    fun inject(activity: RegistrationActivity)
    fun inject(fragment: EnterDetailsFragment)
    fun inject(fragment: TermsAndConditionsFragment)
}
We have to now let the original component AppComponent know which components are its subcomponents. To do this we creat a Module and call it AppSubcomponents and declare the subcomponent.
import dagger.Module

@Module(subcomponents = [RegistrationComponent::class])
class AppSubcomponents {

}
We then go to the original AppComponent and add the module we just created to let AppComponent know of its subcomponents and declare the subcomponent with the other modules.
// Definition of a Dagger component
@Singleton
@Component(modules = [StorageModule::class, AppSubcomponents::class])
interface AppComponent {

   ...
In order to scope the component. We should declare the scope not by its purpose such as @RegistrationScope but by the lifetime it fulfills such as @ActivityScope.
So, we have to create a file and call it ActvityScope and declare the annotation.
import javax.inject.Scope

@Scope
@MustBeDocumented
@Retention(value = AnnotationRetention.RUNTIME)
annotation class ActivityScope
We then set the RegistrationComponent to that scope
@ActivityScope
@Subcomponent
interface RegistrationComponent {

    @Subcomponent.Factory
    interface Factory {
        fun create(): RegistrationComponent
    }
    // CLasses which can be injected by this component
    fun inject(activity: RegistrationActivity)
    fun inject(fragment: EnterDetailsFragment)
    fun inject(fragment: TermsAndConditionsFragment)
}
and then set the viewmodel to that scope as well
@ActivityScope
class RegistrationViewModel @Inject constructor(val userManager: UserManager) {
...
}
To declare an activity or fragment as an entity to be injected into follow the following rules: An Activity injects Dagger in the onCreate method before calling super. A Fragment injects Dagger in the onAttach method after calling super.
In the same way the instance of AppComponent is kept in the Application class, since we want to access the AppComponent for the entire lifecycle of the application. Similarly, we must keep an instance of RegistrationComponent in the RegistrationActivity as for every registration activity we want to use a new registration component and access the dependency graph created by that component.
In the app level build.gradle file add the following:
plugins {
   id 'com.android.application'
   id 'kotlin-android'
   id 'kotlin-android-extensions'
   id 'kotlin-kapt' //annotation processing is supported in Kotlin using kotlin-kapt
}

...

dependencies {
    ...
    def dagger_version = "2.40"
    implementation "com.google.dagger:dagger:$dagger_version" //contains all the annotations
    kapt "com.google.dagger:dagger-compiler:$dagger_version" // contains the annotation processor which generates code for us
}
Dagger is implemented using Java's annotation processor and generates code at compile time using an annotation processor, which are supported in Kotlin with the kapt compiler plugin.
The library implementation "com.google.dagger:dagger:$dagger_version" consists of all the annotations which can be used in the application and the dagger-compiler is the annotation processor that will generate the code for us.
Why do we need tests?
During development everytime you add code you might have to test the same interactions over and over again. This is incredibly time consuming an d takes a huge amount of time. To overcome this issue we add tests which will automatically test the behavior of the old features of our app as new features keep getting added. This saves time since if a new piece of code was added which leads to unexpected behavior it will be detected via failing tests.
There are mainly three types of tests:
- Unit tests
- Integration tests
- UI tests (End to end tests)
This tests single units of our app such as testing the functions of a class. This should make up the bulk of the tests in our app, which is approximately 70%.
Tests how two components of our app work together such as Fragment and ViewModel.
This is also known as End to end tests. These are test which check if many or all components of your app work together well and if the UI looks like it should.
The main principle of test deriven development is that we write our unit tests before we write the implementation of our function.
There are three steps for TDD
- Write the function signature
- Write the test cases foe that function
- Write the function logic so the tests pass
Another principle of TDD is that one should have only one assertion per test. This ensures whether our test succeeds or our test does not succeed.
There are three compoenets to a good test. These are:
- Scope
- Speed
- Fidelity
This determines how much of our code is covered by a single test case.
Determines how fast our test case runs. we want test cases to run fast since fast test cases means we will run them often and that will help us catch more bugs.
How close is our test case to the rela world scenario.
We also want to prevent flaky tests which sometimes succeed and sometimes fail. Example: test a function whch c=produces a random number between 1 and 5 and you put an assetion of 2. So, when the random number si 2 the test passes but for any of the other numbers the test fails.
Outcomes of one test case should never depend on outcomes of a different test case.