Uploading code
So, I wrote this tutorial back in the day - MaKey MaKey Quickstart Guide Part 2 - where I detail how to upload code to the MaKey MaKey. Go there for a really detailed explanation. Here's a quick overview of what you'll need to do:
To enable the MaKey MaKey in Arduino, you'll need to install the Arduino addon. Click here to download the addon.
Unzip the hardware folder into your Arduino sketchbook. Where's your Arduino sketchbook? Well, by default, it should be an Arduino folder in your home directory, but to double-check you can go to File > Preferences within Arduino and see the Sketchbook location text box.

After you've unzipped the addon, your directory structure should look a little something like this:

If you had Arduino open, close and re-open it to finish the addon installation.
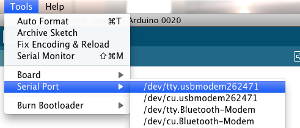
With the addon installed, select MaKey MaKey as your board (under the Tools > Board menu). And select your MaKey MaKey's serial port (under the Tools > Serial Port menu).

MaKey MaKey option under the Tools > Board menu.

Serial port selection on Windows

Serial port selection on Mac
Now download the most recent version of the MaKey Mate Bluetooth code, hosted right here on github. Click here to get a zip file of the most recent version. Unzip it to somewhere handy.
From that zip file, navigate to the maKeyMate_BT folder. The main file of that code - the file you'll open up with Arduino - is the MaKeyMate-BT.ino file. Open that from the Arduino IDE, and it should open 3 more tabs for settings.h, makeyMate.h, and makeyMate.cpp.
With all of the settings correctly made, you should be able to hit the Upload button in Arduino, and the new code should flash onto the MaKey MaKey.

(TODO)
The MaKey Mate Bluetooth example code is comprised of four files: maKeyMate_BT.ino, makeyMate.cpp, makeyMate.h and settings.h.
This is the main Arduino file, where you'll find the standard setup() and loop() functions, as well as most of the MaKey MaKey functionality. This is largely the same code that runs on any store-bought MaKey MaKey. The main changes to this file are turning keyboard.press(...), keyboard.release(...), and mouse.move(...) functions to similar makeyMate.... functions.
At the bottom of this file is a new function definition to check key-press sequences for a defined sequence:
void checkSequence(int pressedKey, int * expectedSequence)
This function is used to check for a key-press sequence of Up->Down->Left->Right->Space->Click, which will cause the Bluetooth Mate to attempt to reconnect. This is called whenever a MaKey MaKey key is pressed.
If you've modified the MaKey MaKey key mappings, you'll be familiar with settings.h. That's where you can modify which input on the MaKey MaKey maps to which key on your computer. For more info on changing that, see this section of the MaKey MaKey tutorial.
The makeyMate.* files deal with the bluetooth module on the Mate. You can mess with these files, but the goal is for those to work completely in the background, performing the bluetooth module's setup and connection.
These files define a class named makeyMateClass, which has public member function definitions for:
-
begin(char * name)- This function is called in maKeyMate.ino'ssetup()function. This initializes the Bluetooth Mate, and assigns it a name. -
connect()- This function attempts to connect to a remote address stored in the Bluetooth Mate. If no remote address is stored, the device will be unable to connect. -
keyPress(uint8_t k); - This should work much likekeyboard.press()(it even borrows a lot of that function's framework).kshould be either an ASCII value or one of the keys listed in settings.h -
keyRelease(uint8_t k); - This will release a single key. Againk` should be an ASCII value, or pre-defined key. -
moveMouse(uint8_t b, uint8_t x, uint8_t y)- This operates like themouse.move()function.bshould be a predefined mouse click value,xandymove the mouse pointer horizontally and vertically.
Where to from here? Here are the next steps: