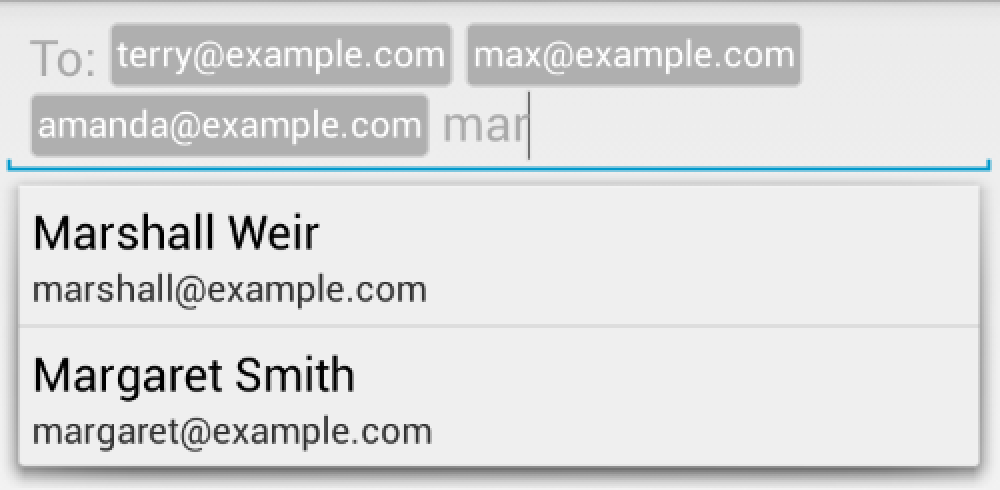
TokenAutoComplete is a Android Gmail style token auto-complete text field and filter. It's designed to have an extremely simple API to make it easy for anyone to implement this functionality while still exposing enough customization to let you make it awesome.
Support for Android 2.2 and up. Will probably work back to Android 2.0, but I haven't tested it.

- Download the jar file and add it to your project
If you would like to get the most recent code in a jar, clone the project and run ./gradlew jar from the root folder. This will build a tokenautocomplete.jar in library/build/libs/.
You may also add the library as an Android Library to your project. All the library files live in library.
If you'd rather just start with a working example, clone the project and take a look.
For a basic token auto complete view, you'll need to
- Subclass TokenCompleteTextView
- Create a layout and activity for your completion view
You'll need to provide your own implementations for getViewForObject and defaultObject. You should return a view that displays the token from getViewForObject. In defaultObject, you need to guess what the user meant with their completion. This is usually from the user typing something and hitting "," - see the way gmail for Android handles this for example. Here's a simple example:
public class ContactsCompletionView extends TokenCompleteTextView {
    public ContactsCompletionView(Context context, AttributeSet attrs) {
        super(context, attrs);
    }

    @Override
    protected View getViewForObject(Object object) {
        Person p = (Person)object;

        LayoutInflater l = (LayoutInflater)getContext().getSystemService(Activity.LAYOUT_INFLATER_SERVICE);
        LinearLayout view = (LinearLayout)l.inflate(R.layout.contact_token, (ViewGroup)ContactsCompletionView.this.getParent(), false);
        ((TextView)view.findViewById(R.id.name)).setText(p.getEmail());

        return view;
    }

    @Override
    protected Object defaultObject(String completionText) {
        //Stupid simple example of guessing if we have an email or not
        int index = completionText.indexOf('@');
        if (index == -1) {
            return new Person(completionText, completionText.replace(" ", "") + "@example.com");
        } else {
            return new Person(completionText.substring(0, index), completionText);
        }
    }
}
Layout code for contact_token
<LinearLayout xmlns:android="http://schemas.android.com/apk/res/android"
    android:layout_height="wrap_content"
    android:layout_width="wrap_content">

    <TextView android:id="@+id/name"
        android:layout_width="wrap_content"
        android:layout_height="wrap_content"
        android:background="@drawable/token_background"
        android:padding="5dp"
        android:textColor="@android:color/white"
        android:textSize="18sp" />

</LinearLayout>
Token backgound drawable
<shape xmlns:android="http://schemas.android.com/apk/res/android" >
    <solid android:color="#ffafafaf" />
    <corners
        android:topLeftRadius="5dp"
        android:bottomLeftRadius="5dp"
        android:topRightRadius="5dp"
        android:bottomRightRadius="5dp" />
</shape>
Person object code
public class Person implements Serializable {
    private String name;
    private String email;

    public Person(String n, String e) { name = n; email = e; }

    public String getName() { return name; }
    public String getEmail() { return email; }

    @Override
    public String toString() { return name; }
}
Note that the class implements Serializable. In order to restore the view state properly, the TokenCompleteTextView needs to be able to save and restore your objects from disk. If your objects cannot be made Serializable, please look at [restoring the view state].
I'm adding some very stupid "contacts" to the app so you can see it work, but you should read data from the contacts data provider in a real app.
Activity code
public class TokenActivity extends Activity {
    ContactsCompletionView completionView;
    Person[] people;
    ArrayAdapter<Person> adapter;

    @Override
    protected void onCreate(Bundle savedInstanceState) {
        super.onCreate(savedInstanceState);
        setContentView(R.layout.activity_main);

        people = new Person[]{
                new Person("Marshall Weir", "marshall@example.com"),
                new Person("Margaret Smith", "margaret@example.com"),
                new Person("Max Jordan", "max@example.com"),
                new Person("Meg Peterson", "meg@example.com"),
                new Person("Amanda Johnson", "amanda@example.com"),
                new Person("Terry Anderson", "terry@example.com")
        };

        adapter = new ArrayAdapter<Person>(this, android.R.layout.simple_list_item_1, people);

        completionView = (ContactsCompletionView)findViewById(R.id.searchView);
        completionView.setAdapter(adapter);
    }
}
Layout code
<RelativeLayout xmlns:android="http://schemas.android.com/apk/res/android"
    android:layout_width="match_parent"
    android:layout_height="match_parent">

    <com.tokenautocomplete.ContactsCompletionView
        android:id="@+id/searchView"
        android:layout_width="match_parent"
        android:layout_height="wrap_content" />

</RelativeLayout>
That's it! You can grab the objects the user tokenized with getObjects() on the TokenCompleteTextView when you need to get the data out.
If you have a short prompt like "To: ", you can probably get away with setting a drawable on the left side of the TokenCompleteTextView. If you have something longer, you will probably not want your prefix to take up the whole height of the view. If you would like to have a prefix that only indents the first line, you should use setPrefix. This code is a little quirky when restoring the activity, so you want to make sure it only gets called on a fresh start in onCreate:
if (savedInstanceState == null) {
    completionView.setPrefix("Your bestest friends: ");
}If you've used the gmail auto complete, you know that it doesn't use the default "toString" filtering you get with an ArrayAdapter. If you've dug in to the ArrayAdapter, you find an unfortunate mess with no good place for you to add your own custom filter code without re-writing the whole class. If you need to support older versions of Android, this quickly becomes difficult as you'll need to carefully handle API differences for each version.
(NOTE: ArrayAdapter is actually well written, it just doesn't allow for easy custom filters)
I've added my own FilteredArrayAdapter to the jar file that is a subclass of ArrayAdapter but does have some good hooks for custom filtering. You'll want to be fairly efficient in this as it gets called a lot, but it's a simple process to add a custom filter. If you are using the TokenActivity above, you simply replace the line
adapter = new ArrayAdapter<Person>(this, android.R.layout.simple_list_item_1, people);with
adapter = new FilteredArrayAdapter<Person>(this, android.R.layout.simple_list_item_1, people) {
    @Override
    protected boolean keepObject(Person obj, String mask) {
        mask = mask.toLowerCase();
        return obj.getName().toLowerCase().startsWith(mask) || obj.getEmail().toLowerCase().startsWith(mask);
    }
};In addition to custom filtering, you may want to make sure you don't accidentally miss something and get duplicate tokens. allowDuplicates(false) on the TokenCompleteTextView will prevent any tokens currently in the view from being added a second time. Token objects must implement equals correctly. Any text the user entered for the duplicate token will be cleared.
If you're solving a similar problem to Splitwise, you need to handle users adding and removing tokens. I've provided a simple interface to get these events and allow you to respond to them in the TokenCompleteTextView:
public static interface TokenListener {
    public void onTokenAdded(Object token);
    public void onTokenRemoved(Object token);
}
We can modify the TokenActivity to see how these callbacks work:
public class TokenActivity extends Activity implements TokenCompleteTextView.TokenListener {

    @Override
    protected void onCreate(Bundle savedInstanceState) {
        /* code from the initial example */

        completionView.setTokenListener(this);
    }

    @Override
    public void onTokenAdded(Object token) {
        System.out.println("Added: " + token);
    }

    @Override
    public void onTokenRemoved(Object token) {
        System.out.println("Removed: " + token);
    }
}
In Splitwise we use these callbacks to handle users selecting a group when adding an expense. When a user adds a group to an expense, we remove all the users in the group and the other groups from the array adapter. A user should only be able to select one group and it would be redundant to add users in the group to the expense again.
You may want to prefill the list with objects. For example when replying to an email, you would want the To: and CC: fields to have the correct emails in them. You can use addObject to put these tokens in. If you are using TokenDeleteStyle.PartialCompletion , you will want to call addObject(obj, "completion text") to get appropriate replacement text, otherwise just call addObject(obj). You can also remove objects programatically with removeObject though this will remove all objects that return true when calling equals on them. If you have copies in the array, you may need to take special care with this.
There are three different styles of click handling build into the project. Please open an issue if you need some behavior beyond this with your code! It's relatively easy to add custom click handling, but I'm not convinced anyone would need anything beyond the ones I've provided. Call setTokenClickStyle to change the behavior.
This is the default, even though it doesn't match the Gmail behavior. When the user clicks on a token, the view will move the cursor in front of or after the token. Users should not be able to get the cursor in the token as this causes confusing behavior.
When the user clicks on a token, the token will be removed from the field. If you need some kind of confirmation, handle it with the onTokenRemoved callback and re-add the token if the user changes their mind.
This behavior most closely matches the Gmail token field behavior, but I did not make it the default to simplify the initial tutorial. The first click on a token will unselect any currently selected token views, then it will call setSelected(true) on the selected token. If you want to change the colors of the token, you will need to add appropriate drawables to your project. In the test project, we have the following:
token_background.xml
<selector xmlns:android="http://schemas.android.com/apk/res/android">
    <item android:drawable="@drawable/token_default" android:state_selected="false" />
    <item android:drawable="@drawable/token_selected" android:state_selected="true" />
</selector>
token_default.xml
<shape xmlns:android="http://schemas.android.com/apk/res/android" >
    <stroke
        android:width="1dp"
        android:color="#ffd4d4d4" />
    <solid android:color="#ffafafaf" />

    <corners
        android:topLeftRadius="3dp"
        android:bottomLeftRadius="3dp"
        android:topRightRadius="3dp"
        android:bottomRightRadius="3dp"/>

</shape>```

token_selected.xml
```xml
<shape xmlns:android="http://schemas.android.com/apk/res/android" >
    <stroke
        android:width="1dp"
        android:color="#ffa4a4a4" />
    <solid android:color="#ff7a7a7a" />

    <corners
        android:topLeftRadius="3dp"
        android:bottomLeftRadius="3dp"
        android:topRightRadius="3dp"
        android:bottomRightRadius="3dp"/>
</shape>
If you need more detailed view customization like changing a picture in the token or resizing the token, you will need to provide a custom view and override setSelected. You can then make appropriate changes to the view:
In some custom view implementation:
@Override
public void setSelected(boolean selected) {
    super.setSelected(selected);

    ImageView v = (ImageView)findViewById(R.id.icon);
    if (selected) {
        v.setImageDrawable(getResources().getDrawable(R.raw.close_x));
    } else {
        v.setImageDrawable(getResources().getDrawable(R.raw.user_icon));
    }
}We've defaulted to the gmail style delete handling. That is, the most recently completed token, when deleted, turns into the text that was there before. All other tokens simply disappear when deleted.
While this is the best in our case, we've provided a couple of other options if you want them. Call setDeletionStyle on the TokenCompleteTextView for different behaviors.
This is the default. The most recently completed token will turn into the partial completion text it replaces, all other tokens will just disappear when deleted
All tokens will turn into the partial completion text they replaced
Tokens will be replaced with the toString value of the objects they represent when they are deleted
If your token objects implement Serializable, the TokenCompleteTextView will automatically handle onSaveInstanceState and onRestoreInstanceState. If you cannot make your objects Serializable, you should override getSerializableObjects and convertSerializableArrayToObjectArray. getSerializableObjects should return an array of Serializable objects that can be used to rebuild your original objects when restoring the view state. convertSerializableArrayToObjectArray should take an array of Serializable objects and use them to rebuild your token objects.
We use something similar to this at splitwise to avoid saving complicated object graphs:
@Override
protected ArrayList<Object> convertSerializableArrayToObjectArray(ArrayList<Serializable> sers) {
    ArrayList<Object> objs = new ArrayList<Object>();
    for (Serializable s: sers) {
        if (s instanceof Long) {
            Contact c = Contact.loadFromDatabase((Long)s);
            objs.add(c);
        } else {
            objs.add(s);
        }
    }

    return objs;
}

@Override
protected ArrayList<Serializable> getSerializableObjects() {
    ArrayList<Serializable> s = new ArrayList<Serializable>();
    for (Object obj: getObjects()) {
        if (obj instanceof Serializable) {
            s.add((Serializable)obj);
        } else {
            //obj is a Contact
            s.add(((Contact)obj).getId());
        }
    }
    return s;
}Copyright (c) 2013 splitwise
Licensed under the Apache License, Version 2.0 (the "License");
you may not use this file except in compliance with the License.
You may obtain a copy of the License at
http://www.apache.org/licenses/LICENSE-2.0
Unless required by applicable law or agreed to in writing, software
distributed under the License is distributed on an "AS IS" BASIS,
WITHOUT WARRANTIES OR CONDITIONS OF ANY KIND, either express or implied.
See the License for the specific language governing permissions and
limitations under the License.