Written by Manawyrm
FMBerry is a piece of software that allows you to transmit FM radio with your Raspberry Pi.
It uses the Sony-Ericsson MMR-70 transmitter, which was originally intended for use with Sonys Walkman cellphones from early 2000s. You can get these for really cheap from Amazon.
If you can't seem to get one, contact me via Mail (fmberry@tbspace.de), I managed to get hold of quite a lot of these transmitters.
- MMR-70 transmitter
- Raspberry Pi (compatible & tested with every Pi, Model Beta, A, B, B+, 2, Zero, 3)
- Soldering equipment (soldering iron and some solder)
- Cable for connecting to your Raspberry Pis GPIO port (old IDE cable does work fine!)
The hardware is explained here: HARDWARE.md
This software was developed under Raspbian Wheezy 2013-02-09.
Arch Linux users: AUR - fmberry-rpi-git
Open raspi-blacklist.conf:
sudo nano /etc/modprobe.d/raspi-blacklist.conf
Comment out the Line "blacklist i2c-bcm2708" with a #.
Save with Ctrl+O and close nano with Ctrl+X
To make sure I²C Support is loaded at boottime open /etc/modules.
sudo nano /etc/modules
Add the following lines:
i2c-dev
Then again, Save with Ctrl+O and then close nano with Ctrl+X.
Please reboot your Raspberry after this step.
First update your local package repository with
sudo apt-get update
then install all needed software with the following command:
sudo apt-get install i2c-tools build-essential git libconfuse-dev
Run
cat /proc/cpuinfo | grep "CPU revision"
in your terminal.
All Raspberry Pi's with a revision newer than rev. 2 have their i2c port connected up to /dev/i2c-1.
Older devices (beta, alpha, early 256MB Model B's) have it connected up to /dev/i2c-0.
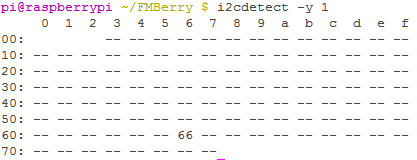
You can check your wiring with the following command:
i2cdetect -y 1
Please remember that you need to run the command on another port on older revisions!
i2cdetect -y 0
You should then see your transmitter at 0x66.
If you are not able to see your transmitter please double check your wiring!
If you connect you MMR-70 to I²C bus 0 on Raspberry Pi rev2 make sure that header P5 pins are configured as I²C pins!
To build the software execute the following commands (in your homefolder):
git clone https://github.com/Manawyrm/FMBerry/
cd FMBerry
If you have got an old revision board, please open fmberryd.c and change the RPI_REVISION definition to RPI_REV1!
make
Compiling the software will take a couple of seconds.
FMBerry is essentially a daemon called fmberryd.
To install it into your system path type
sudo make install.
You can start it by typing sudo /etc/init.d/fmberry start.
To control the daemon you have to use ctlfmberry.
It currently allows the following commands:
ctlfmberry set freq 99000- Frequency in kHz (76000 - 108000)ctlfmberry poweronctlfmberry poweroffctlfmberry set rdsid DEADBEEF(8 chars! Longer strings will be truncated, shorter - padded with spaces)ctlfmberry set rdstext Mike Oldfield - Pictures in the Dark(max. 64 chars. Longer strings will be truncated)ctlfmberry set txpwr 0- 0.5 mW Outputpowerctlfmberry set txpwr 1- 0.8 mW Outputpowerctlfmberry set txpwr 2- 1.0 mW Outputpowerctlfmberry set txpwr 3- 2.0 mW Outputpower (Default.)ctlfmberry stereo on- Enables stereo signal (Default)ctlfmberry stereo off- Disables stereo signalctlfmberry muteon- Mute audioctlfmberry muteoff- Unmute audioctlfmberry gainlow- Audio gain -9dBctlfmberry gainoff- Audio gain 0dB"ctlfmberry set volume 0-6Audio volume level 0 to 6, equal -9dB to +9db, 3dB stepctlfmberry status- Print current statusctlfmberry stop- Stop FMBerry daemon
That's it! :)
FMBerry writes debugging output to /var/log/syslog.
You can watch the information by running ctlfmberry log. It's essentially just a cat /var/log/syslog | grep fmberryd
It will tell you what's wrong.
Please check for new dependencies. You can safely just run the apt-get install command again. It will only install new dependencies if necessary.
First stop the daemon by typing /etc/init.d/fmberry stop.
Then run git pull followed by a make and a sudo make install.
You can then start FMBerry again with /etc/init.d/fmberry start.
- WARNING! I am not a professional C programmer. Please expect this software to have major security flaws. Please don't expose it's control port to the internet! I'm fairly certain that this software is vulnerable to buffer overflows.
- If you are a C programmer, please help by securing this software and sending a pull request.
- The Daemon itself is essentially a simple TCP server. It is listening to Port 42516. (set in fmberry.conf) You can control it by sending the exact same commands you would give to ctlfmberry.
- For information on How to control the Daemon have a look into ctlfmberry. It's a simple shell script.
https://github.com/Manawyrm/FMBerryRDSMPD (streaming of MPD title data via RDS) https://github.com/akkinitsch/FMBerryRemote (streaming of internet radio streams, controllable via Webinterface) http://achilikin.blogspot.de/2013/06/sony-ericsson-mmr-70-transmitter-led.html (enabling the LED on the transmitter to be software controllable)
The daemon does not show anything.
That's normal. You have to use ./ctlfmberry to control the daemon.
I can't seem to hear music.
Turn up the volume/unmute your raspi with alsamixer.
I am getting compile errors.
Did you install all dependencies? (All lines with apt-get)
The transmission dies after a couple of minutes.
You didn't disable the internal processor of the MMR70. Do this by connecting TP18 to GND.
The power supply of the raspberry pi shorts out/there are no lights anymore_
There is a short circuit. Probably caused by a wiring fault or by using an 80pin IDE cable for connecting the FMBerry.
Alternative linux distributions don't detect the I2C bus (ArchLinux, OpenWRT, OSMC)
Linux 3.18 introduced a new feature called Device Tree support. To get the I²C Bus working, you need to put this configuration at the end of /boot/config.txt (change the first parameter according to the RPi you have):
device_tree=bcm2708-rpi-b-plus.dtb
device_tree_param=i2c1=on
device_tree_param=spi=on
Thanks to Daniel for the solution to that problem!