- Practice using
console.log() - Practice using
console.error() - Practice using
console.warn()
Welcome to your first JavaScript lab! You'll notice a few new things in this lesson that we haven't encountered before. Don't worry, we'll walk you through them.
The first new thing you'll notice is tests. When we want to run an experiment, we need to develop a hypothesis and we need to test it. So if we want to experiment with whether adding salt to ice water makes it hotter or colder, we need to design an experiment that controls for all of the other variables: we need to isolate our experiment from parts of its environment that aren't relevant to what we hope to test.
In programming, tests place the scientific method into computer science. We run tests to verify that our programs behave the way we think they do. Tests help us identify bugs, and they give us a sense of the health of our applications.
On Learn, we use tests as teaching tools. Just like in a normal coding environment, we use tests to describe the program's behavior. Unlike in a normal coding environment, you, not we, are in charge of getting the tests to pass — that is, making the app behave like we expect it to.
The structure of this lab — where its files and folders are located — looks roughly like the following:
├── CONTRIBUTING.md
├── LICENSE.md
├── README.md
├── index.js
├── node_modules/
├── package.json
└── test
    └── index-test.js
All labs will more or less have the same structure. (And READMEs, for that matter, will still have CONTRIBUTING.md, LICENSE.md, and README.md files.)
index.js might be called something else (something more descriptive) in other labs, and so test/index-test.js would be renamed accordingly. But index.js is also descriptive in its own right, defining something of an entry point for finding one's way around the app. This is often the file where you will write your code. (Later on, we'll introduce index.html and index.css — you'll have to update or refer to these files sometimes, too!)
For now, open up index.js in your text editor. If you're using the Learn IDE, click the "Open" button on this lesson

your IDE should open up. You'll see a sidebar like this:

If you open up that "javascript-logging-lab..." folder, you'll see a list of files (along with a test/ directory). Click index.js, and it will open in the editor.
In index.js, you should see, well, nothing. We'll fix that soon.
Now open up test/index-test.js. Hey, there's something! What's all of this stuff doing?
Note: The test/index-test.js has great info that we want to look at, but do not edit this file otherwise you may have extra difficulty passing this lab.
At the very top of the file, you'll see
const expect = require('expect')
const fs = require('fs')
const jsdom = require('jsdom')
const path = require('path')
This might be a bit bewildering, but at this point, we don't need to be able to write any of this code, or even understand every line perfectly. All we need is to understand enough so that we can get a sense of what the test is asking us to accomplish, so that we can make the test pass. Let's go through it.
In these first lines, all we're doing is referencing different libraries that help us run your tests. A library is code that someone else (usually multiple someone elses) wrote for our use. Note that require won't work out of the box in the browser. We're actually running our tests in a different environment. (Remember the sandbox analogy from earlier? It's just like that.)
A little farther down the page, you'll see
describe('index', () => {
  // there's stuff in here, too
})
describe is a function provided by our test runner (in this case, we're using Mocha) — it's basically a container for our tests.
Then we have a few chunks like
it('calls console.error()', () => {
  // this is where the tests are!
})
Each of these chunks describes a behavior that we expect the main program to implement. As you can see, they describe that behavior pretty carefully — in this example, we know that our main file should call console.error() — pretty simple, right?
Don't worry too much yet about what's happening inside these chunks. Sometimes we'll need to do some pretty fancy footwork to test some pretty basic things; other times, and as time goes on, you'll be able to read and understand basically what our tests are expecting.
And that'll be great! These aren't like tests that we all took in school: they're testing behavior, not information. Tests are meant to be as transparent as possible about what they're doing, and as you grow as a programmer, it's important to understand more and more what the aims of tests are.
In some of our tests, you'll see lines like the following:
jsdom({
  src: fs.readFileSync(path.resolve(__dirname, '..', 'index.js'), 'utf-8')
})
This line reads index.js (remember how we said we'd modify that?) and adds its code to the execution environment. The "execution environment" is simply where our code runs.
To run the tests, simply type learn test in the terminal part of the Learn IDE. (The terminal is the part below where you've been coding.) You should see something like
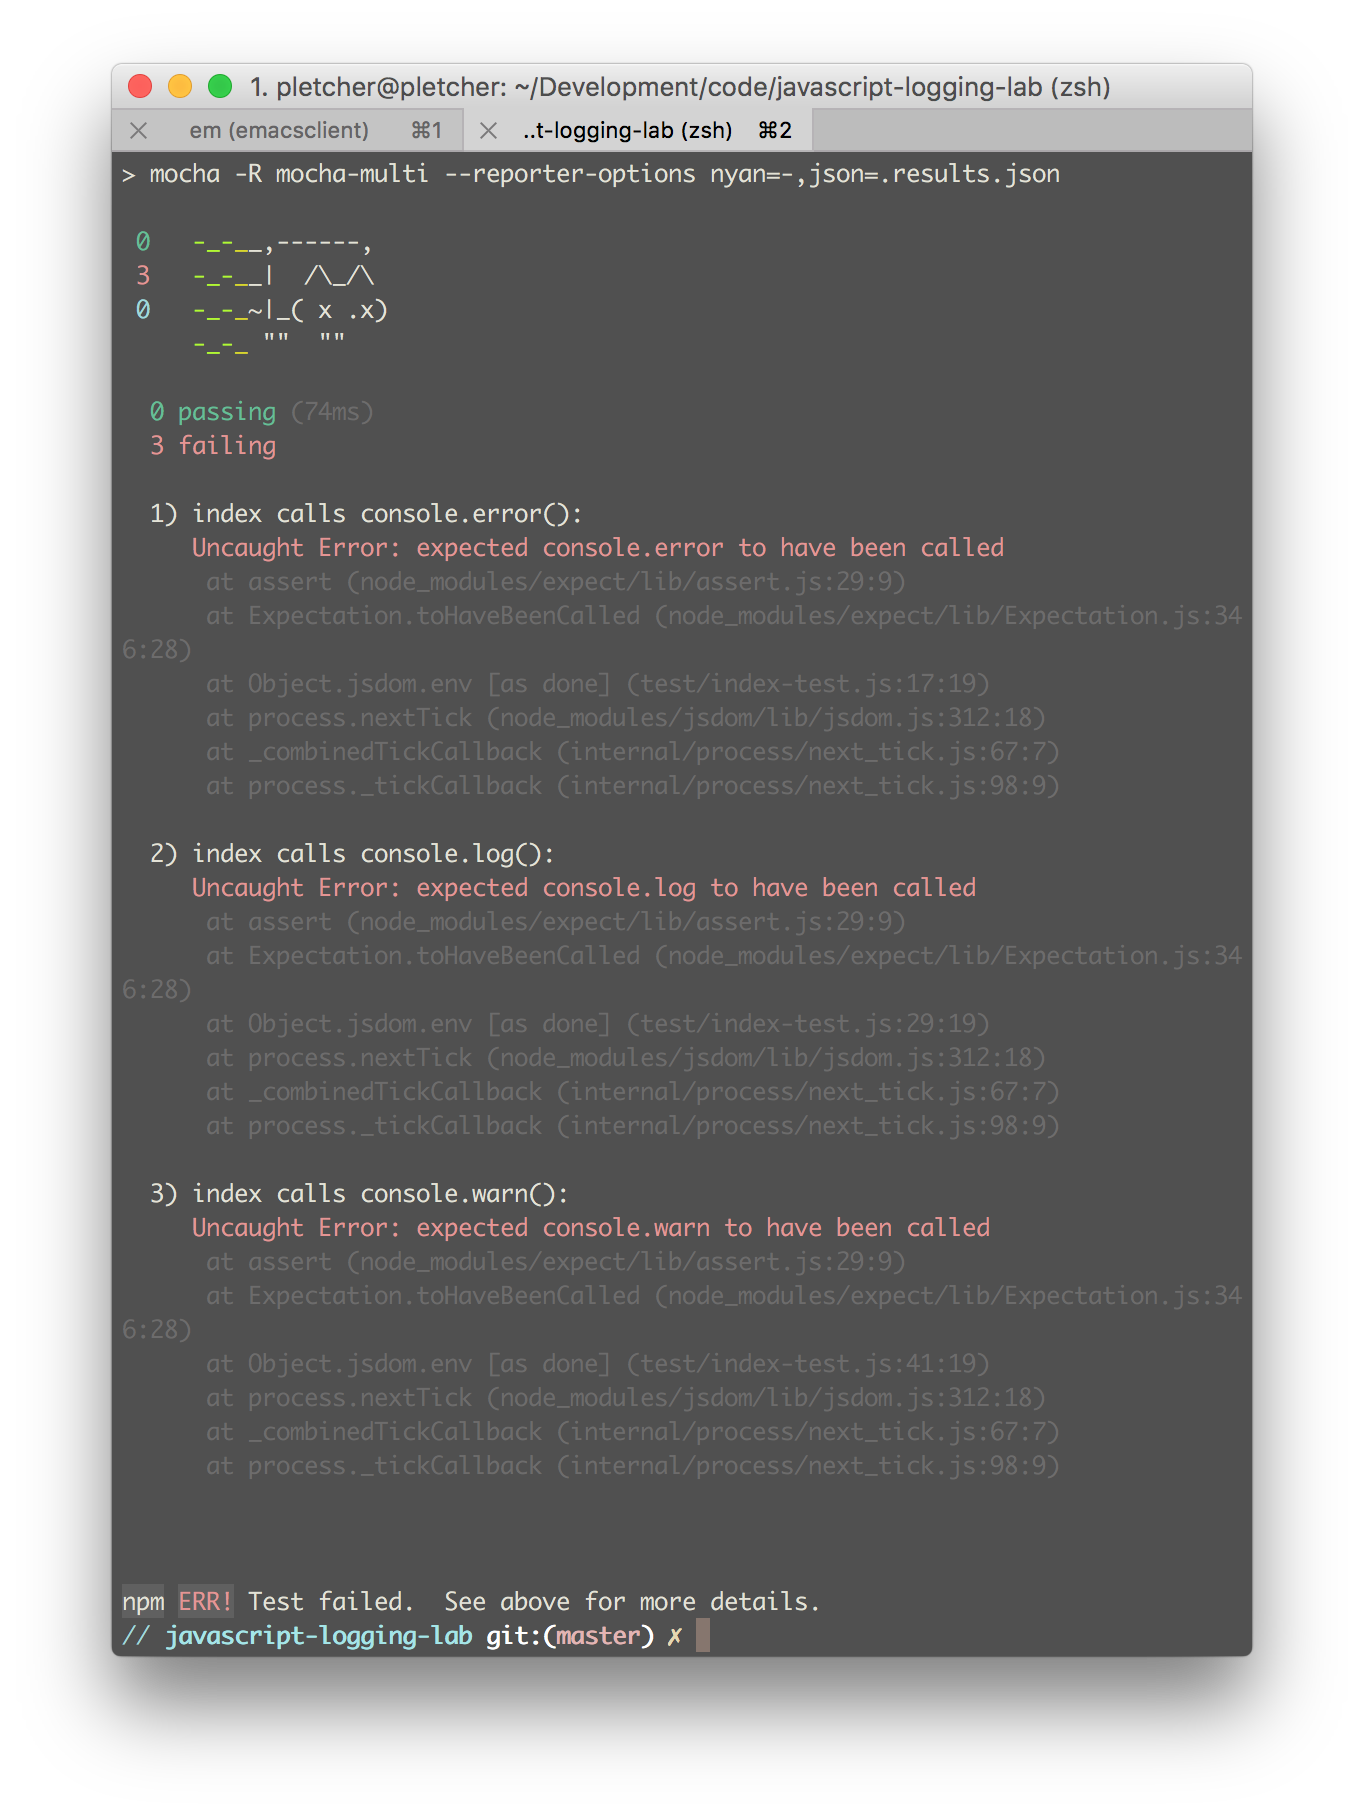
For the moment, all of the tests fail. Let's figure out how to get one of them passing! (The rest will be up to you.)
Let's take the first one. The test description says, "index calls console.error()". So it sounds like, pretty straight-forwardly, like we should call console.error() somewhere in index.js. "Calling" a function means invoking it, causing it to act. We call functions with parentheses: console.error is a function, but console.error() is a call to the function.
In index.js, add a call to console.error() — you can call it with anything you like (as long as the syntax is valid). We're going to go with
console.error("HALP!")Because it seems sufficiently dire. Remember to save your file.
Anyway, let's run the tests again. In the Learn IDE's terminal, run
learn testWe should now see:

Nice! We got the first one to pass!
You might often see errors like the ones above: "Uncaught error: spy was not called". Spies are little bits of code that keep track of whether or not they
were called. We use them to make sure that a function is called when we expect
it to be called.
We'll try to rewrite these error messages when possible to be more descriptive about what kinds of calls we expected; but know that sometimes, especially later on, we leave the errors intentionally ambiguous for you to work out.
Now it's your turn — can you follow a flow similar to the one we followed together above to get the remaining two tests to pass?
Imagine that you're building the user interface for a fancy ATM machine. Because the developers are hip with the latest trends, they're using JavaScript for the user-facing parts.
We need a way to send messages to the user: some messages are just updates, some are warnings (the user should not continue doing what they just did), and some are errors (something broke, and we need to recover).
Your job is to identify a way of sending each kind of message. Hint: in
JavaScript, you'll probably find ways of telling users things with console.
And again, remember to save your files before you re-run your tests.
When all of your tests pass, be sure to run learn submit to move on to the
next lesson.
In the above, when we ran our tests and saw the message "index calls console.error()", we wrote,
console.error("HALP!")Now when we run the tests again and see "index calls console.log()", we should
look at what is the same and what is different between this message and the
previous one. It looks like they're basically the same except for one tells
us to call console.error() and the other tells us to call console.log().
So if we got back to index.js and write something like,
console.log("I would be a logger.") // get it?we're now calling console.log() with a different string. Similarly, when we
see the message "index calls console.warn()", we know that we can go back to our
code and write something with console.warn(). You've got this!
View JavaScript Logging Lab on Learn.co and start learning to code for free.