GettingStartedEclipse
First, make sure you are using the latest version of Eclipse, available at http://eclipse.org/downloads/. It is recommended that you download the "Eclipse IDE for Java EE Developers" package (rather than the package "for Java developers"), as it includes many of the necessary plugins for webapp and API development. Many things have changed in the Juno release, including the Maven integration and the "marketplace" system for discovering and installing additional components. You may run into incompatibilities or mismatched plugin versions when using older versions of Eclipse.
OTP is versioned using Git and its build process and dependencies are managed by Maven, so certain additional Eclipse components will be needed to tie everything together:
- EGit - an "Eclipse team provider" (i.e. version control system plugin) for Git
- m2eclipse - adds Maven support to Eclipse, for editing project models and (automatically) running builds
You will also need the Eclipse Web Tools Platform (WTP) if you want to work on the web interfaces, and the JST server adapters to run OTP on a Tomcat server from within Eclipse. WTP in turn requires the "Maven Integration for Eclipse WTP" component to cooperate with m2eclipse.
EGit, WTP, and m2eclipse (as of version 1.0) are hosted by the Eclipse foundation, and they are bundled with some packages of Eclipse 3.7 (Indigo). See this comparison of eclipse packages when deciding which package to select from the download page. It is recommended that you download the "Eclipse IDE for Java EE Developers" package (rather than the package "for Java developers"), as it includes many of the necessary plugins for webapp and API development. Eclipse is intended to be modular, and you should be able to add all the components you need using the "Add new software" dialog and the "Eclipse marketplace" component discovery service available under Eclipse's help menu, but in practice it can be difficult to locate and add all the components that are missing from your particular package.
You'll also need Project Lombok. Maven will automatically install a copy, but you also need to configure Eclipse to use it. You can download the Lombok jar and run it to let its wizard configure your Eclipse properly. If you get stuck, take a look here.
Depending on the Eclipse package you chose, you will need to install one or more of the Eclipse components mentioned above. For the time being, some of these are easier to install from the "Eclipse marketplace" component discovery service, while for others you will need to fall back on the older "Add new software" dialog. The Eclipse Marketplace seems to do a good job with EGit, m2eclipse (also referred to as m2e or "Maven Integration for Eclipse"), and m2e-wtp ("Maven Integration for Eclipse WTP"). As of this writing, I have only been able to install the WTP and JST components through the Help->Install new software dialog.
As an example, say you need to install m2eclipse. Using the "Eclipse Marketplace" (available from Eclipse's Help menu) search all markets/all categories for "WTP", and "Maven Integration for Eclipse WTP" should be among the first items to appear in the list.

In this case, some WTP components will also be installed as dependencies if they are not already present.
If you do happen to find yourself missing some web development components or the JST server adapters (a typical symptom is being unable to add a Tomcat server in Eclipse) try Help->Install new software... instead of Marketplace. In the "Work with:" dialog box, select the Indigo server at http://download.eclipse.org/releases/indigo. Check the "Web, XML, Java EE, and OSGi Enterprise Development" category, which should include everything you need. EGit can also be easily installed from this server (in the "Collaboration" category) as well as m2eclipse (in the "General Purpose Tools").
The Web Tools / JST server adapter components can in fact be installed via the Eclipse Marketplace system, and are available on the server at http://marketplace.eclipse.org/repo/ but they will not be found in a search unless you switch to the "EclipseSource Yoxos Marketplace" instead of the "Eclipse marketplace". This is accomplished by clicking on the Orange circle icon next to the purple Eclipse icon at the bottom of the Marketplace dialog box. This appears to be a separate, possibly better-cataloged repository.
Next, you will need to:
- Clone the OTP Github repository locally (get a copy of the OTP source code)
- Import the Maven projects from your local clone of the repository into your Eclipse workspace
- Optionally make Eclipse and EGit aware that the projects are under Git version control
There are several ways to accomplish these steps. Repository cloning can be done (1) using the EGit Repositories View from within Eclipse, or (2) using command-line Git tools. Once they are cloned into the local filesystem, the Maven projects in the OTP Git repository can then be imported into Eclipse. Alternatively, (3) the clone and import operations can be done together using File -> Import -> Maven -> Import Maven projects from SCM in Eclipse. If the initial clone operation is not done using the clone button in the EGit Repositories View (i.e. if it is done with command-line Git or Import Maven projects from SCM), you will need to inform Eclipse that your project is under Git version control if you want to do pull / push / commit operations from within Eclipse. In any case you can just perform these operations using command-line Git tools.
According to the EGit user guide, repositories should be cloned somewhere outside your Eclipse workspace. This prevents any misinterpretation/misuse of Git metadata by Eclipse and vice-versa. Note that by importing the Git-versioned Maven projects into Eclipse, you will be not be making an additional copy of those files into your workspace. You will continue to work with the checked-out files in the Git working directory.
Switch to the "Git Repository Exploring" perspective in Eclipse by selecting Window -> Open Perspective -> Git Repositories (if you don't see this option under Open Perspective, choose Window -> Open Perspective -> Other... and select Git Repository Exploring). The Repository Exploring perspective is preconfigured to contain the Git Repositories view. Alternatively, you can add the Git Repositories view to your main Java perspective (Window -> Show View -> Other -> Git Repositories). In the Git Repositories view, click on the "Clone a Git Repository and add clone to this view" button as shown below:

Enter https://github.com/openplans/OpenTripPlanner.git for the URI, select "HTTPS" for the protocol. If you want to contribute edits back, you'll need to enter your GitHub username and password here too, as shown below:

Click Next, then select all branches (although the 'master' branch is probably what you're interested in). Click Next, then select the directory where you want the code to be checked out to. Then click Finish. Be patient, it will take Eclipse a minute or two to download the source to your computer, and then the OpenTripPlanner repository should appear in the "Git Respositories" panel. You still need to import the OTP Maven projects from the local clone of the repository into Eclipse (see "Importing existing OTP Maven projects into Eclipse" below).
Create a directory to hold your cloned git repositories, e.g. ~/git/ and change to that directory. You should not clone a repository directly into your Eclipse workspace. Then issue the Git clone command with the URL for OTP's Github repository:
user@host:~$ mkdir git
user@host:~$ cd git
user@host:~/git$ git clone https://github.com/openplans/OpenTripPlanner.git
Cloning into OpenTripPlanner...
remote: Counting objects: 23923, done.
remote: Compressing objects: 100% (8407/8407), done.
remote: Total 23923 (delta 12216), reused 23696 (delta 11989)
Receiving objects: 100% (23923/23923), 29.48 MiB | 962 KiB/s, done.
Resolving deltas: 100% (12216/12216), done.
user@host:~/git$
That's all for cloning the repository, but you still need to import the OTP Maven projects from the new local repository into Eclipse (see "Importing existing OTP Maven projects into Eclipse" below).
In Eclipse, choose File -> Import... then choose Maven / Check out Maven projects from SCM in the dialog box, as shown below:

Click Next, and then indicate that you are using the Git version control sytstem using the dropdown box next to the label "SCM URL". NOTE: The first time you use this option, this "git" option will probably not be available because an m2e/git connector must be installed. Use the blue "m2e marketplace" link in the lower right corner of this dialog box to find and install the m2e EGit SCM connector, and the 'git' option should become available in the drop-down box.

Then, specify the "Target Location" (in this case, the URL of the remote Github repository that you want to clone locally), as shown above. This URL should be https://github.com/openplans/OpenTripPlanner.git (or ssh://git@github.com/openplans/OpenTripPlanner.git if you have a personal public key registered at Github).
Click Next, then uncheck "Use default workspace location" and specify a directory outside your Eclipse workspace (e.g. ~/git). Your cloned copy of the repository will be placed in a subdirectory of the specified directory, with a rather uninformative name like ~/git/maven.0123456789012.
Click Finish, and m2eclipse should both clone the repository and import the Maven projects into your workspace. The opentripplanner top-level maven module, as well as all the sub-modules, should then appear in your project explorer view. There should be small blue 'M' overlays on the project folders to indicate that they have the "Maven nature". Eclipse should begin pulling in Maven dependencies and building OpenTripPlanner, during which time the project folders may also have red 'X' overlays indicating build errors. These should eventually disappear when all dependencies are pulled in and the compilation completes.
If you used option 1 or 2 above rather than option 3, you have cloned the OTP repository but the OTP Maven projects are not yet visible in Eclipse. Choose the menu option File -> Import, then browse to the Maven / Existing Maven Projects element:

Browse to the local directory where you cloned the OTP Git repository, and then select all the projects of interest:
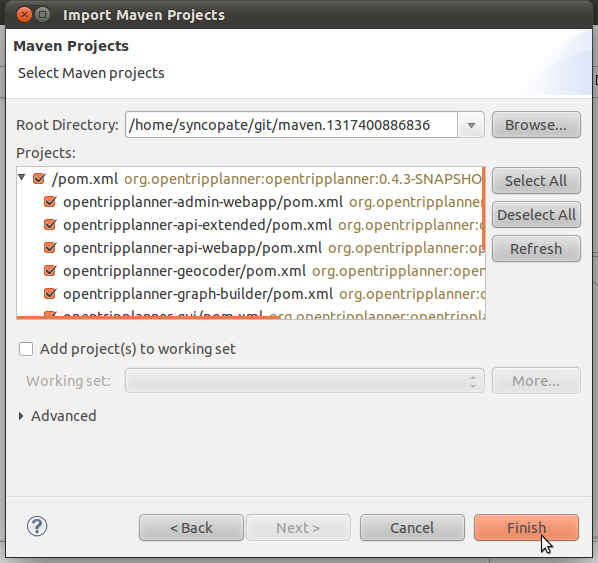
Click Finish, and if everything works correctly you should eventually see each OpenTripPlanner maven module checked out as an individual Eclipse project in your workspace:
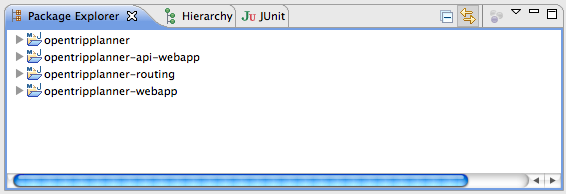
Note that on initial checkout, it may take a while to initially build all the projects in your workspace. In the background, the Maven plugin is downloading all the project dependencies (there are a quite a few). This bulk download only happens once.
Unless you cloned the OTP repository using the EGit Repositories View (option 1 above), operations on the local Git repository will not automatically be possible from within Eclipse because EGit will not be aware of the Git metadata in your new local repository.
You can choose to do all Git operations on the command line, or make EGit aware of the repository as follows: Right-click the top-level OpenTripPlanner project in the Project Explorer view and choose Team -> Share Project, then specify Git as the repository type and check Use or create repository in parent folder of project on the next page. The .git metadata directory should be found and indicated in the dialog box, at which point you can hit the Finish button. An orange cylinder should appear superimposed on the OpenTripPlanner folder icon in the Package Explorer, indicating that it is under version control.
At this point you should be able to open the Git repositories view (Window -> Show View -> Other -> Git Repositories) and do push, pull, and commit operations from within Eclipse. One advantage of this over using only the command line is EGit's graphical diff window that allows you to review changes and select files to commit.
If you expect to submit patches to OTP, please download the GeoTools format specification and apply it to the OTP projects in Eclipse. See the "Code Style" section of the OTP Developer's Guide for instructions on how to do this. This will keep code formatting consistent, and improves readabiility by avoiding a mixture of tabs and spaces in the code.
You might look at:
-
GraphBuilder -- you need to build a graph from your transit data
-
SettingUpATomcatServerInEclipse -- then you need to serve the webapps
- Check out our Troubleshooting page