is an extension for the browser Google Chrome to send and receive credentials from KeePass through the plugin KeePassHttp.
It can be downloaded from Chrome Web Store.
Please read at least the section Important information.
Table of content:
- 1. Features
- 2. Installation
- 3. Functionality
- 4. Configuration and settings
- 5. Tips and tricks
- 6. Important information
- 7. Limitations and known problems
- 8. Troubleshooting
- 9. Security
- secure integration with KeePass using the KeePassHttp plugin
- receive credentials from KeePass
- send new and updated entries to KeePass
- support multiple KeePass databases
- select a unique icon for every database
- contains a password generator which works together with KeePass
- support multiple credentials for one page
- select from popup
- select from autocomplete
- support autocomplete for username fields
- support HTTP Auth requests (also known as htaccess-login)
- support additional field values via String Fields in KeePass
- support fill-in for dropdown menus (only for String Field values)
- accessible via context-menu of input fields
- accessible via shortcuts (Ctrl+Shift+U and Ctrl+Shift+P)
- automatically detect field combinations of username + password
- automated password form fill if only one login combination is available
- choose own credential fields for every page
- checks for update of KeePassHttp
- KeePass v2.17 or higher
- KeePassHttp v1.0.7 or higher (recommended v1.4 or higher)
- it is recommended to disable the built-in Chrome password management when using this extension
-
Your database in KeePass has to be unlocked.
-
Go to the Chrome Web Store and install the extension chromeIPass.
-
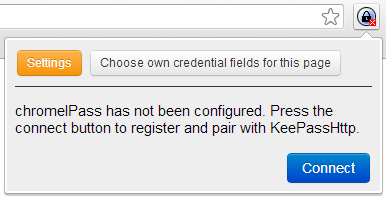
Now there is a new browser icon available:
-
Click on the icon and press the button to connect to KeePassHttp:
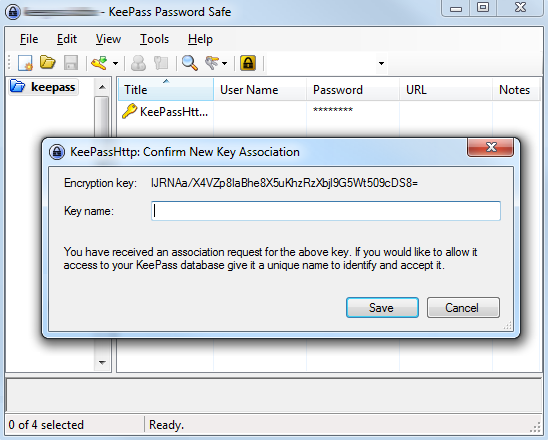
-
KeePassHttp shows you an dialog to give the pairing request a name. You could call it "Chrome on my main computer".
-
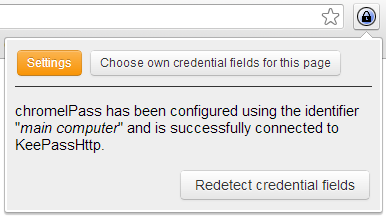
If you click on the browser icon again it should show you the following information:
-
Reload the current page.
-
Open the settings to adjust chromeIPass for your needs.
If chromeIPass detected a combination of username + password fields it requests all credentials for the current page from KeePassHttp.
The received credentials are accessible via multiple ways which are described in the following sections.
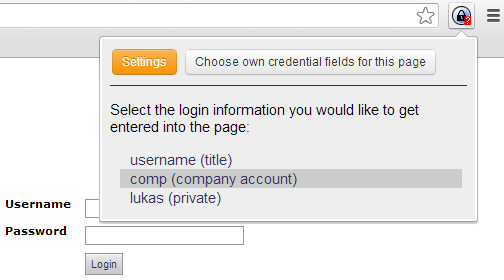
The icon of chromeIPass gets a question mark.
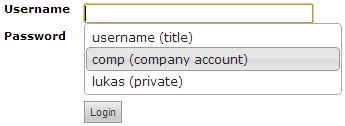
Clicking on the icon opens a popup on which you can choose the credentials which should be filled in.
If there are several username + password combinations on the page the credentials are filled into the focused combination (focus on username or password field) or into the first combination.
For all combinations of username + password fields the username field supports autocomplete for the received credentials.
By clicking on an entry of the list or when the username field loose the focus it checks whether the username belongs to one of the received credentials and fills-in the password field.
This feature is activated by default and can be disabled on the settings page of chromeIPass.
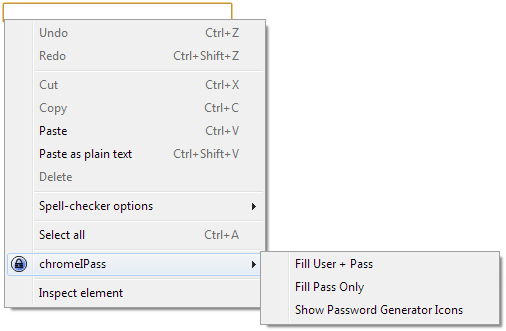
On every textfield chromeIPass adds 3 entries to the context-menu.
Even if the field was not detected as a username or password field by chromeIPass these entries are available.
If you click on Fill User + Pass or Fill Pass Only chromeIPass checks whether the focused field belongs to a detected combination of username + password field. If this check fails it starts a redetection for only the focused field.
If you focus an unrecognized password field and select Fill User + Pass it will automatically detect the username field and fills-in the credentials.
Fill User + Pass of the context-menu will only work if chromeIPass received only one pair of credentials. Otherwise it shows you an error message and you should use the autocomplete or popup.
Fill Pass Only does work either chromeIPass received only one pair of credentials or the associated username field contains a username which belongs to one pair of the received credentials.
Show Password Generator Icons restarts the detection of visible password fields on the page and adds the key-icon for the password generator to each of them.
chromeIPass supports 2 page-wide shortcuts:
Ctrl+Shift+U is the shortcut for Fill User + Pass of the context-menu which is described in 3.1.3.
Ctrl+Shift+P is the shortcut for Fill Pass Only of the context-menu which is also described in 3.1.3.
chromeIPass offers a password generator which receives the password from KeePass itself.
This function has to be enabled on the settings-page of chromeIPass.
This feature is only available with the KeePassHttp v1.4 or higher.
If it is enabled every password field contains a key icon on the right side. Click on it to open the password generator:
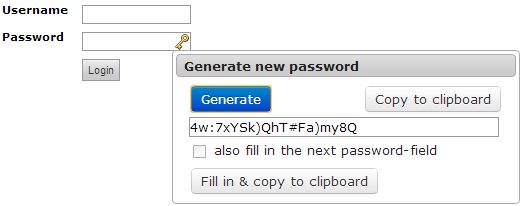
If the key-icon does not appear, right-click on the input-field and select chromeIPass > Show Password Generator icons in the context-menu.
Once opened the generated password is stored in the field till you reload or submit the page or till you press the generate button. Even if you close the dialog and click on another key-icon the displayed password does not change.
Does a page contain more than one password field and you opened the dialog on the first password field, the option to fill-in the next field is enabled. If the two password fields are successive on the page, this option is also checked. Otherwise it is unchecked.
If the password field has a limited length for inputted text chromeIPass will detect it and automatically cut the generated password. It will inform you about this change and copy the cutted password to your clipboard.
Because chromeIPass has some limitations to remember credentials the password should always be copied to your clipboard.
chromeIPass sends a request to KeePass which generates a password with the settings of the built-in profile for auto-generated passwords.
To change the length and composition of generated passwords, please open the KeePass Password Generation Options.
Go to Keepass > Tools > Generate Password... and this dialog opens:
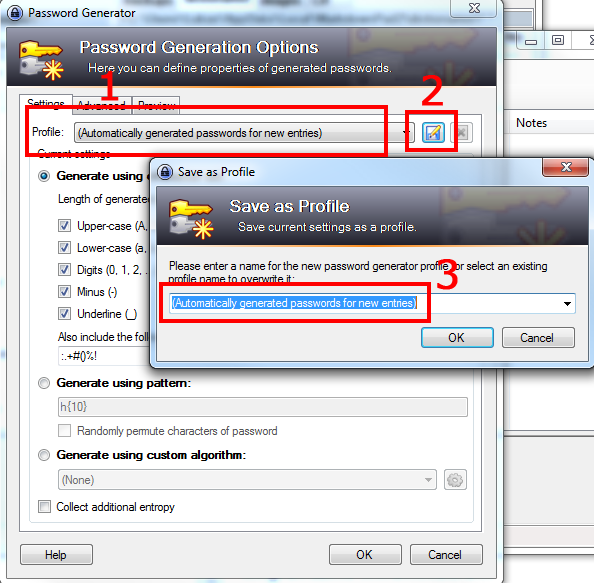
- Select the built-in profile (Automatically generated passwords for new entries) and change the composition of the generated passwords.
- Now click the save button
- A second dialog appears. Click on the down-arrow on the right side and select again the name of the built-in profile (Automatically generated passwords for new entries).
- Press OK and your changes are saved to the profile.
- After the page was loaded chromeIPass starts to search for all visible input fields.
- For every found input field of the type password it checks whether the previous input field is a normal textfield.
- if there is no previous field or the previous field is a password field --> don't add this fields as a detected username + password field combination.
- if the previous field is a textfield --> add both fields as combination of username + password field.
The auto detection of credential fields is called only one time, after loading of the page finished.
There are known limitations when the auto detection cannot detect a username + password combination. Please go to Limitations and known problems > Auto detection of input fields to read more about it.
When it did not detect a username + password field combination you can click on the browser icon of chromeIPass and press the button "Redetect credential fields".
You can also use the shortcuts or context-menu as described in 3.1.3 to start the redetection for the focused field.
Sometimes there are other input fields between the username field and the password field.
In this cases chromeIPass cannot detect the correct combination of username + password fields.
But you can define the combination by yourself for every page.
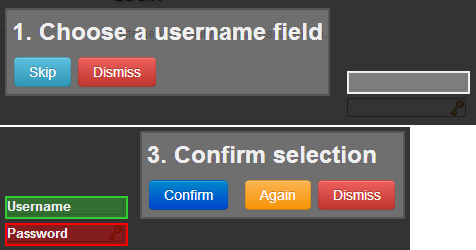
Just click on the browser-icon of chromeIPass and press "Choose own credential fields for this page":
First there are all normal textfields highlighted. Click on the field you want to use as username field or skip this step if no username field is required.
Now choose a password field and in the last step confirm your selection.
You can also choose additional fields, the so-called String Fields. Their functionality is described in section 3.7.
The next time you open this page chromeIPass will use the defined combination of username + password field and does no longer auto detect combinations.
Certainly you can focus another field and use the context-menu (3.1.3) or shortcuts (3.1.4) to start the detection for the focused field.
Because Google Chrome does not offer an API for their built-in password manager chromeIPass implements it own way of detecting new or updated credentials.
If chromeIPass finds a combination of username + password fields it tries to get the corresponding form for them.
For this form it registers a submit event which is called when the form is send.
There are known limitations for this workflow which are described in Limitations and known problems.
If chromeIPass detects unsaved credentials the browser icon of chromeIPass starts blinking red.
The icon will remain blinking till you click on it or you ignore it for 2 further page visits (loading other sites).
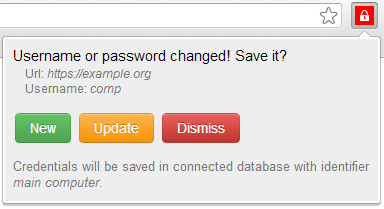
If you click on it, it remains completely red till you add, update or dismiss the detected changes.
It shows you the corresponding URL and username and the database in which the changes will be saved.
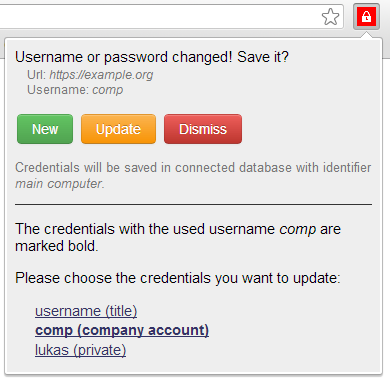
If you have multiple credentials for a page and want to update one entry you can press Update.
Now a list of all available entries appears on which you can select the outdated entry. If the username matchs with one username of the available credentials this entry will be marked bold:
New entries are stored in a separate group in KeePass which will be added by KeePassHttp.
KeePassHttp returns the found credentials sorted by best matching URL to chromeIPass.
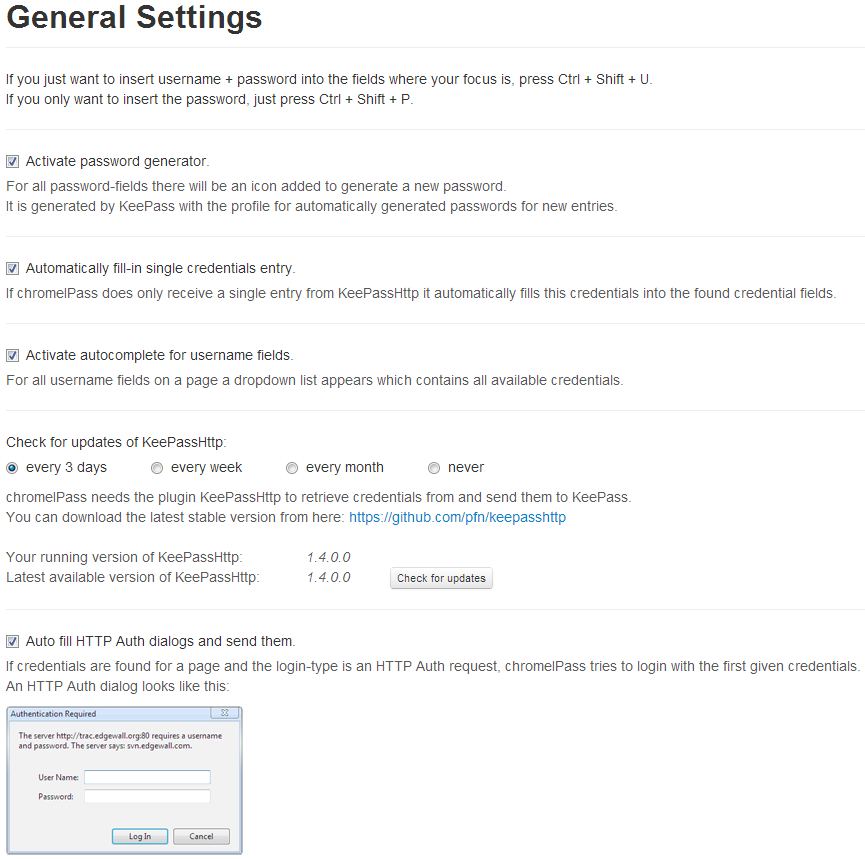
chromeIPass can try to automatically login with the first provided credentials on HTTP Auth requests.
If this login attempt fails the login dialog is shown as normal.
The dialog of an HTTP Auth request is shown in the following screenshot:

This feature is activated by default and can be disabled in settings.
You can fill-in additional information by defining string fields.
- Choose your own credential fields for the page like explained in section 3.4. You can also skip both, username and password.
- Now you can choose additional fields which are named String Fields. You can even choose dropdown elements. The order you choose these string fields is important for the fill-in method!
- Activate the String Fields setting in KeePassHttp like explained in the KeePassHttp-documentation (setting no. 11). The alphanumeric ordered entries are mapped with the order you chose the String Fields.
Dropdown elements are filled in by the visible value. If you open a dropdown element you can see all available values. This visible value has to match with one String Field value from KeePass.
You don't need to configure chromeIPass.
If chromeIPass does not have an authenticated connection to KeePassHttp it displays a red cross in the browser icon and requests you to establish a new connection.
For further configurations you can open the settings which are accessible via the settings button in the popups, the context-menu of the browser icon (entry is called Options) or the tab chrome://extensions on the chromeIPass-entry there is also a link called Options.
On the General Settings you can enable and disable key features like autocomplete, password generator or auto fill for HTTP Auth requests.
The changes are saved immediately.
On the tab Connected Databases chromeIPass shows you which databases are currently paired with KeePassHttp. You can also define a special icon for every database and see when it was last accessed.
The displayed icon depends on the database which is currently activated and unlocked in KeePass.
Removing an entry from chromeIPass does not remove the key from KeePassHttp! But KeePassHttp is no longer able to send credentials to or receive data from chromeIPass for the currently activated database in KeePass.

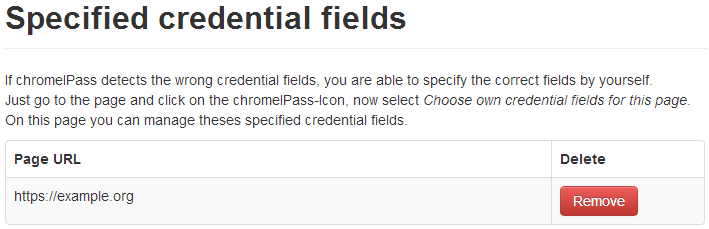
In section 3.4 the function of Choose own credential fields for this page is described.
All credential fields which are defined with this function are listed on this tab.
You can only remove them because it's not useful to define the fields manually.
If the credential fields are not detected automatically you can focus one of the fields and press Ctrl+Shift+U or Ctrl+Shift+P to trigger redetecting the fields and filling-in the credentials. Also you can click on the browser icon and press the button Redetect credential fields.
If chromeIPass detects wrong credential fields choose them by yourself with the button Choose own credential fields for this page which is available in every popup.
If chomeIPass always asks to unlock the database and this is annoying you, you can simply disable this feature in the options of KeePassHttp.
It's always a good idea to have a look into the options of KeePassHttp. Maybe your feature request or problem is still implemented and can be solved by changing the options. Go to the illustrated readme for the KeePassHttp options
This is natively supported by KeePass with the references feature. You can find an illustrated description in the readme of KeePassHttp.
Open the options of KeePassHttp and disable the first feature.
Open the options of KeePassHttp and switch the fifth feature.
-
because Google Chrome does not offer an API to communicate with the built-in password manager chromeIPass needs to implement its own kind of password manager. Please read the known limitations which belongs to that.
-
for security reasons chromeIPass wipes out the temporarily stored credentials from cache every time you switch the tabs. Therefor it requests credentials for the current tab every time you switch on it.
Google Chrome does not offer an API to communicate with the password manager. Therefor chromeIPass implements its own way of checking for changed credentials.
On the form in which a combination of username + password fields is detected, chromeIPass registers an event which will be called when the form is submitted.
This event checks whether the submitted username and password have changed and shows the remember dialog.
But there exist several problems which we currently cannot overcome and which lead to not recognize the changes:
- If the password field is cleared by some JavaScript code which hashes the value for example, chromeIPass can no longer access the value of the password and therefor no remember dialog is shown.
- If there are page internal submit events registered on the form which will be triggered before our submit-request (for example: ajax calls), our request is possibly not triggered and no remember dialog will be shown.
Another problem is that chromeIPass cannot clearly differentiate between a successful and failed login attempt.
The remember dialog will also be shown for failed login attempts.
The detection does only detect fields which are visible when this function is called.
It is only one time called automatically: After loading of the page finished.
New input fields which are created with JavaScript or with an AJAX-call cannot be detected, because they get visible after the auto detection was called.
For example an overlay for signin or signup could possibly not auto detected by chromeIPass because either the input fields are created just-in-time or they are hidden to the user while auto detection is running.
When it did not detect any username + password field combination you can click on the browser icon of chromeIPass and press the button "Redetect credential fields".
You can also focus the visible username field or password field and press Ctrl+Shift+U. This will start a redetection for the focused field, too.
First: Did you read the section 5. Tips and tricks? Second: Did you checked your KeePassHttp options? Maybe you only have to change the options...
If you open an issue always give us at least the following information:
- chromeIPass version
- Google Chrome version
- KeePassHttp version
- KeePass version
- Pages on which the error occur
- Search in KeePass for the URL of the page on which the wrong credentials are filled-in.
- Check the found entries for the credentials and confirm that the entries are up-to-date.
If this does not solve your problem, please open an issue.
- Check if you are using the latest version of chromeIPass.
- Check if your browser Google chrome is up-to-date
- Check if your versions of KeePassHttp and KeePass are up-to-date
-
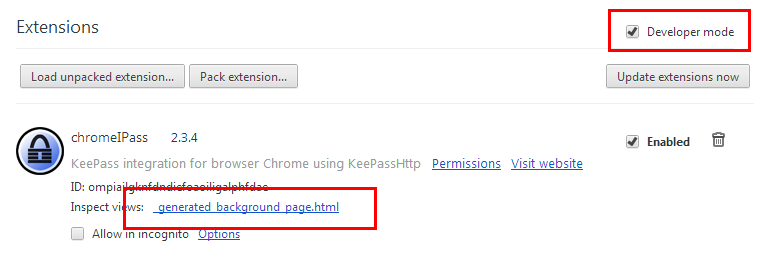
Open a tab with URL chrome://extensions and activate the Developer mode to be able to generate the background page:
-
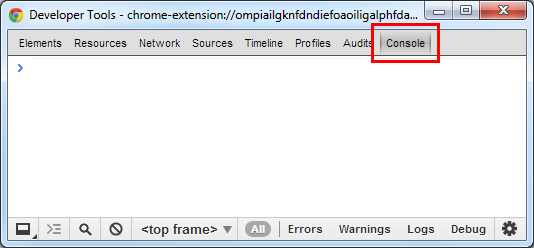
In the opened window choose the tab Console:
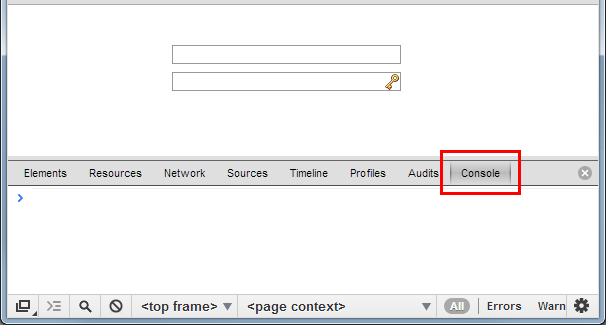
In the page on which chromeIPass stopped working please press F12 or do a right-click and choose Inspect Element from the context-menu. Now choose the tab Console to open the console for the inline scripts:
- every communication with KeePass and KeePassHttp is encrypted with the symmetric version of AES in CBC-mode.
- the messages are crypted with a key of the length of 256bit.
- the communication happens via http://localhost on port 19455 on which KeePassHttp is listening.
The system is only in the moment of connecting a database to chromeIPass vulnerable. At this point KeePassHttp has to transmit the key to chromeIPass which will store it in the secured space of the extension. If someone records this traffic it could be possible to extract the key from it.
Any further communication is encrypted with this key and no longer vulnerable!
This readme was created by Lukas Schulze and last updated in April 2013.