OTG is now called 'SVF2'
UPDATE (2-legged): Forge Derivative service now provides SVF2 conversion. UPDATE (3-legged): BIM360 now automatically converts all assets to both SVF and SVF2, on every upload.
full details: https://forge.autodesk.com/en/docs/model-derivative/v2/tutorials/translate-to-obj/task3-translate-source-file/
- Upload your RVT/NWD file(s) to a Forge Bucket, as normal
- use the following
POST jobrequest with body:
POST https://developer.api.autodesk.com/modelderivative/v2/designdata/job
BODY:
{
         "input": {
           "urn": "{{Urn}}"
         },
         "output": {
           "destination": {
             "region": "us"
           },
           "formats": [
             {
               "type": "svf2",
               "views": [
                 "2d",
                 "3d"
               ]
             }
           ]
         }
       }
- notice the type is
svf2and notsvf.- region can also be
eufor europe region (and soonaufor apac region).- this will return a 'success' json. check progress using
GET manifestas normal
- point ForgeViewer to your URN as normal
- make sure the
optionshave the following environment set:
var options = {
    env: 'MD20ProdUS',
    api: 'D3S',
    // ... remember to add your accessToken stuff here too
    // accessToken: "ek123...
    // getAccessToken: function( cb ) { ...
  };
example here: full source code
When opening a model in OTG format is there any way to look up properties on the model via the old svf dbId ? Yes, use the remap function which has the mapping from old SVF/F2D to OTG
model.remapDbId(x) converts from SVF/F2D to OTG.
This webpage allows customers, with Revit/Navis files, sitting on A360, BIM360, FusionTeam,etc, to evaluate these files using the new OTG file format, instead of the current SVF format.
If you find...
- Forge Viewer crashes when trying to load large Navis files (200MB+)
- when you move the camera slightly and Forge Viewer's progress-bar flickers like crazy, taking 'forever' to load a large design
- Time to first pixel is really slow (greater than 6 minutes, when you were expecting less than 30seconds)
- You need something that is more compact than the SVF format
- You need stable object ID's across versions of the model(s).
- Wider adoption of OTG in Forge API is coming. ie. GDPR complient services (ETA April 2020)
.. then OTG is for you !
OTG uses a de-duplication process of meshes. So think of a wall as a cube. And many walls are just a cube that is squished and rotated into place. So imagine all walls of a building represented by a single cube with many transforms. This saves storage space (data transfer). BUT.... It also significantly improves render performance, with GPU instancing. You send a single cube mesh to the GPU and thousands of tiny transforms as a single draw-call, thus drawing signicantly more triangles per frame.
Similar to the cube primative for walls, the same thing happens for Re-Bar and hand-rails, it's mostly de-duplication of a 'cylindrical primitive'.
OTG (centered at the origin) can theoretically measure a 20km stretch at 4.6 micron precision, which is just equivalent to the limit of 32 bit float precision. Currently, OTG uses a single double precision offset for each model.
Linear designs or geospatial models are yet to be validated with OTG. We are looking for feedback.
OTG uses the same Forge Viewer, as before... just point the viewer to the new environment variable to 'fluent', like this.... and the viewer will use OTG data, instead of SVF.
Here's what the node.js server / webpage looks like when it's running successfully...
LIVE 3-legged testing: https://otg-bim.herokuapp.com/?disableIndexedDb=true
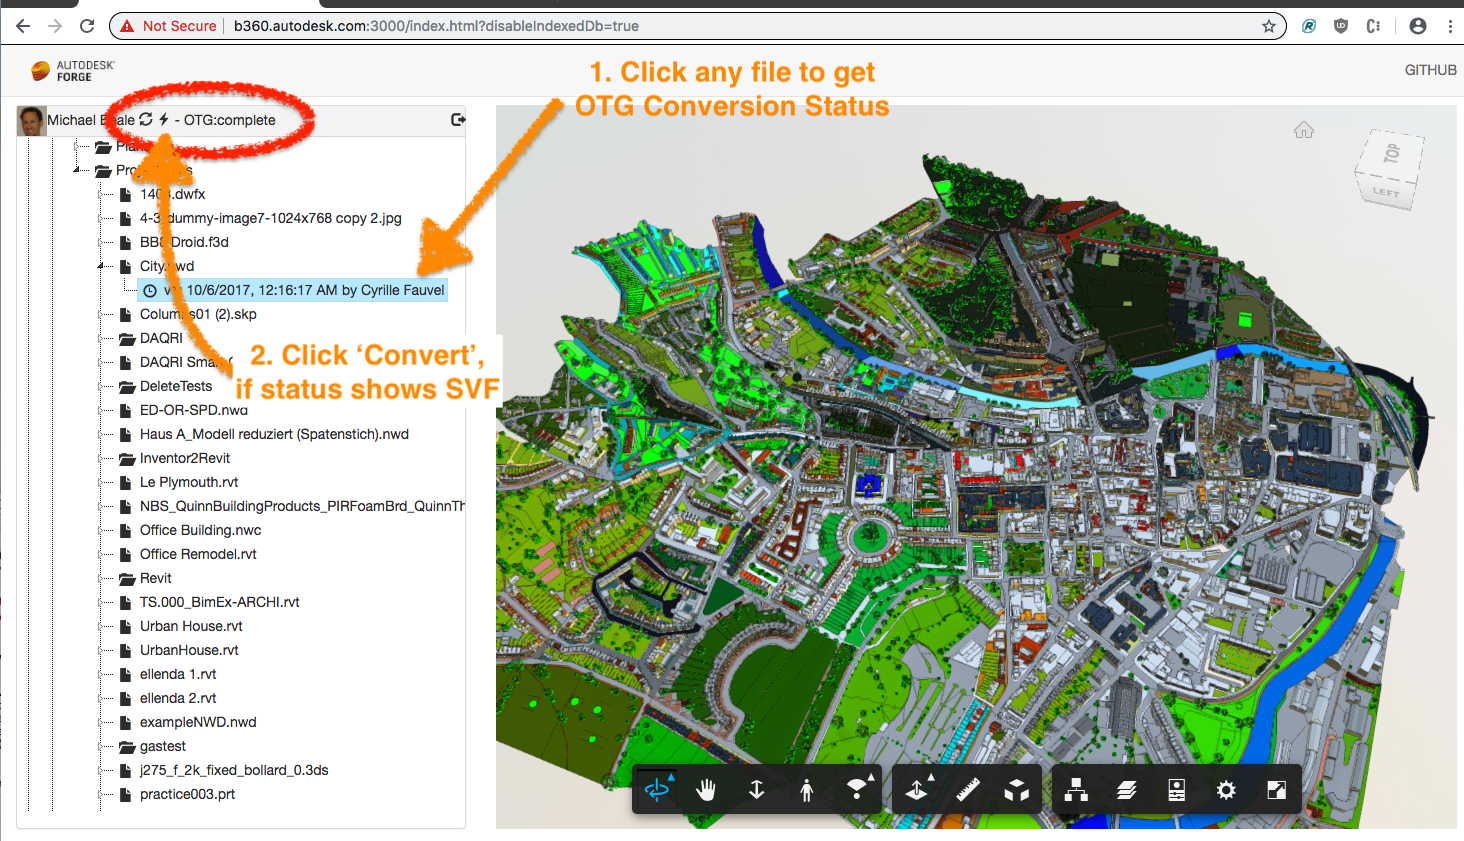
Red Circle shows the "Status"
- Login and navigate into the hubs/projects/folder/file/version in the tree, until you find your Revit/Navis file you want to evaluate.
Now, to convert it... 2. Single click on a version. 3. Click on the ⚡ to start the OTG conversion. 4. Now click on the revit/navis file 'version' again, and look at the 'OTG:progress 0%' in the upper menu bar.
- will show 'SVF' if the file is still in SVF format
- will show 'OTG: 44%' for 44% progress on conversion to OTG
- will show 'OTG: complete' if the file has been converted to OTG.
Once 'status' shows 'OTG:complete', try opening the file, by double clicking it.
This will open the OTG file in the standard forge viewer (with some minor changes to the options variable ).
To make sure it is loading OTG, look at the chrome debug network console, select 'WS', and look for web-sockets. That's how OTG transfers mesh data. You should hopefully also notice that the file loads much faster. That's because it's now loading OTG rather than SVF (more noticable for large things).
If you are experiencing stalling during loading with OTG, check the console for web-socket time-out error messages. You can try adding ?disableIndexedDb=true as a URN parameter, to see if that fixes the problem.
- Create a quick
start.shscript with your Forge App clientID and secret, like this:
export FORGE_CLIENT_ID=xxxx
export FORGE_CLIENT_SECRET=xxxxxxxx
export FORGE_CALLBACK_URL=http://localhost:3000/api/forge/callback/oauth
open "http://localhost:3000/index.html"
node start.js
- In your Forge Account, add the URL
http://localhost:3000/api/forge/callback/oauthto your Forge App's callback. - Install all the node packages with
npm install - Run the script
sh ./start.sh
Your node.js server will start and a browser should popup to your homepage.
- Click login and sign in to your A360 account
- Navigate to your SVF file
- Open it, as normal.
- The OTG version should now load.
That's it !
You can check that OTG is loading in ForgeViewer, by looking for a websocket connections. OTG currently uses multiple websockets to load mesh bits.
If you get an empty tree-view, then try this...
- Log into A360, you may need to create a new account first: http://a360.autodesk.com
- If you have a BIM360 admin access, then you will need to connect BIM360 to your server (project auth access)... Read this blog post: https://fieldofviewblog.wordpress.com/2017/01/19/bim-360-activating-api-access-to-docs/
Steps
- steal a bearer TOKEN from this nodejs sample app (see chrome console log)
Now inside POSTMAN...
- import the script (https://github.com/wallabyway/OTG-client-sample/blob/master/OTG-Service.postman_collection.json)
- in the POSTMAN variables, add the token into
{{OTG_TOKEN}} - click on a file/version, and grab the URN and projectID from the console
- add URN to the POSTMAN variable
{{OTG_URN}} - add projectID to the POSTMAN variable
PROJECT_ID - go to
POST job OTGand click 'send'

You should hopefully get this json response...
{
    "version": 1,
    "type": "convertOtg",
    "request_id": "9cfcf6ad-5b1c-46da-b926-28b5fa62092b",
    "received_at": "2019-03-12T21:13:45.335Z",
    "status": "pending",
    "success": "0%",
    "progress": "0%"
}
now to check for progress...
- send
GET manifestin POSTMAN, and in the JSON response, do a search forOTG-manifestand sub itemprogress

- once
progressreaches 100%, you're done ! The SVF has been converted to OTG.
Note, for BIM360-design-collaboration hosted files, this conversion process is automatically triggered when a file changes.
If you have your files on a standard forge-bucket (standard 2-legged workflow), then you can also convert and view OTG, here's how...
First, gather your Forge ClientID, 2-legged Token and the URN you want to convert...
In the "POST job OTG", request body, put your 'Forge ClientID' into the "account_id" value, remove the project_id completely, and set the {{OTG_URN}} with your URN value. In the header authorization, change the OTG_TOKEN to your 2-legged token. Now click the 'send' button to trigger the conversion (see screenshot)...

That should work, and you should see the same JSON response as the 3-legged version above.
Now, to get the status of the OTG conversion process, use your URN and 2-legged Token, and the replace it in the POSTMAN 'GET manifest request' header and parameters. Click send, and you should see a JSON response similar to the 3-legged example above. View the model, in the same way as the 3-legged example above.
Documentation:
For local development/testing, consider use nodemon package, which auto restart your node application after any modification on your code. To install it, use:
sudo npm install -g nodemon
Then, instead of npm run dev, use the following:
npm run nodemon
Which executes nodemon server.js --ignore www/, where the --ignore parameter indicates that the app should not restart if files under www folder are modified.
After installing Github desktop for Windows, on the Git Shell, if you see a error setting certificate verify locations error, use the following:
git config --global http.sslverify "false"
This sample is licensed under the terms of the MIT License. Please see the LICENSE file for full details.