Customization
This page will explain how you can modify the look and different behaviors of Cmder to your needs.
By the way, You can ✨ contribute to this page too!
📜 Table of contents
-
Shells
-
Cmd/Clink
- Prompt customization (color, text)
- Clink auto answer (e.g. `Terminate batch job (Y/N)?`)
- Powershell
- Bash
-
Cmd/Clink
-
Window
- Icons – change icon color
-
Terminal emulators
- Hyper with Cmder
- Fluent Terminal – blur behind (i.e. "acrylic" effect)
- Color schemes
| name | description |
|---|---|
| 👉 Note: | This is an important note to follow |
| 👉 Tip! | This is a suggestion or a reminder |
| TODO: | Describes an incomplete section |
| TBA | To be added section |
- The configuration files and modifications need to be placed in the
[cmder_root]\configdirectory.
Do not edit the files in the[cmder_root]\vendordirectory, as they will get overwritten on each Cmder update. - Make sure you update to the latest version of Cmder before applying customizations to your shell. The customization guide below only works with the recent versions of Cmder, older versions do not include the required files for configuration.
Cmder can run a variety of different shell profiles (e.g. bash, cmd and powershell).
When you open Cmder, the default cmd shell is displayed. If you're using another shell, you need to also configure it to your liking.
The shell for cmd is enhanced by the enhanced fork of Clink and clink-completions that are included in your Cmder package.
Clink is a utility that enhances the native Windows shell cmd.exe with the powerful command line editing features of the GNU Readline library, which provides rich completion, history, and line-editing capabilities. Readline is best known for its use in the Unix shell Bash, the standard shell for Mac OS X and many Linux distributions.
Cmder includes Clink as one of its components and integrates it with cmd.exe by default.
We will explain how you will be able to change properties such as the prompt text, color, and auto-answer to Ctrl-C behavior.
👉 Note: Clink uses a programming language -- called Lua -- in order to store its configuration files. You can read the manual to learn the syntax, if you are interested.
If you are a power user, you can also take a look at Configuring Clink, which goes into great detail to explain how you can customize Clink to your exact needs. It's a pretty neat component of Cmder!
The default prompt text and color are defined in the the vendor directory here and should not be modified.
In order to make persistent changes across updates, you'll need to edit the clink profile file at the following path:
%cmder_root%\config\cmder_prompt_config.lua
For example, if you have nano text editor installed on your machine (included in the Cmder Full version), type this to create or open the file:
λ nano %cmder_root%\config\cmder_prompt_config.lua👉 Tip! If you don't have the nano editor (or are not comfortable using it to edit your files), feel free to substitute it with your editor of choice (e.g. code for VS Code or notepad for Notepad, or even vim).
The full edition of the Cmder includes nano editor as part of git for Windows. You can of course also install nano separately, or use a different text editor altogether, such as neovim.
👉 Tip! Hit Ctrl + F (using VS Code or Notepad) or Ctrl + W (using Nano) to find each entry.
Turn this option on to show the entire prompt in one line, as opposed to different lines for displaying the current directory and the prompt.
Example:
prompt_singleLine = true
The color is controlled by escape sequences, which is written as ESC [ <number> ; <number> ; ... m in the documentation, or \x1b[ nnn m in our clink.lua file.
For example, \x1b[1;32;40m will display a green text. Each number can be prepended using a semicolon ; in order to add to the text style (e.g. codes 30-37 set the foreground text color, codes 40-47 set the background color, code 1 makes the text bold. So 31;47;1 produces a red text in white background in bold).
If you change 32 to 36, you'll get a cyan path:
If you change 32 to 33, you'll get a yellow path:
| Color | Foreground | Background | Bright Foreground | Bright Background |
|---|---|---|---|---|
| Black | 30 | 40 | 90 | 100 |
| Red | 31 | 41 | 91 | 101 |
| Green | 32 | 42 | 92 | 102 |
| Yellow | 33 | 43 | 93 | 103 |
| Blue | 34 | 44 | 94 | 104 |
| Magenta | 35 | 45 | 95 | 105 |
| Cyan | 36 | 46 | 96 | 106 |
| White | 37 | 47 | 97 | 107 |
| Code | Effect | Description |
|---|---|---|
| 0 | Reset / Normal | Turns off all styles and produces a normal prompt |
| 1 | Bold | Display text in bold or increased intensity |
| 2 | Dim | Terminal-dependant; shows text with lighter colors or decreased intensity |
| 3 | Italic | Display text in italic |
| 4 | Underline | Display text with underline |
| 7 | Reverse | Swap the colors of background and foreground |
👉 Tip! You can chain multiple color codes using the semicolon character, e.g. 1;31;40 will produce a bold text in red on a black background.
Read this page for a complete list of colors.
For further customization, have a look at this comment.
Here are the default color codes:
-- Prompt Element Colors
uah_color = "\x1b[1;33;49m" -- Green = uah = [user]@[hostname]
cwd_color = "\x1b[1;32;49m" -- Yellow cwd = Current Working Directory
lamb_color = "\x1b[1;30;49m" -- Light Grey = Lambda Color
clean_color = "\x1b[37;1m"
dirty_color = "\x1b[33;3m" -- Yellow, Italic
conflict_color = "\x1b[31;1m" -- Red, Bold
unknown_color = "\x1b[37;1m" -- White = No VCS Status Branch Color
👉 Tip! The color code 40 will produce a black background, click here for more details. Use color code 49 for transparent background color.
You can change the lambda λ to any custom UTF-8 character by modifying the lambda variable in your lua script.
Then replace it with the default symbol, like this:
prompt_lambSymbol = "★"
👉 Note: Make sure both your terminal emulator (e.g. ConEmu) and your font (e.g. Consolas) can support and display your character.
We recommend using Windows Terminal, Hyper, Terminus or FluentTerminal as your terminal emulator and either Fira Code, Hasklig or Source Code Pro as your font.
Do you prefer any other font such as Cascadia Code or JetBrains Mono? Edit this wiki and add your favorite fonts here!
You can configure Cmder to automatically answer Cmd.exe messages.
The settings file for the shell is located here:
[cmder_root]\config\clink_settings
For example, if you have nano text editor installed on your machine, type this to create or open the file:
λ nano %cmder_root%\config\settings👉 Tip! As always, you can use a different text editor (such as notepad) instead of nano.
Method 1: Add for the following subsection:
# name: Auto-answer terminate prompt
# type: enum
# options: off,answer_yes,answer_no
cmd.auto_answer = answer_yes
– OR –
Method 2: Enter the following into your Cmder shell:
clink set cmd.auto_answer answer_yes Which outputs:
Setting 'cmd.auto_answer' set to 'answer_yes'
👉 Note: Restart Cmder session to take effect, if required.
Source: @edmundo096
See also: #108, #1666 and this stackoverflow post.
TODO: 👉 Tip! How to use ~ (tilde) for home directory
Update: Cmder has more information in this issue: Use ~ for User's Home directory
A solution to make cd ~ work in Cmder: here
Here is the adjusted section on how to customize PowerShell in Cmder:
PowerShell is a powerful and versatile shell that can run on Windows, Linux, and macOS. Cmder can run PowerShell as one of its shell profiles, and you can customize it to your liking. Here are some ways to do that:
👉 Tip! For PowerShell customization, follow this link. Also, check out cmder-powerline-prompt.
The default prompt for PowerShell in Cmder is defined by the profile.ps1 file in your Cmder vendor folder. It shows some information such as user name, machine name, current path, and git status. You can change it to something more informative and colorful by using some PowerShell modules such as Posh-Git and Oh-My-Posh.
Posh-Git is a module that adds Git status information to your prompt, such as branch name, changes, and conflicts. You can install it by using PowerShellGet:
Install-Module posh-git -Scope CurrentUserOh-My-Posh is a module that adds theme capabilities to your prompt, such as colors, icons, and separators. You can install it by using PowerShellGet:
Install-Module oh-my-posh -Scope CurrentUserTo enable Posh-Git and Oh-My-Posh for your PowerShell session, you need to add the following lines to your user-profile.ps1 file in your Cmder config folder:
Import-Module posh-git
Import-Module oh-my-posh
Set-Theme Paradox
The last line sets the theme for Oh-My-Posh. You can choose from many themes available in the module, such as Agnoster, Paradox, or Sorin. You can see the list of themes by using:
Get-PoshThemesTo edit your user-profile.ps1 file, you can use the following command:
notepad $PROFILE.CurrentUserAllHostsYou can also use any other editor of your choice.
To make your prompt look better with Oh-My-Posh, you may want to use a font that supports Powerline symbols and Nerd Fonts icons. Powerline symbols are special characters that create seamless separators and indicators for your prompt. Nerd Fonts icons are glyphs that add some flair and information to your prompt, such as OS logo, programming language logo, or cloud provider logo.
You can download and install some fonts that support Powerline and Nerd Fonts from here: https://www.nerdfonts.com/font-downloads
Some examples of fonts that support Powerline and Nerd Fonts are MesloLGS NF, FiraCode NF, or Hack NF.
To use a font for your PowerShell session in Cmder, you need to change the font settings in Cmder. You can do that by:
- Open Cmder settings dialog (Win+Alt+P when Cmder window is active) and go to Features > Colors.
- Check the box for TrueMod (24bit color) support.
- Go to Main > Main console font and choose the font you want to use, such as MesloLGS NF.
- Go to Main > Alternative font and choose the same font as above.
- Check the box for Use alternative font (Monospace) for some pseudographics chars.
- Click Save settings.
You should see your prompt change to use the new font with Powerline symbols and Nerd Fonts icons.
Bash is a popular and powerful shell that can run on Windows, Linux, and macOS. Cmder can run bash as one of its shell profiles, and you can customize it to your liking.
👉 Tip! How to add λ to the bash shell and cygwin
Cmder comes with a pre-installed bash, using a vendored git-for-windows installation. This means that you can use git commands and other tools that come with git-for-windows, such as curl, wget, ssh, etc. However, this also means that you may not have the latest version of bash or some other tools that you may need.
If you want to use a different or updated version of bash, you can install it from other sources, such as Cygwin or Babun. Cygwin is a large collection of GNU and Open Source tools that provide functionality similar to a Linux distribution on Windows. Babun is a pre-configured Cygwin with many features and extras.
To install bash from Cygwin or Babun, you need to follow these steps:
- Download and run the installer for Cygwin or Babun from their websites.
- Follow the instructions to install the desired packages and components, such as bash, coreutils, grep, sed, etc.
- Locate the folder where Cygwin or Babun is installed, such as
C:\cygwin64orC:\Users\yourname\.babun. - Create a new task in Cmder settings dialog (Win+Alt+P when Cmder window is active) and go to Startup > Tasks.
- Click the + button to add a new task, and give it a name, such as
bash::cygwinorbash::babun. - In the Task parameters box, enter
/icon "C:\cygwin64\Cygwin.ico"or/icon "C:\Users\yourname\.babun\cygwin\bin\mintty.exe"to set the icon for the task. - In the Commands box, enter
set "PATH=%ConEmuBaseDirShort%\wsl;%PATH%" & %ConEmuBaseDirShort%\conemu-cyg-64.exe -new_console:p C:\cygwin64\bin\bash.exe --login -iorset "PATH=%ConEmuBaseDirShort%\wsl;%PATH%" & %ConEmuBaseDirShort%\conemu-cyg-64.exe -new_console:p C:\Users\yourname\.babun\cygwin\bin\bash.exe --login -ito launch bash from Cygwin or Babun. - Click Save settings.
You should now be able to use bash from Cygwin or Babun in Cmder by selecting the task from the + button in the toolbar.
The default prompt for bash in Cmder is defined by the profile.d/cmder.sh file in your Cmder vendor folder. It shows some information such as user name, machine name, current path, and git status. You can change it to something more informative and colorful by using some bash features such as PS1 variable, ANSI escape sequences, and prompt commands.
The PS1 variable is used to define the primary prompt string for bash. It can contain various special characters that are interpreted by bash to display different information. For example, \u displays the user name, \h displays the host name, \w displays the current working directory, etc. You can see the full list of special characters here: https://www.gnu.org/software/bash/manual/html_node/Controlling-the-Prompt.html
ANSI escape sequences are used to control the color and style of the text in the terminal. They are written as ESC [ ; ; ... m , where ESC is \033 in octal or \e in bash notation. For example, \e[1;32;40m will display a green text on a black background. You can see the full list of ANSI escape sequences here: https://en.wikipedia.org/wiki/ANSI_escape_code
Prompt commands are functions that are executed before displaying each prompt. They can be used to perform some actions or calculations that are needed for the prompt. For example, you can use a prompt command to check the git status of your current directory and display it in your prompt.
You can change the lambda λ symbol for the bash shell prompt by creating/editing the ~/.config/git/git-prompt.sh file.
If it's empty (or non-existent) firstly open the default bash prompt file from here, find the first line containing PS1= and copy all lines from that line to the last line containing PS1= you see (right before the fi statement).
Then adjust the PS1="$PS1"'λ ' line to your liking, and save it.
More information: https://github.com/cmderdev/cmder/blob/master/vendor/git-prompt.sh
To customize the prompt for bash in Cmder, you need to add or modify some lines in your user-profile.sh file in your Cmder config folder:
# Define colors
RED="\e[1;31m"
GREEN="\e[1;32m"
YELLOW="\e[1;33m"
BLUE="\e[1;34m"
MAGENTA="\e[1;35m"
CYAN="\e[1;36m"
WHITE="\e[1;37m"
RESET="\e[0m"

# Define prompt command
function prompt_command {
  # Check if the current directory is a git repository
  if git rev-parse --git-dir > /dev/null 2>&1; then
    # Get the current branch name
    branch=$(git branch --show-current)
    # Get the current status
    status=$(git status --short | wc -l)
    # Set the color and icon based on the status
    if [ $status -eq 0 ]; then
      color=$GREEN
      icon="✔"
    else
      color=$RED
      icon="✘"
    fi
    # Set the git part of the prompt
    git_part="[$color$branch$RESET $color$icon$RESET]"
  else
    # Set the git part of the prompt to empty
    git_part=""
  fi
}

# Set the prompt command
PROMPT_COMMAND=prompt_command

# Set the PS1 variable
PS1="$CYAN\u@\h$RESET $YELLOW\w$RESET $git_part $MAGENTAλ$RESET "
You can customize the prompt further by changing the colors, icons, or information that are displayed. You can also use some tools or frameworks that can help you create a beautiful and functional prompt, such as Starship, Powerlevel10k, or Bash-it.
This section explains customizations related to the terminal window (e.g. icon, transparency, acrylic blur, etc)
Cmder package includes 6 rainbow-colored icons in addition to the default icon.
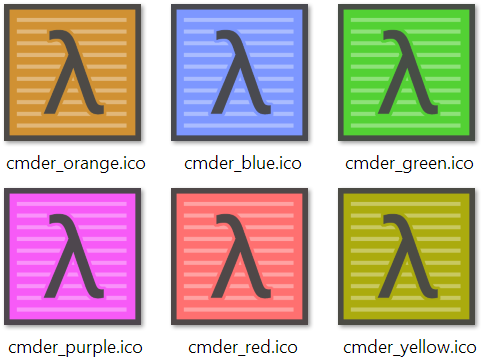
The icons are available in the icons folder:
[cmder_root]\icons\cmder_*.ico
You can choose one for the Cmder shortcut.
To do so, right-click on the shortcut file, from Properties → Shortcut → Change Icon... open and select the new cmder icon.
Cmder is a terminal package that includes ConEmu as the underlying terminal emulator, and different shell profiles.
You can replace ConEmu with different terminal emulators, such as Hyper, Terminus or FluentTerminal.
Hyper is a terminal emulator built with web-technologies such as xterm.js and Electron. Read more…

Fluent Terminal is a terminal emulator built with UWP and xterm.js. It is GPU-accelerated and uses web-technologies.
Here's how the acrylic blurred-behind looks:
This effect is achieved using FluentTerminal integration.

👉 Note: The following color schemes are made for the ConEmu terminal emulator. Other terminal emulators (such as Hyper, Terminus and Fluent Terminal) use different scheme formats.
-
🐼 Panda Syntax Theme for Cmder – 💾 Download
-
More color schemes – 💾 Download
-
Dracula for cmder – 💾 Download