Getting Started
tmux is a program which runs in a terminal and allows multiple other terminal programs to be run inside it. Each program inside tmux gets its own terminal managed by tmux, which can be accessed from the single terminal where tmux is running - this called multiplexing and tmux is a terminal multiplexer.
tmux - and any programs running inside it - may be detached from the terminal where it is running (the outside terminal) and later reattached to the same or another terminal.
Programs run inside tmux may be full screen interactive programs like vi(1) or top(1), shells like bash(1) or ksh(1), or any other program that can be run in a Unix terminal.
There is a powerful feature set to access, manage and organize programs inside tmux, both interactively and from scripts.
The main uses of tmux are to:
-
Protect running programs on a remote server from connection drops by running them inside tmux.
-
Allow programs running on a remote server to be accessed from multiple different local computers.
-
Work with multiple programs and shells together in one terminal, a bit like a window manager.
For example:
-
A user connects to a remote server using ssh(1) from an xterm(1) on their work computer and run several programs. perhaps an editor, a compiler and a few shells.
-
They work with these programs interactively, perhaps start compiling, then close the xterm(1) with tmux and go home for the day.
-
They are then able to connect to the same remote server from home, attach to tmux, and continue from where they were previously.
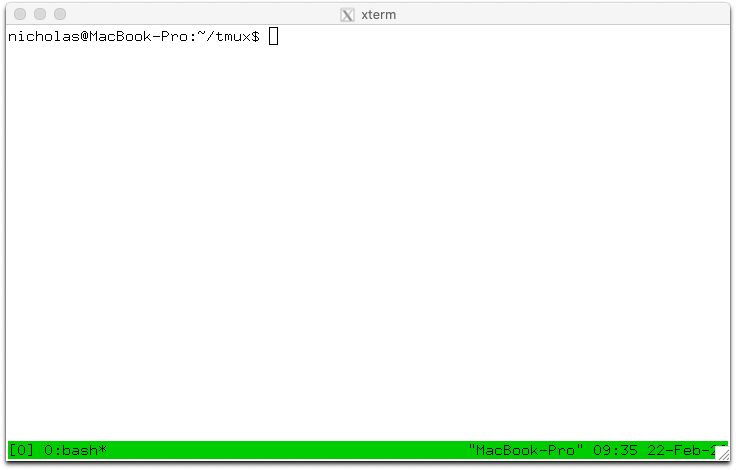
Here is a screenshot of tmux in an xterm(1) showing the shell:
This document gives an overview of some of tmux's key concepts, a description of how to use the main features interactively and some information on basic customization and configuration.
Note that this document may mention features only available in the latest tmux release. Only the latest tmux release is supported. Releases are made approximately every six months.
tmux may be installed from package management systems on most major platforms. See this document for instructions on how to install tmux or how to build it from source.
Here are several places to find documentation and help about tmux:
-
 The manual
page has detailed reference documentation on
tmux and a description of every command, flag and option. Once tmux is
installed it is also available in section 1:
The manual
page has detailed reference documentation on
tmux and a description of every command, flag and option. Once tmux is
installed it is also available in section 1:$ man 1 tmux -
The FAQ has solutions to commonly asked questions, mostly about specific configuration issues.
tmux has a set of basic concepts and terms it is important to be familiar with. This section gives a description of how the terminals inside tmux are grouped together and the various terms tmux uses.
tmux keeps all its state in a single main process, called the tmux server. This runs in the background and manages all the programs running inside tmux and keeps track of their output. The tmux server is started automatically when the user runs a tmux command and by default exits when there are no running programs.
Users attach to the tmux server by starting a client. This takes over the
terminal where it is run and talks to the server using a socket file in /tmp.
Each client runs in one terminal, which may be an X(7) terminal such as
xterm(1), the system console, or a terminal inside another program (such as
tmux itself). Each client is identified by the name of the outside terminal
where it is started, for example /dev/ttypf.
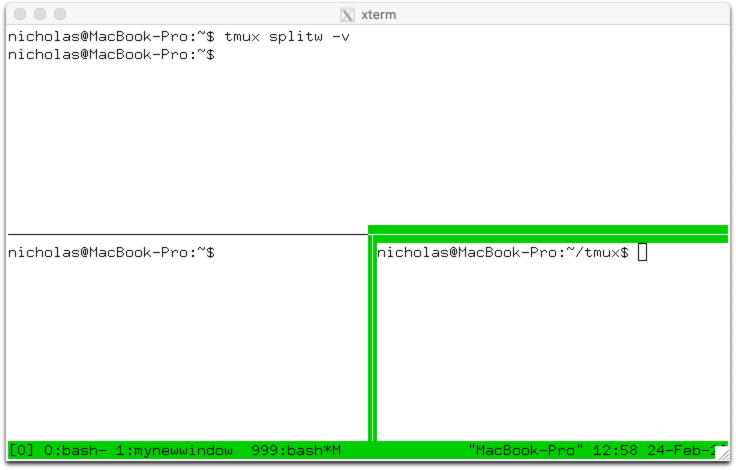
 Every terminal inside tmux belongs to one pane, this is a rectangular area
which shows the content of the terminal inside tmux. Because each terminal
inside tmux is shown in only one pane, the term pane can be used to mean all of
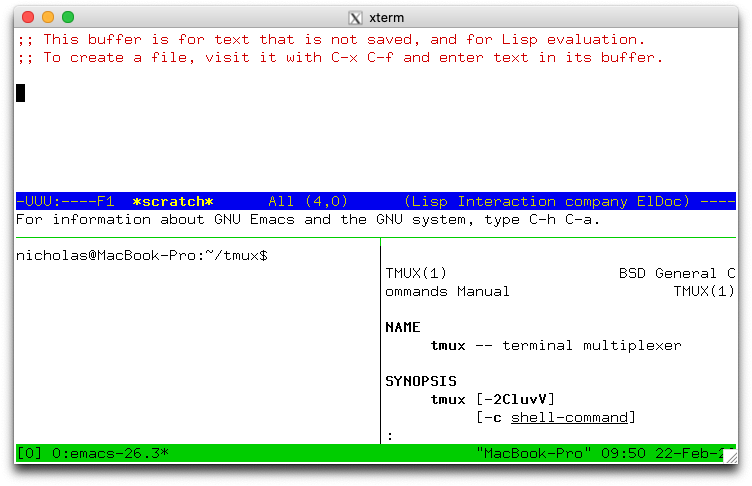
the pane, the terminal and the program running inside it. The screenshot to the
right shows tmux with panes.
Every terminal inside tmux belongs to one pane, this is a rectangular area
which shows the content of the terminal inside tmux. Because each terminal
inside tmux is shown in only one pane, the term pane can be used to mean all of
the pane, the terminal and the program running inside it. The screenshot to the
right shows tmux with panes.
Each pane appears in one window. A window is made up of one or more panes which together cover its entire area - so multiple panes may be visible at the same time. A window normally takes up the whole of the terminal where tmux is attached, but it can be bigger or smaller. The sizes and positions of all the panes in a window is called the window layout.
Every window has a name - by default tmux will choose one but it can be changed by the user. Window names do not have to be unique, windows are usually identified by the session and the window index rather than their name.
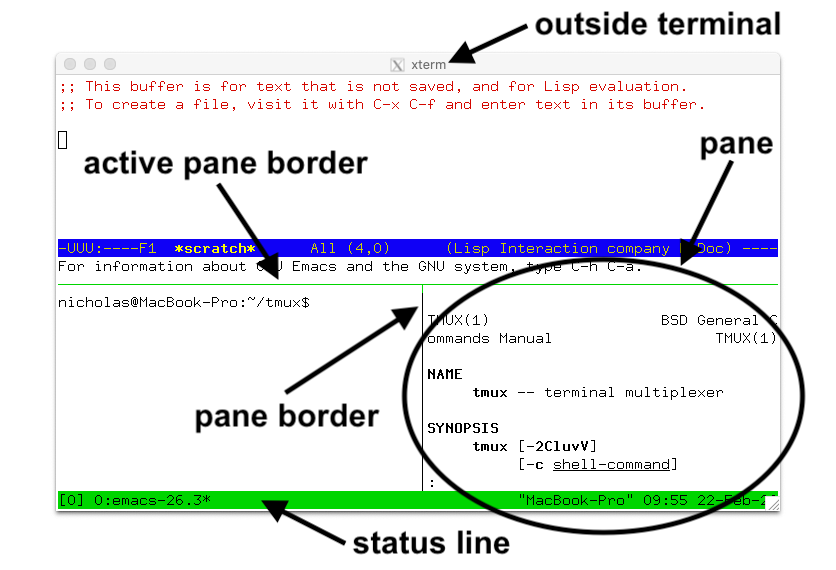 Each pane is separated from the panes around it by a line, this is called the
pane border. There is one pane in each window called the active pane, this is
where any text typed is sent and is the default pane used for commands that
target the window. The pane border of the active pane is marked in green, or if
there are only two panes then the top, bottom, left or right half of the border
is green.
Each pane is separated from the panes around it by a line, this is called the
pane border. There is one pane in each window called the active pane, this is
where any text typed is sent and is the default pane used for commands that
target the window. The pane border of the active pane is marked in green, or if
there are only two panes then the top, bottom, left or right half of the border
is green.
Multiple windows are grouped together into sessions. If a window is part of a session, it is said to be linked to that session. Windows may be linked to multiple sessions at the same time, although mostly they are only in one. Each window in a session has a number, called the window index - the same window may be linked at different indexes in different sessions. A session's window list is all the windows linked to that session in order of their indexes.
Each session has one current window, this is the window displayed when the session is attached and is the default window for any commands that target the session. If the current window is changed, the previous current window becomes known as the last window.
A session may be attached to one or more clients, which means it is shown on the outside terminal where that client is running. Any text typed into that outside terminal is sent to the active pane in the current window of the attached session. Sessions do not have an index but they do have a name, which must be unique.
In summary:
- Programs run in terminals in panes, which each belong to one window.
- Each window has a name and one active pane.
- Windows are linked to one or more sessions.
- Each session has a list of windows, each with an index.
- One of the windows in a session is the current window.
- Sessions are attached to one or more clients, or are detached (attached to no clients).
- Each client is attached to one session.
| Term | Description |
|---|---|
| Client | Attaches a tmux session from an outside terminal such as xterm(1) |
| Session | Groups one or more windows together |
| Window | Groups one or more panes together, linked to one or more sessions |
| Pane | Contains a terminal and running program, appears in one window |
| Active pane | The pane in the current window where typing is sent; one per window |
| Current window | The window in the attached session where typing is sent; one per session |
| Last window | The previous current window |
| Session name | The name of a session, defaults to a number starting from zero |
| Window list | The list of windows in a session in order by number |
| Window name | The name of a window, defaults to the name of the running program in the active pane |
| Window index | The number of a window in a session's window list |
| Window layout | The size and position of the panes in a window |
To create the first tmux session, tmux is run from the shell. A new session is
created using the new-session command - new for short:
$ tmux new
Without arguments, new-session creates a new session and attaches it. Because
this is the first session, the tmux server is started and the tmux run from the
shell becomes the first client and attaches to it.
The new session will have one window (at index 0) with a single pane containing a shell. The shell prompt should appear at the top of the terminal and the green status line at the bottom (more on the status line is below).
By default, the first session will be called 0, the second 1 and so on.
new-session allows a name to be specified for the session with the -s flag:
$ tmux new -smysession
This creates a new session called mysession. A command may be given instead
of running a shell by passing additional arguments. If one argument is given,
tmux will pass it to the shell, if more than one it runs the command directly.
For example these run emacs(1):
$ tmux new 'emacs ~/.tmux.conf'
Or:
$ tmux new -- emacs ~/.tmux.conf
By default, tmux calls the first window in the session after whatever is
running in it. The -n flag gives a name to use instead, in this case a window
mytopwindow running top(1):
$ tmux new -nmytopwindow top
new-session has other flags - some are covered below. A full list is in the
tmux manual.
When a tmux client is attached, it shows a status line on the bottom line of the screen. By default this is green and shows:
-
On the left, the name of the attached session:
[0]. -
In the middle, a list of the windows in the session, with their index, for example with one window called
kshat index 0:0:ksh. -
On the right, the pane title in quotes (this defaults to the name of the host running tmux) and the time and the date.
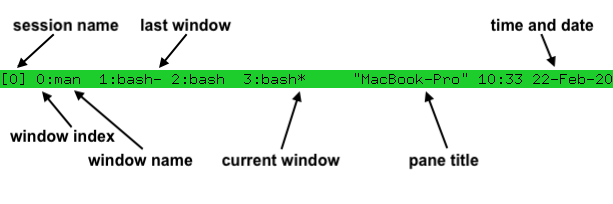
As new windows are opened, the window list grows - if there are too many
windows to fit on the width of the terminal, a < or > will be added at the
left or right or both to show there are hidden windows.
In the window list, the current window is marked with a * after the name, and
the last window with a -.
Once a tmux client is attached, any keys entered are forwarded to the program running in the active pane of the current window. For keys that control tmux itself, a special key must be pressed first - this is called the prefix key.
The default prefix key is C-b, which means the Ctrl key and b. In tmux,
modifier keys are shown by prefixing a key with C- for the control key, M-
for the meta key (normally Alt on modern computers) and S- for the shift
key. These may be combined together, so C-M-x means pressing the control key,
meta key and x together.
When the prefix key is pressed, tmux waits for another key press and that
determines what tmux command is executed. Keys like this are shown here with a
space between them: C-b c means first the prefix key C-b is pressed, then
it is released and then the c key is pressed. Care must be taken to release
the Ctrl key after pressing C-b if necessary - C-b c is different from
C-b C-c.
Pressing C-b twice sends the C-b key to the program running in the active
pane.
Every default tmux key binding has a short description to help remember what
the key does. A list of all the keys can be seen by pressing C-b ?.
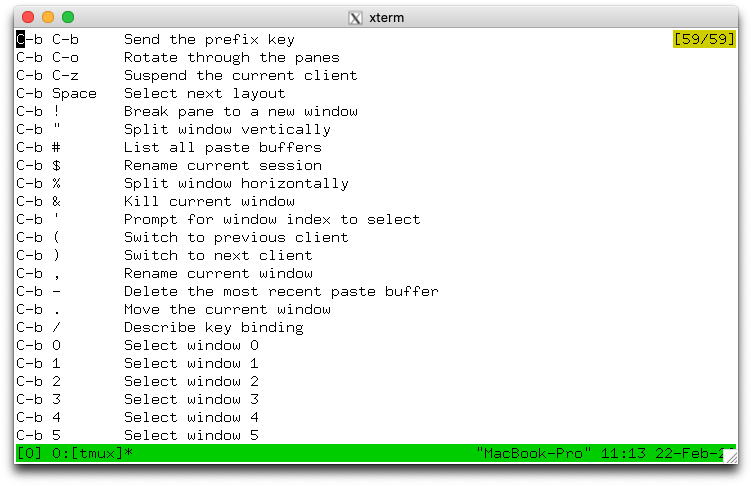
C-b ? enters view mode to show text. A pane in view mode has its own key
bindings which do not need the prefix key. These broadly follow emacs(1). The
most important are Up, Down, C-Up, C-Down to scroll up and down, and
q to exit the mode. The line number of the top visible line together with the
total number of lines is shown in the top right.
Alternatively, the same list can be seen from the shell by running:
$ tmux lsk -N|more
C-b / shows the description of a single key - a prompt at the bottom of the
terminal appears. Pressing a key will show its description in the same place.
For example, pressing C-b / then ? shows:
C-b ? List key bindings
tmux has a large set of commands. These all have a name like new-window or
new-session or list-keys and many also have a shorter alias like neww or
new or lsk.
Any time a key binding is used, it runs one or more tmux commands. For example,
C-b c runs the new-window command.
Commands can also be used from the shell, as with new-session and list-keys
above.
Each command has zero or more flags, in the same way as standard Unix commands.
Flags may or may not take a single argument themselves. In addition, commands
may take additional arguments after the flags. Flags are passed after the
command, for example to run the new-session command (alias new) with flags
-d and -n:
$ tmux new-session -d -nmysession
All commands and their flags are documented in the tmux manual page.
This document focuses on the available key bindings, but commands are mentioned for information or where there is a useful flag. They can be entered from the shell or from the command prompt, described in the next section.
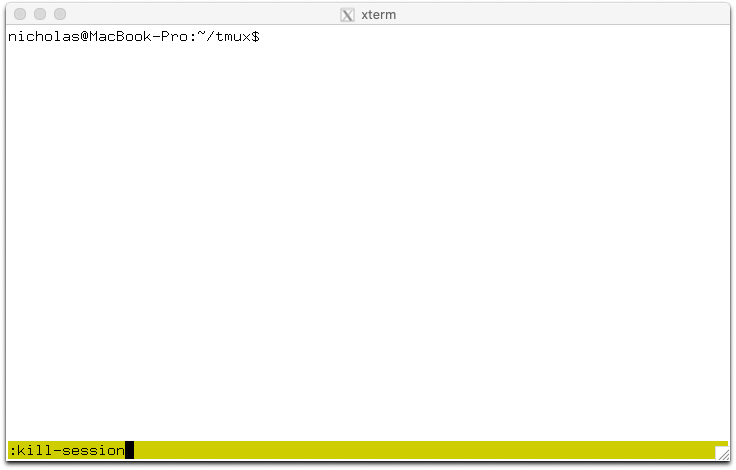
tmux has an interactive command prompt. This can be opened by pressing C-b :
and appears instead of the status line, as shown in this screenshot.
At the prompt, commands can be entered similarly to how they are at the shell. Output will either be shown for a short period in the status line, or switch the active pane into view mode.
By default, the command prompt uses keys similar to emacs(1); however, if the
VISUAL or EDITOR environment variables are set to something containing vi
(such as vi or vim or nvi), then vi(1)-style keys are used instead.
Multiple commands may be entered together at the command prompt by separating
them with a semicolon (;). This is called a command sequence.
Detaching from tmux means that the client exits and detaches from the outside
terminal, returning to the shell and leaving the tmux session and any programs
inside it running in the background. To detach tmux, the C-b d key binding is
used. When tmux detaches, it will print a message with the session name:
[detached (from session mysession)]
The attach-session command attaches to an existing session. Without
arguments, it will attach to the most recently used session that is not already
attached:
$ tmux attach
Or -t gives the name of a session to attach to:
$ tmux attach -tmysession
By default, attaching to a session does not detach any other clients attached
to the same session. The -d flag does this:
$ tmux attach -dtmysession
The new-session command has a -A flag to attach to an existing session if
it exists, or create a new one if it does not. For a session named mysession:
$ tmux new -Asmysession
The -D flag may be added to make new-session also behave like
attach-session with -d and detach any other clients attached to the
session.
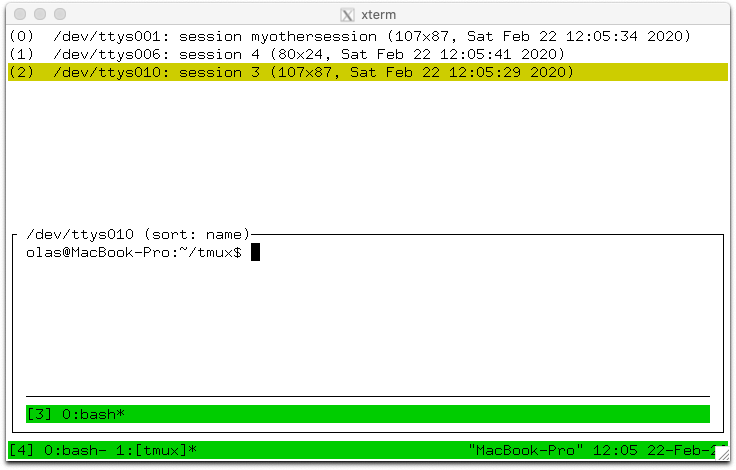
The list-session command (alias ls) shows a list of available sessions that
can be attached. This shows four sessions called 1, 2, myothersession and
mysession:
$ tmux ls
1: 3 windows (created Sat Feb 22 11:44:51 2020)
2: 1 windows (created Sat Feb 22 11:44:51 2020)
myothersession: 2 windows (created Sat Feb 22 11:44:51 2020)
mysession: 1 windows (created Sat Feb 22 11:44:51 2020)
If there are no sessions, windows or panes inside tmux, the server will exit.
It can also be entirely killed using the kill-server command. For example, at
the command prompt:
:kill-server

A new window can be created in an attached session with the C-b c key
binding which runs the new-window command. The new window is created at the
first available index - so the second window will have index 1. The new window
becomes the current window of the session.
If there are any gaps in the window list, they are filled by new windows. So if there are windows with indexes 0 and 2, the next new window will be created as index 1.
The new-window command has some useful flags which can be used with the
command prompt:
-
The
-dflag creates the window, but does not make it the current window. -
-nallows a name for the new window to be given. For example using the command prompt to create a window calledmynewwindowwithout making it the current window::neww -dnmynewwindow -
The
-tflag specifies a target for the window. Command targets have a special syntax, but for simple use withnew-windowit is enough just to give a window index. This creates a window at index 999::neww -t999
A command to be run in the new window may be given to new-window in the same
way as new-session. For example to create a new window running top(1):
:neww top
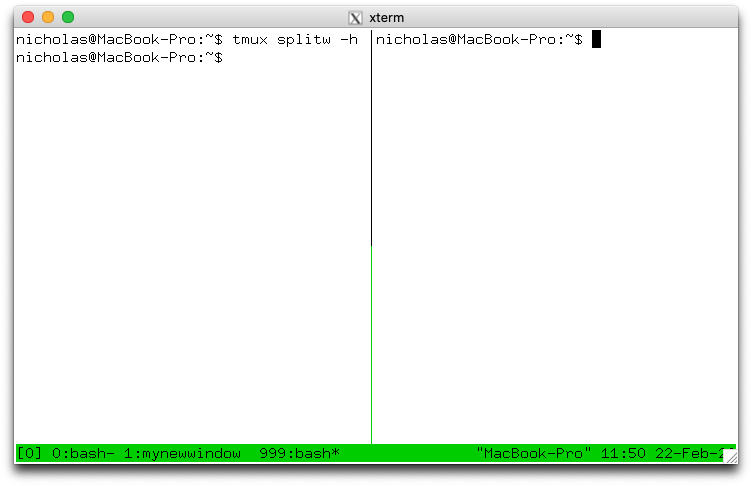
A pane is created by splitting a window. This is done with the split-window
command which is bound to two keys by default:
-
C-b %splits the current pane into two horizontally, producing two panes next to each other, one on the left and one on the right. -
C-b "splits the current pane into two vertically, producing two panes one above the other.
Each time a pane is split into two, each of those panes may be split again using the same key bindings, until the pane becomes too small.
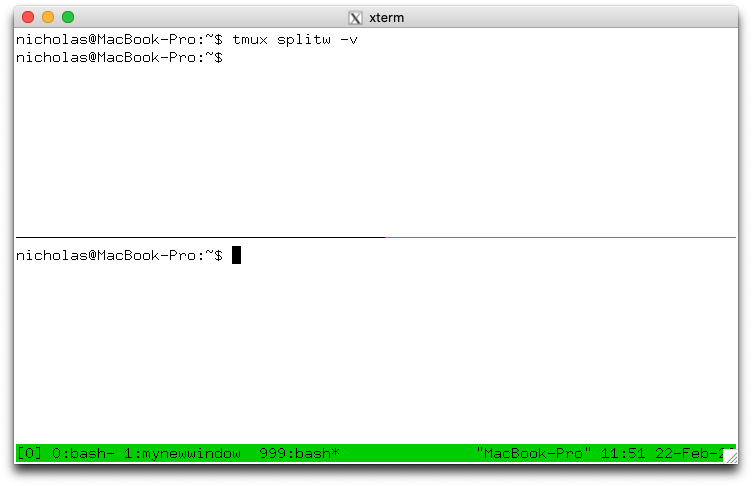
split-window has several useful flags:
-
-hdoes a horizontal split and-va vertical split. -
-ddoes not change the active pane to the newly created pane. -
-fmakes a new pane spanning the whole width or height of the window instead of being constrained to the size of the pane being split. -
-bputs the new pane to the left or above of the pane being split instead of to the right or below.
A command to be run in the new pane may be given to split-window in the same
way as new-session and new-window.
There are several key bindings to change the current window of a session:
-
C-b 0changes to window 0,C-b 1to window 1, up to windowC-b 9for window 9. -
C-b 'prompts for a window index and changes to that window. -
C-b nchanges to the next window in the window list by number. So pressingC-b nwhen in window 1 will change to window 2 if it exists. -
C-b pchanges to the previous window in the window list by number. -
C-b lchanges to the last window, which is the window that was last the current window before the window that is now.
These are all variations of the select-window command.
The active pane can be changed between the panes in a window with these key bindings:
-
C-b Up,C-b Down,C-b LeftandC-b Rightchange to the pane above, below, left or right of the active pane. These keys wrap around the window, so pressingC-b Downon a pane at the bottom will change to a pane at the top.
-
C-b qprints the pane numbers and their sizes on top of the panes for a short time. Pressing one of the number keys before they disappear changes the active pane to the chosen pane, soC-b q 1will change to pane number 1. -
C-b omoves to the next pane by pane number andC-b C-oswaps that pane with the active pane, so they exchange positions and sizes in the window.
These use the select-pane and display-panes commands.
Pane numbers are not fixed, instead panes are numbered by their position in the window, so if the pane with number 0 is swapped with the pane with number 1, the numbers are swapped as well as the panes themselves.
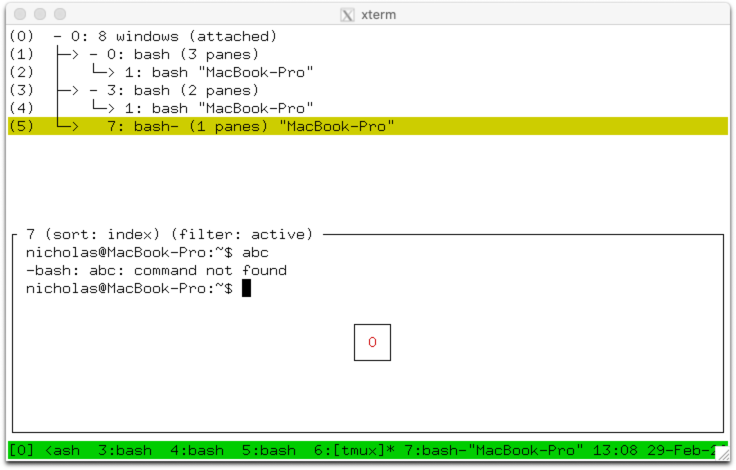
 tmux includes a mode where sessions, windows or panes can be chosen from a
tree, this is called tree mode. It can be used to browse sessions, windows and
panes; to change the attached session, the current window or active pane; to
kill sessions, windows and panes; or apply a command to several at once by
tagging them.
tmux includes a mode where sessions, windows or panes can be chosen from a
tree, this is called tree mode. It can be used to browse sessions, windows and
panes; to change the attached session, the current window or active pane; to
kill sessions, windows and panes; or apply a command to several at once by
tagging them.
There are two key bindings to enter tree mode: C-b s starts showing only
sessions and with the attached session selected; C-b w starts with sessions
expanded so windows are shown and with the current window in the attached
session selected.
Tree mode splits the window into two sections: the top half has a tree of sessions, windows and panes and the bottom half has a preview of the area around the cursor in each pane. For sessions the preview shows the active panes in as many windows will fit; for windows as many panes as will fit; and for panes only the selected pane.
Keys to control tree mode do not require the prefix. The list may be navigated
with the Up and Down keys. Enter changes to the selected item (it becomes
the attached session, current window or active pane) and exits the mode.
Right expands the item if possible - sessions expand to show their windows
and windows to show their panes. Left collapses the item to hide any windows
or panes. O changes the order of the items and q exits tree mode.
Items in the tree are tagged by pressing t and untagged by pressing t
again. Tagged items are shown in bold and with * after their name. All tagged
items may be untagged by pressing T. Tagged items may be killed together by
pressing X, or a command applied to them all by pressing : for a prompt.
Each item in the tree has as shortcut key in brackets at the start of the line.
Pressing this key will immediately choose that item (as if it had been selected
and Enter pressed). The first ten items are keys 0 to 9 and after that
keys M-a to M-z are used.
This is a list of the keys available in tree mode without pressing the prefix key:
| Key | Function |
|---|---|
Enter |
Change the attached session, current window or active pane |
Up |
Select previous item |
Down |
Select next item |
Right |
Expand item |
Left |
Collapse item |
x |
Kill selected item |
X |
Kill tagged items |
< |
Scroll preview left |
> |
Scroll preview right |
C-s |
Search by name |
n |
Repeat last search |
t |
Toggle if item is tagged |
T |
Tag no items |
C-t |
Tag all items |
: |
Prompt for a command to run for the selected item or each tagged item |
O |
Change sort field |
r |
Reverse sort order |
v |
Toggle preview |
q |
Exit tree mode |
Tree mode is activated with the choose-tree command.
A list of clients is available by pressing C-b D (that is, C-b S-d). This
is similar to tree mode and is called client mode.
Each client is shown in the list in the top half with its name, attached session, size and the time and date when it was last used; the bottom half has a preview of the selected client with as much of its status line as will fit.
The movement and tag keys are the same as tree mode, but others are different,
for example the Enter key detaches the selected client.
This is a list of the keys in client mode without the movement and tagging keys that are the same as tree mode:
| Key | Function |
|---|---|
Enter |
Detach selected client |
d |
Detach selected client, same as Enter
|
D |
Detach tagged clients |
x |
Detach selected client and try to kill the shell it was started from |
X |
Detach tagged clients and try to kill the shells they were started from |
Other than using client mode, the detach-client command has a -a flag to
detach all clients other than the attached client.
Pressing C-b & prompts for confirmation then kills (closes) the current
window. All panes in the window are killed at the same time. C-b x kills only
the active pane. These are bound to the kill-window and kill-pane commands.
The kill-session command kills the attached session and all its windows and
detaches the client. There is no key binding for kill-session but it can be
used from the command prompt or the : prompt in tree mode.

C-b $ will prompt for a new name for the attached session. This uses the
rename-session command. Likewise, C-b , prompts for a new name for the
current window, using the rename-window command.
tmux allows panes and windows to be swapped with the swap-pane and
swap-window commands.
To make swapping easy, a single pane can be marked. There is one marked pane
across all sessions. The C-b m key binding toggles whether the active pane in
the current window in the attached session is the marked pane. C-b M clears
the marked pane entirely so that no pane is marked. The marked pane is shown by
a green background to its border and the window containing the marked pane has
an M flag in the status line.
Once a pane is marked, it can be swapped with the active pane in the current
window with the swap-pane command, or the window containing the marked pane
can be swapped with the current window using the swap-window command. For
example, using the command prompt:
:swap-pane
Panes can additionally be swapped with the pane above or below using the C-b { and C-b } key bindings.
Moving windows uses the move-window command or the C-b . key binding.
Pressing C-b . will prompt for a new index for the current window. If a
window already exists at the given index, an error will be shown. An existing
window can be replaced by using the -k flag - to move a window to index 999:
:move-window -kt999
If there are gaps in the window list, the indexes can be renumbered with the
-r flag to move-window. For example, this will change a window list of 0,
1, 3, 999 into 0, 1, 2, 3:
:movew -r
Panes may be resized in small steps with C-b C-Left, C-b C-Right, C-b C-Up and C-b C-Down and in larger steps with C-b M-Left, C-b M-Right,
C-b M-Up and C-b M-Down. These use the resize-pane command.
A single pane may be temporarily made to take up the whole window with C-b z,
hiding any other panes. Pressing C-b z again puts the pane and window layout
back to how it was. This is called zooming and unzooming. A window where a pane
has been zoomed is marked with a Z in the status line. Commands that change
the size or position of panes in a window automatically unzoom the window.
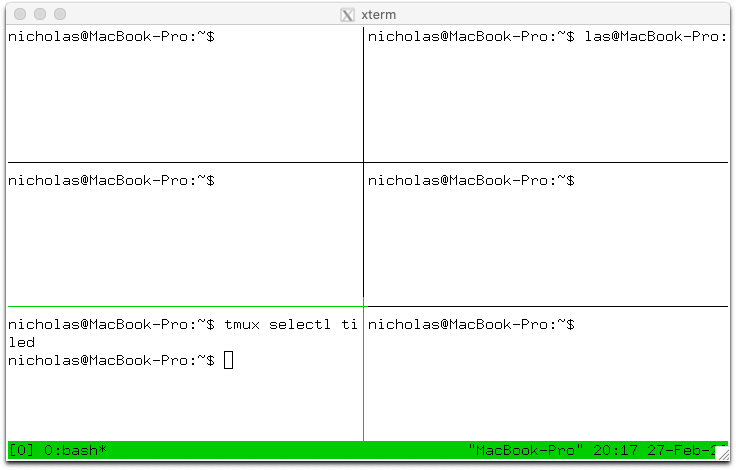
The panes in a window may be automatically arranged into one of several named
layouts, these may be rotated between with the C-b Space key binding or
chosen directly with C-b M-1, C-b M-2 and so on.
The available layouts are:
| Name | Key | Description |
|---|---|---|
| even-horizontal | C-b M-1 |
Spread out evenly across |
| even-vertical | C-b M-2 |
Spread out evenly up and down |
| main-horizontal | C-b M-3 |
One large pane at the top, the rest spread out evenly across |
| main-vertical | C-b M-4 |
One large pane on the left, the rest spread out evenly up and down |
| tiled | C-b M-5 |
Tiled in the same number of rows as columns |
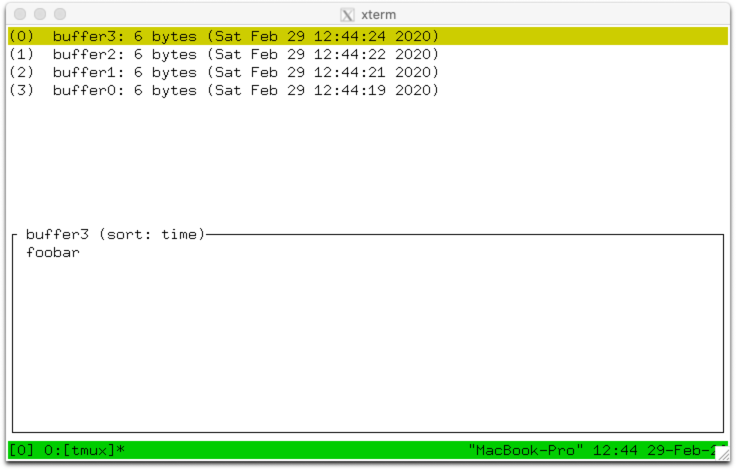
tmux has its own copy and paste system. A piece of copied text is called a
paste buffer. Text is copied using copy mode, entered with C-b [, and the most
recently copied text is pasted into the active pane with C-b ].

Paste buffers can be given names but by default they are assigned a name by
tmux, such as buffer0 or buffer1. Buffers like this are called automatic
buffers and at most 50 are kept - once there are 50 buffers, the oldest is
removed when another is added. If a buffer is given a name, it is called a
named buffer; named buffers are not deleted no matter how many there are.
It is possible to configure tmux to send any copied text to the system clipboard: this document explains the different ways to configure this.
Copy mode freezes any output in a pane and allows text to be copied. View mode (described earlier) is a read-only form of copy mode.
Like the command prompt, copy mode uses keys similar to emacs(1); however, if
the VISUAL or EDITOR environment variables are set to something containing
vi, then vi(1)-style keys are used instead. The following keys are some of
those available in copy mode with emacs(1) keys:
| Key | Action |
|---|---|
Up, Down, Left, Right
|
Move the cursor |
C-Space |
Start a selection |
C-w |
Copy the selection and exit copy mode |
q |
Exit copy mode |
C-g |
Stop selecting without copying, or stop searching |
C-a |
Move the cursor to the start of the line |
C-e |
Move the cursor to the end of the line |
C-r |
Search interactively backwards |
M-f |
Move the cursor to the next word |
M-b |
Move the cursor to the previous word |
A full list of keys for both vi(1) and emacs(1) is available in the manual page.
Once some text is copied, the most recent may be pasted with C-b ] or an
older buffer pasted by using buffer mode, entered with C-b =. Buffer mode is
similar to client mode and tree mode and offers a list of buffers together with
a preview of their contents. As well as the navigation and tagging keys used in
tree mode and client mode, buffer mode supports the following keys:
| Key | Function |
|---|---|
Enter |
Paste selected buffer |
p |
Paste selected buffer, same as Enter
|
P |
Paste tagged buffers |
d |
Delete selected buffer |
D |
Delete tagged buffers |
A buffer may be renamed using the set-buffer command. The -b flag gives the
existing buffer name and -n the new name. This converts it into a named
buffer. For example, to rename buffer0 to mybuffer from the command prompt:
:setb -bbuffer0 -nmybuffer
set-buffer can also be used to create buffers. To create a buffer called
foo with text bar:
:setb -bfoo bar
load-buffer will load a buffer from a file:
:loadb -bbuffername ~/a/file
set-buffer or load-buffer without -b creates an automatic buffer.
An existing buffer can be saved to a file with save-buffer:
:saveb -bbuffer0 ~/saved_buffer
C-b f prompts for some text and then enters tree mode with a filter to show
only panes where that text appears in the visible content or title of the pane
or in the window name. If panes are found, only those panes appear in the tree,
and the text filter: active is shown above the preview. If no panes are
found, all panes are shown in the tree and the text filter: no matches
appears above the preview.
tmux has rich support for the mouse. It can be used to change the active pane or window, to resize panes, to copy text, or to choose items from menus.
Support for the mouse is enabled with the mouse option; options and the
configuration file are described in detail in the next section. To turn the
mouse on from the command prompt, use the set-option command:
:set -g mouse on
Once the mouse is enabled:

-
Pressing the left button on a pane will make that pane the active pane.
-
Pressing the left button on a window name on the status line will make that the current window.
-
Dragging with the left button on a pane border resizes the pane.
-
Dragging with the left button inside a pane selects text; the selected text is copied when the mouse is released.
-
Pressing the right button on a pane opens a menu with various commands. When the mouse button is released, the selected command is run with the pane as target. Each menu item also has a key shortcut shown in brackets.
-
Pressing the right button on a window or on the session name on the status line opens a similar menu for the window or session.
When the tmux server is started, tmux runs a file called .tmux.conf in the
user's home directory. This file contains a list of tmux commands which are
executed in order. It is important to note that .tmux.conf is only run when
the server is started, not when a new session is created.
A different configuration file may be run from .tmux.conf or from a running
tmux server using the source-file command, for example to run .tmux.conf
again from a running server using the command prompt:
:source ~/.tmux.conf
Commands in a configuration file appear one per line. Any lines starting with
# are comments and are ignored:
# This is a comment - the command below turns the status line off
set -g status off
Lines in the configuration file are processed similar to the shell, for example:
-
Arguments may be enclosed in
'or"to include spaces, or spaces may be escaped. These four lines do the same thing:set -g status-left "hello word" set -g status-left "hello\ word" set -g status-left 'hello word' set -g status-left hello\ word -
But escaping doesn't happen inside
's. The string here ishello\ worldnothello world:set -g status-left 'hello\ word' -
~is expanded to the home directory (except inside's):source ~/myfile -
Environment variables can be set and are also expanded (but not inside
's):MYFILE=myfile source "~/$MYFILE"Any variables set in the configuration file will be passed on to new panes created inside tmux.
-
A few special characters like
\n(newline) and\t(tab) are replaced. A literal\must be given as\\.
Although tmux configuration files have some features similar to the shell, they
are not shell scripts and cannot use shell constructs like $().
tmux key bindings are changed using the bind-key and unbind-key commands.
Each key binding in tmux belongs to a named key table. There are four default
key tables:
-
The
roottable contains key bindings for keys pressed without the prefix key. -
The
prefixtable contains key bindings for keys pressed after the prefix key, like those mentioned so far in this document. -
The
copy-modetable contains key bindings for keys used in copy mode with emacs(1)-style keys. -
The
copy-mode-vitable contains key bindings for keys used in copy mode with vi(1)-style keys.
All the key bindings or those for a single table can be listed with the
list-keys command. By default, this shows the keys as a series of bind-key
commands. The -T flag gives the key table to show and the -N flag shows the
key help, like the C-b ? key binding.
For example to list only keys in the prefix table:
$ tmux lsk -Tprefix
bind-key    -T prefix C-b     send-prefix
bind-key    -T prefix C-o     rotate-window
...
Or:
$ tmux lsk -Tprefix -N
C-b     Send the prefix key
C-o     Rotate through the panes
...
bind-key commands can be used to set a key binding, either interactively or
most commonly from the configuration file. Like list-keys, bind-key has a
-T flag for the key table to use. If -T is not given, the key is put in the
prefix table; the -n flag is a shorthand for -Troot to use the root
table.
For example, the list-keys command shows that C-b 9 changes to window 9
using the select-window command:
$ tmux lsk -Tprefix 9
bind-key -T prefix 9 select-window -t :=9
A similar key binding to make C-b M-0 change to window 10 can be added like this:
bind M-0 selectw -t:=10
The -t flag to select-window specifies the target window. In this example,
the : means the target is a window and = means the name must match 10
exactly. Targets are documented further in the COMMANDS section of the manual
page.
The unbind-key command removes a key binding. Like bind-key it has -T and
-n flags for the key table. It is not necessary to remove a key binding
before binding it again, bind-key will replace any existing key binding.
unbind-key is necessary only to completely remove a key binding:
unbind M-0
Copy mode key bindings are set in the copy-mode and copy-mode-vi key
tables. Copy mode has a separate set of commands which are passed using the
-X flag to the send-keys command, for example the copy mode start-of-line
command moves the cursor to the start of the line and is bound to C-a in the
copy-mode key table:
$ tmux lsk -Tcopy-mode C-a
bind-key -T copy-mode C-a send-keys -X start-of-line
A full list of copy mode commands is available in the manual page. Here is a selection:
| Command | emacs(1) | vi(1) | Description |
|---|---|---|---|
| begin-selection | C-Space | Space | Start selection |
| cancel | q | q | Exit copy mode |
| clear-selection | C-g | Escape | Clear selection |
| copy-pipe | Copy and pipe to the command in the first argument | ||
| copy-selection-and-cancel | M-w | Enter | Copy the selection and exit copy mode |
| cursor-down | Down | j | Move the cursor down |
| cursor-left | Left | h | Move the cursot left |
| cursor-right | Right | l | Move the cursor right |
| cursor-up | Up | k | Move the cursor up |
| end-of-line | C-e | $ | Move the cursor to the end of the line |
| history-bottom | M-> | G | Move to the bottom of the history |
| history-top | M-< | g | Move to the top of the history |
| middle-line | M-r | M | Move to middle line |
| next-word-end | M-f | e | Move to the end of the next word |
| page-down | PageDown | C-f | Page down |
| page-up | PageUp | C-b | Page up |
| previous-word | M-b | b | Move to the previous word |
| rectangle-toggle | R | v | Toggle rectangle selection |
| search-again | n | n | Repeat the last search |
| search-backward | ? | Search backwards, the first argument is the search term | |
| search-backward-incremental | C-r | Search backwards incrementally, usually used with the -i flag to command-prompt
|
|
| search-forward | / | Search forwards, the first argument is the search term | |
| search-forward-incremental | C-s | Search forwards incrementally | |
| search-reverse | N | N | Repeat the last search but reverse the direction |
| start-of-line | C-a | 0 | Move to the start of the line |
tmux is configured by setting options. There are several types of options:
-
Server options which affect the entire server.
-
Session options which affect one or all sessions.
-
Window options which affect one or all windows.
-
Pane options which affect one or all panes.
-
User options which are not used by tmux but are reserved for the user.
Session and window options have both a global set of options and a set for each session or window. If the option is not present in the session or window set, the global option is used. Pane options are similar except the window options are also checked.
When configuring tmux, it is most common to set server options and global session or window options. This document only covers these.
Options are displayed using the show-options command. The -g flag shows
global options. It can show server, session or window options:
-
-sshows server options:
$ tmux show -s
backspace C-?
buffer-limit 50
...
-
-gwith no other flags shows global session options:
$ tmux show -g
activity-action other
assume-paste-time 1
...
-
-gand-wtogether show global window options:
$ tmux show -wg
aggressive-resize off
allow-rename off
...
An individual option value may be shown by giving its name to show-option.
When an option name is given, it is not necessary to give -s or -w because
tmux can work it out from the option name. For example, to show the status
option:
$ tmux show -g status
status on
Options are set or unset using the set-option command. Like show-option, it
is not necessary to give -s or -w because tmux can work out it out from the
option name. -g is necessary to set global session or window options; for
server options it does nothing.
To set the status option:
set -g status off
Or the default-terminal option:
set -s default-terminal 'tmux-256color'
The -u flag unsets an option. Unsetting a global option restores it to its
default value, for example:
set -gu status
Many options make use of formats. Formats provide a powerful syntax to
configure how text appears, based on various attributes of the tmux server, a
session, window or pane. Formats are enclosed in #{} in string options or as
a single uppercase letter like #F. This is the default status-right with
several formats:
$ tmux show -s status-right
status-right "#{?window_bigger,[#{window_offset_x}#,#{window_offset_y}] ,}\"#{=21:pane_title}\" %H:%M %d-%b-%y"
Formats are described in this document and in the manual page.
Some options may contain embedded shell commands. This is limited to the status
line options such as status-left. Embedded shell commands are enclosed in
#(). They can either:
-
Print a line and exit, in which case the line will be shown in the status line and the command run at intervals to update it. For example:
set -g status-left '#(uptime)'The maximum interval is set by the
status-intervaloption but commands may also be run sooner if tmux needs. Commands will not be run more than once a second. -
Stay running and print a line whenever needed, for example:
set -g status-left '#(while :; do uptime; sleep 1; done)'
Note that is it not usually necessary to use an embedded command for the date
and time since tmux will expand the date formats like %H and %S itself in
the status line options. If a command like date(1) is used, any %s must be
doubled as %%.
tmux allows the colour and attribute of text to be configured with a simple syntax, this is known as the style. There are two places styles appear:
-
In options, such as
status-style. -
Enclosed in
#[]in an option value, this is called an embedded style (see the next section).
A style has a number of terms separated by spaces or commas, the most useful are:
-
defaultuses the default colour; this must appear on its own. The default colour is often set by another option, for example for embedded styles in thestatus-leftoption, it isstatus-style. -
bgsets the background colour. The colour is also given, for examplebg=red. -
fgsets the foreground colour. Likebg, the colour is given:fg=green. -
brightorbold,underscore,reverse,italicsset the attributes. These appear alone, such as:bright,reverse.
Colours may be one of black, red, green, yellow, blue, magenta,
cyan, white for the standard terminal colours; brightred, brightyellow
and so on for the bright variants; colour0 to colour255 for the colours
from the 256-colour palette; default for the default colour; or a hexadecimal
RGB colour such as #882244.
The remaining style terms are described in the manual page.
For example, to set the status line background to blue using the status-style option:
set -g status-style 'bg=blue'
Embedded styles are included inside another option in between #[ and ].
Each changes the style of following text until the next embedded style or the
end of the text.
For example, to put some text in red and blue in status-left:
set -g status-left 'default #[fg=red] red #[fg=blue] blue'
Because this is long it is also necessary to also increase the
status-left-length option:
set -g status-left-length 100
Or embedded styles can be used conditionally, for example to show P in red if
the prefix has been pressed or in the default style if not:
set -g status-left '#{?client_prefix,#[bg=red],}P#[default] [#{session_name}] '
This is a short list of the most commonly used tmux options, apart from style options:
| Option | Type | Description |
|---|---|---|
base-index |
session | If set, then windows indexes start from this instead of from 0 |
buffer-limit |
server | The maximum number of automatic buffers to keep, the default is 50 |
default-terminal |
server | The default value of the TERM environment variable inside tmux |
display-panes-time |
window | The time in milliseconds the pane numbers are shown for C-b q
|
display-time |
session | The time in milliseconds for which messages on the status line are shown |
escape-time |
server | The time tmux waits after receiving an Escape key to see if it is part of a longer key sequence |
focus-events |
server | Whether focus key sequences are sent by tmux when the active pane changes and when received from the outside terminal if it supports them |
history-limit |
session | The maximum number of lines kept in the history for each pane |
mode-keys |
window | Whether emacs(1) or vi(1) key bindings are used in copy mode |
mouse |
session | If the mouse is enabled |
pane-border-status |
window | Whether a status line appears in every pane border: top or bottom
|
prefix |
session | The prefix key, the default is C-b
|
remain-on-exit |
window | Whether panes are automatically killed when the program running in the exits |
renumber-windows |
session | If on, windows are automatically renumbered to close any gaps in the window list |
set-clipboard |
server | Whether tmux should attempt to set the external X(7) clipboard when text is copied and if the outside terminal supports it |
set-titles |
session | If on, tmux will set the title of the outside terminal |
status |
session | Whether the status line if visible |
status-keys |
session | Whether emacs(1) or vi(1) key bindings are used at the command prompt |
status-interval |
session | The maximum time in seconds before the status line is redrawn |
status-position |
session | The position of the status line: top or bottom
|
synchronize-panes |
window | If on, typing in any pane in the window is sent to all panes in the window - care should be taken with this option! |
terminal-overrides |
server | Any capabilities tmux should override from the TERM given for the outside terminal |
This is a list of the most commonly used tmux style and format options:
| Option | Type | Description |
|---|---|---|
display-panes-active-colour |
session | The style of the active pane number for C-b q
|
display-panes-colour |
session | The style of the pane numbers, apart from the active pane forC-b q
|
message-style |
session | The style of messages shown on the status line and of the command prompt |
mode-style |
window | The style of the selection in copy mode |
pane-active-border-style |
window | The style of the active pane border |
pane-border-format |
window | The format of text that appears in the pane border status line if pane-border-status is set |
pane-border-style |
window | The style of the pane borders, apart from the active pane |
status-left-length |
session | The maximum length of the status line left |
status-left-style |
session | The style of the status line left |
status-left |
session | The format of the text in the status line left |
status-right-length |
session | The maximum length of the status line right |
status-right-style |
session | The style of the status line right |
status-right |
session | The format of the text in the status line right |
status-style |
session | The style of the status line as a whole, parts may be overridden by more specific options like status-left-style
|
window-active-style |
window | The style of the default colour in the active pane in the window |
window-status-current-format |
window | The format of the current window in the window list |
window-status-current-style |
window | The style of the current window in the window list |
window-status-format |
window | The format of windows in the window list, apart from the current window |
window-status-separator |
window | The separator between windows in the window list |
window-status-style |
window | The style of windows in the window list, apart from the current window |
window-style |
window | The style of the default colour of panes in the window, apart from the active pane |
This section shows examples of some common configuration changes for
.tmux.conf.
The prefix key is set by the prefix option. The C-b key is also bound to
the send-prefix command in the prefix key table so pressing C-b twice sends
it through to the active pane. To change to C-a:
set -g prefix C-a
unbind C-b
bind C-a send-prefix
There are many options for customizing the status line. The simplest options are:
-
Turn the status line off:
set -g status off -
Move it to the top:
set -g status-position top -
Set the background colour to red:
set -g status-style bg=red -
Change the text on the right to the time only:
set -g status-right '%H:%M' -
Underline the current window:
set -g window-status-current-style 'underscore'
The pane border colours may be set:
set -g pane-border-style fg=red
set -g pane-active-border-style 'fg=red,bg=yellow'
Each pane may be given a status line with the pane-border-status option, for
example to show the pane title in bold:
set -g pane-border-status top
set -g pane-border-format '#[bold]#{pane_title}#[default]'
tmux supports key bindings based on vi(1) for copy mode and the command prompt. There are two options that set the key bindings:
-
mode-keyssets the key bindings for copy mode. If this is set tovi, then thecopy-mode-vikey table is used in copy mode; otherwise thecopy-modekey table is used. -
status-keyssets the key bindings for the command prompt.
If either of the VISUAL or EDITOR environment variables are set to
something containing vi (such as vi, vim, nvi) when the tmux server is
first started, both of these options are set to vi.
To set both to use vi(1) keys:
set -g mode-keys vi
set -g status-keys vi
When dragging the mouse to copy text, tmux copies and exits copy mode when the
mouse button is released. Alternative behaviours are configured by changing the
MouseDragEnd1Pane key binding. The three most useful are:
- Do not copy or clear the selection or exit copy mode when the mouse is released. The keyboard must be used to copy the selection:
unbind -Tcopy-mode MouseDragEnd1Pane
- Copy and clear the selection but do not exit copy mode:
bind -Tcopy-mode MouseDragEnd1Pane send -X copy-selection
- Copy but do not clear the selection:
bind -Tcopy-mode MouseDragEnd1Pane send -X copy-selection-no-clear
tmux has a large set of features and commands not mentioned in this document, many allowing powerful scripting. Here is a list of some that may be worth further reading:
-
Alerts:
monitor-activity,monitor-bell,monitor-silence,activity-action,bell-actionand other options. -
Options for individual session, windows and panes.
-
Moving panes with
join-paneandbreak-pane. -
Sending keys to panes with
send-keys. -
The command prompt
history-fileoption. -
Saved layout strings with
select-layout. -
Command sequences (separated by
;):select-window; kill-window. -
Configuration file syntax:
{},%ifand so on. -
Mouse key bindings:
MouseDown1Paneand so on. -
Locking:
lock-command,lock-after-timeand other options. -
Capturing pane content with
capture-paneand piping withpipe-pane. -
Linking windows: the
link-windowcommand. -
Session groups: the
-tflag tonew-session. -
Respawing window and panes with
respawn-windowandrespawn-pane. -
Custom menus with the
display-menucommand and custom prompts withcommand-promptandconfirm-before. -
Different key tables:
bind-keyand the-Tflag toswitch-client. -
Empty panes: the
split-windowwith an empty command and-Itodisplay-message. -
Hooks:
set-hookandshow-hooks. -
Synchronization for scripts with
wait-for.