This simple script makes it easy to perform backups of several Fortigate firewalls. It reads a list of Fortigates from a CSV file, performs a backup of each one and saves the backup file in a local directory.
- Python 3.8 or newer
- Requests module
Clone the project
git clone https://github.com/mcarneir0/fortigate-backup-api.gitGo to project folder.
cd fortigate-backup-apiInstall dependencies.
pip install -r requirements.txtAdd the details of each Fortigate to backup in the fortigates.csv file and then you can perform the backup in two ways:
- Run the
fgt-backup.pyfile to perform a backup of all Fortigates without user input. Useful for use with cron job or scheduled tasks.python fgt-backup.py
- Run the
manual-backup.pyfile to display a list of all Fortigates and then select which Fortigates will be backed up.python manual-backup.py
Additionally, you can use the -d or --debug option to enable debug logging.
python fgt-backup.py -d
python manual-backup.py -dThe fortigates.csv file should have the following format:
name,ip_1,ip_2,apikey
Fortigate1,192.168.1.1,,xxxxxxxxxxxxxxxxx
Fortigate2,10.0.0.1:9999,myfortigate.fortiddns.com:9999,yyyyyyyyyyyyyyyyy
Tip
FQDN addresses can be used too!
Where:
name: A name to identify the Fortigateip_1: Primary IP/FQDN address of the Fortigateip_2: Secondary IP/FQDN address of the Fortigate (optional)apikey: API key provided by the Fortigate
- If you are using a custom administrative port (other than 443) you should include it with the IP address in
<IP>:<PORT>format. - If your Fortigate does not have a secondary IP address, just leave it blank as
Fortigate1example.
Starting in version v0.6.0, the script does not check for SSL certificates by default anymore and will not display warnings if you are using self-signed certificates.
If you still want to enable SSL certificate checks, comment the following lines in the utils/networker.py file:
# Comment these two lines below to enable SSL certificate checks
requests.packages.urllib3.disable_warnings()
req.verify = FalseThe main scripts are located in the root directory of the project. The utils folder contains some functions used by the main scripts. While the scripts are running, the backups and logs folders are created to store the backups and logs in the following structure:
backups/yyyy-mm-dd: Contains the backup files for each Fortigate in the formatbkp-<fortigate_name>-<datetime>.conformanual-bkp-<fortigate_name>-<datetime>.confif you are using themanual-backup.pyscript.logs/: Contains the log files in the formatbkp-<datetime>.logormanual-bkp-<datetime>.logif you are using themanual-backup.pyscript.
Note
The datetime used in the file names is obtained as soon as the script is started and is the same for all files. The datetime format is yyyy-mm-ddTHHMMSS.
The main reason to use the API key is that you don't need to enter your login credentials anywhere or access the firewall directly.
But to do it so you need to create a REST API Admin with super_admin rights firstly. Follow the steps below.
Login to the firewall GUI with your credentials and make sure you have super_admin rights.
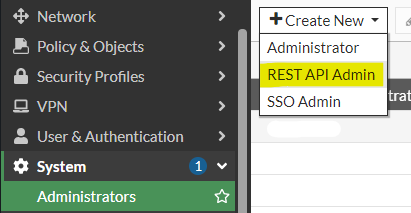
Click on System > Administrators and create a new REST API Admin.
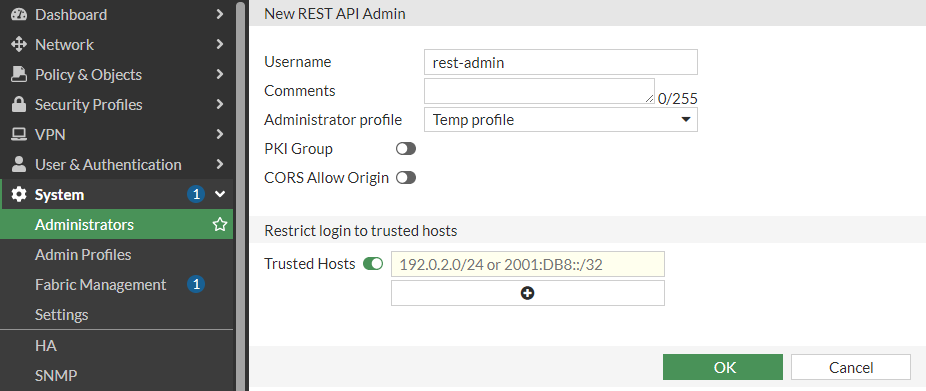
Insert a username, comments (optional), select any profile from the list (will be changed later), disable PKI Group and CORS.
Important
Trusted Hosts is optional on FortiOS 7.x but mandatory on 6.x versions.
Warning
It is strongly recommended that you fill in your IP or network range in Trusted Hosts to ensure that only requests made from these addresses are accepted; otherwise, anyone with access to the API token could have unrestricted and/or unauthorized access to the firewall.
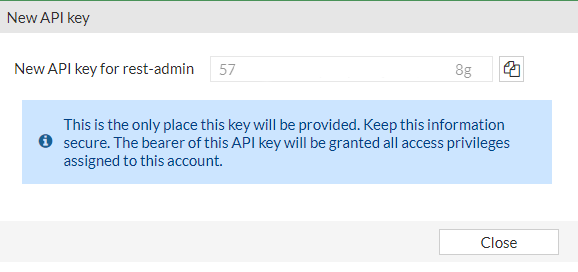
Click OK and you will be prompted to store the generated API key in a secure location. Remember that this key will not be fully displayed again, so if you lose it, you will have to generate another one.
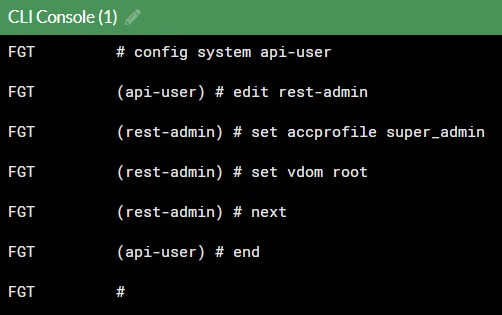
FortiOS doesn't allow creating super_admin REST API users directly. But this permission is needed to backup other super_admin users you may have on the firewall.
To do this, you need to run the following commands in the CLI Console, click on the option in the upper right corner to open it.
# config system api-user
(api-user) edit <username>
(<username>) set accprofile super_admin
(<username>) set vdom root
(<username>) next
(api-user) end
Close the CLI and you're good to go.
- Python 3.8.x / 3.10.x / 3.11.x / 3.12.x / 3.13.x
- FortiOS 6.0.x / 6.2.x / 7.0.x / 7.2.x / 7.4.x / 7.6.x
- FortiGate REST API Token Authentication
- Technical Tip: Get backup config file on FortiGate using RestAPI via Python script
This project is licensed under the GPL-2.0 License - see the LICENSE file for details.


