
If you are new to Linode, please signup using the following link1:
https://www.linode.com/?r=5b426b2a0a026ebcf71261b824fa3a0ff3a6f82d
and use promo code DOCS10 for $10 credit on your new account.
Signed up:


There are two options for creating a Virtual Machine (VM): (A) Manually and (B) Automated.
#### Step 1: Select an instance type

Once you've launched the instance, you should see the Linode Manager:

Select an Operating System (we tend to use the most recent Ubuntu "LTS" version):

Remember to click on [Boot] button to actually run the instance:

Click on the "Dashboard" link for your VM:

Click on "Remote Access" then click on "Launch Lish Console":

Use "Lish Console" to add public ssh key to the node:
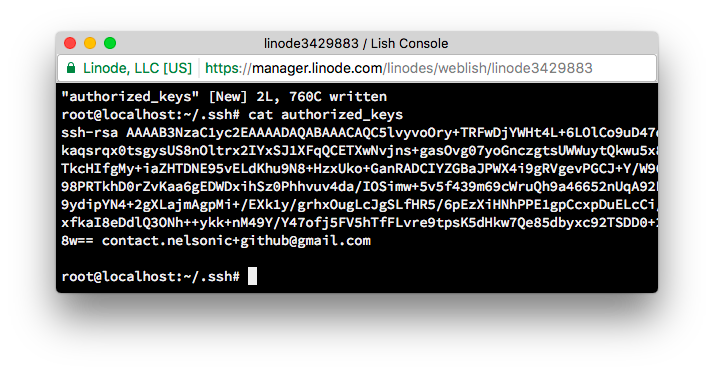
Now can login from localhost using ssh using public key:

SSH using RSA Key: https://www.linode.com/docs/security/use-public-key-authentication-with-ssh
For the next section we are using
Vagrantto (automate) "provisioning" a VM. If you are new toVagrant, please see: github.com/dwyl/learn-vagrant
Login to your Linode account and visit My Profile > API Keys
then create a new key:

You should see something like this:

Don't worry, this is not a "epic security fail" ... the key is not active, it's just for illustrative purposes.
Copy the newly created API Key to a safe place
(your choice of key storage)
and then export it as an Environment Variable:
In your terminal window type export LINODE_API_KEY= and paste your API Key:
export LINODE_API_KEY=aKiuRAOe5WEgnIaGouhWz19jJSInnwQzx8wOdSlAIEMkk4Z8cXGQQHQBdB2MSaRk
confirm that Environment Variable was set
by running printenv and checking the output.
Note: if you are new to using Environment Variables, please see: github.com/dwyl/learn-environment-variables
#### Step 3: Install the Linode Vagrant Plugin
Once you have installed Vagrant
you will need to install the vagrant-linode plugin:
vagrant plugin install vagrant-linode
you should see:
Installing the 'vagrant-linode' plugin. This can take a few minutes...
Installed the plugin 'vagrant-linode (0.2.8)'!
Following this guide: https://www.linode.com/docs/applications/configuration-management/vagrant-linode-environments
Create a Vagrantfile for your project and copy-paste
the contents of the sample:
vagrant up --debug &> vagrant.log
Note: that command will output the steps the
vagrant upcommand tovagrant.logso you can monitor it's progress (eventual success/failure). Rememver to add thevagrant.logto your.gitignorefile as it's thousands of lines which change each time an instance is created. e.g:
echo "vagrant.log >> .gitignore"
You should see something similar to:
 Once the
 vagrant up command has completed provisioning the Linode VM,
login to the VM using the command:
vagrant ssh
that will give you the IP Address of the Vagrant Box, which in our case is: 213.168.248.157
If you visit the IP address in a browser you will see a 502 error:
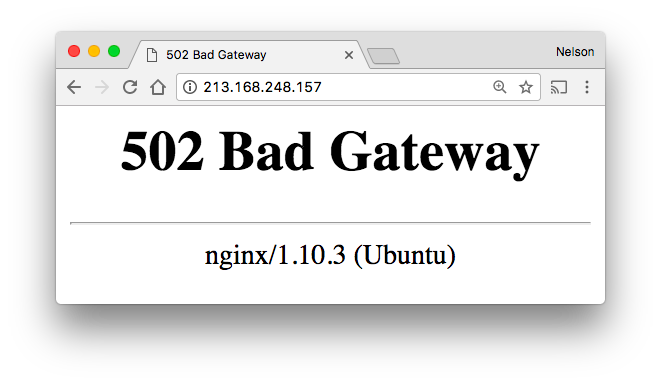
That is a good thing because it tells you that NGiNX is working!
(the 502 is because we don't have a Phoenix app
running on port 4000, yet!)
git clone git@github.com:nelsonic/hello_world_edeliver.git
cd hello_world_edeliver
Open the .deliver/config file and update:
BUILD_HOST(IP Address)BUILD_USERPRODUCTION_USER
to the values you need. In our case I updated the values to:
BUILD_HOST="213.168.248.157"
BUILD_USER="ubuntu"
BUILD_AT="/home/ubuntu/hello_world_edeliver/builds"

PRODUCTION_HOSTS="213.168.248.157"
PRODUCTION_USER="ubuntu"
DELIVER_TO="/home/ubuntu"
Now run the edeliver commands to build, deploy and start
mix edeliver build release --verbose --branch=continuous-delivery
mix edeliver deploy release to production --verbose
mix edeliver start production
You should see:

And when you refresh the browser page you should see the Phoenix App!
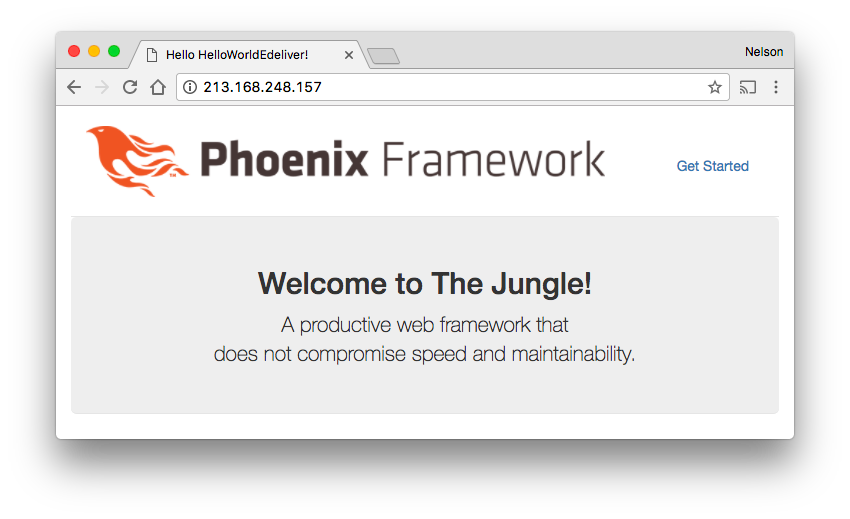
So now we have a working server running a Phoenix App on Linode!