The Torq integration enables you to trigger workflows in response to Datadog alerts, providing alert enrichment. You can then send back events directly from your Torq workflows to your Datadog event stream and dedicated Torq dashboard.
To set up this integration, you must have an active Torq account and an Account Owner role in that account. You must also have proper admin permissions in Datadog.
-
Go to Integrations > Triggers, locate the Datadog card, and click Add.
-
Enter a meaningful name for the integration and click Add.
-
Copy the generated Webhook URL. You need this URL to configure a Webhook integration in your Datadog tenant.
-
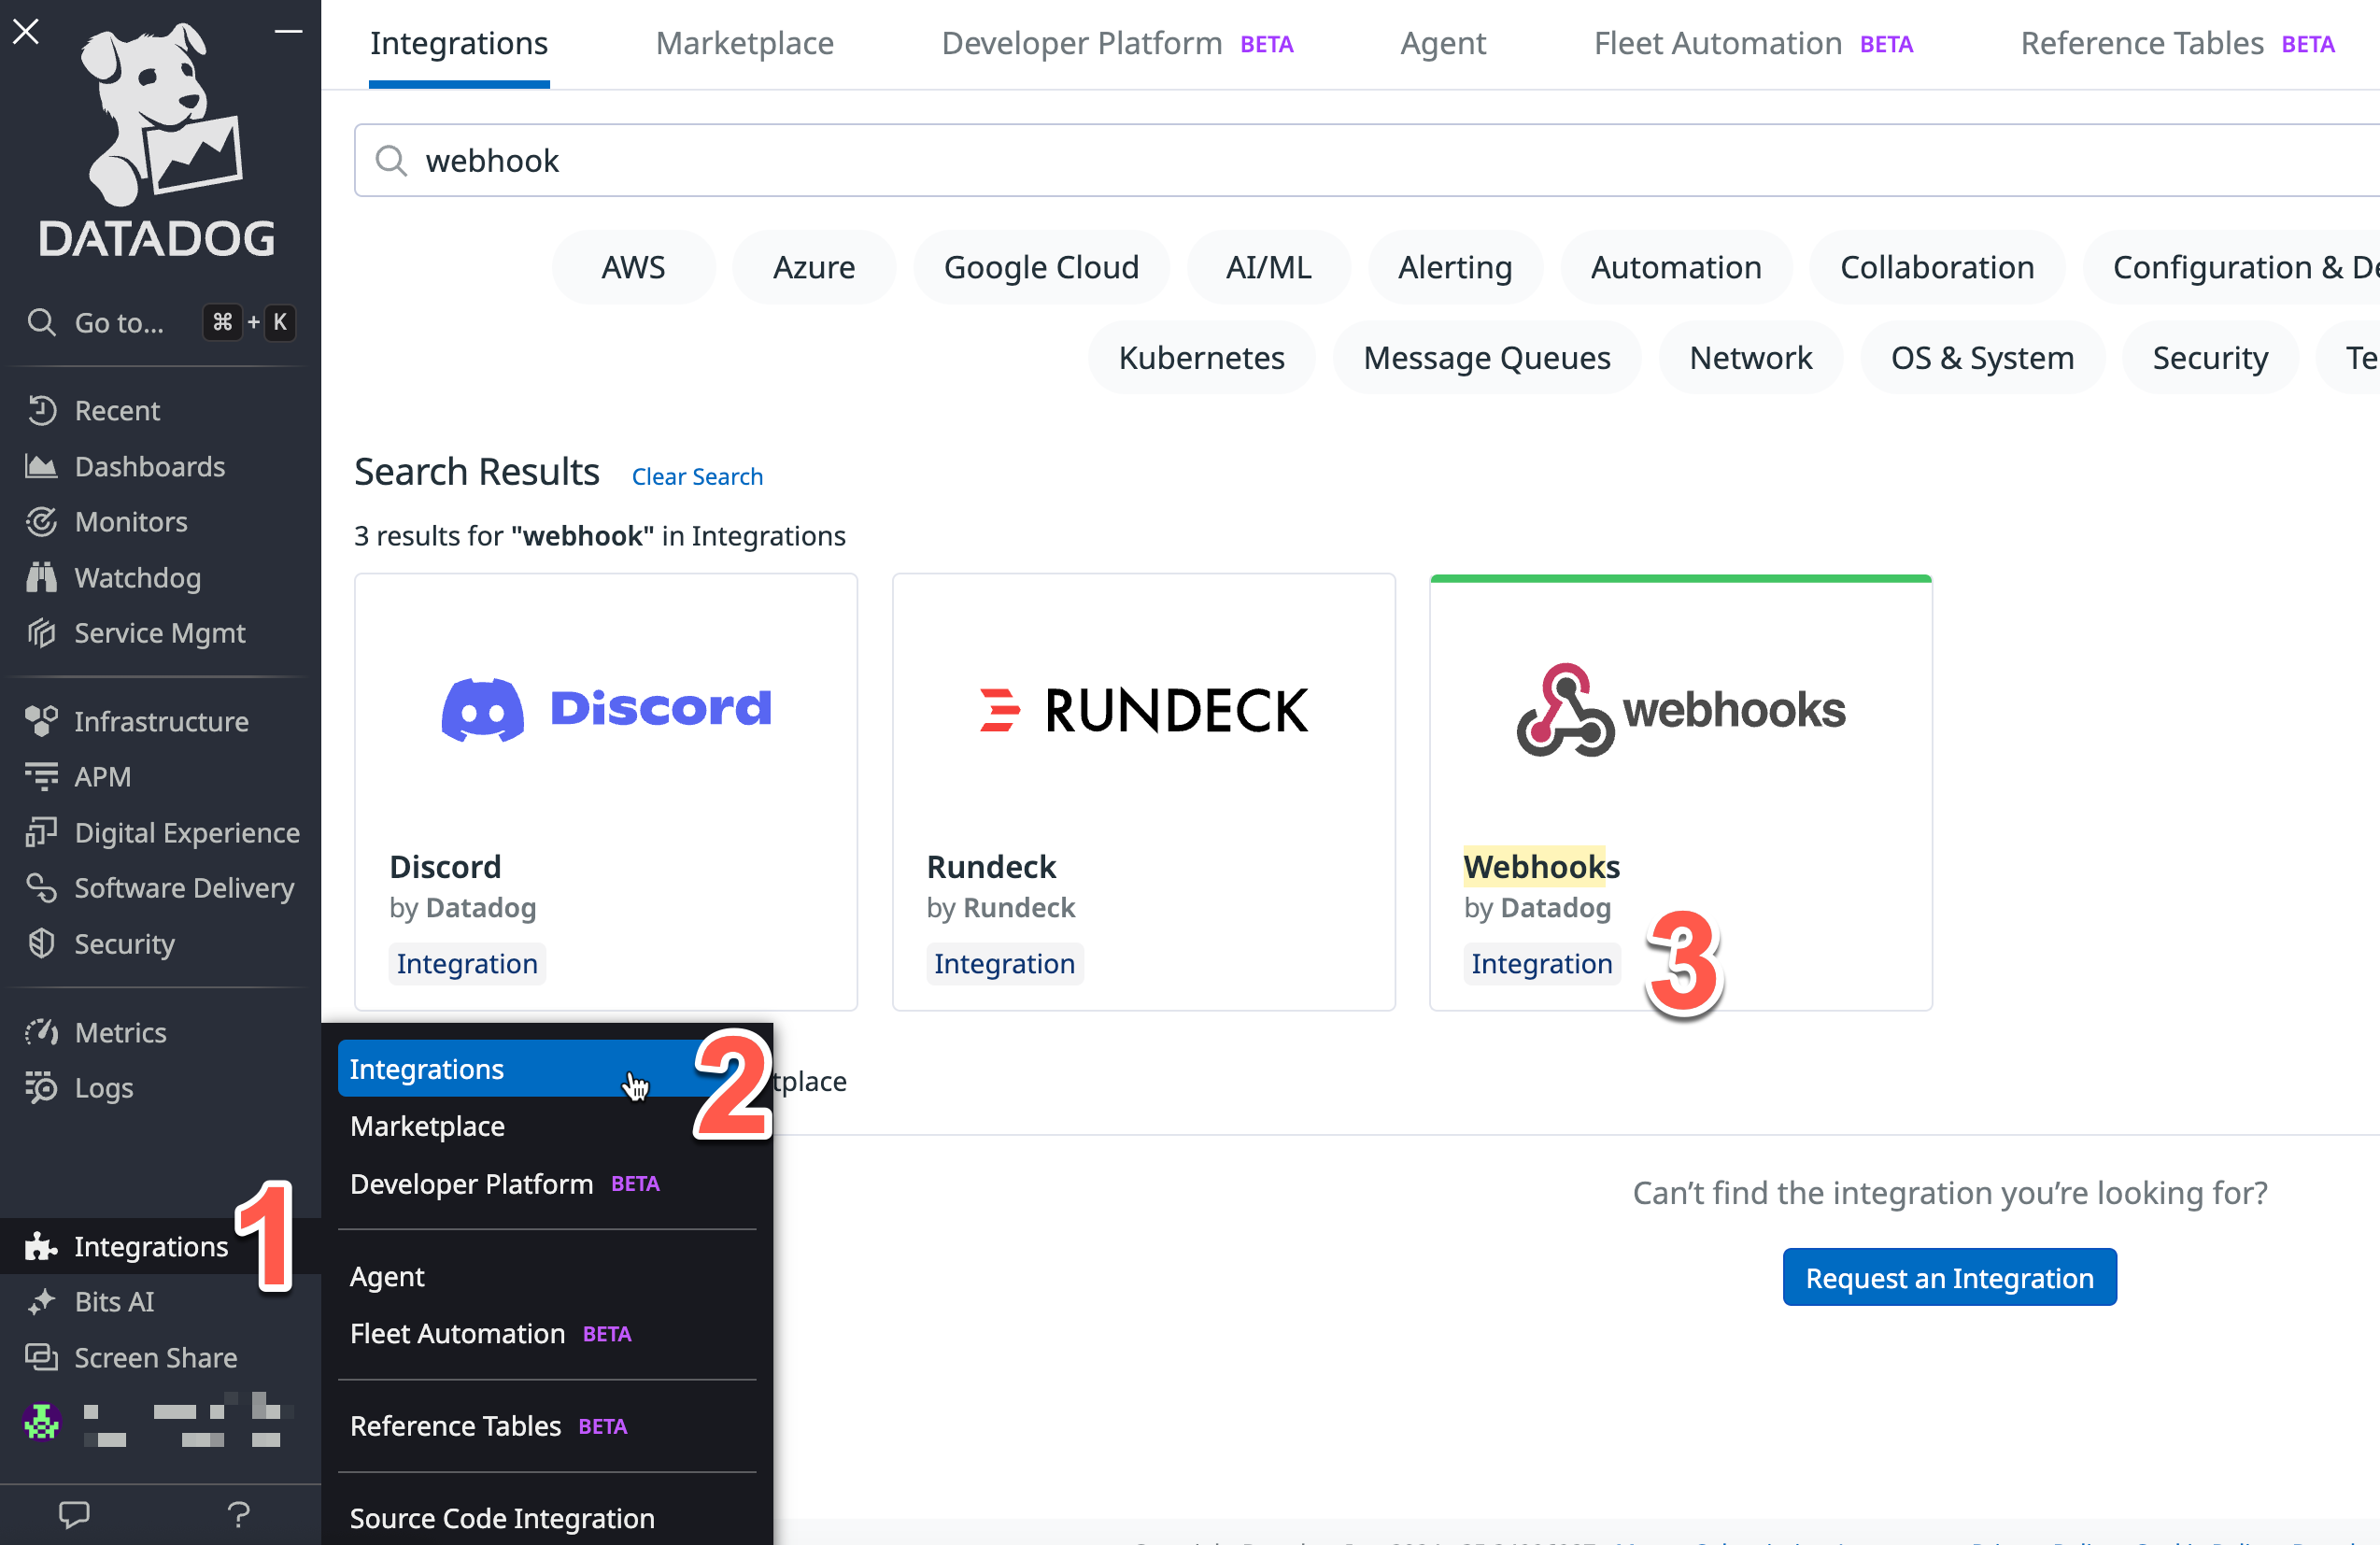
Navigate to Integrations > Integrations, click the Webhooks card, and click New.
-
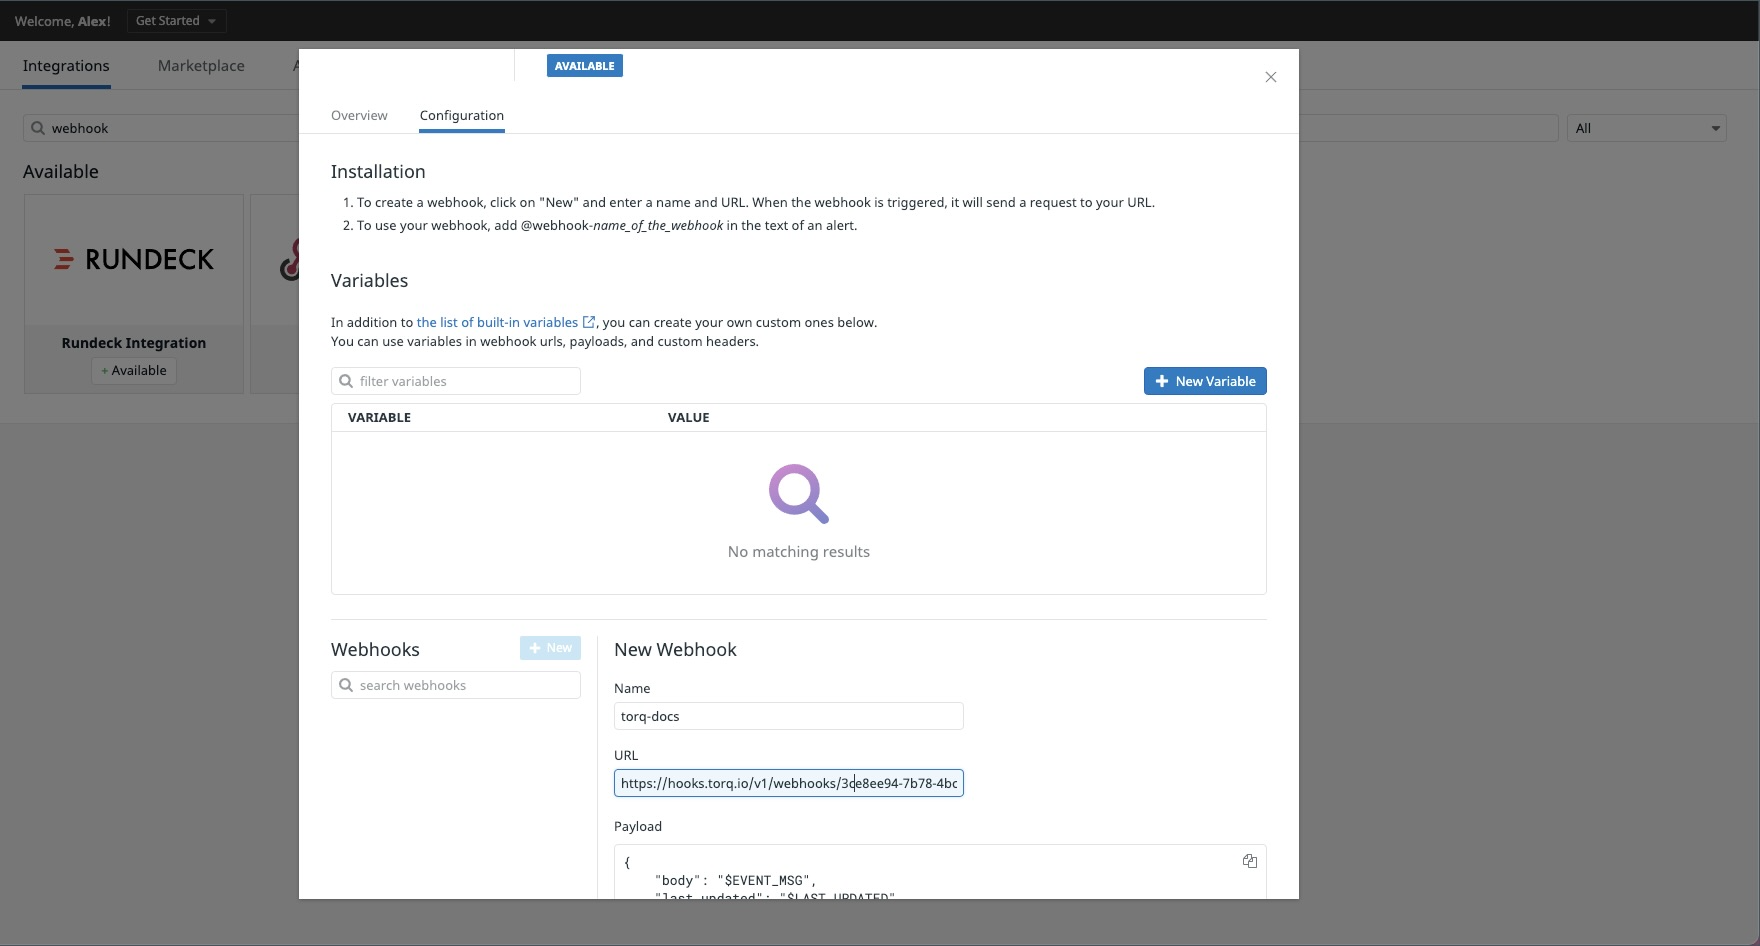
Enter a meaningful name for the Webhook integration and paste the generated Webhook URL from Torq. You need the integration name to associate the identifier (used for specific Datadog monitors to trigger Torq) and generated Webhook URL from Torq.
-
Torq recommends adding additional alert information to the payload. You can use portions of the following configuration:
{ "body": "$EVENT_MSG", "title": "$EVENT_TITLE", "date": "$DATE", "id": "$ID", "metadata": { "AGGREG_KEY": "$AGGREG_KEY", "ALERT_CYCLE_KEY": "$ALERT_CYCLE_KEY", "ALERT_ID": "$ALERT_ID", "ALERT_METRIC": "$ALERT_METRIC", "ALERT_QUERY": "$ALERT_QUERY", "ALERT_SCOPE": "$ALERT_SCOPE", "ALERT_STATUS": "$ALERT_STATUS", "ALERT_TITLE": "$ALERT_TITLE", "ALERT_TRANSITION": "$ALERT_TRANSITION", "ALERT_TYPE": "$ALERT_TYPE", "EMAIL": "$EMAIL", "EVENT_MSG": "$EVENT_MSG", "EVENT_TITLE": "$EVENT_TITLE", "EVENT_TYPE": "$EVENT_TYPE", "HOSTNAME": "$HOSTNAME", "ID": "$ID", "LAST_UPDATED": "$LAST_UPDATED", "LINK": "$LINK", "METRIC_NAMESPACE": "$METRIC_NAMESPACE", "ORG_ID": "$ORG_ID", "ORG_NAME": "$ORG_NAME", "PRIORITY": "$PRIORITY", "SNAPSHOT": "$SNAPSHOT", "TAGS": "$TAGS", "TEXT_ONLY_MSG": "$TEXT_ONLY_MSG", "USER": "$USER", "USERNAME": "$USERNAME", "LOGS_SAMPLE": "$LOGS_SAMPLE" } } -
Pick monitors to trigger Torq Playbooks and add a reference to the newly created Webhook integration in the Alert Your Team field. For more details, see Manage Monitors.
You need to create a Datadog API key and an application key to use as input parameters for Datadog steps in Torq.
Note: Some Datadog steps in Torq require an API key and application key, while other steps require the Datadog integration.
After you create the API key, copy and save it because you are not able to access it later. For more information, see API and Application Keys.
- Hover over your user name and select Organization Settings.
- From the left panel, click API Keys.
- Click + New Key.
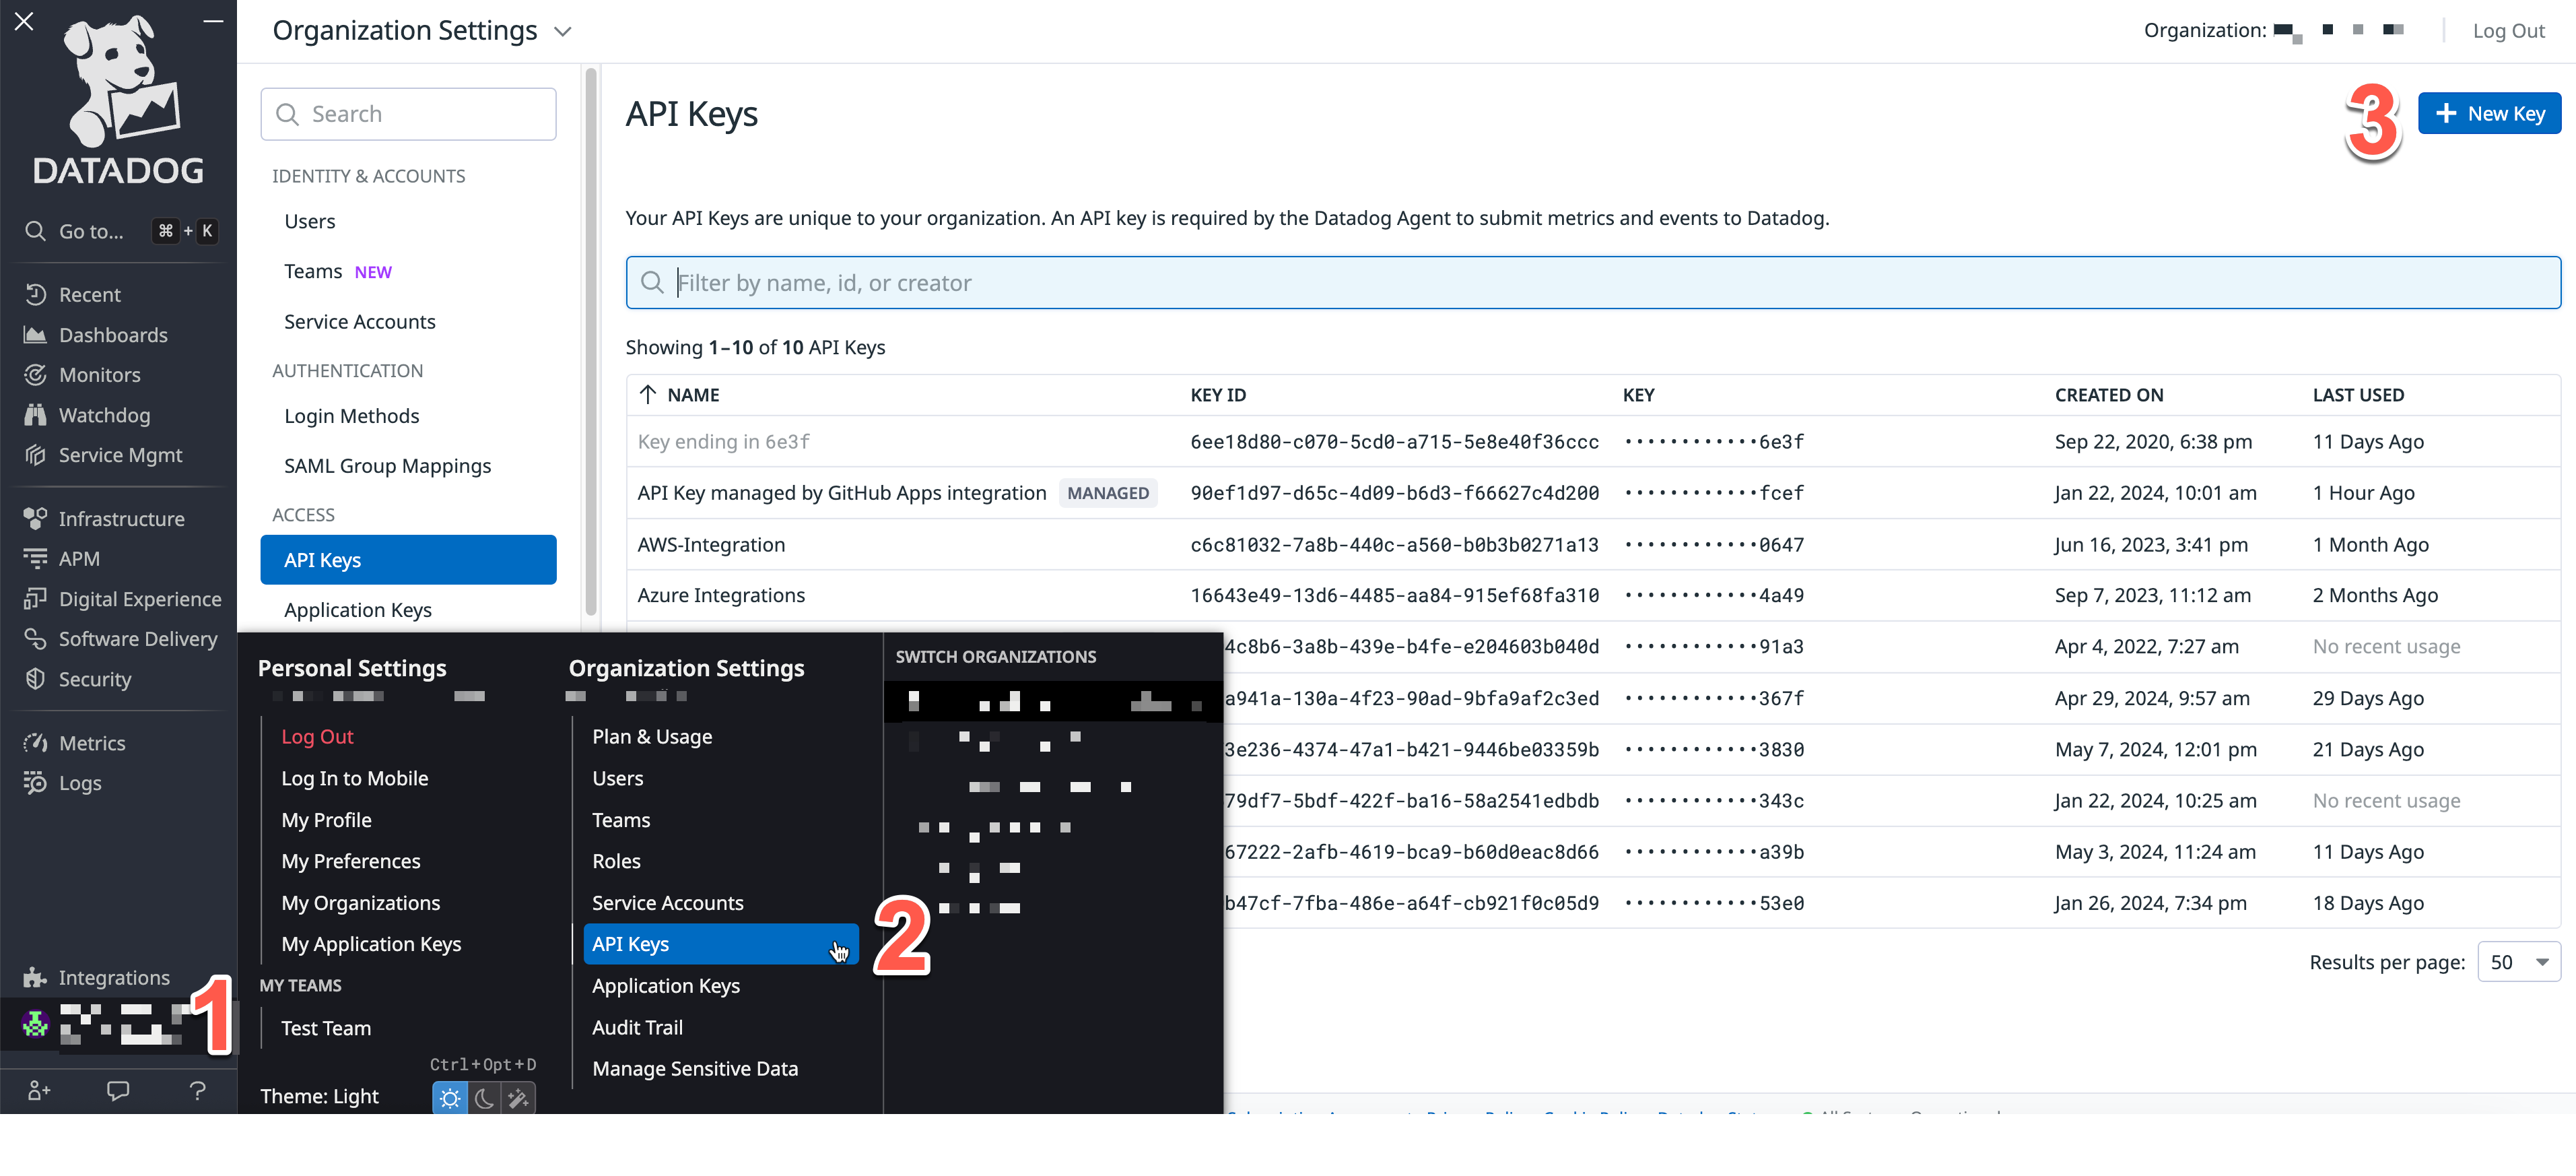
- Enter a meaningful name for the API key such as
Torqand click Create Key. - Copy the
Keyand save it. You need this key to create a Datadog integration in Torq.
After you create the application key, copy and save it because you are not able to access it later. For more information, see [API and Application Keys]]13.
- Hover over your user name and select Organization Settings.
- From the left panel, click Application Keys.
- Click + New Key.
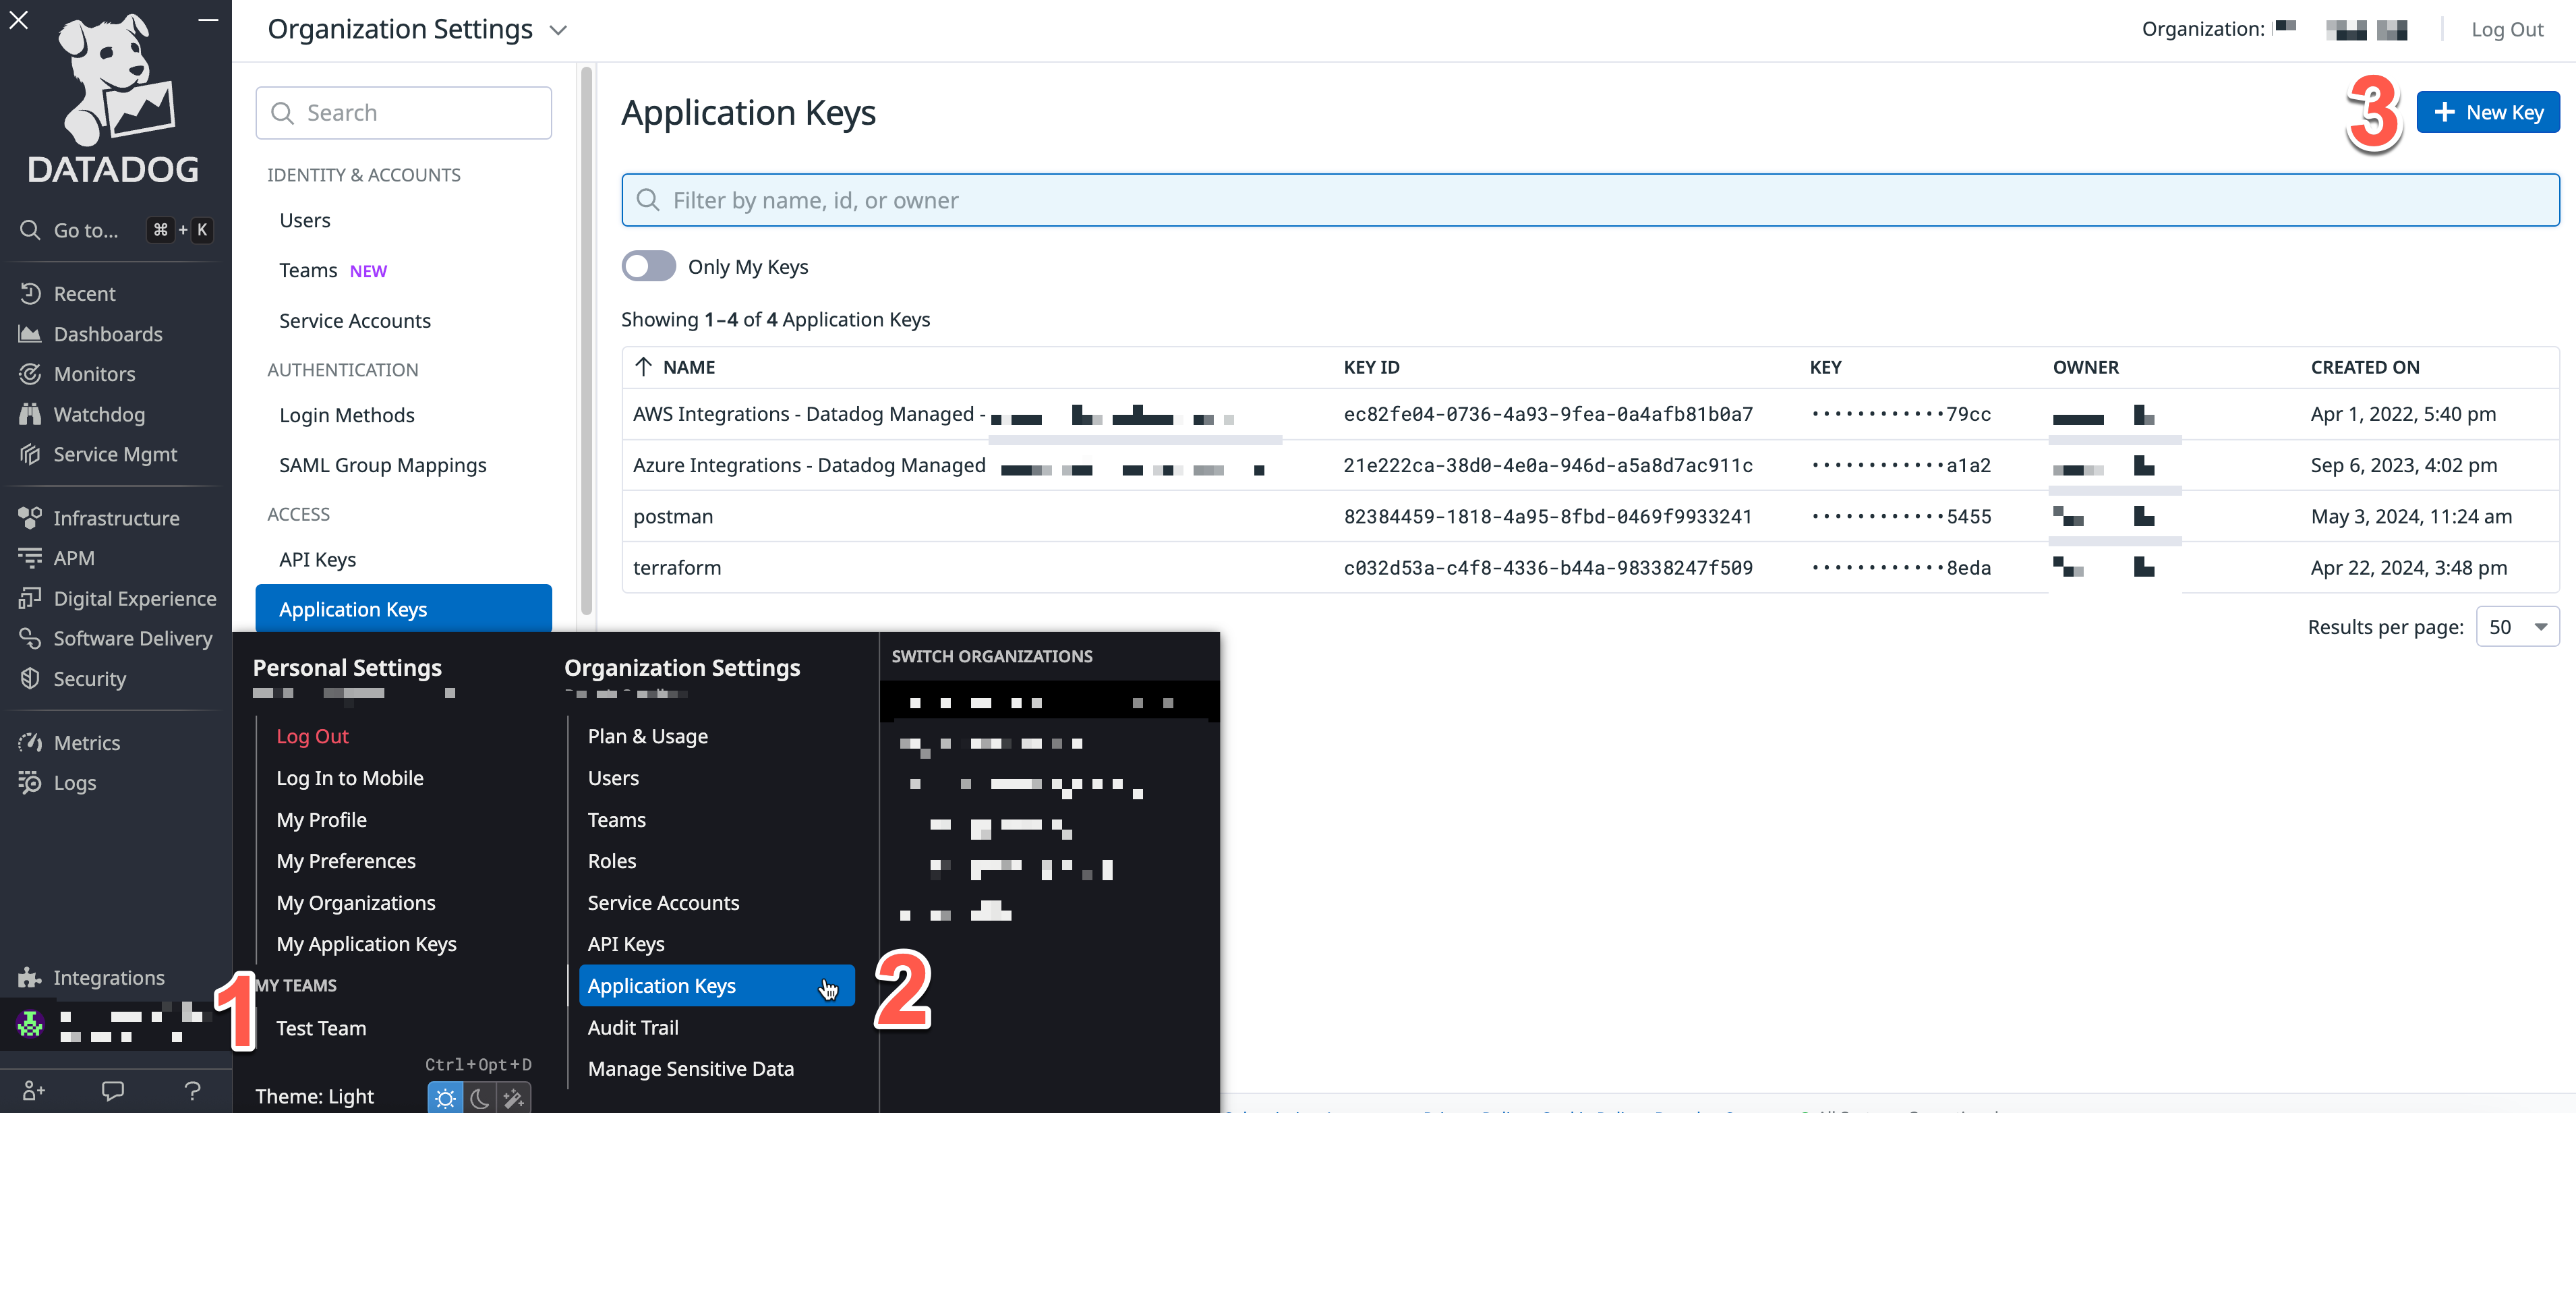
- Enter a meaningful name for the application key such as
Torqand click Create Key. - Copy the
Keyand save it. You need this key to create a Datadog integration in Torq.
This integration enables you to use Datadog steps in your Torq workflows.
-
Go to Integrations > Steps, locate the Datadog card, and click Add.
-
Enter a meaningful name for the integration such as
Datadog-<monitor_type>and click Add.
The Torq integration does not provide any metrics.
The Torq integration allows you to send events to your Datadog event stream from a Torq workflow using the Datadog Post Event step. You can use the step with your playbooks to notify Datadog about successful mitigations and execution failures. You can also send enriched alert data back to Datadog.
The Torq integration does not include any service checks.
Need help? Contact Datadog support.