

![]()

A fast and lightweight Flutter plugin for scanning barcodes and QR codes using the device’s camera. It supports multiple barcode formats, real-time detection, and customization options for an optimized scanning experience on multiple platforms.
- Fast barcode and QR code scanning
- Supports multiple barcode formats
- Real-time detection
- Customizable camera and scanner behavior
See the examples for runnable examples of various usages, such as the basic usage, applying a scan window, or retrieving images from the barcodes.
| Android | iOS | macOS | Web | Linux | Windows |
|---|---|---|---|---|---|
| ✔ | ✔ | ✔ | ✔ | ❌ | ❌ |
See the example app for detailed implementation information.
| Features | Android | iOS | macOS | Web |
|---|---|---|---|---|
| analyzeImage | ✔️ | ✔️ | ✔️ | ❌ |
| returnImage | ✔️ | ✔️ | ✔️ | ❌ |
| scanWindow | ✔️ | ✔️ | ✔️ | ❌ |
| autoZoom | ✔️ | ❌ | ❌ | ❌ |
Add the dependency in your pubspec.yaml file:
dependencies:
  mobile_scanner: ^<latest_version>
Then run:
flutter pub get
This package uses by default the bundled version of MLKit Barcode-scanning for Android. This version is immediately available to the device. But it will increase the size of the app by approximately 3 to 10 MB.
The alternative is to use the unbundled version of MLKit Barcode-scanning for Android. This version is downloaded on first use via Google Play Services. It increases the app size by around 600KB.
You can read more about the difference between the two versions here.
To use the unbundled version of the MLKit Barcode-scanning, add the following line to your /android/gradle.properties file:
dev.steenbakker.mobile_scanner.useUnbundled=true
Since the scanner needs to use the camera, add the following keys to your Info.plist file. (located in /ios/Runner/Info.plist)
NSCameraUsageDescription - describe why your app needs access to the camera. This is called Privacy - Camera Usage Description in the visual editor.
If you want to use the local gallery feature from image_picker, you also need to add the following key.
NSPhotoLibraryUsageDescription - describe why your app needs permission for the photo library. This is called Privacy - Photo Library Usage Description in the visual editor.
Example,
<key>NSCameraUsageDescription</key>
<string>This app needs camera access to scan QR codes</string>

<key>NSPhotoLibraryUsageDescription</key>
<string>This app needs photos access to get QR code from photo library</string>
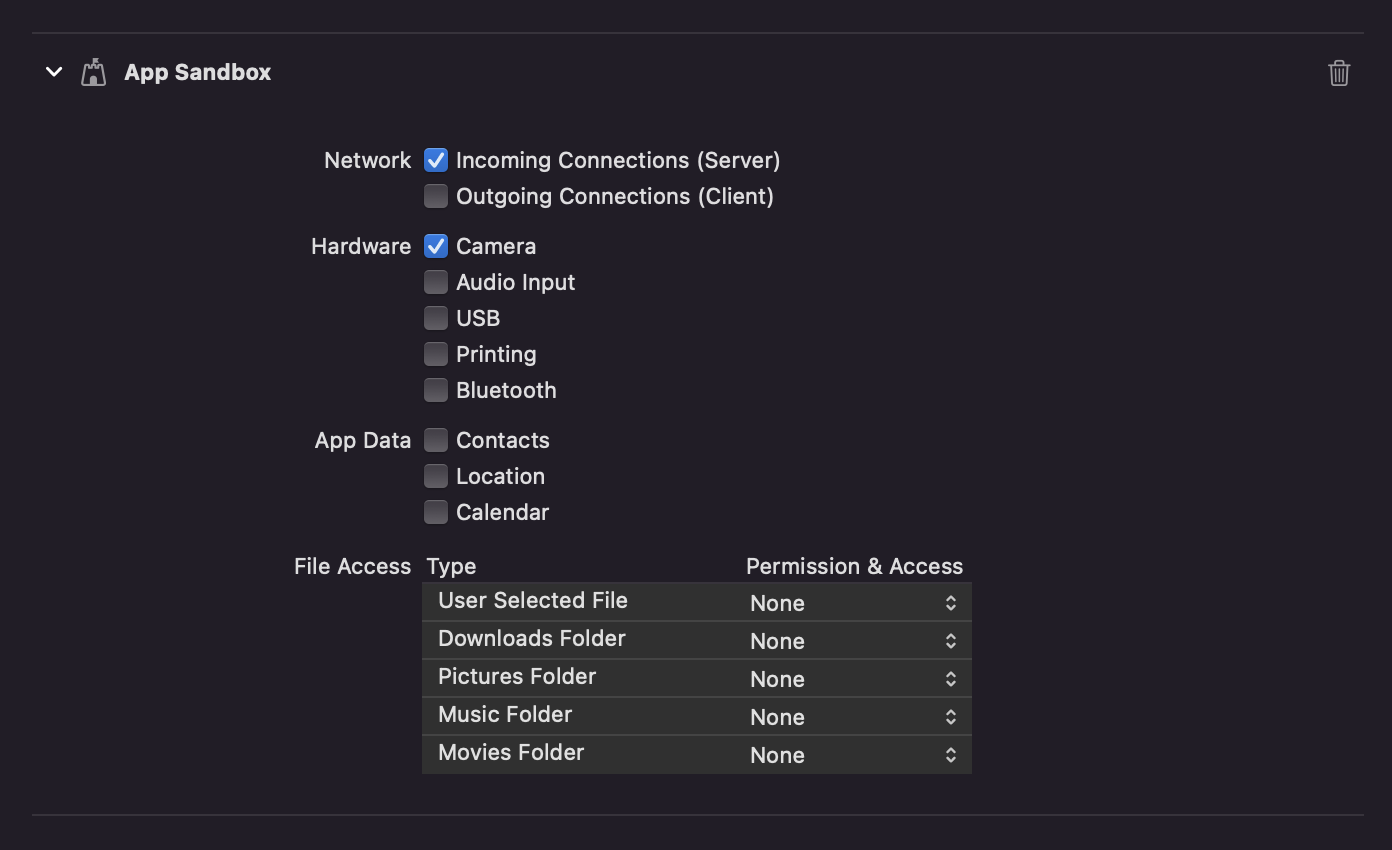
Ensure that you granted camera permission in XCode -> Signing & Capabilities:
As of version 5.0.0 adding the barcode scanning library script to the index.html is no longer required,
as the script is automatically loaded on first use.
If a different mirror is needed to load the barcode scanning library, the source URL can be set beforehand.
import 'package:flutter/foundation.dart';
import 'package:mobile_scanner/mobile_scanner.dart';

final String scriptUrl = // ...

if (kIsWeb) {
  MobileScannerPlatform.instance.setBarcodeLibraryScriptUrl(scriptUrl);
}Import the package with package:mobile_scanner/mobile_scanner.dart. The only required parameter is onDetect, which returns the scanned barcode or qr code.
MobileScanner(
  onDetect: (result) {
    print(result.barcodes.first.rawValue);
  },
),If you want more control over the scanner, you need to create a new MobileScannerController controller. The controller contains multiple parameters to adjust the scanner.
final MobileScannerController controller = MobileScannerController(
  cameraResolution: size,
  detectionSpeed: detectionSpeed,
  detectionTimeoutMs: detectionTimeout,
  formats: selectedFormats,
  returnImage: returnImage,
  torchEnabled: true,
  invertImage: invertImage,
  autoZoom: autoZoom,
);MobileScanner(
controller: controller,
onDetect: (result) {
print(result.barcodes.first.rawValue);
},
);If you want to pause the scanner when the app is inactive, you need to use WidgetsBindingObserver.
First, provide a StreamSubscription for the barcode events. Also, make sure to create a MobileScannerController with autoStart set to false, since we will be handling the lifecycle ourself.
final MobileScannerController controller = MobileScannerController(
  autoStart: false,
);

StreamSubscription<Object?>? _subscription;
Then, ensure that your State class mixes in WidgetsBindingObserver, to handle lifecyle changes, and add the required logic to the didChangeAppLifecycleState function:
class MyState extends State<MyStatefulWidget> with WidgetsBindingObserver {
  // ...

  @override
  void didChangeAppLifecycleState(AppLifecycleState state) {
    // If the controller is not ready, do not try to start or stop it.
    // Permission dialogs can trigger lifecycle changes before the controller is ready.
    if (!controller.value.hasCameraPermission) {
      return;
    }

    switch (state) {
      case AppLifecycleState.detached:
      case AppLifecycleState.hidden:
      case AppLifecycleState.paused:
        return;
      case AppLifecycleState.resumed:
        // Restart the scanner when the app is resumed.
        // Don't forget to resume listening to the barcode events.
        _subscription = controller.barcodes.listen(_handleBarcode);

        unawaited(controller.start());
      case AppLifecycleState.inactive:
        // Stop the scanner when the app is paused.
        // Also stop the barcode events subscription.
        unawaited(_subscription?.cancel());
        _subscription = null;
        unawaited(controller.stop());
    }
  }

  // ...
}
Then, start the scanner in void initState():
@override
void initState() {
  super.initState();
  // Start listening to lifecycle changes.
  WidgetsBinding.instance.addObserver(this);

  // Start listening to the barcode events.
  _subscription = controller.barcodes.listen(_handleBarcode);

  // Finally, start the scanner itself.
  unawaited(controller.start());
}
Finally, dispose of the the MobileScannerController when you are done with it.
@override
Future<void> dispose() async {
  // Stop listening to lifecycle changes.
  WidgetsBinding.instance.removeObserver(this);
  // Stop listening to the barcode events.
  unawaited(_subscription?.cancel());
  _subscription = null;
  // Dispose the widget itself.
  super.dispose();
  // Finally, dispose of the controller.
  await controller.dispose();
}