![]()

- Introduction
- Getting started
- Service container
- Configuration
- Database
- ORM
- Sessions
- Authentication
- Admin panel
- Routes
- User interface
- Pager
- Cache
- Tasks
- Cron
- Files
- HTTPS
- Logging
- Credits
Pagoda is not a framework but rather a base starter-kit for rapid, easy full-stack web development in Go, aiming to provide much of the functionality you would expect from a complete web framework as well as establishing patterns, procedures and structure for your web application.
Built on a solid foundation of well-established frameworks and modules, Pagoda aims to be a starting point for any web application with the benefit over a mega-framework in that you have full control over all of the code, the ability to easily swap any frameworks or modules in or out, no strict patterns or interfaces to follow, and no fear of lock-in.
While separate JavaScript frontends have surged in popularity, many prefer the reliability, simplicity and speed of a full-stack approach with server-side rendered HTML. Even the popular JS frameworks all have SSR options. This project aims to highlight that Go alone can be powerful and easy to work with as a full-stack solution, and interesting frontend libraries can provide the same modern functionality and behavior without having to write any JS or CSS at all. In fact, you can even avoid writing HTML as well.
While many great projects were used to build this, all of which are listed in the credits section, the following provide the foundation of the back and frontend. It's important to note that you are not required to use any of these. Swapping any of them out will be relatively easy.
- Echo: High performance, extensible, minimalist Go web framework.
- Ent: Simple, yet powerful ORM for modeling and querying data.
- Gomponents: HTML components written in pure Go. They render to HTML 5, and make it easy for you to build reusable components.
Go server-side rendered HTML combined with the projects below enable you to create slick, modern UIs without writing any JavaScript or CSS.
- HTMX: Access AJAX, CSS Transitions, WebSockets and Server Sent Events directly in HTML, using attributes, so you can build modern user interfaces with the simplicity and power of hypertext.
- Alpine.js: Rugged, minimal tool for composing behavior directly in your markup. Think of it like jQuery for the modern web. Plop in a script tag and get going.
- DaisyUI: The Tailwind CSS plugin you will love! It provides useful component class names to help you write less code and build faster. No JavaScript dependencies.
- SQLite: A small, fast, self-contained, high-reliability, full-featured, SQL database engine and the most used database engine in the world.
Originally, Postgres and Redis were chosen as defaults but since the aim of this project is rapid, simple development, it was changed to SQLite which now provides the primary data storage as well as persistent, background task queues. For caching, a simple in-memory solution is provided. If you need to use something like Postgres or Redis, swapping those in can be done quickly and easily. For reference, this branch contains the code that included those (but is no longer maintained).


Ensure that Go is installed on your system.
Start by checking out the repository. Since this repository is a template and not a Go library, you do not use go get.
git clone git@github.com:mikestefanello/pagoda.git
cd pagoda
Several optional tools are available to make development easier for you. This includes Ent code-generator, for generating ORM code, Air CLI, to provide live reloading, and Tailwind CSS CLI, to generate CSS.
If you wish to use Tailwind (with or without Daisy UI), modify the Makefile, and adjust the TAILWIND_PACKAGE variable to reference the proper package for your operating system. By default, it's set to work with Linux x64. If you want to use Tailwind but don't want to use the standalone CLI, ie npm, modify the tailwind-install and css make targets based on your preferences.
To easily install all tools, run make install from the root of the repo. There are also separate make targets for each tool (run make help to list all targets).
To access the admin panel, you must log in with an admin user and to create your first admin user account, you must use the command-line. Execute make admin email=your@email.com from the root of the codebase, and an admin account will be generated using that email address. The console will print the randomly-generated password for the account.
Once you have one admin account, you can use that account to manage other users and admins from within the UI.
From within the root of the codebase, simply run make run.
By default, you should be able to access the application in your browser at localhost:8000. Your data will be stored within the dbs directory. If you ever want to quickly delete all data, just remove this directory.
These settings, and many others, can be changed via the configuration.
Rather than using make run, if you prefer live reloading so your app automatically rebuilds and runs whenever you save code changes, start by installing Air, if you haven't already, by running make air-install (or make install to install all tools), then use make watch to start the application with automatic live reloading.
When code changes are detected, make css will run to re-compile Tailwind styles automatically before restarting the app. If you choose not to use Tailwind, either modify make css to run whatever commands you require, or remove this from the make build target.
The container is located at pkg/services/container.go and is meant to house all of your application's services and/or dependencies. It is easily extensible and can be created and initialized in a single call. The services currently included in the container are:
- Authentication
- Cache
- Configuration
- Database
- Files
- Graph
- ORM
- Tasks
- Validator
- Web
A new container can be created and initialized via services.NewContainer(). It can be later shutdown via Shutdown(), which will attempt to gracefully shutdown all services.
The container exists to facilitate easy dependency-injection both for services within the container and areas of your application that require any of these dependencies. For example, the container is automatically passed to the Init() method of your route handlers so that the handlers have full, easy access to all services.
It is common that your tests will require access to dependencies, like the database, or any of the other services available within the container. Keeping all services in a container makes it especially easy to initialize everything within your tests. You can see an example pattern for doing this here.
The config package provides a flexible, extensible way to store all configuration for the application. Configuration is added to the Container as a Service, making it accessible across most of the application.
Be sure to review and adjust all the default configuration values provided in config/config.yaml.
Leveraging the functionality of viper to manage configuration, all configuration values can be overridden by environment variables. The name of the variable is determined by the set prefix and the name of the configuration field in config/config.yaml.
In config/config.go, the prefix is set as pagoda via viper.SetEnvPrefix("pagoda"). Nested fields require an underscore between levels. For example:
http:
  port: 1234
can be overridden by setting an environment variable with the name PAGODA_HTTP_PORT.
The configuration value for the current environment (Config.App.Environment) is an important one as it can influence some behavior significantly (will be explained in later sections).
A helper function (config.SwitchEnvironment) is available to make switching the environment easy, but this must be executed prior to loading the configuration. The common use-case for this is to switch the environment to Test before tests are executed:
func TestMain(m *testing.M) {
    // Set the environment to test
    config.SwitchEnvironment(config.EnvTest)

    // Start a new container
    c = services.NewContainer()

    // Run tests
    exitVal := m.Run()

    // Shutdown the container
    if err := c.Shutdown(); err != nil {
        panic(err)
    }

    os.Exit(exitVal)
}The database currently used is SQLite but you are free to use whatever you prefer. If you plan to continue using Ent, the incredible ORM, you can check their supported databases here. The database driver is provided by go-sqlite3. A reference to the database is included in the Container if direct access is required.
Database configuration can be found and managed within the config package.
Ent provides automatic migrations which are executed on the database whenever the Container is created, which means they will run when the application starts.
Since many tests can require a database, this application supports a separate database specifically for tests. Within the config, the test database can be specified at Config.Database.TestConnection, which is the database connection string that will be used. By default, this will be an in-memory SQLite database.
When a Container is created, if the environment is set to config.EnvTest, the database client will connect to the test database instead and run migrations so your tests start with a clean, ready-to-go database.
When this project was using Postgres, it would automatically drop and recreate the test database. Since the current default is in-memory, that is no longer needed. If you decide to use a test database not in-memory, you can alter the Container initialization code to do this for you.
As previously mentioned, Ent is the supplied ORM. It can be swapped out, but I highly recommend it. I don't think there is anything comparable for Go, at the current time. If you decide to remove Ent, you will lose the dynamic admin panel which allows you to administer all entity types from within the UI. If you're not familiar with Ent, take a look through their top-notch documentation.
An Ent client is included in the Container to provide easy access to the ORM throughout the application.
Ent relies on code-generation for the entities you create to provide robust, type-safe data operations. Everything within the ent directory in this repository is generated code for the two entity types listed below except the schema declaration and custom extension to generate code for the admin panel.
The two included entity types are:
- User
- PasswordToken
While you should refer to their documentation for detailed usage, it's helpful to understand how to create an entity type and generate code. To make this easier, the Makefile contains some helpers.
- Ensure all Ent code is downloaded by executing
make ent-install. - Create the new entity type by executing
make ent-new name=UserwhereUseris the name of the entity type. This will generate a file like you can see inent/schema/user.gothough theFields()andEdges()will be left empty. - Populate the
Fields()and optionally theEdges()(which are the relationships to other entity types). - When done, generate all code by executing
make ent-gen.
The generated code is extremely flexible and impressive. An example to highlight this is one used within this application:
entity, err := c.ORM.PasswordToken.
    Query().
    Where(passwordtoken.ID(tokenID)).
    Where(passwordtoken.HasUserWith(user.ID(userID))).
    Where(passwordtoken.CreatedAtGTE(expiration)).
    Only(ctx.Request().Context())
This executes a database query to return the password token entity with a given ID that belong to a user with a given ID and has a created at timestamp field that is greater than or equal to a given time.
Sessions are provided and handled via Gorilla sessions and configured as middleware in the router located at pkg/handlers/router.go. Session data is currently stored in cookies but there are many options available if you wish to use something else.
Here's a simple example of loading data from a session and saving new values:
func SomeFunction(ctx echo.Context) error {
    sess, err := session.Get(ctx, "some-session-key")
    if err != nil {
        return err
    }
    sess.Values["hello"] = "world"
    sess.Values["isSomething"] = true
    return sess.Save(ctx.Request(), ctx.Response())
}Session data is encrypted for security purposes. The encryption key is stored in configuration at Config.App.EncryptionKey. While the default is fine for local development, it is imperative that you change this value for any live environment otherwise session data can be compromised.
Included are standard authentication features you expect in any web application. Authentication functionality is bundled as a Service within services/AuthClient and added to the Container. If you wish to handle authentication in a different manner, you could swap this client out or modify it as needed.
Authentication currently requires sessions and the session middleware.
The AuthClient has methods Login() and Logout() to log a user in or out. To track a user's authentication state, data is stored in the session including the user ID and authentication status.
Prior to logging a user in, the method CheckPassword() can be used to determine if a user's password matches the hash stored in the database and on the User entity.
Routes are provided for the user to login and logout at user/login and user/logout.
Users can reset their password in a secure manner by issuing a new password token via the method GeneratePasswordResetToken(). This creates a new PasswordToken entity in the database belonging to the user. The actual token itself, however, is not stored in the database for security purposes. It is only returned via the method so it can be used to build the reset URL for the email. Rather, a hash of the token is stored, using bcrypt the same package used to hash user passwords. The reason for doing this is the same as passwords. You do not want to store a plain-text value in the database that can be used to access an account.
Tokens have a configurable expiration. By default, they expire within 1 hour. This can be controlled in the config package. The expiration of the token is not stored in the database, but rather is used only when tokens are loaded for potential usage. This allows you to change the expiration duration and affect existing tokens.
Since the actual tokens are not stored in the database, the reset URL must contain the user and password token ID. Using that, GetValidPasswordToken() will load a matching, non-expired password token entity belonging to the user, and use bcrypt to determine if the token in the URL matches stored hash of the password token entity.
Once a user claims a valid password token, all tokens for that user should be deleted using DeletePasswordTokens().
Routes are provided to request a password reset email at user/password and to reset your password at user/password/reset/token/:user/:password_token/:token.
The actual registration of a user is not handled within the AuthClient but rather just by creating a User entity. When creating a user, use HashPassword() to create a hash of the user's password, which is what will be stored in the database.
A route is provided for the user to register at user/register.
A checkbox field has been added to the User entity type to indicate if the user has admin access. If your app requires a more robust authorization system, such as roles and permissions, you could easily replace this field and adjust all usage of it accordingly. If a user has this field checked, they will be able to access the admin panel. Middleware is provided to easily restrict access to routes based on admin status.
The AuthClient has two methods available to get either the User entity or the ID of the user currently logged in for a given request. Those methods are GetAuthenticatedUser() and GetAuthenticatedUserID().
Registered for all routes is middleware that will load the currently logged in user entity and store it within the request context. The middleware is located at middleware.LoadAuthenticatedUser() and, if authenticated, the User entity is stored within the context using the key context.AuthenticatedUserKey.
If you wish to require either authentication or non-authentication for a given route, you can use either middleware.RequireAuthentication() or middleware.RequireNoAuthentication().
If you wish to restrict a route to admins only, you can use middleware.RequireAdmin.
Most web applications require the user to verify their email address (or other form of contact information). The User entity has a field Verified to indicate if they have verified themself. When a user successfully registers, an email is sent to them containing a link with a token that will verify their account when visited. This route is currently accessible at /email/verify/:token and handled by pkg/handlers/auth.go.
There is currently no enforcement that a User must be verified in order to access the application. If that is something you desire, it will have to be added in yourself. It was not included because you may want partial access of certain features until the user verifies; or no access at all.
Verification tokens are JSON Web Tokens generated and processed by the jwt module. The tokens are signed using the encryption key stored in configuration (Config.App.EncryptionKey). It is imperative that you override this value from the default in any live environments otherwise the data can be comprimised. JWT was chosen because they are secure tokens that do not have to be stored in the database, since the tokens contain all of the data required, including built-in expirations. These were not chosen for password reset tokens because JWT cannot be withdrawn once they are issued which poses a security risk. Since these tokens do not grant access to an account, the ability to withdraw the tokens is not needed.
By default, verification tokens expire 12 hours after they are issued. This can be changed in configuration at Config.App.EmailVerificationTokenExpiration. There is currently not a route or form provided to request a new link.
Be sure to review the email section since actual email sending is not fully implemented.
To generate a new verification token, the AuthClient has a method GenerateEmailVerificationToken() which creates a token for a given email address. To verify the token, pass it in to ValidateEmailVerificationToken() which will return the email address associated with the token and an error if the token is invalid.
The admin panel functionality is considered to be in beta and remains under active development, though all features described here are expected to be fully-functional. Please use caution when using these features and be sure to report any issues you encounter.
The admin panel currently includes:
- A completely dynamic UI to manage all entities defined by Ent.
- A section to monitor all background tasks and queues.
There are no separate templates or interfaces for the admin section (see screenshots).
Users with admin access will see additional links on the default sidebar at the bottom. As with all default UI components, you can easily move these pages and links to a dedicated section, layout, etc. Clicking on the link for any given entity type will provide a pageable table of entities and the ability to add/edit/delete.
In order to automatically and dynamically provide admin functionality for entities, code generation is used by means of leveraging Ent's extension API which makes generating code using the Ent graph schema very easy. A custom extension is provided to generate code that provides flat entity type structs and handler code that work directly with Echo. So, both of those are required in order for any of this to work. Whenever you modify one of your entity types or generate a new one, the admin code will also automatically generate.
Without going in to too much detail here, the generated code provides a handler that is then used by a provided web handler to power all the routes used in the admin UI. While the rest of the related code should be simple enough to follow, it's worth calling attention to the highly-dynamic entity form that is constructed using the Ent graph data structure.
Only admin users can access the admin panel. The details are outlined in the admins and middleware sections. If you haven't yet generated an admin user, follow these instructions.
Since the generated code is completely dynamic, all entity functionality related to creating and editing must be defined within your Ent schema. Refer to the User entity schema as an example.
- Field validation must be defined within each entity field (ie, validating an email address in a string field).
- Pre-processing must be defined within entity hooks (ie, hashing the user's password).
- Sensitive fields will be omitted from the UI, and only modified if a value is provided during creation or editing.
- Edges must be bound to an edge field if you want them visible and editable.
- Determine which tests should be included and provide them.
- Inline validation.
- Either exposed sorting, or allow the handler to be configured with sort criteria for each type.
- Exposed filters.
- Support all field types (types such as JSON as currently not supported).
- Control which fields appear in the entity list table.
The router functionality is provided by Echo and constructed within via the BuildRouter() function inside pkg/handlers/router.go. Since the Echo instance is a Service on the Container which is passed in to BuildRouter(), middleware and routes can be added directly to it.
By default, a middleware stack is included in the router that makes sense for most web applications. Be sure to review what has been included and what else is available within Echo and the other projects mentioned.
A middleware package is included which you can easily add to along with the custom middleware provided.
A Handler is a simple type that handles one or more of your routes and allows you to group related routes together (ie, authentication). All provided handlers are located in pkg/handlers. Handlers also handle self-registering their routes with the router.
The provided patterns are not required, but were designed to make development as easy as possible.
For this example, we'll create a new handler which includes a GET and POST route and uses the ORM. Start by creating a file at pkg/handlers/example.go.
- Define the handler type:
type Example struct {
    orm *ent.Client
}- Register the handler so the router automatically includes it
func init() {
    Register(new(Example))
}- Initialize the handler (and inject any required dependencies from the Container). This will be called automatically.
func (e *Example) Init(c *services.Container) error {
    e.orm = c.ORM
    return nil
}- Declare the routes
It is highly recommended that you provide a Name for your routes. Most methods on the back and frontend leverage the route name and parameters in order to generate URLs. All route names are currently stored as consts in the routenames package so they are accessible from within the ui layer.
func (e *Example) Routes(g *echo.Group) {
    g.GET("/example", e.Page).Name = routenames.Example
    g.POST("/example", c.PageSubmit).Name = routenames.ExampleSubmit
}- Implement your routes
func (e *Example) Page(ctx echo.Context) error {
    // add your code here
}

func (e *Example) PageSubmit(ctx echo.Context) error {
    // add your code here
}Routes can return errors to indicate that something wrong happened and an error page should be rendered for the request. Ideally, the error is of type *echo.HTTPError to indicate the intended HTTP response code, and optionally a message that will be logged. You can use return echo.NewHTTPError(http.StatusInternalServerError, "optional message"), for example. If an error of a different type is returned, an Internal Server Error is assumed.
The error handler is set to the provided Handler in pkg/handlers/error.go in the BuildRouter() function. That means that if any middleware or route return an error, the request gets routed there. This route passes the status code to the pages.Error UI component page, allowing you to easily adjust the markup depending on the error type.
The pkg/redirect package makes it easy to perform redirects, especially if you provide names for your routes. The Redirect type provides the ability to chain redirect options and also supports automatically handling HTMX redirects for boosted requests.
For example, if your route name is user_profile with a URL pattern of /user/profile/:id, you can perform a redirect by doing:
return redirect.New(ctx).
    Route("user_profile").
    Params(userID).
    Query(queryParams).
Go()Since most of your web application logic will live in your routes, being able to easily test them is important. The following aims to help facilitate that.
The test setup and helpers reside in pkg/handlers/router_test.go.
Only a brief example of route tests were provided in order to highlight what is available. Adding full tests did not seem logical since these routes will most likely be changed or removed in your project.
When the route tests initialize, a new Container is created which provides full access to all the Services that will be available during normal application execution. Also provided is a test HTTP server with the router added. This means your tests can make requests and expect responses exactly as the application would behave outside of tests. You do not need to mock the requests and responses.
With the test HTTP server setup, test helpers for making HTTP requests and evaluating responses are made available to reduce the amount of code you need to write. See httpRequest and httpResponse within pkg/handlers/router_test.go.
Here is an example how to easily make a request and evaluate the response:
func TestAbout_Get(t *testing.T) {
    doc := request(t).
        setRoute("about").
        get().
        assertStatusCode(http.StatusOK).
        toDoc()
}A helpful, included package to test HTML markup from HTTP responses is goquery. This allows you to use jQuery-style selectors to parse and extract HTML values, attributes, and so on.
In the example above, toDoc() will return a *goquery.Document created from the HTML response of the test HTTP server.
Here is a simple example of how to use it, along with testify for making assertions:
h1 := doc.Find("h1.title")
assert.Len(t, h1.Nodes, 1)
assert.Equal(t, "About", h1.Text())Originally, standard Go templates were chosen for this project and a lot of code was written to build tools to make using them as easy and flexible as possible. That code remains archived in this branch but is no longer maintained. Despite providing tools such as a powerful template renderer, which did things like automatically compile nested templates to separate layouts from pages, automatically include component templates, support HTMX partial rendering, provide funcmap function helpers, and more, the end result left a lot to be desired. Templates provide no type-safety, child templates are difficult to call when you have multiple arguments, templates are not flexible enough to easily provide reusable components and elements, the funcmap and form submission code often had to return HTML or CSS classes, and more.
While I was extremely hesitant to adopt a rendering option outside the standard library, if an option exists that I personally feel is far superior, that is what I'm going to go with. Templ was also a consideration as that project has made massive progress, seen an explosion in adoption, and aims to solve all the problems previously mentioned. I did not feel that it was a good fit for this project though as it requires you to know and understand their templating language, to install a CLI and an IDE plugin (which does not work with all IDEs; especially GoLand), and separately compile template code.
Gomponents allows you to build HTML using nothing except pure, type-safe Go; whether that's entire documents or dynamic, reusable components. Here are some basic examples to give you an idea of how it works and this tool is incredibly useful for quickly converting HTML to gomponent Go code. When I first came across this library, I was very much against it, and couldn't imagine writing tons of nested function calls just to produce some HTML; especially for complex markup. But after actually spending some time using it to replicate the UI of this project, and feeling the downsides of Go templates, I quickly became a big fan and supporter of this approach. Between this and the chosen JS/CSS libraries, you can literally write your entire frontend without leaving Go.
Before making any quick judgements of your own, I ask that you deeply consider what you've used in the past, review what previously existed in this project, and compare to the current solution and code presented here. I believe I've laid out the ui package in a way that makes building your frontend with gomponents very easy and enjoyable.
HTMX is an awesome JavaScript library allows you to access AJAX, CSS Transitions, WebSockets and Server Sent Events directly in HTML, using attributes, so you can build modern user interfaces with the simplicity and power of hypertext.
Many examples of its usage are available in the included examples:
- All navigation links use boost which dynamically replaces the page content with an AJAX request, providing a SPA-like experience.
- All forms use either boost or hx-post to submit via AJAX.
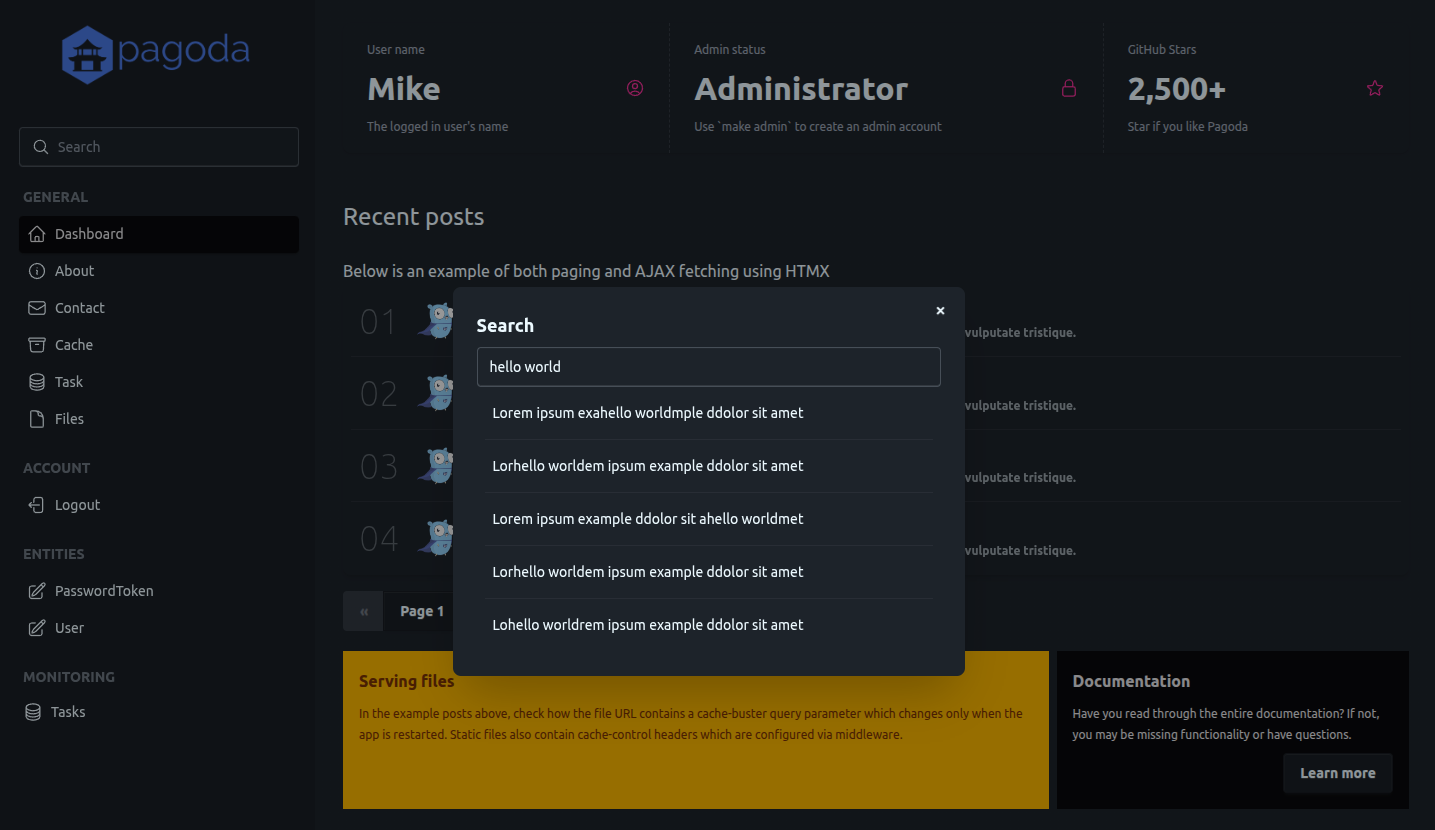
- The mock search autocomplete modal uses hx-get to fetch search results from the server via AJAX and update the UI.
- The mock posts on the homepage/dashboard use hx-get to fetch and page posts via AJAX.
All of this can be easily accomplished without writing any JavaScript at all.
Another benefit of HTMX is that it's completely backend-agnostic and does not require any special tools or integrations on the backend, though many things are provided here to make it simple.
Included is an htmx package to read and write HTTP headers that HTMX uses to communicate additional information and commands for both the request and response. This allows you, for example, to determine if HTMX is making the given request and what exactly it is doing, which could be useful both in your route and your ui.
From within your route, you can fetch HTMX request details by calling htmx.GetRequest(ctx), and you can send commands back to HTMX by calling htmx.Response{...}.Apply(ctx), and populating any fields on the htmx.Response struct.
From within your ui, the Request object will automatically contain the request details on the Htmx field.
Since HTMX communicates what it is doing with the server, you can use the request headers to conditionally process in your route or render in your ui, if needed.
The most important case to support is partial rendering. If HTMX is making a request, unless it is boosted, you only want to render the content of your route, and not the entire layout. This is automatically handled by the Render() method on the Request type. More can be read about that here.
If your routes aren't doing multiple things, you may not need conditional rendering, but it's worth knowing how flexible you can be. A simple example of this:
if htmx.GetRequest(ctx).Target == "search" {
    // This request is HTMX fetching content just for the #search element
}If CSRF protection is enabled, the token value will automatically be passed to HTMX to be included in all non-GET requests. This is done in the JS() component by leveraging HTMX events.
DaisyUI, which is a component library for Tailwind CSS, was chosen as the default CSS solution. You are not required to use either of these and removing what has been provided should be quite simple. Both of these tools are very mature, have huge communities, and endless resources, making them ideal for rapid, simple frontend development
Review the installing tools section to ensure you have everything installed, and you understand how the make commands handle building your CSS styles and how live reloading automatically handles executing the Tailwind CLI. By default, the compiled CSS is written to public/static/main.css when make css is executed.
Tailwind configuration is stored in tailwind.css and is configured to check for classes within pkg/ui. Remember, full class names must be present in the Go files in order for Tailwind to find them; you cannot dynamically build classes.
The Request type in the ui package is a foundational helper that provides useful data from the current request as well as resources and methods that make rendering UI components much easier. Using the echo.Context, a Request can be generated by executing ui.NewRequest(ctx). As you develop and expand your application, you will likely want to expand this type to include additional data and methods that your frontend requires.
NewRequest() will automatically populate the following fields using the echo.Context from the current request:
Context: The provided echo.ContextCurrentPath: The requested URL pathIsHome: If the request was for the homepageIsAuth: If the user is authenticatedAuthUser: The logged-in user entity, if oneCSRF: The CSRF token, if the middleware is being usedHtmx: Data from the HTMX headers, if HTMX made the requestConfig: The application configuration, if the middleware is being used
The Request type has additional fields to make it easy to set static values within components being rendered on a given page. While the title is always important, the others are provided as an example:
Title: The page titleMetatags:Description: The description of the pageTags: A slice of keyword tags
As mentioned in the Routes section, it is recommended, though not required, to provide names for each of your routes. These are currently defined as consts in the routenames package. If you use names for your routes, you can leverage the URL generation methods on the Request. This allows you to prevent hard-coding your route paths and parameters in multiple places.
The methods both take a route name and optional variadic route parameters:
Path(): Generates a relative path for a given route.Url(): Generates an absolute URL for a given route. This uses theApp.Hostfield in your configuration to determine the host of the URL.
Example:
g.GET("/user/:uid", profilePage).Name = routenames.Profilefunc ProfileLink(r *ui.Request, userName string, userID int64) gomponents.Node {
return A(
Class("profile"),
Href(r.Path(routenames.Profile, userID)),
Text(userName),
)
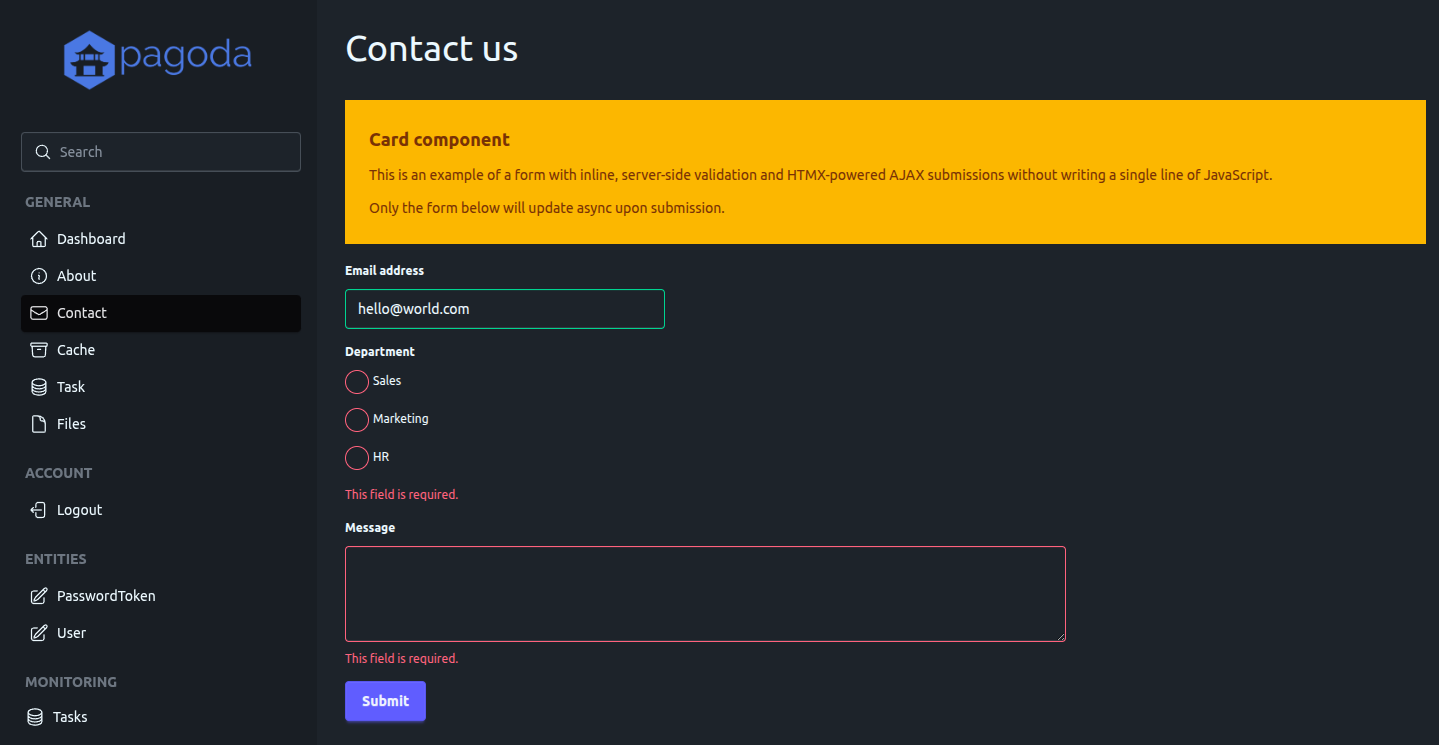
}The components package is meant to be your library of reusable gomponent components. Having this makes building your layouts, pages, forms, models and the rest of your user interface much easier. Some of the examples provided include components for flash messages, navigation menus, tabs, metatags, and form elements used to automatically provide inline validation.
Your components can also make using utility-based CSS libraries, such as Tailwind CSS, much easier by avoiding excessive duplication of classes across elements. A number of DaisyUI components are provided.
Here are some examples:
Badge(ColorSuccess, "Hello")Card(CardParams{
Title: "Hello world",
Body: Group{
Span(Text("This is a card.")),
},
Footer: Group{
ButtonLink(ColorNeutral, "https://daisyui.com", "Learn more"),
},
Color: ColorInfo,
Size: SizeMedium,
})Tabs([]Tab{
{
Title: "Tab 1",
Body: "Here is tab 1.",
},
{
Title: "Tab 2",
Body: "Check out tab 2.",
},
})Layouts are full HTML templates that are used by pages to inject themselves in to, allowing you to easily have multiple pages that all use the same layout, and to easily switch layouts between different pages. Included is a primary and auth layout as an example, which you can see in action by navigating between the links on the General and Account sidebar menus.
Pages are what route handlers ultimately assemble and render. They may accept primitives, models, forms, or nothing at all, and they embed themselves in a layout of their choice. Each page represents a different page of your web application and many examples are provided for reference. See below for a minimal example.
The Request type contains a Render() method which makes rendering your page within a given layout simple. It automatically handles partial rendering, omitting the layout and only rendering the page if the request is made by HTMX and is not boosted. Using HTMX is completely optional. This is accomplished by passing in your layout and page separately, for example:
func MyPage(ctx echo.Context, username string) error {
    r := ui.NewRequest(ctx)
    r.Title = "My page"
    node := Div(Textf("Hello, %s!", username))
    return r.Render(layouts.Primary, node)
}
Using Render(), in this example, only node will render if HTMX made the request in a non-boosted fashion, otherwise node will render within layouts.Primary.
And from within your route handler, simply:
func (e *ExampleHandler) Page(ctx echo.Context) error {
    return pages.MyPage(ctx, "abcd")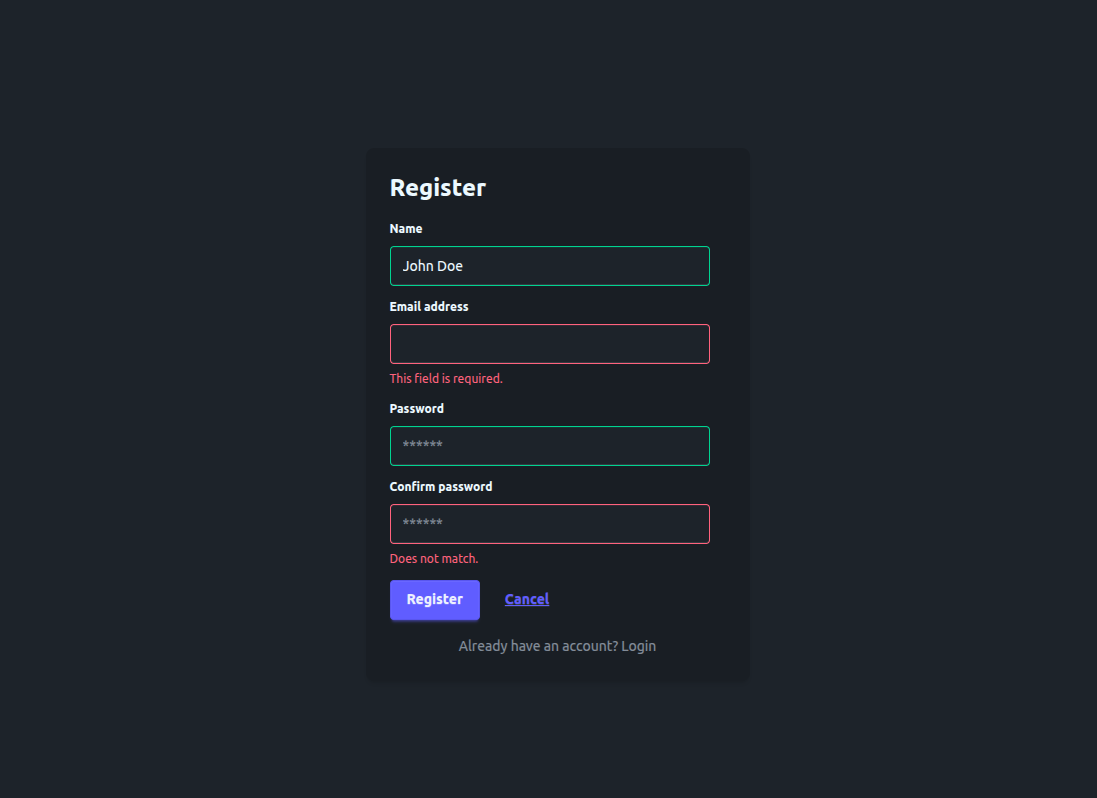
}Building, rendering, validating and processing forms is made extremely easy with Echo binding, validator, form.Submission, and the provided gomponent components.
Start by declaring the form within the forms package:
type Guestbook struct {
    Message    string `form:"message" validate:"required"`
    form.Submission
}
Embedding form.Submission satisfies the form.Form interface and handles submissions and validation for you.
Next, provide a method that renders the form:
func (f *Guestbook) Render(r *ui.Request) Node {
    return Form(
        ID("guestbook"),
        Method(http.MethodPost),
        Attr("hx-post", r.Path(routenames.GuestbookSubmit)),
        TextareaField(TextareaFieldParams{
            Form:      f,
            FormField: "Message",
            Name:      "message",
            Label:     "Message",
            Value:     f.Message,
        }),
        ControlGroup(
            FormButton(ColorPrimary, "Submit"),
        ),
        CSRF(r),
    )
}
Then, create a page that includes your form:
func UserGuestbook(ctx echo.Context, form *forms.Guestbook) error {
    r := ui.NewRequest(ctx)
    r.Title = "User page"

    content := Div(
        Class("guestbook"),
        H2(Text("My guestbook")),
        P(Text("Hi, please sign my guestbook!")),
        form.Render(r)
    )

    return r.Render(layouts.Primary, content)
}
And last, have your handler render the page in a route, and provide a route for the submission.
func (e *Example) Routes(g *echo.Group) {
    g.GET("/guestbook", e.Page).Name = routenames.Guestbook
    g.POST("/guestbook", c.PageSubmit).Name = routenames.GuestbookSubmit
}

func (e *Example) Page(ctx echo.Context) error {
    return pages.UserGuestbook(ctx, form.Get[forms.Guestbook](ctx))
}
form.Get will either initialize a new form, or load one previously stored in the context (ie, if it was already submitted).
Using the example form above, this is all you would have to do within the POST callback for your route:
Start by submitting the form via form.Submit(), along with the request context. This will:
- Store a pointer to the form in the context so that your GET callback can access the form values (shown previously). That allows the form to easily be re-rendered with any validation errors it may have as well as the values that were provided.
- Parse the input in the POST data to map to the struct so the fields becomes populated. This uses the
formstruct tags to map form input values to the struct fields. - Validate the values in the struct fields according to the rules provided in the optional
validatestruct tags.
Then, evaluate the error returned, if one, and process the form values however you need to:
func (e *Example) Submit(ctx echo.Context) error {
    var input forms.Guestbook

    // Submit the form.
    err := form.Submit(ctx, &input)

    // Check the error returned, and act accordingly.
    switch err.(type) {
    case nil:
        // All good!
    case validator.ValidationErrors:
        // The form input was not valid, so re-render the form with the errors included.
        return e.Page(ctx)
    default:
        // Request failed, show the error page.
        return err
    }

    msg.Success(fmt.Sprintf("Your message was: %s", input.Message))

    return redirect.New(ctx).
        Route(routenames.Home).
        Go()
}The Submission makes inline validation easier because it will store all validation errors in a map, keyed by the form struct field name. It also contains helper methods that the provided form components, such as TextareaField shown in the example above, use to automatically provide classes and error messages. The example form above will have inline validation without requiring anything other than what is shown above.
While validator is a great package that is used to validate based on struct tags, the downside is that the messaging, by default, is not very human-readable or easy to override. Within Submission.setErrorMessages() the validation errors are converted to more readable messages based on the tag that failed validation. Only a few tags are provided as an example, so be sure to expand on that as needed.
By default, all non GET requests will require a CSRF token be provided as a form value. This is provided by middleware and can be adjusted or removed in the router.
The Request automatically extracts the CSRF token from the context, but you must include it in your forms by using the provided CSRF() component as shown in the example above.
Models are objects built and provided by your routes that can be rendered by your ui. Though not required, they reside in the models package and each has a Render() method, making them easy to render within your pages. Please see example routes such as the homepage and search for an example.
A starting SVG icon library is provided in pkg/ui/icons with icons from heroicons. You are free to use any icons you want and in any manner.
Example:
A(
  Href("/user/123"),
  icons.UserCircle,
  Text("Profile")
)While most likely unnecessary for most applications, but because optimizing software is fun, a simple gomponents.Node cache is provided. This is not because gomponents is inefficient, in fact my basic benchmarks put it as either similar or slightly better than Go templates, but rather because there are some performance gains to be seen by caching static nodes and it may seem wasteful to build and render static HTML on every single page load. It is important to note, you can only cache nodes that are static and will never change.
A good example of this, and one included, is the entire upper navigation bar, search form, and search modal in the Primary layout. It contains a large amount of nested gomponent function calls and a lot of rendering is required. There is no reason to do this more than once.
The cache functions are available in pkg/ui/cache and can most easily used like this:
func SearchModal() gomponents.Node {
    return cache.SetIfNotExists("searchModal", func() gomponents.Node {
        return Div(...your entire nested node...)
    })
}cache.SetIfNotExists()is a helper function that uses cache.Get() to check if the Node is already cached under the provided key, and if not, executes the func to generate the Node, and caches that via cache.Set().
cache.Set() does more than just cache the Node in-memory. It renders the entire Node into a bytes.Buffer, then stores a Raw() Node using the rendered content. This means that everytime the Node is taken from the cache and rendered, the pre-rendered string is used rather than having to iterate through the nested component, executing all of the element functions and rendering and building the entire HTML output.
It's worth noting that my benchmarking was very limited and cannot be considered anything definitive. In my tests, gomponents was faster, allocated less overall, but had more allocations in total. If you're able to cache static nodes, gomponents can perform significantly better. Reiterating, for most applications, these differences in nanoseconds and bytes will most likely be completely insignificant and unnoticed; but it's worth being aware of.
Flash messaging functionality is provided within the msg package. It is used to provide one-time status messages to users.
Flash messaging requires that sessions and the session middleware are in place since that is where the messages are stored.
There are four types of messages, and each can be created as follows:
- Success:
msg.Success(ctx echo.Context, message string) - Info:
msg.Info(ctx echo.Context, message string) - Warning:
msg.Warning(ctx echo.Context, message string) - Error:
msg.Error(ctx echo.Context, message string)
When a flash message is retrieved from storage to be rendered, it is deleted from storage so that it cannot be rendered again.
A component, FlashMessages(), is provided to render flash messages within your UI.
A very basic mechanism is provided to handle and facilitate paging located in pkg/pager and can be initialized via pager.NewPager(). If the requested URL contains a page query parameter with a numeric value, that will be set as the page number in the pager. This query key can be controlled via the QueryKey constant.
Methods include:
SetItems(items int): Set the total amount of items in the entire result-setIsBeginning(): Determine if the pager is at the beginning of the pagesIsEnd(): Determine if the pager is at the end of the pagesGetOffset(): Get the offset which can be useful in constructing a paged database query
There is currently no generic component to easily render a pager, but the homepage does have an example.
As previously mentioned, the default cache implementation is a simple in-memory store, backed by otter, a lockless cache that uses S3-FIFO eviction. The Container houses a CacheClient which is a useful wrapper to interact with the cache (see examples below). Within the CacheClient is the underlying store interface CacheStore. If you wish to use a different store, such as Redis, and want to keep using the CacheClient, simply implement the CacheStore interface with a Redis library and adjust the Container initialization to use that.
The built-in usage of the cache is currently only used for a simple example route located at /cache where you can set and view the value of a given cache entry.
Since the current cache is in-memory, there's no need to adjust the Container during tests. When this project used Redis, the configuration had a separate database that would be used strictly for tests to avoid writing to your primary database. If you need that functionality, it is easy to add back in.
Set data with just a key:
err := c.Cache.
    Set().
    Key("my-key").
    Data(myData).
    Expiration(time.Hour * 2).
    Save(ctx)
Set data within a group:
err := c.Cache.
    Set().
    Group("my-group").
    Key("my-key").
    Expiration(time.Hour * 2).
    Data(myData).
    Save(ctx)
Include cache tags:
err := c.Cache.
    Set().
    Key("my-key").
    Tags("tag1", "tag2").
    Expiration(time.Hour * 2).
    Data(myData).
Save(ctx)data, err := c.Cache.
Get().
Group("my-group").
Key("my-key").
Fetch(ctx)err := c.Cache.
Flush().
Group("my-group").
Key("my-key").
Execute(ctx)This will flush all cache entries that were tagged with the given tags.
err := c.Cache.
    Flush().
    Tags("tag1", "tag2").
Execute(ctx)As shown in the previous examples, cache tags were provided because they can be convenient. However, maintaining them comes at a cost and it may not be a good fit for your application depending on your needs. When including tags, the CacheClient must lock in order to keep the tag index in sync. And since the tag index cannot support eviction, since that could result in a flush call not actually flushing the tag's keys, the maps that provide the index do not have a size limit. See the code for more details.
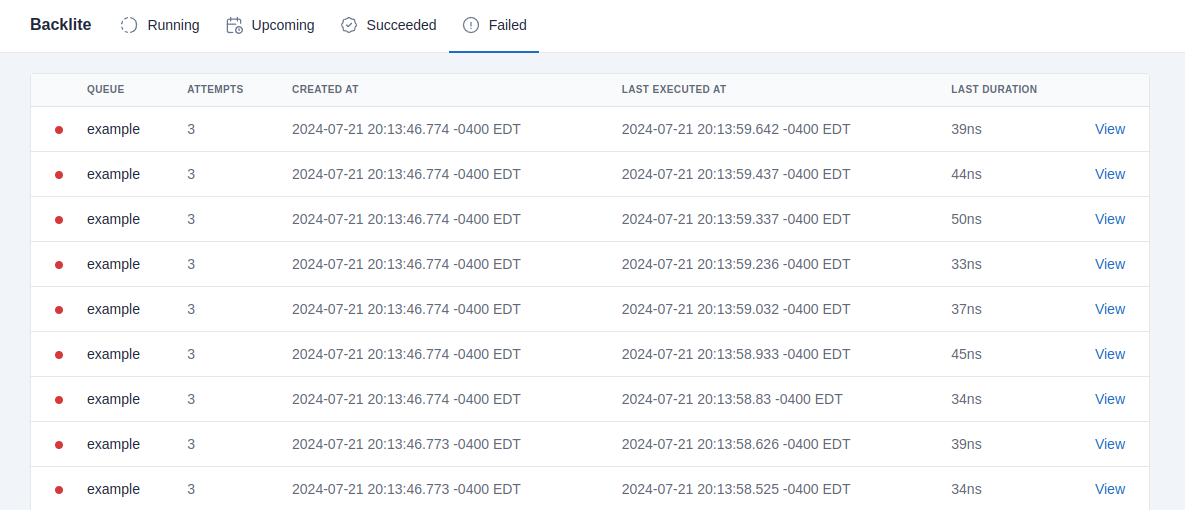
Tasks are queued operations to be executed in the background, either immediately, at a specific time, or after a given amount of time has passed. Some examples of tasks could be long-running operations, bulk processing, cleanup, notifications, etc.
Since we're already using SQLite for our database, it's available to act as a persistent store for queued tasks so that tasks are never lost, can be retried until successful, and their concurrent execution can be managed. Backlite is the library chosen to interface with SQLite and handle queueing tasks and processing them asynchronously. I wrote that specifically to address the requirements I wanted to satisfy for this project.
To make things easy, the Backlite client is provided as a Service on the Container which allows you to register queues and add tasks.
Configuration for the Backlite client is exposed through the app's yaml configuration. The required database schema will be automatically installed when the app starts.
A full example of a queue implementation can be found in pkg/tasks with an interactive form to create a task and add to the queue at /task (see pkg/handlers/task.go). Also refer to the Backlite documentation for reference and examples.
See pkg/tasks/register.go for a simple way to register all of your queues and to easily pass the Container to them so the queue processor callbacks have access to all of your app's dependencies.
The task dispatcher is what manages the worker pool used for executing tasks in the background. It monitors incoming and scheduled tasks and handles sending them to the pool for execution by the queue's processor callback. This must be started in order for this to happen. In cmd/web/main.go, the task dispatcher is automatically started when the app starts via:
c.Tasks.Start(ctx)The app configuration contains values to configure the client and dispatcher including how many goroutines to use, when to release stuck tasks back into the queue, and how often to cleanup retained tasks in the database.
When the app is shutdown, the dispatcher is given 10 seconds to wait for any in-progress tasks to finish execution. This can be changed in cmd/web/main.go.
The admin panel contains the UI provided by Backlite in order to fully monitor all tasks and queues from within your browser.
By default, no cron solution is provided because it's very easy to add yourself if you need this. You can either use a ticker or a library.
Providing a generic approach to files that works for all use-cases is nearly impossible, so the defaults provided here is more of an illustration of what features are available. It's likely you will want to use a CDN and/or cloud storage for all or some of your file management.
To handle file management functionality such as file uploads, an abstracted file system interface is provided as a Service on the Container powered by afero. This allows you to easily change the file system backend (ie, local, GCS, SFTP, in-memory) without having to change any of the application code other than the initialization on the Container. By default, the local OS is used with a directory specified in the application configuration (which defaults to uploads). When running tests, an in-memory file system backend is automatically used.
A simple file upload form example is provided at /files which also dynamically lists all files previously uploaded. No database entities or entries are created or provided for files and uploaded files are not available to be served. You will have to implement whatever functionality your application needs.
Static files, which are intended to be CSS, JS, UI images, etc, are currently configured in the router (pkg/handler/router.go) to be served from the public/static directory and are available via the URL prefix /static. By default, make css will write your css file here.
While it's ideal to use cache control headers on your static files so browsers cache the files, you need a way to bust the cache in case the files are changed. To do this, a function, StaticFile(), is provided in the ui package to generate a static file URL for a given file that appends a cache-buster query. This query string is generated using the timestamp of when the app started and persists until the application restarts.
For example, to render a file located in public/static/picture.png, you would use:
return Img(Src(ui.StaticFile("picture.png")))Which would result in:
<img src="/static/picture.png?v=1741053493"/>Where 1741053493 is the cache-buster.
An additional option for public files that do not fit in to the previously mentioned categories is provided as an example. Defined in the router, files located in public/files are available via the URL prefix /files. ui.PublicFile() can be used to generate URLs for files within this directory.
Static and public files are grouped separately so you can apply middleware only to them. Included is a custom middleware to set cache control headers (middleware.CacheControl) which has been added to the static files router group.
The cache max-life is controlled by the configuration at Config.Cache.Expiration.PublicFile and defaults to 6 months.
An email client was added as a Service to the Container but it is just a skeleton without any actual email-sending functionality. The reason is that there are a lot of ways to send email and most prefer using a SaaS solution for that. That makes it difficult to provide a generic solution that will work for most applications.
The structure in the client (MailClient) makes composing emails very easy, and you have the option to construct the body using either a simple string or with a renderable gomponent, as explained in the user interface, in order to produce HTML emails. A simple example is provided in pkg/ui/emails.
The standard library can be used if you wish to send email via SMTP and most SaaS providers have a Go package that can be used if you choose to go that direction. You must finish the implementation of MailClient.send.
The from address will default to the configuration value at Config.Mail.FromAddress. This can be overridden per-email by calling From() on the email and passing in the desired address.
See below for examples on how to use the client to compose emails.
Sending with a string body:
err = c.Mail.
    Compose().
    To("hello@example.com").
    Subject("Welcome!").
    Body("Thank you for registering.").
    Send(ctx)
Sending an HTML body using a gomponent:
err = c.Mail.
    Compose().
    To("hello@example.com").
    Subject("Confirm your email address").
    Component(emails.ConfirmEmailAddress(ctx, username, token)).
    Send(ctx)
This will use the HTML provided when rendering the gomponent as the email body.
By default, the application will not use HTTPS but it can be enabled easily. Just alter the following configuration:
Config.HTTP.TLS.Enabled:trueConfig.HTTP.TLS.Certificate: Full path to the certificate fileConfig.HTTP.TLS.Key: Full path to the key file
To use Let's Encrypt follow this guide.
By default, the Echo logger is not used for the following reasons:
- It does not support structured logging, which makes it difficult to deal with variables, especially if you intend to store a logger in context with pre-populated attributes.
- The upcoming v5 release of Echo will not contain a logger.
- It should be easy to use whatever logger you prefer (even if that is Echo's logger).
The provided implementation uses the relatively new log/slog library which was added to Go in version 1.21 but swapping that out for whichever you prefer is very easy.
The simple pkg/log package provides the ability to set and get a logger from the Echo context. This is especially useful when you use the provided logger middleware (see below). If you intend to use a different logger, modify these methods to receive and return the logger of your choice.
Adding a logger to the context:
logger := slog.New(logHandler).With("id", requestId)
log.Set(ctx, logger)
Access and use the logger:
func (h *handler) Page(ctx echo.Context) error {
    log.Ctx(ctx).Info("send a message to the log",
      "value_one", valueOne,
      "value_two", valueTwo,
    )
}When the Container configuration is initialized (initConfig()), the slog default log level is set based on the environment. INFO is used for production and DEBUG for everything else.
The SetLogger() middleware has been added to the router which sets an initialized logger on the request context. It's recommended that this remains after Echo's RequestID() middleware because it will add the request ID to the logger which means that all logs produced for that given request will contain the same ID, so they can be linked together. If you want to include more attributes on all request logs, set those fields here.
The LogRequest() middleware is a replacement for Echo's Logger() middleware which produces a log of every request made, but uses our logger rather than Echo's.
2024/06/15 09:07:11 INFO GET /contact request_id=gNblvugTKcyLnBYPMPTwMPEqDOioVLKp ip=::1 host=localhost:8000 referer="" status=200 bytes_in=0 bytes_out=5925 latency=107.527803ms
Thank you to all the following amazing projects for making this possible.