When you want to study the fluid mechanics of food, or "Fooid Mechanics," with scientific rigor, you need a tool to make quantitative measurements. Here, we share printable files so that anyone with access to a 3D printer can make their own Oreometer, for measuring the rheology of Oreos and other sandwich cookies and snacks.
This work is associated with a publication in the Physics of Fluids, which has more detail on the physics and rheology of Oreo creme as measured on our laboratory rheometer and on our original Oreometer.
On Oreology, the fracture and flow of “milk’s favorite cookie®” by Crystal E. Owens (crystalo@mit.edu), Max R. Fan (范瑞), A. John Hart, and Gareth H. McKinley
Sections in this ReadMe:
2. Guided tutorial on using the Oreometer
Design file set: Complete files are included in this current github repo to print a full Oreometer including .stl file format to be directly printable after slicing and .step file format to allow easy import and manipulation in most CAD software. If you want to modify the files, we recommend Autodesk Fusion 360, which is available with a free license for educational use. If you come up with a cool modification, please share with us!
Designs were made in Fusion 360 and printed out of PLA using a Creality Ender 3. Parts were sliced with Cura using a 0.3mm layer height, 20% infill, 210°C extruder temperature, and 55°C bed temperature, and printed with supports for the base halves, Oreo clamps, and penny castles. If a 3D printer isn’t available, parts could be printed at a local makerspace, in a local school or library that has a 3D printer, or ordered from a 3D printing service bureau. 3D printed plastic is often not "food-grade", so Oreos used for rheology experiments should not be consumed if this is the case for your printed parts!

This is an example layout in Cura to print one large penny castle and Oreo base half. The gray box around the penny tower is a support blocker that prevents supports from being generated in all the windows (for ease of removal). But it's not necessary for printing quality.

The fully-printed design has a two-part front clamp, two-part back clamp, two penny castles, a two-part base, a bolt, and a nut, assembled as shown. Additional items are rubber bands (we used Advantage Rubber Bands #64 with dimensions 3 1/2 x 1/4 in) and pennies (~2.5 g each) or dimes (~1 g each) to fill one of the penny castles.
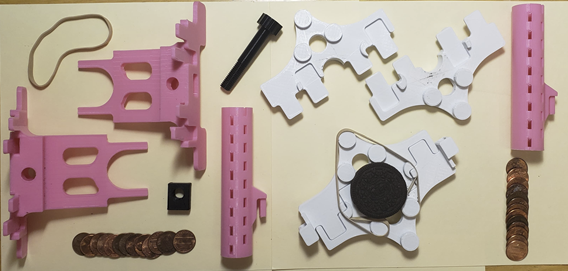
All printed and required parts are shown here, with one Oreo clamp assembled around a cookie.

Fully-printed and assembled Oreometer, ready for use!
Animated Oreometer assembly video: https://youtu.be/V_gaJ4po_Nw
This section walks you through steps to use the Oreometer, with questions and activities to guide investigation.
Learning objectives
• Be able to define rheology and what it is used for
• Understand and be able to measure failure stress for soft solids
• Be able to explain why torque may be different for different cookies but material stress is the same
• Be able to define adhesive and cohesive failure and explain the difference
• Be able to make your own measurements at home and understand the results
Background
Torque is a measure of how much “twist” you apply around a point. Shear stress is the stress in the material in response to this torque and can be calculated by considering the different geometric factors. For example, a disk with small radius and a disk with large radius, made from the same material, will deform with the same shear stress, but the torque will be much greater for the larger disk. Specific equations to convert between torque and stress are included in our paper.
Rheology is the study of this material deformation for soft solids including creams, cheeses, and more, and a rheometer is the machine we use in a laboratory to measure this property, which is characterized as viscosity (for simple fluids) or rheology (for complex or non-Newtonian fluids that have a non-constant viscosity).
Oreos consist of two wafers with creme sandwiched in between. The creme-wafer interface is an adhesive contact since it is between two different materials. It is not a chemical bond, but a physical interface. The interfaces within the creme are cohesive since they are physical contact within the same material. If the Oreo breaks between the creme and wafer (a clean break), this is adhesive failure, whereas if the Oreo breaks so that creme is on both wafers, this is cohesive failure.
Introduction
“Frugal science” is a method of making high-tech but low-cost equipment for scientific measurements outside of research labs. Rheometers and other lab equipment are typically very expensive, over USD$100,000, but our 3D printed Oreo twister (which we will call the “Oreometer”) provides a simple, cheap way to study the same basic fluid properties.
Materials
- One box of Oreos (any type), sandwich cookie, or fluid between disks that is approximately Oreo-sized
- 100 Pennies
- 2 rubber bands
- Printed parts from CAD files
- Optional: milk
Procedure:
- Load Oreo into clamps using the suggested rubber band configuration or a configuration of your choosing. Keep in mind that there are two types of clamp halves: front clamp and back clamp. A front clamp has a slot on the side for a penny castle whereas a back clamp does not. Be sure to place clamps of the same type together.
- What do different rubber band patterns on the clamps do? Can you make one that is too tight? Too loose?
- Load the clamped Oreo onto the two base halves (which are identical) and adjust the spacing using the nut and bolt. Twist the bolt clockwise until the base halves are close enough to keep the clamps from falling out, but not so close that they squeeze the clamps.
- Why shouldn’t the base halves be moved so close together that they squeeze the clamps?
- Place the two penny castles into the slots located on the sides of the front clamp.
- Why are there two penny castles? Can you use just one?
- Start inserting pennies into one of the penny castles until the Oreo twists apart. For easy counting, the windows on the outside of the penny castle are each 5 pennies tall. Below the center of the front clamp, there are tick marks to indicate whether the Oreo has begun to twist. The tick marks are spaced 9° apart, or 1/40th of a revolution.
- Before creme failure, how much does the Oreo rotate, if at all? After failure, is the creme split evenly onto both wafers or does one wafer have more creme than the other?
- Record the number of pennies required to cause the Oreo to twist apart. Unclamp the broken Oreo and test out several more Oreos.
-
What was the maximum and minimum number of pennies required to twist an Oreo? What was the average number of pennies? Given that the mass of a penny is 2.5 grams and the arm length of the Oreometer is 90 mm, what torque and stress does this correspond to?
-
Extra 1: See if you can get the Oreo to twist by letting pennies sit in the penny castle for an extended time. Even with low stresses, Oreos will continue to deform slightly, which is called creep, and sometimes they will suddenly fail, even though no more stress has been applied. This phenomenon is known as delayed yielding, and is related to how landslides and avalanches happen. (Snow and mud are yield stress fluids!) Record the number of pennies and time it took for the Oreo to twist. What is the least number of pennies you can use and still see it yield?
-
Extra 2: Test out stale, heated, or frozen Oreos. What effect does this have on the number or pennies required to twist the Oreos? How is the creme distributed on the Oreos affected? What temperature gives the cleanest wafer/creme surface?
-
Extra 3: Test out different Oreo variations such as mint or Double Stuf or even other cookies of similar shape. How many pennies are required now? Is the creme distribution affected?
-
Extra 4 (design skills required!): Design and print your own cookie "wafers" as two disks that are 46 mm in diameter and about 2 mm in thickness. For best results, add some texture to one surface. Alternatively, find other cookies or crackers of similar size. Use these to make your own sandwiches with other complex fluids in between. How does the yield stress of peanut butter compare to Oreo creme? Hot sauce? Can you find a stronger fluid in your kitchen?
-
What other questions do you have?
Some observation and results (click to reveal)
In our lab, we found that normal Oreos take around 30-60 pennies to break. However, Oreos that have been heated, chilled, or become stale will likely require more or fewer pennies.
It is common to see clean breaks (adhesive failure profiles). This is likely due to the way Oreo-like cookies are manufactured, where the creme seems to bond more weakly with one of the wafers. Oftentimes, within an Oreo box most of the weak wafer-creme bonds will be on the same side for all the Oreos, and also affected by the location of the Oreos inside the box.
The record in our lab for the fewest pennies to break an Oreo open was 10. We left our Oreometer set up overnight, and it was twisted open by the next morning (due to delayed yielding). Can you make it happen with fewer?
Find more details of our observations in our full paper in the Physics of Fluids