Scrollimate focuses on features and functions related to scrolling, animations (hence the name), but includes also other functionalities.
- Setup and Usage
- The Methods
This is a jQuery Plugin, so you'll need jQuery. Include jQuery. Include scrollimate.js.
<script src="path/to/your/scripts/jquery-2.1.4.min.js"></script>
<script src="path/to/your/scripts/scrollimate.js"></script>
Each of the functionalities are implemented as methods of the scrollimate object. That means you just need to call the method you want, or you can use the handy init function and just need one call for them all!
(Parallax is called via the init method)
The init function takes a single argument, a JavaScript Object. Inidicate the name of the function as the key, and the arguments for that function as the value, like so:
scrollimate.init({
    'saScroll', true
});
will initiate the Smooth Anchor Sroll and Parallax functions
The init function takes a single argument, an array of the methods you want to use, for example:
scrollimate.init(['saScroll', 'parallax'])
will initiate the Smooth Anchor Sroll and Parallax functions
While you can call (almost) every method via init, you can also call the methods each manually, such as:
scrollimate.saTabs();
which will initiate the saTabs Function
Many Methods can be called as an extension of jQuery. See full documentation below for more detailed instructions.
$('.your-selector').saRipple({
    color: "rgba(0,255,0,0.7)",
    interaction: "mouseover",
    noclass: true
});
What does Scrollimate Entail? Let's take a look:

The original scrollimate function. You have to call SA Parallax with the init function.
- Follow the Instructions for Scrollimate Installation
- add the following data-attribute to the element you wish to parallax scroll:
data-sabglayer - Call the init Function with:
<script> scrollimate.init(['saParallax']); </script>
You can tell the data-sabglayer attribute how your parallax animation should behave.
By Default, it will simply start at the top and will scroll at half the speed that the page once you start scrolling.
The data-sabglayer will take two arguments:
- Supply a single number like so:
data-sabglayer="0.5"
Supply it a single number, this is the speed at which you want the element to scroll relative to the page speed. To create several layers of parallax, or simply to more fine-tune the effect, you can se the data-sabglayer attribute to any floating point value between 0 (which will cause the element to scroll normally) and 2 (which will cause the element to appear static on the page).
You can also use any number larger than 2, which will cause the element to scroll in the opposite direction of the scroll. And yes, you can also use negative numbers and make the element scroll faster than the page!

See how in this example, the top hero-image parallaxes right away, but each following elements (images) only when it comes into view, and consistently for each element? SA Parallax can do that!
You can supply more than one argument to SA Parallax. This is useful if the element you wish to parallax is not at the top. Supplying two elements will cause the eement to only start parallaxing once in view.
NEW in 1.3:
- Supply two arguments (separated by comma), with the second argument set to center like so:
data-sabglayer="-0.5, center"
This will calculate the parallax so that the element will be in it's “ideal” position when centered vertically on the screen. Plus, (ideally) you would never see it parallax out of view in either direction. (Mileage may vary...)
- Supply a second argument separated by comma like so:
data-sabglayer="-0.5, 0.25"
With this, you can define the position of parallaxing element. This is useful if you want the fine-control the element’s be position. This number is the fraction it is offset by it’s own hight. For example, 0.5 on a 500px tall element will cause it to be offset by 250px, 1 by 500px, etc.
If you don't want the element to be offset, but not start parallaxing until in view, simply set the second number to 0, like so: data-sabglayer="1.5, 0"
By default, parallax will not be enabled on screen sizes smaller than 768px. (Sidenote: This applies to initial screen-size: Whatever your page loaded with, determined whether or not parallax is enabled. This is by design so that check is not performed over and over).
You can re-enable mobile parallax by calling the enableMobile before the saParallax method like so:
<script> scrollimate.init(['enableMobile', 'saParallax']); </script>
(If you are running the init function with other methods the order doens't matter, as long as saParallax gets called last).
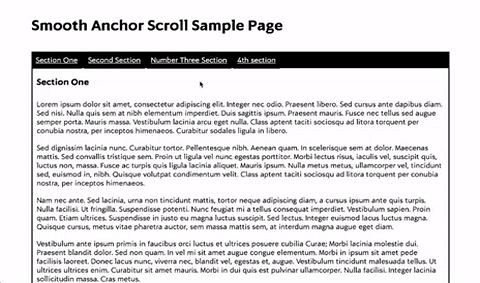
Smoothly scrolls to elements on websites that contain anchor scrolls. Instead of jumping to a point in the page, website scrolls smoothly (and at a consistent speed) to each anchor.
- Follow the Instructions for Scrollimate Installation
- Call the Method once on the page:
<script> scrollimate.saScroll; </script>(You may also use the init function by supplying 'saScroll' as an additional argument)
The above method cancels any scroll on user-input, in order to preserve and respect the user's scroll before the automatic scroll. Alternatively, you can force the scroll by calling the method with a force argument like so:
scrollimate.saScroll('force')
There is also a provision for a callback, just remember to decide on the force parameter first. Usage:
scrollimate.saScroll( false, you-callback() )
_
Create simple, bookmarable, browser-history-respecting tab content on any website. No cluttered Markup: You just need to add one custom data-attribute.
You need to have two things:
In the collection of links, link the links via #s to the sections.
For example, you may have two divs, one has the id of id="one", the other id="two"
Your links should link to href="#one" and href="#two".
Wrap each link in a parent. (This is important for styling, or if you are using a list)
Wrap each parent to a link in another parent, and give it the following attribute
"data-tabscrollnavcontainer".
<ul data-tabscrollnavcontainer>
    <li>
        <a href="#one">One</a>
    </li>
    <li>
        <a href="#two">Two</a>
    </li>
</ul>
<div data-tabscrollnavcontainer>
    <div>
        <div>
            <a href="#one">One</a>
        </div>
        <div>
            <a href="#two">Two</a>
        </div>
    </div>
</div>
I recommend it to look something like this:
<div>
    <div id="one">
        ...
    </div>
    <div id="tow">
        ...
    </div>
</div>
<article>
    <section id="one">
        ...
    </section>
    <section id="two">
        ...
    </section>
</article>
Note: (The class for the active tab on the navigation is .tabscroll_activeNavi)
- Follow the Instructions for Scrollimate Installation
- Call the Method once on the page:
<script> scrollimate.saTabs; </script>(You may also use the init function by supplying 'saTabs' as an additional argument)
You can control the type of transition between tabs with the data-tabscrollnavcontainer attribute. You can set it to:
fadeslide- or leave blank for no transition at all
You may not want your tabs to be indexed / indexable. SA Tabs keeps track of your tabs via the URL, by adding a fragment (“hash”) to the end of the URL. But what if you have an application on your page that already does that?
Now SA Tabs can accomodate, by simply calling the nonIDTabs(); method some time after the initial setup. (You can it as an additional argument to the init method, after the saTabs Method) This will not index your tabs, not write to the URL, but still keep the same markup and functionality for your tabs.
You want to have a link within your navigation that does something else. An external link, a popup link, etc. This is possible by simply adding the data-saexclude attribute to the anchor element.
You may not want your tabs to be indexed / indexable. Tabscroll keeps track of your tabs via the URL, by adding a fragment (“hash”) to the end of the URL. But what if you have an application on your page that already does that?
Now Tabscroll can accomodate, by simply calling the saTabs.nonIDTabs(); method some time after you included tabscroll.js. This will not index your tabs, not write to the URL, but still keep the same markup and functionality for your tabs.
SA Tabs triggers a custom event, satabchanged when a tab change is invoked. You can listen to this event like so $(document).on('satabchanged', your-custom-function());
SA Tabs auto-generated markup is using best practices according to https://www.w3.org/TR/wai-aria-practices/examples/tabs/tabs-1/tabs.html
Will add a specifiable class to any element when a target element is scrolled, and remove it when it stops scrolling.
- Follow the Instructions for Installation
- Call the Method once on the page:
<script> scrollimate.scrollClass( $(window), $('.topnav'), 'scrolling' ); </script>
SA Scroll Class takes three arguments:
- complete jQuery Selector of the element you want to scroll (in the above example it would be the entire window, but it can be an overflow-ed div, or really anything )
- complete jQuery selector of the element that you want to add the class to (in the above example we are adding a class to the element with the
.topnavclass) - The name of the class you want to add
In the above example, the .topnav Element will get the scrolling class when the window is scrolled.
(examples: https://codepen.io/justMoritz/pen/vJVZVd)
A simple horizontal accordion for an infinite number of elements.
- You will need any number elements with the same selector, for example 5 divs with the class of
element. please float these elements left, inline or inline-block the, so they will be next to each other . Clearing the float etc. will be up to you. - Follow the Instructions for Scrollimate Installation
- Call the Method once on the page with two arguments like so:
<script> scrollimate.saAccordion('.element', '66.66'); </script>
SA Accordion takes at least one, but can take four arguments:
- The target elements selector (in the above example every element with the
.elementclass) - (optional) The width (in percent) of the exanded element. If none is provided, the default width is 50%.
- (optional) The type of event that raises the change over the element selected in argument 1. Can be click, mouseover, mouseout, etc. If left blank, defaults to CLICK
- (optional) You can determin the height of the element, in pixels, or in percent of the width of the individual element. (This is done via padding-bottom)
You can run it via jQuery as well: $('.secondElement').saAccordion();. You can pass arguments as well: $('.secondElement').saAccordion('66.66', 'mouseover', '100px');
Please note that SA Accordion works with float: left;, and will take up 100% of the width of its container, so please plan your markup accordingly.
(DEMO: https://codepen.io/justMoritz/pen/veMmbE)
If you like the idea of having a link underlined, because it makes them easily identifyable as a to read as a link; but you find that it makes them hard to imposisble to style, this method is for you.
This method will wrap each word inside a link (anchor tag) in it's own span, which you can then style (or style it's pseudo element). See the Demo link for some examples.
for full functianlity (aka, with arguments), this method can current not be called with the init method :(
The following will target all links:
- Follow the Instructions for Scrollimate Installation
- Call the Method once on the page with two arguments like so:
<script> scrollimate.saUnderline(); </script> - Apply the styles you want to
a span:before(or something simliar).
note: You can call this basic setup via this init() method.
If you pass a parameter, it will target
1 Same as above, but ...
2. ...call with scrollimate.saUnderline( $('your-selector-here') );
$('.another_dimension').saUnderline();. It's really that simple!
(DEMO: https://codepen.io/justMoritz/pen/qVxPBZ)
Add a material-design-like ripple effect that activates on click.
for full functianlity (aka, with arguments), this method can current not be called with the init method :(
- Follow the Instructions for Scrollimate Installation
- Give the elements you want to have the ripple-effect a class of
.ripple. - Call the Method once on the page with like so:
<script> scrollimate.saRipple(); </script>
note: You can call this basic setup via this init() method.
You can also call it via jQuery like $('.your-selector').saRipple();
You can set the ripple color in 3 ways:
- use default: White. Nothin is needed other than the call the function one time on the page
- When initializing saRipple, you can set the color by passing it as an argument, like so
scrollimate.saRipple({color: #ff4400}); - add the
data-ripplecolorattribute the dom element, and put the complete CSS color therein
You can also target just a specifc element by passing a target of the complete jQuery selector like so: scrollimate.saRipple({target: $(your-selector-here) });
You can also cause the ripple effect on mouseover, etc. by passing an interaction argument like so: scrollimate.saRipple({interaction: 'mouseover' });
You can also set noclass to true, in which case the target element will not inherit the basic styles required to make ripple effect work. (display: inline-block, overflow: hidden, position relative). Remember to apply them manually!
Finally, you can combile all the arments and may end up with something like this:
scrollimate.saRipple({
  color: 'rgba(0,255,0,0.05)',
  interaction: 'mouseover',
  target: $('.mouseclass'),
  noclass: true
});
$('.your-selector').saRipple({
    color: "rgba(0,255,0,0.7)",
    interaction: "mouseover",
    noclass: true
});
note: You can currently not call this advanced setup via this init() method.
(DEMO: https://codepen.io/justMoritz/pen/KYbypw)
Adds a “springy Element” method which allows items to be slightly dragged by the curser or touch events and spring back when released, out-bounded or travelled a certain amount of pixels.
Call on any jQuery-able element like so: $('your-selector-here').springyElement();
note: Calling this method via the init() method is currently untested !
Takes one argument, the amount of pixels an element can travel (20px by default) $('your-selector-here').springyElement(200);
note: You can currently not call this advanced setup via this init() method.
Simple jQuery “stuff is scrolled into view so let's add a class” plugin
scrollstuff Extends the jQuery Object with a new method, so the easiest usage is like this:
$('your-selector-here').scrollstuff({});
You van also run scrollstuff with arguments
$('your-selector-here').scrollstuff({
  classname: 'custom-class-name',
  delay: 700,
  repeat: true
});
The scrollstuff object current accepts the following arguments in object notation:
- classname (string) — name of the class to attach to object.
'this--nowinview'by default. - delay int — delay until class is added, in milliseconds
- repeat boolean whether or not the animation repeats when it's out and in of view again