Allows for easy use of the 74HC595 Shift Register with a Raspberry Pi
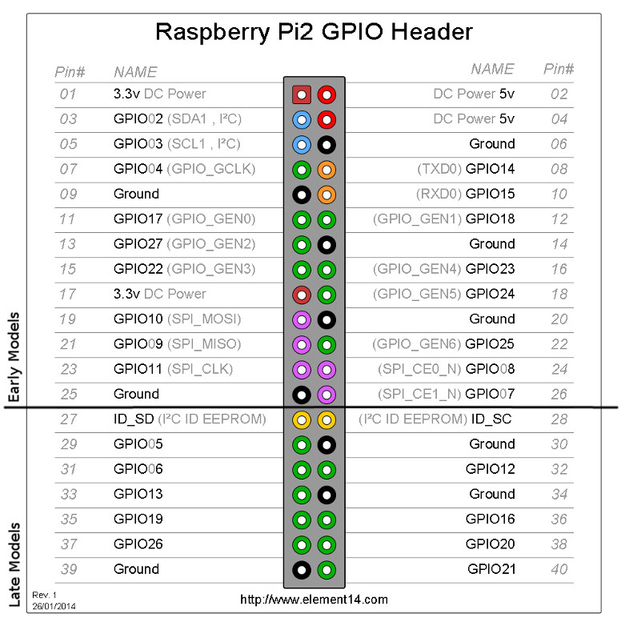
$ pip install pi74HC595| Raspberry Pi Pinout | 74HC595 Pinout |
|---|---|
 |
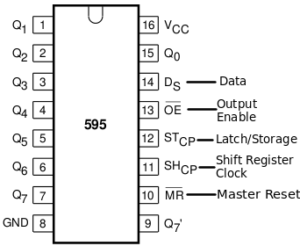 |
You will need to connect:
-
Vcc and MR to 5V
-
GND to Ground
-
Ds to any GPIO pin (DS pin during initialization)
-
STcp to any GPIO pin (ST pin during initialization)
-
SHcp to any GPIO pin (SH pin during initialization)
-
Q0 -> Q7 to anything you want to output to (not all have to be used)
-
Q7' to Ds on the next pi74HC595 if Daisy Chaining (multiple 74HC595s in series)
gpio.setmode() can be either gpio.BOARD or gpio.BCM (pin numbering vs GPIO numbering).
from pi74HC595 import pi74HC595
import RPi.GPIO as gpio

gpio.setmode(gpio.BOARD)
shift_register = pi74HC595()
This package's default pins assumes gpio.BOARD as default
def __init__(
        DS: int = 11, # gpio.BOARD
        ST: int = 13,
        SH: int = 15,
        daisy_chain: int = 1,
)You will likely need to change the Raspberry Pi pins during initialization. Remember to check whether you used gpio.BOARD or gpio.BCM in your program.
shift_register = pi74HC595(7, 37, 22)These can also be set after initialization with...
shift_register.set_ds(7) # Any GPIO pin on Raspberry Pi
shift_register.set_sh(37)
shift_register.set_st(22)If you are daisy chaining multiple 74HC595s then you can set daisy_chain to your number of 74HC595s during initialization.
shift_register = pi74HC595(7, 37, 22, 2)

shift_register = pi74HC595(daisy_chain = 13)

# etc
This can also be done after initialization with...
shift_register.set_daisy_chain(3) # Any positive intWill accept both Integers (1 and 0 only) as well as Boolean values (True and False)
shift_register.set_by_list([0, 1, 0, 1, 1, 1, 0, 0])
shift_register.set_by_list([False, True, False,...])This was created with the intent to send a single 1 or 0 for on or off, but can also function with a larger int as it converts to binary
shift_register.set_by_int(0)
shift_register.set_by_int(1)

shift_register.set_by_int(12) #1100
shift_register.set_by_int(9999) #1111100111Can send a single True or False for on or off.
shift_register.set_by_bool(True)
shift_register.set_by_bool(False)Sets each value to off (0)
shift_register.clear()Returns the current values
shift_register.get_values()[0, 0, 0, 0, 0, 0, 0, 0]
It took me a while to finally understand how the 74HC595 worked since I had no prior hardware experience. These are the tutorials I used to understand the shift register.
MIT License. Please see License File for more information.