Instant messaging connects people wherever they are and allows them to communicate with others in real time. With built-in user interfaces (UI) for the conversation list and contact list, the Agora Chat UI Samples enables you to quickly embed real-time messaging into your app without requiring extra effort on the UI.
This page shows a sample code to add peer-to-peer messaging into your app by using the Agora Chat UI Samples.
The following figure shows the workflow of how clients send and receive peer-to-peer messages:
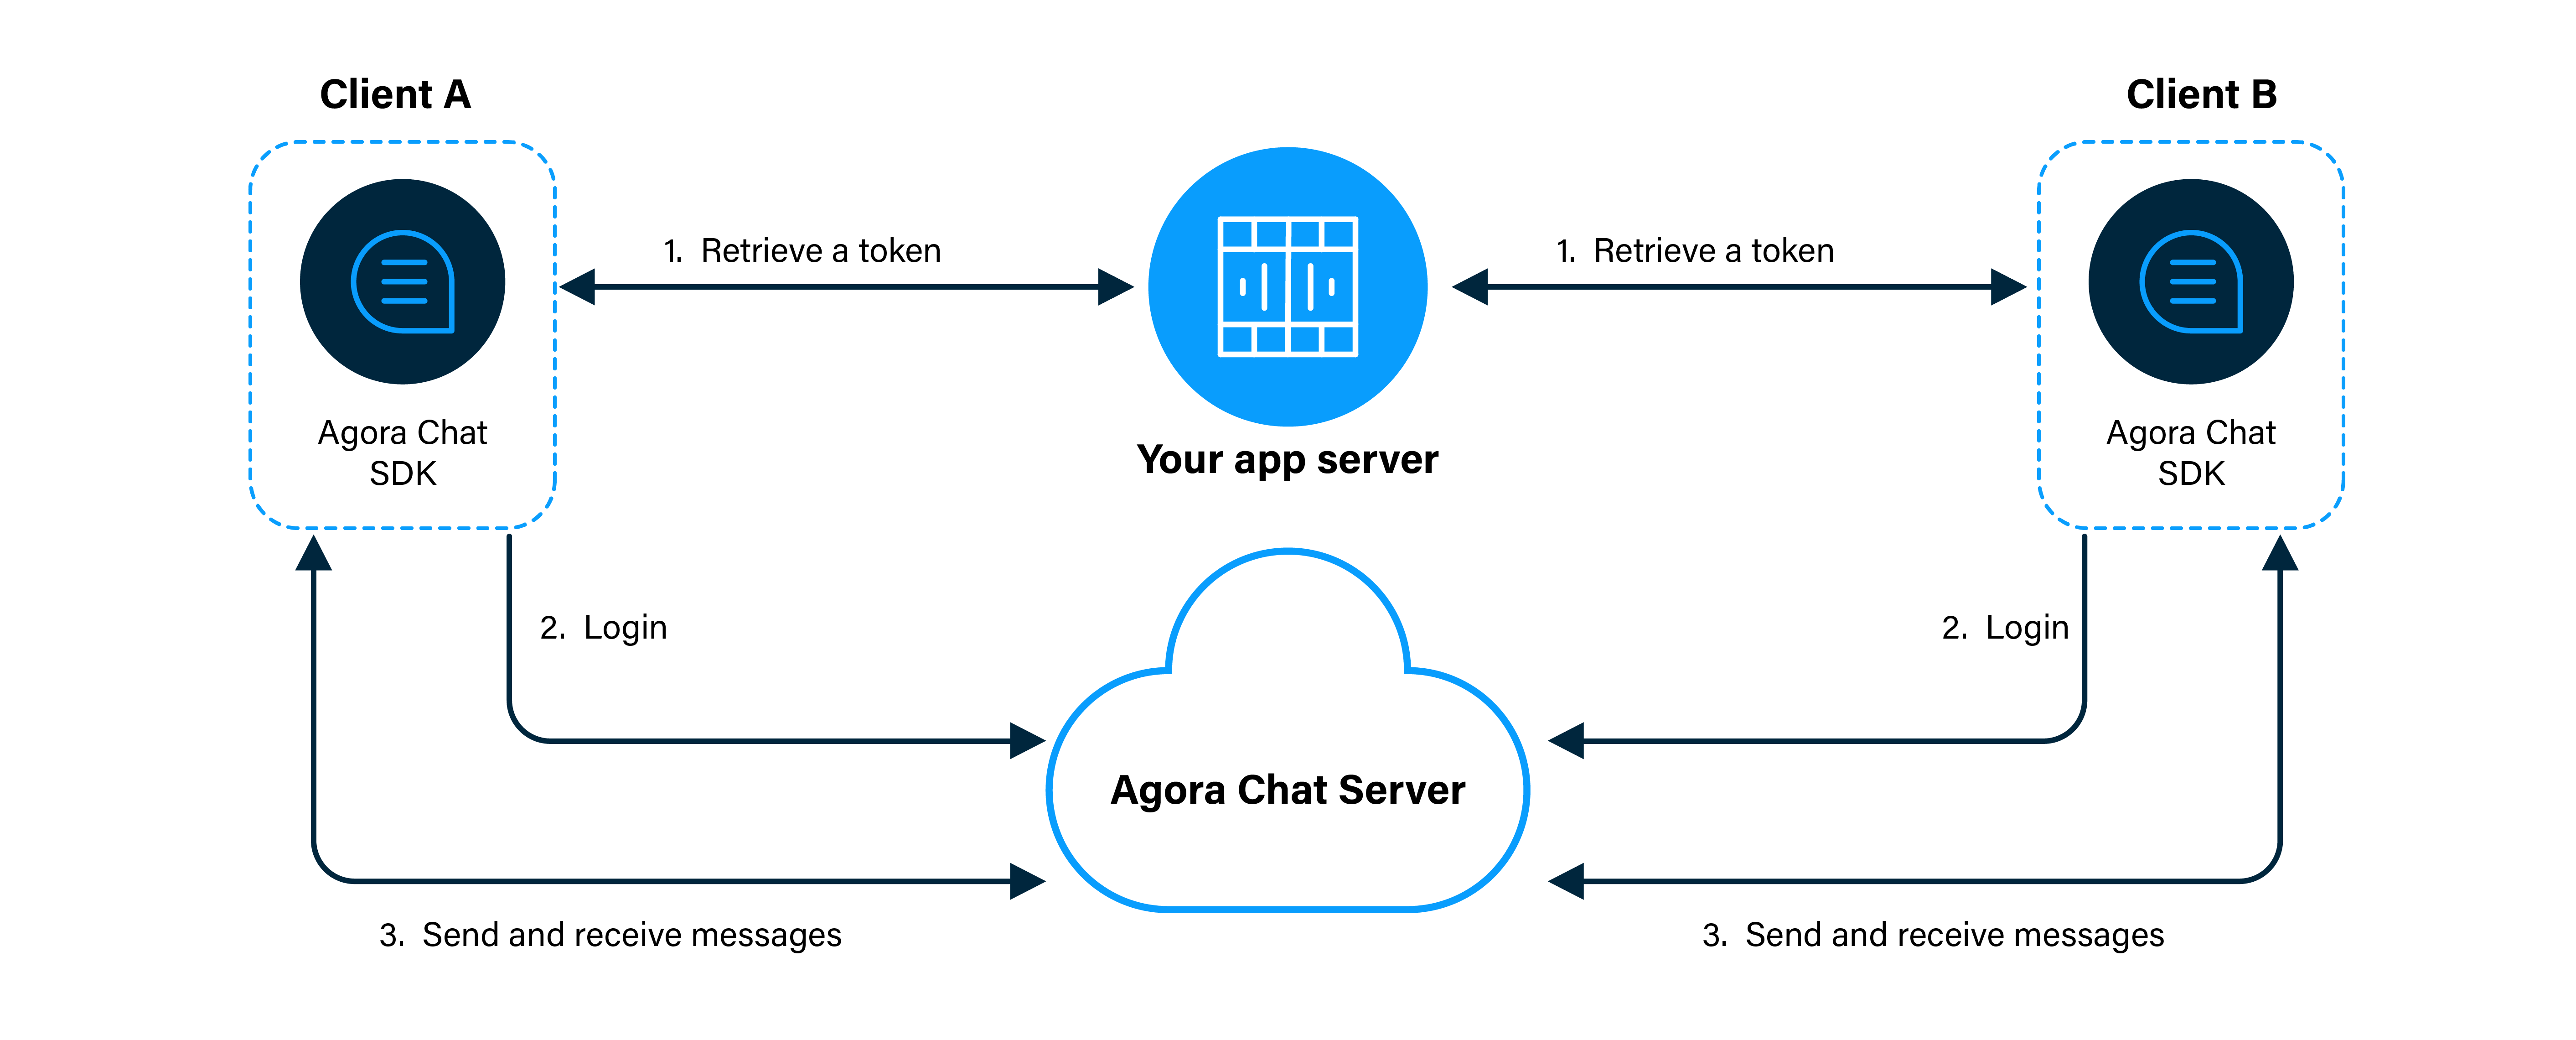
- Clients retrieve a token from your app server.
- Client A and Client B log in to Agora Chat.
- Client A sends a message to Client B. The message is sent to the Agora Chat server and the server delivers the message to Client B. When Client B receives the message, the SDK triggers an event. Client B listens for the event and gets the message.
In order to follow the procedure in this page, you must have:
- React 16.8.0 or later
- React DOM 16.8.0 or later
- A Windows or macOS computer that has a browser supported by the Agora Chat SDK:
- Internet Explorer 11 or later
- Edge 43 or later
- Firefox 10 or later
- Chrome 54 or later
- Safari 11 or later
- An App Key.
- A valid Agora account.
- A valid Agora project with an App Key.
This section describes how to register a user at Agora Console and generate a temporary token.
To generate a user ID, do the following:
- On the Project Management page, click Config for the project you want to use.
- On the Edit Project page, click Config next to Chat below Features.
- In the left-navigation pane, select Operation Management > User and click Create User.
- In the Create User dialog box, fill in the User ID, Nickname, and Password, and click Save to create a user.
To ensure communication security, Agora recommends using tokens to authenticate users logging in to an Agora Chat system.
For testing purposes, Agora Console supports generating Agora chat tokens. To generate an Agora chat token, do the following:
- On the Project Management page, click Config for the project you want to use.
- On the Edit Project page, click Config next to Chat below Features.
- In the Data Center section of the Application Information page, enter the user ID in the Chat User Temp Token box and click Generate to generate a token with user privileges.
- Install a CLI tool.
npm install create-react-app
- Create an my-app project.
npx create-react-app my-app
cd my-app
The project directory is as follows:
├── package.json
├── public # The static directory of Webpack.
│ ├── favicon.ico
│ ├── index.html # The default single-page app.
│ └── manifest.json
├── src
│ ├── App.css # The CSS of the app's root component.
│ ├── App.js # The app component code.
│ ├── App.test.js
│ ├── index.css # The style of the startup file.
│ ├── index.js # The startup file.
│ ├── logo.svg
│ └── serviceWorker.js
└── yarn.lock
- To install the Web Chat UIKit with npm, run the following command:
npm install agora-chat-uikit --save
- To Install Agora chat UIKit for Web with Yarn, run the following command:
yarn add agora-chat-uikit
Import agora-chat-uikit into your code.
// App.js
import React, { Component, useEffect } from "react";
import {
  Provider,
  Chat,
  ConversationList,
  useClient,
  rootStore,
} from "agora-chat-uikit";
import "agora-chat-uikit/style.css";

const appKey = "you app key"; // your appKey
const user = ""; // your user ID
const agoraToken = ""; // agora chat token

const conversation = {
  chatType: "singleChat", // 'singleChat' || 'groupChat'
  conversationId: "agora", // target user id or group id
  name: "Agora", // target user nickname or group name
  lastMessage: {},
};
const ChatApp = () => {
  useEffect(() => {
    rootStore.conversationStore.addConversation(conversation);
  }, []);

  return (
    <div>
      <div>
        <ConversationList />
      </div>
      <div>
        <Chat />
      </div>
    </div>
  );
};

class App extends Component {
  render() {
    return (
      <Provider
        initConfig={{
          appKey,
          userId: user,
          token: agoraToken,
        }}
        onError={(err) => {
          console.log("error: ", err);
        }}
      >
        <ChatApp />
      </Provider>
    );
  }
}

export default App;In your terminal, run the following command to launch the app:
npm run start
Now, you can see your app in the browser.

If the default App Key is used, the UIKit allows you to send the text, emoji, image, and voice messages.
Note
If a custom App Key is used, no contact is available by default and you need to first add contacts or join a group.
Agora provides an open-source Web project for Agora Chat UIKit on GitHub. You can clone and run the project or reference the logic to create a project that integrates agora-chat-uikit.