Note: This is the mynewt branch that supports Watch Faces built with Rust on Mynewt
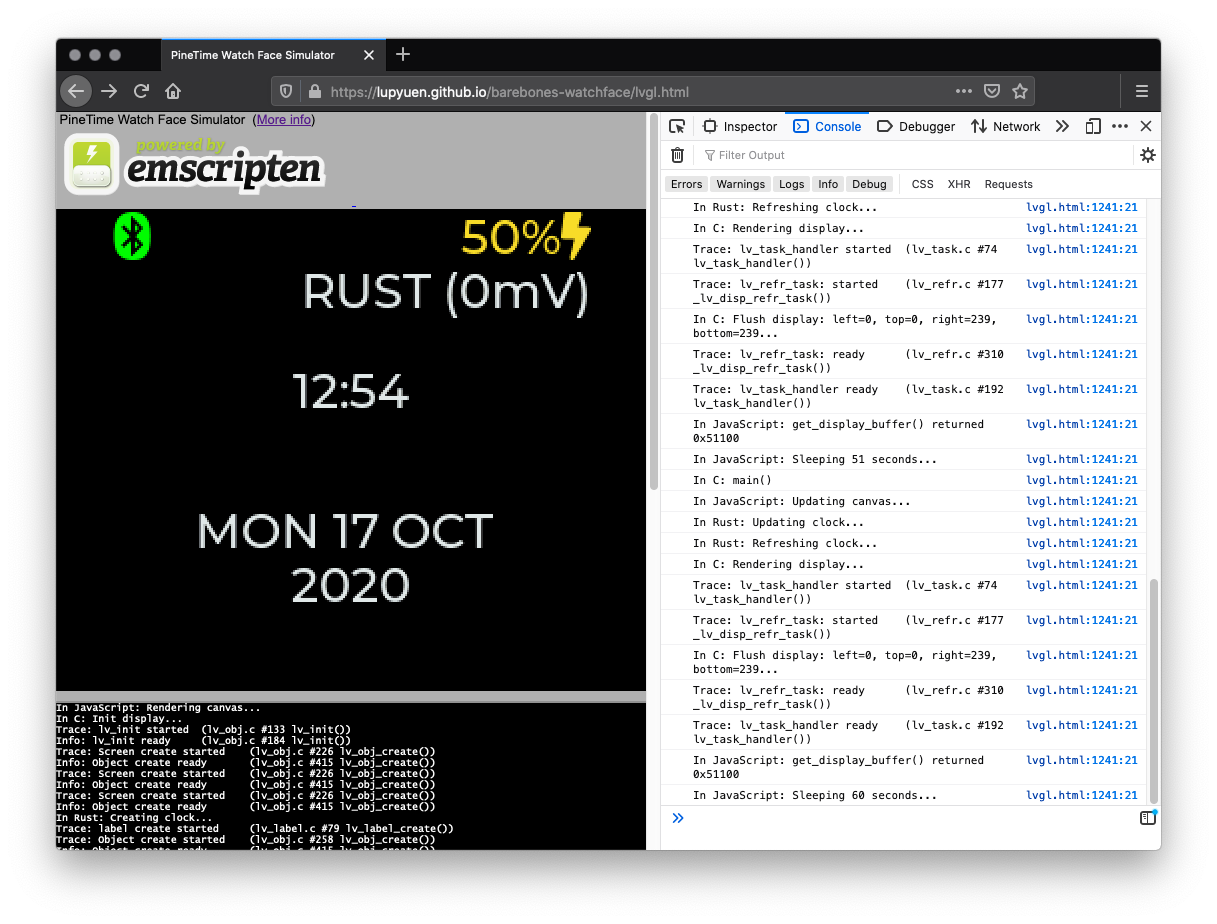
Simulate Rust on Mynewt Watch Face in Web Browser (with WebAssembly), for easier development of custom watch faces
-
Compiles actual Rust On Mynewt Watch Face from Rust to WebAssembly without any code changes
-
Uses GitHub Actions Workflow to build any Rust Watch Face into WebAssembly. Browse Rust Watch Faces
-
Renders LVGL to HTML Canvas directly via WebAssembly, without using SDL2. See
lvgl.html -
Supports RGB565 Framebuffer Format used by PineTime Display Controller, so that bitmaps will be rendered correctly
-
Shows current Date and Time
-
Supports multiple Fonts and Bitmaps
-
Accept Touch Input for LVGL
-
Allow Watch Faces to be built online in Rust with online preview
-
"Create Your Own PineTime Watch Face in Rust... And Publish on crates.io"
-
"Preview PineTime Watch Faces in your Web Browser with WebAssembly"
To build PineTime Watch Face Simulator on Linux, macOS or Windows (without WSL), follow these steps based on the GitHub Actions Workflow .github/workflows/simulator.yml...
-
Install emscripten (
emsdk) and wabt. See instructions below. -
Install Rust from
rustup.rs -
Enter...
git clone --branch mynewt  https://github.com/AppKaki/lvgl-wasm
cd lvgl-wasm
The
emsdkandlvgl-wasmfolders should be installed at the same folder level. -
Build the Rust app...
rustup default nightly
rustup target add wasm32-unknown-emscripten
cargo build
Ignore this error, we'll fix in the next step...
error[E0432]: unresolved import `ad` --> /home/runner/.cargo/registry/src/github.com-1ecc6299db9ec823/cty-0.1.5/src/lib.rs:8:9 pub use ad::*; ^^ maybe a missing crate `ad`? -
Change
$HOME/.cargo/registry/src/github.com-*/cty-0.1.5/src/lib.rsFrom...
target_arch = "arm"To...
target_arch = "arm", target_arch = "wasm32"Here is the
sedscript that makes the change...cat $HOME/.cargo/registry/src/github.com-*/cty-0.1.5/src/lib.rs \ | sed 's/target_arch = "arm"/target_arch = "arm", target_arch = "wasm32"/' \ >/tmp/lib.rs cp /tmp/lib.rs $HOME/.cargo/registry/src/github.com-*/cty-0.1.5/src/lib.rs rm /tmp/lib.rs
-
(Optional) Inject the Watch Face Crate into lvgl-wasm.
By default lvgl-wasm builds the WebAssembly Simulator with the Barebones Watch Face. Skip this step to use the default Watch Face.
Assuming that
my_watchface::MyWatchFaceis the Watch Face that will be built into the Simulator...Change
mynewt/wasm/Cargo.tomlfrombarebones-watchface = "x.x.x"to
# If my-watchface is on crates.io...
my-watchface = "x.x.x"

# If my-watchface is on GitHub...
my-watchface = { git = "https://github.com/..." }
Change
mynewt/wasm/src/lib.rsfromuse barebones_watchface::watchface::lvgl::mynewt::fill_zero; use barebones_watchface::watchface::{self, WatchFace}; type WatchFaceType = barebones_watchface::BarebonesWatchFace;to
use my_watchface::watchface::lvgl::mynewt::fill_zero;
use my_watchface::watchface::{self, WatchFace};
type WatchFaceType = my_watchface::MyWatchFace;
For the
sedscript, seebarebones-watchface/.github/workflows/simulator.yml -
Build the LVGL WebAssembly app containing our Watch Face...
cargo build
source emsdk/emsdk_env.sh
make -f mynewt/Makefile
For Windows (without WSL): See the build instructions in
mynewt/build.cmd -
If we see this error...
emscripten:ERROR: emscript: failure to parse metadata output from wasm-emscripten-finalizeRevert to the older working version of emscripten...
emsdk/emsdk install 2.0.6
make -f mynewt/Makefile
-
Copy the generated WebAssembly files to the
docsfolder (used by GitHub Pages)...cp wasm/lvgl.js wasm/lvgl.wasm docs
For Windows (without WSL):
copy wasm/lvgl.js wasm/lvgl.wasm docsWe don't need
lvgl.htmlbecausedocsalready contains a version oflvgl.htmlwith custom JavaScript. -
Start a Web Server for the
docsfolder, because WebAssembly doesn't work when opened from the filesystem.For Linux: Use
darkhttpd...darkhttpd docs
For macOS and Windows: Use the Chrome Extension Web Server for Chrome and set the folder to
docs -
Launch a Web Browser and open the URL shown by
darkhttpdor Web Server for Chrome.Enter
lvgl.htmlin the URL bar to view the PineTime Watch Face Simulator.
In case of problems, compare with the following...
-
GitHub Actions build log (look for
mynewtbranch)
To install emscripten on plain old Windows without WSL...
# Get the emsdk repo
git clone https://github.com/emscripten-core/emsdk.git

# Enter that directory
cd emsdk

# Download and install version 2.0.6 of the SDK tools. The latest version 2.0.7 fails to build lvgl-wasm.
emsdk.bat install 2.0.6

# Make version 2.0.6 active for the current user (writes .emscripten file)
emsdk.bat activate 2.0.6

# Activate PATH and other environment variables in the current terminal
emsdk_env.bat

# Show version
emcc --version
emcc --version Enter these commands according to the docs...
# Get the emsdk repo
git clone https://github.com/emscripten-core/emsdk.git

# Enter that directory
cd emsdk

# Download and install version 2.0.6 of the SDK tools. The latest version 2.0.7 fails to build lvgl-wasm.
./emsdk install 2.0.6

# Make version 2.0.6 active for the current user (writes .emscripten file)
./emsdk activate 2.0.6

# Activate PATH and other environment variables in the current terminal
source ./emsdk_env.sh

# Show version
emcc --version
emcc --version
If we see this error...
+ exec python ./emsdk.py install latest
Installing SDK 'sdk-releases-upstream-d7a29d82b320e471203b69d43aaf03b560eedc54-64bit'..
Installing tool 'node-12.18.1-64bit'..
Error: Downloading URL 'https://storage.googleapis.com/webassembly/emscripten-releases-builds/deps/node-v12.18.1-darwin-x64.tar.gz': <urlopen error [SSL: CERTIFICATE_VERIFY_FAILED] certificate verify failed (_ssl.c:777)>
Warning: Possibly SSL/TLS issue. Update or install Python SSL root certificates (2048-bit or greater) supplied in Python folder or https://pypi.org/project/certifi/ and try again.
Installation failed!
Try installing the latest Python 3 via brew install. Then edit the shell script emsdk/emsdk and set EMSDK_PYTHON to the path of the installed Python 3 executable...
# Insert this line before exec
EMSDK_PYTHON=/usr/local/Cellar/python@3.8/3.8.5/bin/python3

exec "$EMSDK_PYTHON" "$0.py" "$@"
(If you're using plain old Windows without WSL, check the instructions above under "Install emscripten on Windows Without WSL")
To install emscripten on Ubuntu x64 and Windows WSL...
# Get the emsdk repo
git clone https://github.com/emscripten-core/emsdk.git

# Enter that directory
cd emsdk

# Download and install version 2.0.6 of the SDK tools. The latest version 2.0.7 fails to build lvgl-wasm.
./emsdk install 2.0.6

# Make version 2.0.6 active for the current user (writes .emscripten file)
./emsdk activate 2.0.6

# Activate PATH and other environment variables in the current terminal
source ./emsdk_env.sh

# Show version
emcc --version
emcc --version
Alternatively, use the prebuilt emscripten binary for Ubuntu x64...
# Download the emscripten binary from lvgl-wasm
curl -L https://github.com/AppKaki/lvgl-wasm/releases/download/v1.0.0/emsdk.tgz -o emsdk.tgz

# Unzip to emsdk
tar xzf emsdk.tgz
rm emsdk.tgz

# Activate PATH and other environment variables in the current terminal
source emsdk/emsdk_env.sh

# Show version
emcc --version
emcc --version
This is based on the GitHub Actions Workflow: .github/workflows/simulator.yml...
-
Look for the steps "Install emscripten" and "Install wabt"
-
Change
/tmpto a permanent path like~ -
Then add emscripten and wabt to the PATH...
# Add emscripten and wabt to the PATH
source ~/emsdk/emsdk_env.sh
export PATH=$PATH:~/wabt/build
Works on Pinebook Pro with Manjaro...
sudo pacman -S emscripten
sudo pacman -S wabt
source /etc/profile.d/emscripten.sh
emcc --version
# Shows emscripten version 1.39.20
wasm-as --version
# Shows binaryen version 95emscripten and binaryen will probably work, skip the rest of this section.
This will fail during the build, because emscripten 1.39 needs binaryen version 93, not 95.
We could install binaryen version 93... But emcc will fail with an error "stackSave already exists". That's because binaryen 93 generates the "stackSave" that conflicts with emscripten 1.39.20. More details here
To fix this, we install binaryen version 94, but rename it as version 93...
# Download binaryen 94
git clone --branch version_94 https://github.com/WebAssembly/binaryen
cd binaryen
nano CMakeLists.txt
Change
project(binaryen LANGUAGES C CXX VERSION 94)
To
project(binaryen LANGUAGES C CXX VERSION 93)
Then build and install binaryen...
cmake .
make -j 5
sudo cp bin/* /usr/bin
sudo cp lib/* /usr/lib
wasm-as --version
# Shows binaryen "version 93 (version_94)"
binaryen is now version 93, which is correct. Proceed to build the app...
cd lvgl-wasm
rm -rf ~/.emscripten_cache
make clean
make -j 5
The app build should complete successfully.
If we see this error...
   emcc: error: unexpected binaryen version: 95 (expected 93) [-Wversion-check] [-Werror]
   FAIL: Compilation failed!: ['/usr/lib/emscripten/emcc', '-D_GNU_SOURCE', '-o', '/tmp/tmpbe4ik5na.js', '/tmp/tmpzu5jusdg.c', '-O0', '--js-opts', '0', '--memory-init-file', '0', '-Werror', '-Wno-format', '-s', 'BOOTSTRAPPING_STRUCT_INFO=1', '-s', 'WARN_ON_UNDEFINED_SYMBOLS=0', '-s', 'STRICT=1', '-s', 'SINGLE_FILE=1']
Then we need to install the right version of binaryen (see above)
If we see this error...
   Fatal: Module::addExport: stackSave already exists
   emcc: error: '/usr/bin/wasm-emscripten-finalize --detect-features --global-base=1024 --check-stack-overflow /tmp/emscripten_temp_84xtyzya/tmpzet09r88.wasm -o /tmp/emscripten_temp_84xtyzya/tmpzet09r88.wasm.o.wasm' failed (1)
   FAIL: Compilation failed!: ['/usr/lib/emscripten/emcc', '-D_GNU_SOURCE', '-o', '/tmp/tmpzet09r88.js', '/tmp/tmpxk8zxvza.c', '-O0', '--js-opts', '0', '--memory-init-file', '0', '-Werror', '-Wno-format', '-s', 'BOOTSTRAPPING_STRUCT_INFO=1', '-s', 'WARN_ON_UNDEFINED_SYMBOLS=0', '-s', 'STRICT=1', '-s', 'SINGLE_FILE=1']
That means binaryen 93 generates the "stackSave" that conflicts with emscripten 1.39.20. More details here
We need to install branch version_94 of binaryen, change version in CMakeLists.txt to version 93 (see above)
The WebAssembly Simulator is compiled as multiple parts...
-
Watch Face Library in Rust, from
mynewt/wasmCompiled with
cargowith targetwasm32-unknown-emscripteninto a WebAssembly Static Library:target/wasm32-unknown-emscripten/debug/libwasm.aContains the selected Watch Face code and WebAssembly interface
mynewt/wasm -
LVGL Library in C, from
srcCompiled from C to WebAssembly with emscripten
-
WebAssembly Interface in C, from
wasm/lvgl.cCompiled from C to WebAssembly with emscripten
The Makefile mynewt/Makefile links the above into WebAssembly like this...
emcc -o wasm/lvgl.html \
	-Wl,--start-group \
  target/wasm32-unknown-emscripten/debug/libwasm.a \
	(List of C and C++ object files from LVGL and Sandbox) \
	-Wl,--end-group \
	-g \
	-I src/lv_core \
	-D LV_USE_DEMO_WIDGETS \
	-s WASM=1 \
    -s "EXPORTED_FUNCTIONS=[ '_main', '_get_display_buffer', '_get_display_width', '_get_display_height', '_test_display', '_init_display', '_render_display', '_render_widgets', '_create_clock', '_refresh_clock', '_update_clock' ]"
The emscripten compiler emcc generates three files in folder wasm...
-
lvgl.wasm: WebAssembly Executable Code, containing our Watch Face, LVGL and the Sandbox. Sample File -
lvgl.js: Provides the JavaScript glue that's needed to loadlvgl.wasmand run it in a Web Browser. Sample File -
lvgl.html: The HTML file that callslvgl.jsto render the user interface.We won't be using this file, because we have a custom version of
lvgl.html
EXPORTED_FUNCTIONS are the C functions that will be exposed from WebAssembly to JavaScript. See the section on "Exported Functions" below.
Because we use a custom lvgl.html, we rename the generated lvgl.html to prevent overwriting...
# Rename the HTML files so we don't overwrite the updates
mv wasm/lvgl.html wasm/lvgl.old.htmlFor troubleshooting, we may dump the text version of the WebAssembly module to lvgl.txt...
# Dump the WebAssembly modules
wasm-objdump -x wasm/lvgl.wasm >wasm/lvgl.txtThis error appears because WebAssembly is not defined for the imported C types...
error[E0432]: unresolved import `ad`
 --> /home/luppy/.cargo/registry/src/github.com-1ecc6299db9ec823/cty-0.1.5/src/lib.rs:8:9
  |
8 | pub use ad::*;
  |         ^^ maybe a missing crate `ad`?
Edit ~/.cargo/registry/src/github.com-*/cty-0.1.5/src/lib.rs
Under aarch64, insert a line for wasm32...
#[cfg(any(target_arch = "aarch64",
          target_arch = "arm",
          target_arch = "asmjs",
          target_arch = "powerpc",
          target_arch = "powerpc64",
          target_arch = "s390x",
          target_arch = "wasm32"))]
mod ad {
    pub type c_char = ::c_uchar;

    pub type c_int = i32;
    pub type c_uint = u32;
}
If we see this error...
error: language item required, but not found: `eh_personality`
Check Cargo.toml...
[profile.dev]
panic = "abort" # Disable stack unwinding on panicOur WebAssembly Simulator runs in a Web Browser based on WebAssembly (somewhat similar to Java Applets). More about WebAssembly
Our Watch Face Crate calls functions from two providers...
-
LVGL Library (Version 7) for UI widgets
-
PineTime Watch Face Framework for current date / time, Bluetooth status and power status
lvgl-wasm simulates the minimal set of functions needed for rendering Watch Faces.
Hence lvgl-wasm works like a Sandbox. Here's how the Sandbox works...
The Sandbox exports the following WebAssembly functions from Rust to JavaScript...
These functions create the Watch Face, render the LVGL widgets on the Watch Face, and update the time...
-
create_clock()Create the Watch Face. Calls
pinetime-watchfaceto create an instance of the Watch Face from the Watch Face Crate. -
refresh_clock()Redraw the Watch Face. Currently does nothing.
-
update_clock(year, month, day, hour, minute, second)Set the current date and time. Calls
pinetime-watchfaceto redraw the instance of the Watch Face from the Watch Face Crate.TODO: This code needs to be fixed to show the correct day of week
These functions initialise the LVGL library and render the LVGL Widgets to the WebAssembly Display Buffer...
-
init_display()Init the LVGL display.
From
wasm/lvgl.c -
render_display()Render the LVGL display in 16-bit RGB565 format. From
wasm/lvgl.cCalls the WebAssembly Display Driver defined in
wasm/lv_port_disp.cWhich calls
put_display_px()to draw individual pixels to the the WebAssembly Display Buffer:wasm/lvgl.c
The WebAssembly Display Driver maintains a Display Buffer: 240 x 240 array of pixels, 4 bytes per pixel, in RGBA colour format: wasm/lvgl.c
///  RGBA WebAssembly Display Buffer that will be rendered to HTML Canvas
#define LV_HOR_RES_MAX          240
#define LV_VER_RES_MAX          240
#define DISPLAY_BYTES_PER_PIXEL 4
uint8_t display_buffer[LV_HOR_RES_MAX * LV_VER_RES_MAX * DISPLAY_BYTES_PER_PIXEL];
Our JavaScript code copies the Display Buffer from WebAssembly Memory and renders to HTML Canvas by calling the following functions...
-
get_display_width()Returns 240, the width of the WebAssembly Display Buffer.
From
wasm/lvgl.c -
get_display_height()Returns 240, the height of the WebAssembly Display Buffer.
From
wasm/lvgl.c -
get_display_buffer()Return the WebAssembly Address of the WebAssembly Display Buffer.
From
wasm/lvgl.c
Note that JavaScript is allowed to read and write to WebAssembly Memory (treating it like a JavaScript array of bytes). But WebAssembly can't access any JavaScript Memory.
That's why we designed the Display Buffer Functions to manipulate WebAssembly Memory.
For testing only...
-
test_display()(For Testing) Render a colour box to the WebAssembly Display Buffer.
From
wasm/lvgl.c -
render_widgets()(For Testing) Render a Button Widget and a Label Widget.
From
wasm/lvgl.c
-
main(): Does nothing.From
wasm/lvgl.c
The JavaScript functions here call the Exported WebAssembly Functions to render the Watch Face. From docs/lvgl.html
We register a callback in the emscripten API, to be notified when the WebAssembly Module lvgl.wasm has been loaded...
//  In JavaScript: Wait for emscripten to be initialised
Module.onRuntimeInitialized = function() {
  //  Render LVGL to HTML Canvas
  render_canvas();
};When the WebAssembly Module lvgl.wasm has been loaded, we call the WebAssembly Function init_display() to initialise the LVGL display...
/// In JavaScript: Create the Watch Face in WebAssembly
function render_canvas() {
  //  Init LVGL Display
Module._init_display();Then we create the LVGL Watch Face Class from Clock.cpp...
  //  Create the Watch Face in WebAssembly
Module._create_clock();Every minute we update the Watch Face time in DateTimeController...
/// In JavaScript: Update the Watch Face time in WebAssembly and render the WebAssembly Display Buffer to the HTML Canvas
function updateCanvas() {
  //  Update the WebAssembly Date and Time: year, month, day, hour, minute, second
  const localTime = new Date();
  const timezoneOffset = localTime.getTimezoneOffset();  //  In mins
  //  Compensate for the time zone
  const now = new Date(
    localTime.valueOf()             //  Convert time to millisec
    - (timezoneOffset * 60 * 1000)  //  Convert mins to millisec
  );
  Module._update_clock(
    now.getFullYear(),
    now.getMonth() - 1,  //  getMonth() returns 1 to 12
    now.getDay(),
    now.getHours(),
    now.getMinutes(),
    now.getSeconds()
  );
Note that we need to compensate for the timezone.
And redraw the Watch Face in Clock.cpp...
  //  Update the Watch Face time in WebAssembly
Module._refresh_clock();We call LVGL to render the Widgets into the WebAssembly Display Buffer...
  //  Render LVGL Widgets to the WebAssembly Display Buffer
Module._render_display();We resize the HTML Canvas to PineTime's 240 x 240 resolution, scaled by 2 times...
  const DISPLAY_SCALE = 2;  //  Scale the canvas width and height

  //  Fetch the PineTime dimensions from WebAssembly Display Buffer
  var width = Module._get_display_width();
  var height = Module._get_display_height();

  //  Resize the canvas to PineTime dimensions (240 x 240)
  if (
    Module.canvas.width != width * DISPLAY_SCALE ||
    Module.canvas.height != height * DISPLAY_SCALE
  ) {
    Module.canvas.width = width * DISPLAY_SCALE;
    Module.canvas.height = height * DISPLAY_SCALE;
}We fetch the HTML Canvas...
  //  Fetch the canvas pixels
  var ctx = Module.canvas.getContext('2d');
  var imageData = ctx.getImageData(0, 0, width * DISPLAY_SCALE, height * DISPLAY_SCALE);
var data = imageData.data;We copy the pixels from the WebAssembly Display Buffer to the HTML Canvas (which uses 24-bit RGBA format)...
  const DISPLAY_SCALE = 2;  //  Scale the canvas width and height
  const DISPLAY_BYTES_PER_PIXEL = 4;  //  4 bytes per pixel: RGBA

  //  Copy the pixels from the WebAssembly Display Buffer to the canvas
  var addr = Module._get_display_buffer();
  Module.print(`In JavaScript: get_display_buffer() returned ${toHex(addr)}`);
  for (var y = 0; y < height; y++) {
    //  Scale the pixels vertically to fill the canvas
    for (var ys = 0; ys < DISPLAY_SCALE; ys++) {
      for (var x = 0; x < width; x++) {
        //  Copy from src to dest with scaling
        const src = ((y * width) + x) * DISPLAY_BYTES_PER_PIXEL;
        const dest = ((((y * DISPLAY_SCALE + ys) * width) + x) * DISPLAY_BYTES_PER_PIXEL)
          * DISPLAY_SCALE;
        //  Scale the pixels horizontally to fill the canvas
        for (var xs = 0; xs < DISPLAY_SCALE; xs++) {
          const dest2 = dest + xs * DISPLAY_BYTES_PER_PIXEL;
          //  Copy 4 bytes: RGBA
          for (var b = 0; b < DISPLAY_BYTES_PER_PIXEL; b++) {
            data[dest2 + b] = Module.HEAPU8[addr + src + b];
          }
        }
      }
    }
  }
Note that JavaScript is allowed to read and write to WebAssembly Memory (treating it like a JavaScript array of bytes in Module.HEAPU8[]). But WebAssembly can't access any JavaScript Memory.
That's why we designed the Display Buffer Functions to manipulate WebAssembly Memory.
Finally we update the HTML Canvas...
  //  Paint the canvas
  ctx.putImageData(imageData, 0, 0);
}