Presentation available here
Create a New Azure IoT Suite Remote Monitoring solution
- Log in to Azure IoT Suite and click Create a New Preconfigured Solution
Note: For first time users, get started with an Azure free trial which gives you 200USD of credit to get started.
- Select the Remote Monitoring option
- Type in a solution name.
Note: Copy the names and connection strings mentioned for reference later.
- Choose your subscription and desired region to deploy, then click Create Solution
- Wait for Azure to finish provisioning (may take up to 10 minutes), and then click Launch
- Open the link to your IoT Suite’s “Solution Dashboard.” You may have been redirected there already. This opens your personal remote monitoring site at the URL <Your Azure IoT Hub suite name>.azurewebsites.net
- Click Add a Device at the lower left hand corner of your screen
- Add a new custom device
- Enter your desired
device ID. In this case we’ll use “Arduino_Platform”, and then click Check ID - If Device ID is available, go ahead and click Create
- Make note of your
device ID,Device Key, andIoT Hub Hostnameto enter into the code you’ll run on your device later
Warning: The Remote Monitoring solution provisions a set of Azure IoT Services in your Azure account. It is meant to reflect a real enterprise architecture and thus its Azure consumption is quite heavy. To avoid unnecessary Azure consumption, we recommend you delete the preconfigured solution in azureiotsuite.com once you are done with your work (since it is easy to recreate). Alternatively, if you want to keep it up and running you can do two things to reduce consumption:
-
Disable the simulated devices created with the solution (Go to Devices>>Select the device>> on the device details menu on the right, clich on Disable Device. Repeat with all the simulated devices).
-
Stop your remote monitoring solution while you are working on the next steps.
- Code is based on the Remote Sample here
- For additional reference, refer to the following:
- https://azure.microsoft.com/en-us/documentation/articles/iot-suite-remote-monitoring-sample-walkthrough/
- https://azure.microsoft.com/en-us/documentation/articles/iot-suite-connecting-devices/
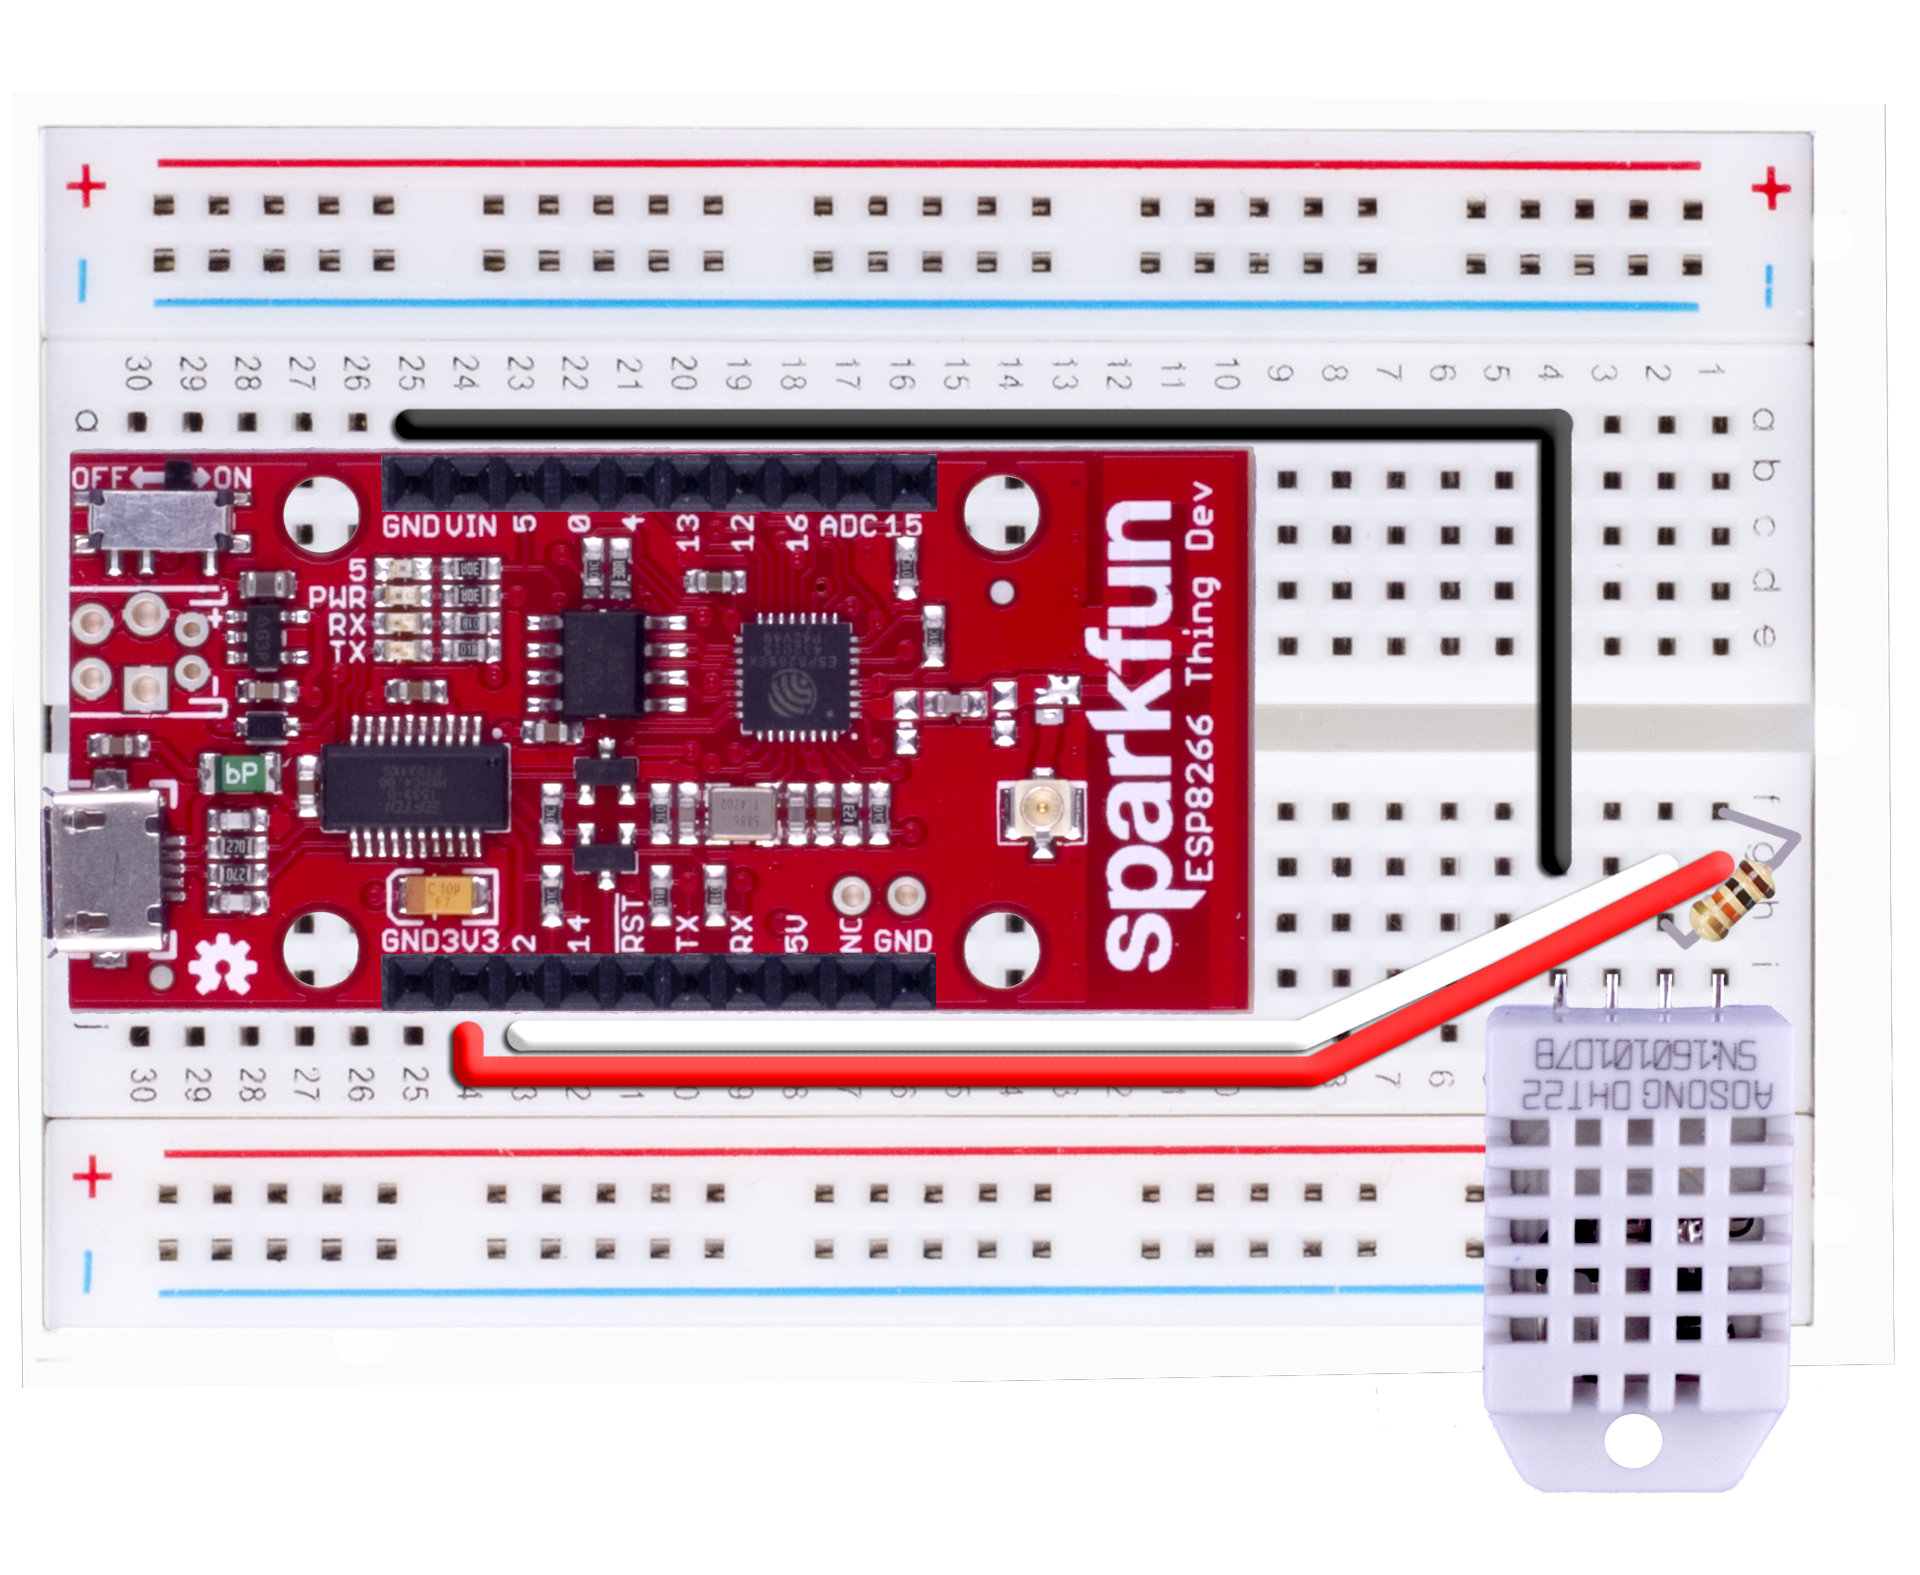
- Using this image as a reference, connect your DHT22 and Arduino to the breadboard
Note: Column on the left corresponds to sensor and on the Right to board. On the image, the board is place between 10 and 30 and sensor between 1 and 9.
- For sensor pins, we will use the following wiring:
| Start | End | Cable Color |
|---|---|---|
| VDD (Pin 1G) | Pin 24J | Red cable |
| DATA (Pin 2G) | Pin 23J | White cable |
| GND (Pin 4G) | Pin 25A | Black cable |
| Start | End | Connector |
|---|---|---|
| DHT22 (Pin 1I) | DHT22 (Pin 4I) | DHT22 |
| NULL (Pin 2H) | Pin 1F | 10k Ohm Resistor |
-
For more information, see: Adafruit DHT22 sensor setup.
-
After going through this, you should have a working sample with a blinking light on your board.
- If you can’t upload the sample, reconnect the device, then the power switch to OFF. Press the upload button, and flip the switch back to ON.
For this project, we'll also need the following libraries:
- DHT Sensor Library
- Adafruit DHT Unified
- AzureIoTHub
- AzureIoTUtility
- AzureIoTProtocol_MQTT
To install them, click on the Sketch -> Include Library -> Manage Libraries. Search for each library using the box in the upper-right to filter your search, click on the found library, and click the "Install" button.
The Adafruit Sensor library is also needed. This can be downloaded here. Instructions for manually installing a library can be found here.
Note: Starting on version 1.0.17, AzureIoTHub required the AzureIoTUtility and one of the available protocols. These samples use the AzureIoTProtocol_MQTT, but it is prepared to work with AzureIoTProtocol_HTTP too.
- In the project, edit the
iot_configs.h, look for the following lines of code:
#define IOT_CONFIG_WIFI_SSID            "<Your WiFi network SSID or name>"
#define IOT_CONFIG_WIFI_PASSWORD        "<Your WiFi network WPA password or WEP key>"
- Replace the placeholders with your WiFi name (SSID), WiFi password, and the device connection string you created at the beginning of this tutorial.
- Look for the following line of code and replace the placeholders connection information (this is the Device information that you obtained in the Remote Monitoring console):
#define IOT_CONFIG_CONNECTION_STRING "HostName=<host_name>.azure-devices.net;DeviceId=<device_id>;SharedAccessKey=<device_key>"
- Save with
Control-s
- On windows, the COM port will disconnect, and a new one will appear. Use Tools -> Port -> COM to re-select it.
- Build and upload the code using Sketch -> Upload.
Note: As of 1.6.8, the Arduino IDE doesn't properly show "Upload Completed", even when it succeeds.
- There should now be a green LED on your Arduino. Re-select the COM port if necessary, and then open the Serial Monitor. After 15 seconds you should see a measurements update.
Note: When first starting you will likely see a “Fetching NTP epoch time failed” error – This is normal, and it trying to sync with Azure. This can take even up to 30 seconds to find a NTP server to sync with. One it is synced, it should start transmitting from there.
- Once you have the sample running, visit your dashboard by visiting azureiotsuite.com and clicking “Launch” on your solution
- Make sure the “Device to View” in the upper right is set to your device
- If the demo is running, you should see the graph change as your data updates in real time!
Note: Make sure you delete or stop your remote monitoring solution once you have completed this to avoid unnecessary Azure consumption!