implementation group: 'com.github.brunomndantas', name: 'tpl4j', version: '1.2.1'<dependency>
<groupId>com.github.brunomndantas</groupId>
<artifactId>tpl4j</artifactId>
<version>1.2.1</version>
</dependency>- Usage
- Development
During this chapter you will have a guide oriented to examples on how to use TPL4J. If the functionality you are trying to implemnet is not supported out of the box, plase check the Development chapter and fell free to extend the library funcionality.
Let's start with our good friend "Hello World". Our goal is to create a task which its job is to print the text "Hello World" on console. For that you can create an instance of Task and pass, as parameter, a lambda with the code.
new Task(() -> System.out.println("Hello World")).start();If you are really anxious and ran this piece of code you probably realized that nothing happened.
What a crappy library! Not even the "Hello Word" works!
Let's see what happened.
You created a task and told to the task that it could start its job. When you invoke method start() the task will run our code on a different thread.
OH! Now I see it! We have to wait until the task finishes its job. How can we do it?
Ok, here you have some options but since this is a dummy example we will invoke the method getResult() which blocks the current thread until task finishes. Later on you will understand better this method and different ways of waiting for a task to finish.
Ok, it's time. You can call method getResult() and run our Hello World. Your code should look like:
Task<?> task = new Task<>(() -> System.out.println("Hello World"));
task.start();
task.getResult();
If everything went smoothly, your console should have something like:
Hello WorldPretty simple, right? You can simplify this example by using the utilirary class TaskFactory.
TaskFactory
.createAndStart(() -> System.out.println("Hello World"))
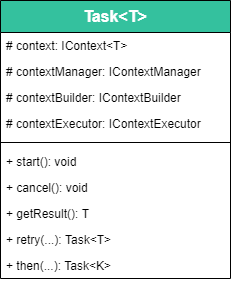
.getResult();Task class represents a task which will be executed asynchronously and produces an output. The main constructor of Task has the following interface:
public Task(
  String taskId,
  IAction<T> action,
  ICancellationToken cancellationToken,
  IScheduler scheduler,
  Option... options) { }
This constructor has the following parameters:
taskId: String with id of task. This property is helpfull when we need to analise the log. During the task life cycle it is logged the state transitions associated with the task's id.action: represents the action to be executed. You can see here all types of action supported.cancellationToken: the token through which you can send a cancel request. You can find more about cancellation here.scheduler: entity responsible to schedule theaction. You can find more about schedule here.options: options to configure task's execution. You can see all options existent here.
All the parameters of Task constructor, with exception of action, are optional. For this reason Task class has overloads of this constructor receiving all combinations of different parameters.
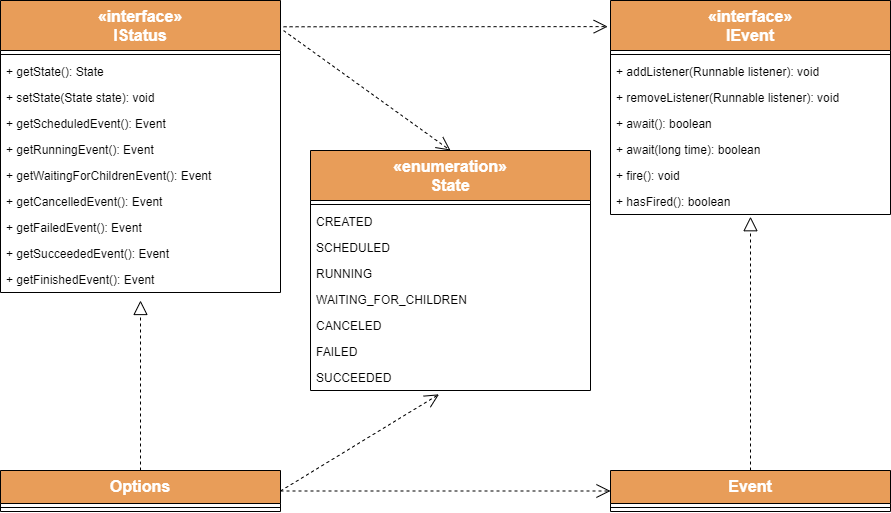
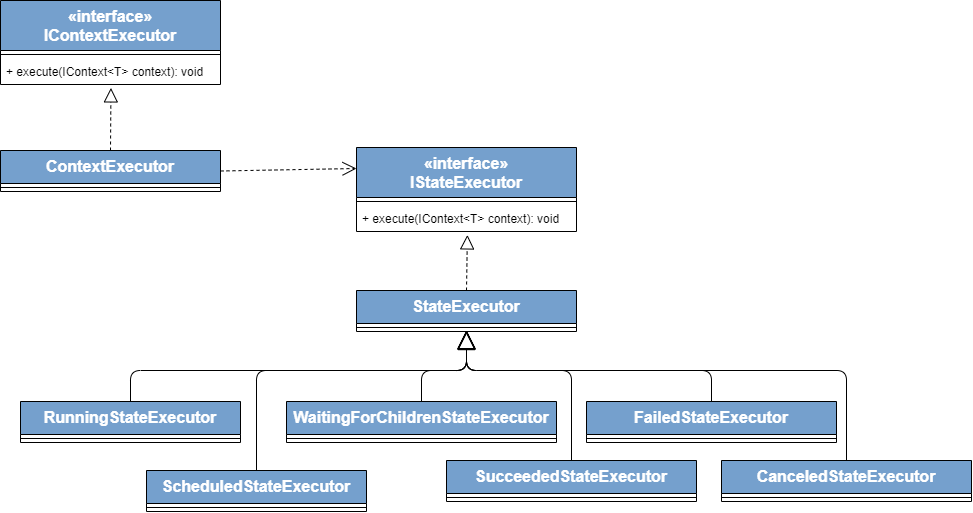
On the image bellow you an see the different states of a task's life cycle.
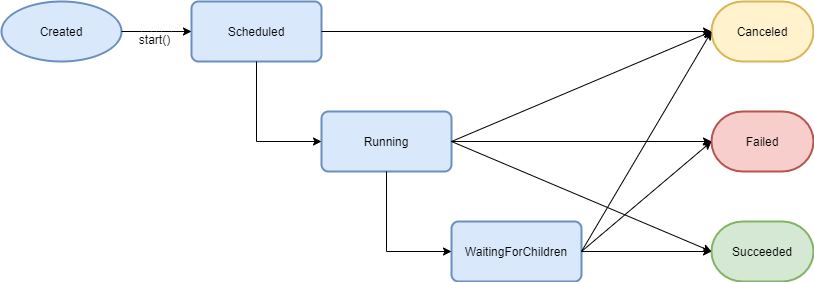
A task starts on Created state. The task will stay on this state until you invoke start() method which makes the task transit to Scheduled state.
When on Scheduled state, if the task has a cancel request it will transit synchronously to Canceled state otherwise the task will transit to Running state asynchronously.
When on Running state the task will execute the action supplied. From here it can transit to the following states:
WaitingForChildren: the task has children. See more about children here.Canceled: the action supplied ends withCancelledExceptionand has no childrenFailed: the action supplied ends withException(excludingCancelledException) and has no childrenSucceeded: the action ends successfully and has no children
When on WaitingForChildren the task will stay on this state until all its children finish. From here it can transit to the following states:
Failed: the action supplied ends withException(excludingCancelledException) or any of its children finished troughFailedstate.Canceled: the action supplied ends withCancelledExceptionor any of its children finished troughCanceledstate.Succeeded: the action and its children finish successfully
IAction is the functional interface to define the action that a task will execute. This interface declares a method run which produces K and receives an instance of CancellationToken. Learn more about CancellationToken here .
Since sometimes we just want to execute some action which produces no result or we don't need to deal with CancellationToken, Task constructor has variants compatible with the following functional interfaces:
/*IAction*/
K run(CancellationToken cancellationToken) throws Exception;

/*IVoidAction*/
void run(CancellationToken cancellationToken) throws Exception;

/*IEmptyAction*/
K run() throws Exception;

/*IEmptyVoidAction*/
void run() throws Exception;In order to get the result produced by a task, you can invoke getResult() method. This method blocks the thread until the task finishes. If the task ends successfully the result will be returned, if ends with fail or cancel state the respective exception will be thrown.
Here follows an example of a successful task:
Task<String> task = TaskFactory.createAndStart(() -> "Paul");
System.out.println("Hello " + task.getResult() + "!");
Output:
Hello Paul!Here follows an example of a failed task:
Task<String> task = TaskFactory.createAndStart(() -> { throw new Exception("Error"); });

try {
  System.out.println("Hello " + task.getResult() + "!");
} catch(Exception e) {
  System.out.println(e.getMessage());
}
Output:
ErrorIf you want to handle the the value/exception separatly, you have the methods getResultValue() and getResultException() which will return the respective result. Both these methods are not blocking, so you must to invoke them after the task finishes.
Here follows an example:
Task<String> task = TaskFactory.createAndStart(() -> "Paul");
System.out.println("Hello " + task.getResultValue() + "!");

task.getFinishedEvent().await();

System.out.println("Hello " + task.getResultValue() + "!");
Output:
Hello null!
Hello Paul!In order to check the task's status you can access it trought getStatus() method. This method returns an instance of Status.
Status class offers all life cycle events and the current state of a Task.
The enum State indicates the state in which the task is. State enum has the following values:
CREATED: task was created but not scheduled.SCHEDULED: task was scheduled and will be executed asynchronously.RUNNING: scheduler already took the task and is being executed.WAITING_FOR_CHILDREN: execution of task's action ended but is pendent until its children finish.SUCCEEDED: task succeeded.FAILED: task failed.CANCELED: task canceled.
With an Event instance you can:
- wait for it:
await() - register a listener:
addListener(Runnable listener) - check if it fired:
hasFired()
On the following code we register an action on each event to log the different status of a task.
Task<?> task = new Task<>(() -> System.out.println("Task Action!"));

task.getScheduledEvent().addListener(() -> System.out.println("SCHEDULED"));
task.getRunningEvent().addListener(() -> System.out.println("RUNNING"));
task.getSucceededEvent().addListener(() -> System.out.println("SUCCEEDED"));
task.getFinishedEvent().addListener(() -> System.out.println("FINISHED"));

task.start();

task.getFinishedEvent().await();

System.out.println("Final:" + task.getState());
Output:
SCHEDULED
RUNNING
Task Action!
SUCCEEDED
FINISHED
Final:SUCCEEDEDSometimes it is useful to create other tasks inside a certain task. TPL4J allows you to make a certain task finishes only when all its children finished.
This feature needs to be declared explicitly. Child must be created with ATTACH_TO_PARENT option.
If you create a task with the option REJECT_CHILDREN, all attached children will be ignored and the parent task will terminate without waiting for children.
Here you have an example:
Task<String> task = new Task<>(() -> {
    System.out.println("Parent");

    new Task<>(() -> {
        System.out.println("Child");
    }, Option.ATTACH_TO_PARENT).start();

});

task.start();

task.getResult();

System.out.println("Finished");
Output:
Parent
Child
Finished
Parent with attached children state's depends on children's result.
| Category | Detached child tasks | Attached child tasks |
|---|---|---|
| Parent waits for child tasks to complete. | No | Yes |
| Parent propagates exceptions thrown by child tasks. | No | Yes |
| Status of parent depends on status of child. | No | Yes |
If any exception occurs on a child task, this exception will be propagated to its parent and this parent task will end with fail status. The same happens if the child end with cancel status.
Here you have a table summarizing the result of a parent task depending of children's result:
| -- | Child Succeeds | Child Cancels | Child Fails |
|---|---|---|---|
| Parent Succeeds | Succeeds | Cancels. The CancelledException thrown by child is propagated to the parent. |
Fails. The exception thrown by child is propagated to the parent. |
| Parent Cancels | Cancels | Cancels. The CancelledException thrown by child is marked as suppresed by the parent exception. |
Fails. The CancelledException thrown by parent is ignored and the exception thrown by child is propagated to the parent. |
| Parent Fails | Fails | Fails. The CancelledException thrown by the child is ignored. |
Fails. The exception thrown by child is marked as suppresed by the parent exception. |
Next step is to chain tasks. For this example we will have two tasks, one producer and one consumer. To chain tasks you can use method <T> Task<T> then(Task<T> task), this method registers the given task to run after the current task finishes.
Go ahead, create a producer task and a consumer task. Now register consumer task to run after producer task. Your code should look like:
Task<String> producerTask = new Task<>(() -> "Paul");
Task<?> consumerTask = new Task<>(() -> System.out.println("Hello " + producerTask.getResult() + " !"));

producerTask.then(consumerTask);

producerTask.start();

consumerTask.getResult();
Run this example and observe the following output:
Hello Paul!If you look carefully you will realize that then method returns a Task. The returned task is the same task received as parameter. This mechanism permits to have a fluent syntax to chain tasks:
Task<String> task = new Task<>(() -> System.out.println(1));
task.start();

task.then(new Task<>(() -> System.out.println(2)))
    .then(new Task<>(() -> System.out.println(3)))
    .then(new Task<>(() -> System.out.println(4)))
    .getResult();
Output:
1
2
3
4
I know, I know. You are probably thinking that it would be easier to pass a lambda to then method. Guess what?... I totally agree ;) that's why you have multiple overloads of method then. These variants of method then create a task with the given ILinkAction, chain it with the current task and return the created task. With these overloads the previous example could be written like this:
Task<?> task = new Task<>(() -> System.out.println(1));
task.start();

task.then(() -> System.out.println(2))
    .then(() -> System.out.println(3))
    .then(() -> System.out.println(4))
      .getResult();
All variants of then method will create the new task sharing the properties of the current task. These properties are CancellationToken, IScheduler and Options[].
ILinkAction is the functional interface to define the action to be executed after some task finishes. This interface declares a method run which produces K, receives an CancellationToken instance and the previous task. CancellationToken is explained on Cancel section.
Similarly to task's constructors with IAction interface, sometimes we just want to execute some action which produces no result or we don't need to deal with CancellationToken and the previous Task. then method has variants compatible with the following functional interfaces:
/*ILinkAction*/
T run(Task<K> previousTask, CancellationToken cancellationToken) throws Exception;

/*ILinkVoidAction*/
void run(Task<K> previousTask, CancellationToken cancellationToken) throws Exception;

/*ILinkEmptyAction*/
T run() throws Exception;

/*ILinkEmptyVoidAction*/
void run() throws Exception;retry methods help you to retry a certain task if this one failed. Take in considerantion that fail don't include cancel state. If the task finished in cancel state, the task created by retry method will also automaticaly end with cancel state.
There are three main variants:
- Receiving an instance of
Supplier<Boolean>- this one creates a task which will retry current task until it succeeds or the supplier returns false. - Receiving an
int- this one creates a task which will retry the current task until it succeeds in a maximum of times supplied. - Receiving no arguments - this one creates a task which will retry the current task until it succeeds.
All these variants has the same overloads we have see so far with all task constructor properties.
Task<?> task = new Task<>(() -> {
  System.out.println("Running");
  throw new Exception();
});
task.start();

task = task.retry(2);

task.getFinishedEvent().await();
Output:
Running
Running
Running
All variants of retry method will create the new task sharing the properties of the current task. These properties are CancellationToken, IScheduler and Options[].
In order to a task finish with cancel state, the execution of the task must result in a CanceledException.
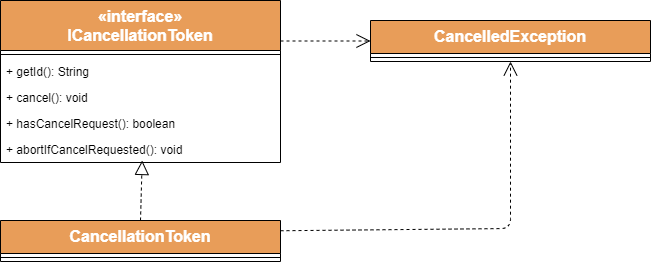
To deal with cancel mechanism, TPL4J offers the ICancellationToken interface. Every task has an instance of ICancellationToken which is passed to the task's action when this one is executed. The action is responsible to control cancel requests. For this you have these methods on ICancellationToken:
hasCancelRequest()- indicates if there is a cancel request.abortIfCancelRequested()- checks if there is a cancel request and if so, aCanceledExceptionis thrown.cancel()- declares the intention of a cancellation
Here you have an example:
Task<?> task = new Task<>((IVoidAction)(cancelToken) -> {
    while(true) {
        System.out.println("Sleep");
        Thread.sleep(1000);
        cancelToken.abortIfCancelRequested();
    }
});

task.start();

Thread.sleep(3000);
task.cancel();

task.getFinishedEvent().await();
System.out.println(task.getState());
Output:
Sleep
Sleep
Sleep
CANCELED
There two moments in which is checked if there is a cancel request:
- during schedule
- when the scheduler runs the scheduled work and before running the task's action action
Option enum permits to change the task's behavior. By default there is no options associated with a task.
The REJECT_CHILDREN option makes the parent ignore all tasks created during its execution. This includes the tasks created or not with the ATTACH_TO_PARENT option.
The ATTACH_TO_PARENT option attaches the task to its parent. This makes de parent's result dependent from the child.
The NOT_CANCELABLE option turns off the internal verification of cancel request. The task can stil be cancelled if its action dicides so.
The NOT_PROPAGATE_CANCELLATION option makes the parent ignores the cancelation of attached children.
The NOT_PROPAGATE_FAILURE option makes the parent ignores the failure of attached children.
The CANCEL_CHILDREN_ON_CANCELLATION option makes the parent send a cancel request for its attached children if it cancels.
The CANCEL_CHILDREN_ON_FAILURE option makes the parent send a cancel request for its attached children if it fails.
The CANCEL_PARENT_ON_CANCELLATION option makes the task send a cancel request for its parent if it cancels.
The CANCEL_PARENT_ON_FAILUERE option makes the task send a cancel request for its parent if it fails.
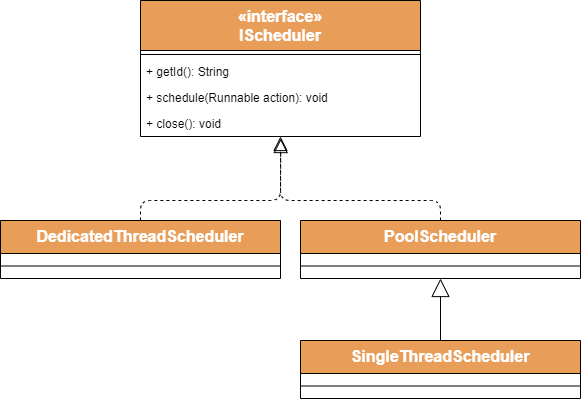
Scheduler is the component responsible for task's execution. When you invoke a task's start method, the task will schedule its execution through its scheduler.
IScheduler interface
By default, a task is created with the scheduler acessible through Task.DEFAULT_SCHEDULER which is an instance of DedicatedThreadScheduler.
TPL4J offers the following implementations of IScheduler:
DedicatedThreadScheduler- creates a Thread for each execution.PoolScheduler- uses a thread pool for the executions.SingleThreadScheduler- uses only one thread for all executions.
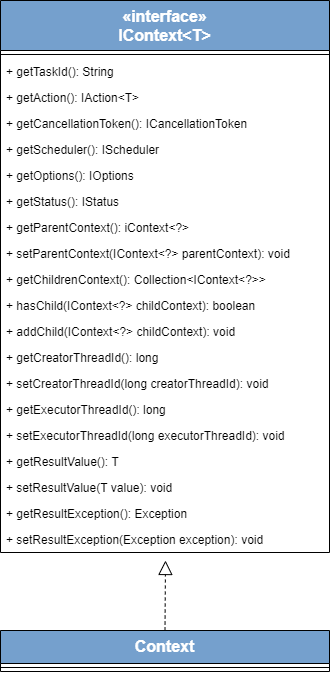
Through task's context property you have access to the following properties:
- taskid
- action
- cancellationToken
- options
- scheduler
- status
- resultValue
- resultException
- parentContext
- childrenContexts
- creatorThreadId
- executorThreadId
TaskFactory has some static utilitary methods.
createAndStart creates and starts a new task.
As you already realized we have a common pattern of creating and starting a Task. Imagine the following example:
Task<String> task = new Task<>(() -> System.out.println(1));
task.start();

task.then(new Task<>(() -> System.out.println(2)))
    .then(new Task<>(() -> System.out.println(3)))
    .then(new Task<>(() -> System.out.println(4)))
    .getResult();
We can take advantage of this method and rewrite this code like so:
TaskFactory
    .createAndStart(() -> System.out.println(1))
    .then(new Task<>(() -> System.out.println(2)))
    .then(new Task<>(() -> System.out.println(3)))
    .then(new Task<>(() -> System.out.println(4)))
.getResult();forEach method returns a Task which internally will create the same number of children as the number of cpus available. Each child task will process the elements of the supplied Iterable. The result of this task is a collection containing all results of applying action to each element.
Here you have an example:
Collection<String> elements = Arrays.asList("1","2","3");
Task<Collection<Integer>> task = TaskFactory.forEach(elements, (element) -> {
    Thread.sleep(1000);
    return Integer.parseInt(element);
});
task.getResult().forEach(System.out::println);
Output:
1
2
3It can be convenient in some scenarios that a task returns another Task and we end up with a Task<Task<?>>. Now we have a task which its result is another task but we are only interested on the result of the returned task.
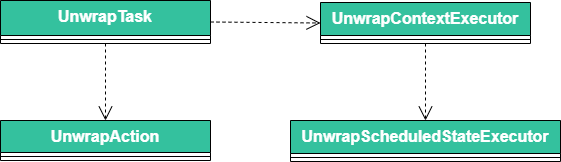
unwrap method returns a task that will only be completed when the task returned by another task is completed. This task's result will be the same of the inner task.
Here you have and example:
Task<Task<String>> task = TaskFactory.createAndStart(() -> TaskFactory.createAndStart(() -> "Task"));

Task<String> unwrappedTask = TaskFactory.unwrap(task);

System.out.println(unwrappedTask.getResult());
Output:
TaskwhenAll method returns a task that will only be completed when all the given tasks complete. The result of the returned task is a Collection containing the result of all given tasks. If any of the supplied tasks fails or cancels the result of the returned task is also be failure or cancellation respectively.
Here you have an example:
Collection<Task<String>> tasks = Arrays.asList(
    TaskFactory.createAndStart(()->"A"),
    TaskFactory.createAndStart(()->"B"),
    TaskFactory.createAndStart(()->"C")
);

Task<Collection<String>> task = TaskFactory.whenAll(tasks);

task.getResult().forEach(System.out::println);
Output:
A
B
CwhenAny method returns a task that will only be completed when one of the given tasks completes. The result of the returned task is the task that finished first. It is considered as finish any task which finished independently from the state (success, cancellation or failure).
Here you have an example:
Collection<Task<String>> tasks = Arrays.asList(
    TaskFactory.createAndStart(()->"A"),
    TaskFactory.create(()->"B"),
    TaskFactory.create(()->"C")
);

Task<Task<String>> collectTask = TaskFactory.whenAny(tasks);
System.out.println(collectTask.getResult().getResult());
Output:
AAs it was already mentioned, if no scheduler is passed to the task, a new thread is created to run the task's action. This works ok in majority of the scenarios but sometimes we want to have some control over the created threads.
Let´s see how can we execute our tasks on a pool:
ExecutorService pool = Executors.newFixedThreadPool(8);
IScheduler scheduler = new IScheduler(){
    @Override
    public String getId() { return "id"; }

    @Override
    public void schedule(Runnable action) { pool.submit(action); }

    @Override
    public void close() { }
};
Task<?> task = new Task<>(() -> System.out.println("Hello World!"), scheduler);

task.start();

task.getResult();
pool.shutdown();
This is exactly what TaskPool does. When you create a task through an instance of TaskPool, TaskPool will pass its pool as scheduler to the task. So the previous example, written with TaskPool, looks like:
TaskPool pool = new TaskPool(8);
Task<?> task = pool.create(() -> System.out.println("Hello World!"));

task.start();

task.getResult();
pool.close();
On a TaskPool instance you have all methods we saw on TaskFactory.
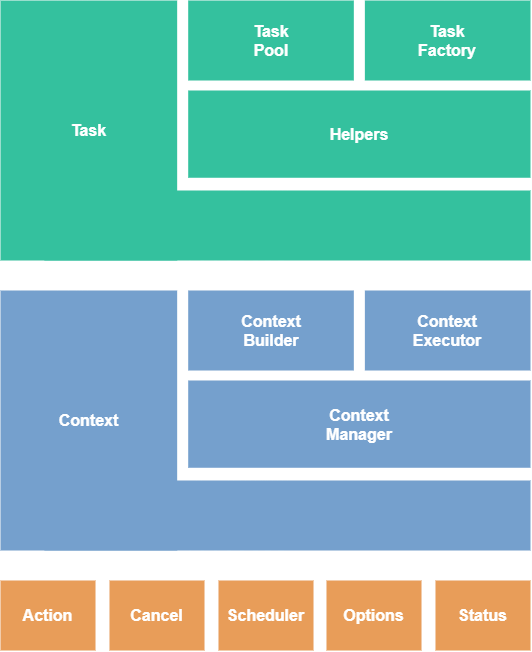
During this chapter you will see how the architecture of TPL4J was mounted. You will understand all the components and how they interact with each other. Fell free to use and extend the library functionalities.