Tips & Tricks
Table of Contents generated with DocToc
- Override the data storage location for a CMB2 box
- Override text strings in field
- Inject static content in a field
- Inject dynamic content in a field via a callback
- Using the dynamic before/after form hooks
- Setting a metabox to 'closed' by default
- Using CMB2 helper functions and cmb2_init
- Setting a default value for a checkbox
- A dropdown for taxonomy terms which does NOT set the term on the post
- Setting a default field value via a callback
- Setting dynamic attributes that may use post data, like the post ID
- Modify Field Label Output
- Change the year range for the date field types
- Modify Field Row Output and Markup
- Limit text field to numbers only
- Limit text field to numbers with increments of 10
- Adding a CMB2 debug helper to your plugin/theme
Protip: If you're looking for an even bigger box of tricks, check out the CMB2 Snippet Library.
One request I get semi-frequently is, "how do I get/set data to and from a custom table, rather than meta?"
CMB2 actually has several handy filters for accomplishing this. There are 2 filters for overriding the getting of data.
Getting:
-
cmb2_override_meta_value- Filter whether to override getting of meta value. Returning a non'cmb2_field_no_override_val'value will effectively short-circuit the value retrieval. -
cmb2_override_{$field_id}_meta_value- Operates the same ascmb2_field_no_override_val, but is more specific to a single field.
See the inline docs for a definition of each of the parameters passed to the filter.
There are also 2 filters for overriding the setting/removing of data as well.
Setting:
-
cmb2_override_meta_save- Filter whether to override saving of meta value. Returning a non-nullvalue will effectively short-circuit the function. -
"cmb2_override_{$field_id}_meta_save"- Operates the same ascmb2_override_meta_save, but is more specific to a single field.
See the inline docs for a definition of each of the parameters passed to the filter.
Removing:
-
cmb2_override_meta_remove- Filter whether to override removing of meta value. Returning a non-null value will effectively short-circuit the function. -
"cmb2_override_{$field_id}_meta_remove"- Operates the same ascmb2_override_meta_remove, but is more specific to a single field.
See the inline docs for a definition of each of the parameters passed to the filter.
For a working example of these filters in use, see this example in the CMB2 Snippet Library.
In that snippet, you can see even a bit more context/help in the inline comments.
Several of the CMB2 field types have text strings in them, and CMB2 provides a way to override each of them.
The file field type has a button with the text, "Add or Upload File." Here is how you would override that text during your field configuration:
$cmb->add_field( array(
	'name'    => 'PDF',
	'id'      => 'yourprefix_pdf',
	'type'    => 'file',
	'options' => array(
		'add_upload_file_text' => 'Upload PDF',
	),
	'query_args' => array(
		'type' => 'application/pdf', // Make library only display PDFs.
	),
) );
To find a particular string, search for it in the CMB2_Types class, or search for '$this->_text('. The first parameter passed to the CMB2_Types::_text() method is the key you will use in the field options parameter array.
There are several field properties you can use to inject text or content in your fields. These parameters are:
- before_field
- before_row
- before
- after
- after_row
- after_field
(view more in the Field Parameters documentation)
To use them in your field, it would look something like this:
$cmb->add_field( array(
	'name'         => 'Testing Field Parameters',
	'id'           => 'yourprefix_test_parameters',
	'type'         => 'text',
	'before_row'   => '<p>Testing <b>"before_row"</b> parameter</p>',
	'before'       => '<p>Testing <b>"before"</b> parameter</p>',
	'before_field' => '<p>Testing <b>"before_field"</b> parameter</p>',
	'after_field'  => '<p>Testing <b>"after_field"</b> parameter</p>',
	'after'        => '<p>Testing <b>"after"</b> parameter</p>',
	'after_row'    => '<p>Testing <b>"after_row"</b> parameter</p>',
) );
And that field would look like:

Those same parameters can accept a callback to be called at runtime, and get passed two parameters, $field_args and $field. The $field object will have some handy parameters to help us add some conditional logic to our callbacks.
Let's say, for example, that you only want to show text in front of your field if the $post_id is 2. First you will need to create your callback function:
/**
 * Conditionally displays a message if the $post_id is 2
 *
 * @param  array             $field_args Array of field parameters
 * @param  CMB2_Field object $field      Field object
 */
function cmb2_before_row_if_2( $field_args, $field ) {
	if ( 2 == $field->object_id ) {
		echo '<p>Testing <b>"before_row"</b> parameter (on $post_id 2)</p>';
	} else {
		echo '<p>Testing <b>"before_row"</b> parameter (<b>NOT</b> on $post_id 2)</p>';
	}
}
Then you can specifiy that callback in your field parameter:
$cmb->add_field( array(
	'name'       => 'Testing Field Parameters',
	'id'         => 'yourprefix_test_parameters',
	'type'       => 'text',
	'before_row' => 'cmb2_before_row_if_2', // callback
) );If we wanted to hook in before or after our test_metabox metabox form from example-functions.php, our best option would be to use the dynamic action hooks. If you look in the source code, you will see this hook before the form begins:
do_action( "cmb2_before_{$object_type}_form_{$this->cmb_id}", $object_id, $this );and this hook after the form:
do_action( "cmb2_after_{$object_type}_form_{$this->cmb_id}", $object_id, $this );The first dynamic portion of the hook name, $object_type, is the type of object you are working with. Usually post (this applies to all post-types). This could also be comment, user or options-page.
The second dynamic portion of the hook name, $this->cmb_id, is the meta_box id.
The parameters passed into the hook are:
-
$object_id: The ID of the current object -
$cmb: This CMB2 object
So to accomplish our goal for hooking in before our test_metabox metabox form, we would do something like this:
function cmb2_test_before_form() {
	echo 'This is some text before the form.';
}
add_action( 'cmb2_before_post_form_test_metabox', 'cmb2_test_before_form' );
If we wanted access to the CMB2 object, we could request 2 parameters when we do our add_action:
function cmb2_test_before_form( $post_id, $cmb ) {
	echo $cmb->prop( 'title' );
}
add_action( 'cmb2_before_post_form_test_metabox', 'cmb2_test_before_form', 10, 2 );If you prefer a particular metabox to be closed by default, you can do it via the closed metabox parameter:
$cmb = new_cmb2_box( array(
	'id'           => 'test_metabox',
	'title'        => __( 'Test Metabox', 'cmb2' ),
	'object_types' => array( 'page', ),
	'closed'       => true, // true to keep the metabox closed by default
) );Since CMB2 init is included/setup on init, the CMB2 helper functions will not be available until then. Rather than trying to determine which hook priority CMB2 is loaded on init, you can use the 'cmb2_init' hook ('cmb2_admin_init' if you're working in the admin). This is the earliest hook where you can safely use the CMB2 helper functions.
function cmb2_init_check_field_value() {
	$radio_value = cmb2_get_field_value( 'test_metabox', '_cmb2_test_radio', get_queried_object_id() );

	// Perform additional logic based on $radio_value
}
add_action( 'cmb2_init', 'cmb2_init_check_field_value' );
Setting a default value for a checkbox is tricky. A checkbox is basically an on/off (empty) value.. So if you set a default for 'on', and they set it to 'off' (which toggles it to empty again), the default will kick in (default is 'on', remember?). You now have a checkbox which can only have a value of 'on'.
One way to get around that is to only set your default if you're on the post-new screen. Then, once the post is saved, the default no longer applies. How can we accomplish that? With a simple function like:
/**
 * Only return default value if we don't have a post ID (in the 'post' query variable)
 *
 * @param  bool  $default On/Off (true/false)
 * @return mixed          Returns true or '', the blank default
 */
function cmb2_set_checkbox_default_for_new_post() {
	return isset( $_GET['post'] )
		// No default value.
		? ''
		// Default to true.
		: true;
}
What this function does is to check if we're on the post-new page, and if so, set the default value for the checkbox. It's a little bit silly, because if you pass it false, it will operate the exact same as not setting a default at all, but it gets the job done.
If we're NOT on the post-new screen, the value '' will be returned, which again, is the same value if we hadn't set a default at all. This ensures that once they save the post, the value they saved will stick.
To see it in action, here's a sample metabox and field:
function cmb2_checkbox_default_metabox_test() {
	/**
	 * Sample metabox to demonstrate setting a checkbox default value
	 */
	$cmb = new_cmb2_box( array(
		'id' => 'checkbox_default',
		'title'        => 'Set Checkbox Default',
		'object_types' => array( 'post' ),
		'context'      => 'side',
	) );

	$cmb->add_field( array(
		'desc'       => 'Click Me',
		'type'       => 'checkbox',
		'id'         => '_test_checkbox_default',
		'default_cb' => 'cmb2_set_checkbox_default_for_new_post',
	) );
}
add_action( 'cmb2_admin_init', 'cmb2_checkbox_default_metabox_test' );I have often been asked why the taxonomy_select field doesn't return a term_id. The reason is that the taxonomy_select field is not meant for that purpose. it is meant to set a term for a post and to be a replacement for the built-in WordPress term-setting UI.
However, there are some cases where you may want to save an arbitrary term_id. Maybe you have an options page and want to set the featured category. Or maybe you want to set the featured category for a post. In either of those cases, being able to save a term_id is desireable.
This can be accomplished with the help of a function:
/**
 * Gets a number of terms and displays them as options
 * @param  CMB2_Field $field
 * @return array An array of options that matches the CMB2 options array
 */
function cmb2_get_term_options( $field ) {
	$args = $field->args( 'get_terms_args' );
	$args = is_array( $args ) ? $args : array();

	$args = wp_parse_args( $args, array( 'taxonomy' => 'category' ) );

	$taxonomy = $args['taxonomy'];

	$terms = (array) cmb2_utils()->wp_at_least( '4.5.0' )
		? get_terms( $args )
		: get_terms( $taxonomy, $args );

	// Initate an empty array
	$term_options = array();
	if ( ! empty( $terms ) ) {
		foreach ( $terms as $term ) {
			$term_options[ $term->term_id ] = $term->name;
		}
	}

	return $term_options;
}
Now you can use this function to set the options for a CMB2 select, radio, or multicheck field:
$cmb->add_field( array(
	'name'       => 'Featured Category',
	'desc'           => 'Set a featured category for this post.',
	'id'             => '_cmb2_featured_category',
	'type'           => 'select',
	// Use a callback to avoid performance hits on pages where this field is not displayed (including the front-end).
	'options_cb'     => 'cmb2_get_term_options',
	// Same arguments you would pass to `get_terms`.
	'get_terms_args' => array(
		'taxonomy'   => 'category',
		'hide_empty' => false,
	),
) );CMB2 fields have a 'default_cb' parameter. This allows you to use things like the $field->object_id (the $post ID) to dynamically set your default value.
field config:
$cmb->add_field( array(
	'name'       => __( 'Test', 'cmb2' ),
	'id'         => 'yourprefix_test',
	'type'       => 'text',
	'default_cb' => 'prefix_set_test_default',
) );
callback:
function prefix_set_test_default( $field_args, $field ) {
	return 'Post ID: '. $field->object_id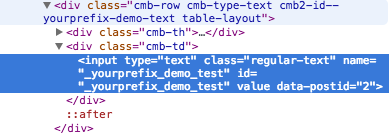
}There are several callback hooks in the lifecycle of a field display. These are meant to provide you with a hook to output arbitrary or dynamic data. BUT, you can also use these hooks to modify the CMB2_Field $field object. In this example, we're going to use a callback on the 'before' parameter which we'll use to modify that $field object's 'attributes' array. We're going to do this so we can add a custom data attribute with the post ID as the value.
field config:
$cmb->add_field( array(
	'name'   => __( 'Test', 'cmb2' ),
	'id'     => 'yourprefix_test',
	'type'   => 'text',
	'before' => 'prefix_set_field_data_attr',
) );
callback:
function prefix_set_field_data_attr( $args, $field ) {
	$field->args['attributes']['data-postid'] = $field->object_id;
}
In a recent Github issue a user asked if they could add tooltips next to the Field label. This snippet doesn't cover the CSS/JS side of things, but documents how you can easily modify the markup to accommodate tooltips, while leveraging some CMB2 methods to store your tooltip data to the field's options parameter.
$cmb->add_field( array(
	'name' => __( 'Test Text Area', 'cmb2' ),
	'id'   => 'yourprefix_textarea',
	'type' => 'textarea',
	'label_cb' => 'prefix_add_tooltip_to_label',
	'options' => array(
		'tooltip-class' => 'fa-info-circle',
		'tooltip'       => 'This is info about this setting or field',
	),
) );
Then the callback function would look something like this:
function prefix_add_tooltip_to_label( $field_args, $field ) {
	// Get default label
	$label = $field->label();

	if ( $label && $field->options( 'tooltip' ) ) {
		// If label and tooltip exists, add it
		$label .= sprintf( '<span class="tip"><i class="fa %s"></i>%s</span>', $field->options( 'tooltip-class' ), $field->options( 'tooltip' ) );
	}

	return $label;
}In this Github issue a user asked how to make the year range in the date picker go back further than 2006 (it happens to span 10 years before today and 10 years after). To change that range for a specific field, you would need to add a 'data-datepicker' data attribute to the field being registered. (This feature was added in version 2.2.0. Previously you would have had to use the 'cmb2_localized_data' filter to override the defaults for ALL datepicker fields.) This will allow you to override the jQuery datepicker default value for this field with your own range. In this case, I have set the range to start in 1990 and to end 10 years after the current year (using php's date() function).
$cmb_demo->add_field( array(
	'name'       => __( 'Test Date Picker (UNIX timestamp)', 'cmb2' ),
	'id'         => 'yourprefix_textdate_timestamp',
	'type'       => 'text_date_timestamp',
	'attributes' => array(
		// CMB2 checks for datepicker override data here:
		'data-datepicker' => json_encode( array(
			'yearRange' => '1990:'. ( date( 'Y' ) + 10 ),
		) ),
	),
) );When adding a field, you can pass a function to the render_row_cb option to modify the way a field row is rendered. This is mainly to edit the markup that surrounds each individual field, not to edit the field itself.
$cmb->add_field( array(
    'name' => 'Test Row Field Callback',
    'type' => 'text',
    'id'   => 'wiki_test_row_cb',
    // Add the name of your function to override the default row render method
    'render_row_cb' => 'override_render_field_callback'
) );
Passing the name of a function to the render_row_cb option provides a callback with the field object and field arguments so you can add additional classes or markup surrounding a wrapped field.
/**
 * Overrides the default render field method
 * Allows you to add custom HTML before and after a rendered field
 *
 * @param  array             $field_args Array of field parameters
 * @param  CMB2_Field object $field      Field object
 */
function override_render_field_callback( $field_args, $field ) {

	// If field is requesting to not be shown on the front-end
	if ( ! is_admin() && ! $field->args( 'on_front' ) ) {
		return;
	}

	// If field is requesting to be conditionally shown
	if ( ! $field->should_show() ) {
		return;
	}

	$field->peform_param_callback( 'before_row' );

	// Remove the cmb-row class
	printf( '<div class="custom-class %s">', $field->row_classes() );

	if ( ! $field->args( 'show_names' ) ) {

		// If the field is NOT going to show a label output this
		echo '<div class="cmb-td custom-label-class">';
		$field->peform_param_callback( 'label_cb' );

	} else {

		// Otherwise output something different
		if ( $field->get_param_callback_result( 'label_cb', false ) ) {
			echo '<div class="cmb-th custom-label-field-class">', $field->peform_param_callback( 'label_cb' ), '</div>';
		}
		echo '<div class="cmb-td custom-label-field">';
	}

	$field->peform_param_callback( 'before' );

	// The next two lines are key. This is what actually renders the input field
	$field_type = new CMB2_Types( $field );
	$field_type->render();

	$field->peform_param_callback( 'after' );

	echo '</div></div>';

	$field->peform_param_callback( 'after_row' );

    // For chaining
	return $field;
}
This example replicates the default render method with custom classes assigned to wrapping divs and the original cmb-row class removed as an example. When writing your callback function make sure to create an instance of the CMB2_Types class, passing the field object, and calling the function on render() on this instance. This will actually render the fields HTML. Also be sure to return the $field object to allow chaining.
$cmb_demo->add_field( array(
	'name' => __( 'My Number Field', 'theme-domain' ),
	'desc' => __( 'Numbers only', 'theme-domain' ),
	'id'   => 'yourprefix_number',
	'type' => 'text',
	'attributes' => array(
		'type' => 'number',
		'pattern' => '\d*',
	),
) );$cmb_demo->add_field( array(
'name' => __( 'My Number Field', 'theme-domain' ),
'desc' => __( 'Numbers only', 'theme-domain' ),
'id' => 'yourprefix_number',
'type' => 'text',
'attributes' => array(
'type' => 'number',
'min' => '10',
'max' => '100',
'step' => '10',
),
) );If you are bundling CMB2 in your plugin or theme, there may be times you are trying to determine if the right version of CMB2 is loading for your user. CMB2 is built to always load the newest version of itself, even if it's a newer version than the one bundled with your plugin/theme. The only way this would not be true would be if someone edited the core of CMB2 (please don't do this!), or if they bundled it incorrectly (please don't do this!). You can see the correct way to bundle CMB2 here.
To help with debugging your theme/plugin, you can include the following snippet so that you're able to see which version/location of CMB2 is being loaded:
add_action( 'cmb2_admin_init', 'yourprefix_cmb2_debug_info' );
/**
 * Adds a wp-admin notice with some CMB2 debug info, as long as the debug query arg is set.
 * wp-admin/?yourprefix_cmb2_debug=1
 */
function yourprefix_cmb2_debug_info() {
	if ( ! empty( $_GET['yourprefix_cmb2_debug'] ) ) {
		add_action( 'all_admin_notices', 'yourprefix_output_cmb2_debug_info' );
	}
}

/**
 * Outputs a wp-admin notice with some CMB2 debug info.
 */
function yourprefix_output_cmb2_debug_info() {
	echo '
	<div class="notice notice-warning notice-alt is-dismissible">
		<h2>CMB2 Debug Info</h2>
		<pre>'. print_r( [
			'CMB2_VERSION' => defined( 'CMB2_VERSION' ) ? CMB2_VERSION : 'not defined',
			'CMB2_LOADED' => defined( 'CMB2_LOADED' ) ? CMB2_LOADED : 'not defined',
			'CMB2_DIR' => defined( 'CMB2_DIR' ) ? CMB2_DIR : 'not defined',
		], true ) .'</pre>
	</div>
	';
}
Then, to use this snippet, you can go to wp-admin/?yourprefix_cmb2_debug=1 on your user's site to investigate, or if you don't have wp-admin credentials, ask them to do it for you.
Of course, replace yourprefix with a prefix unique to your project.