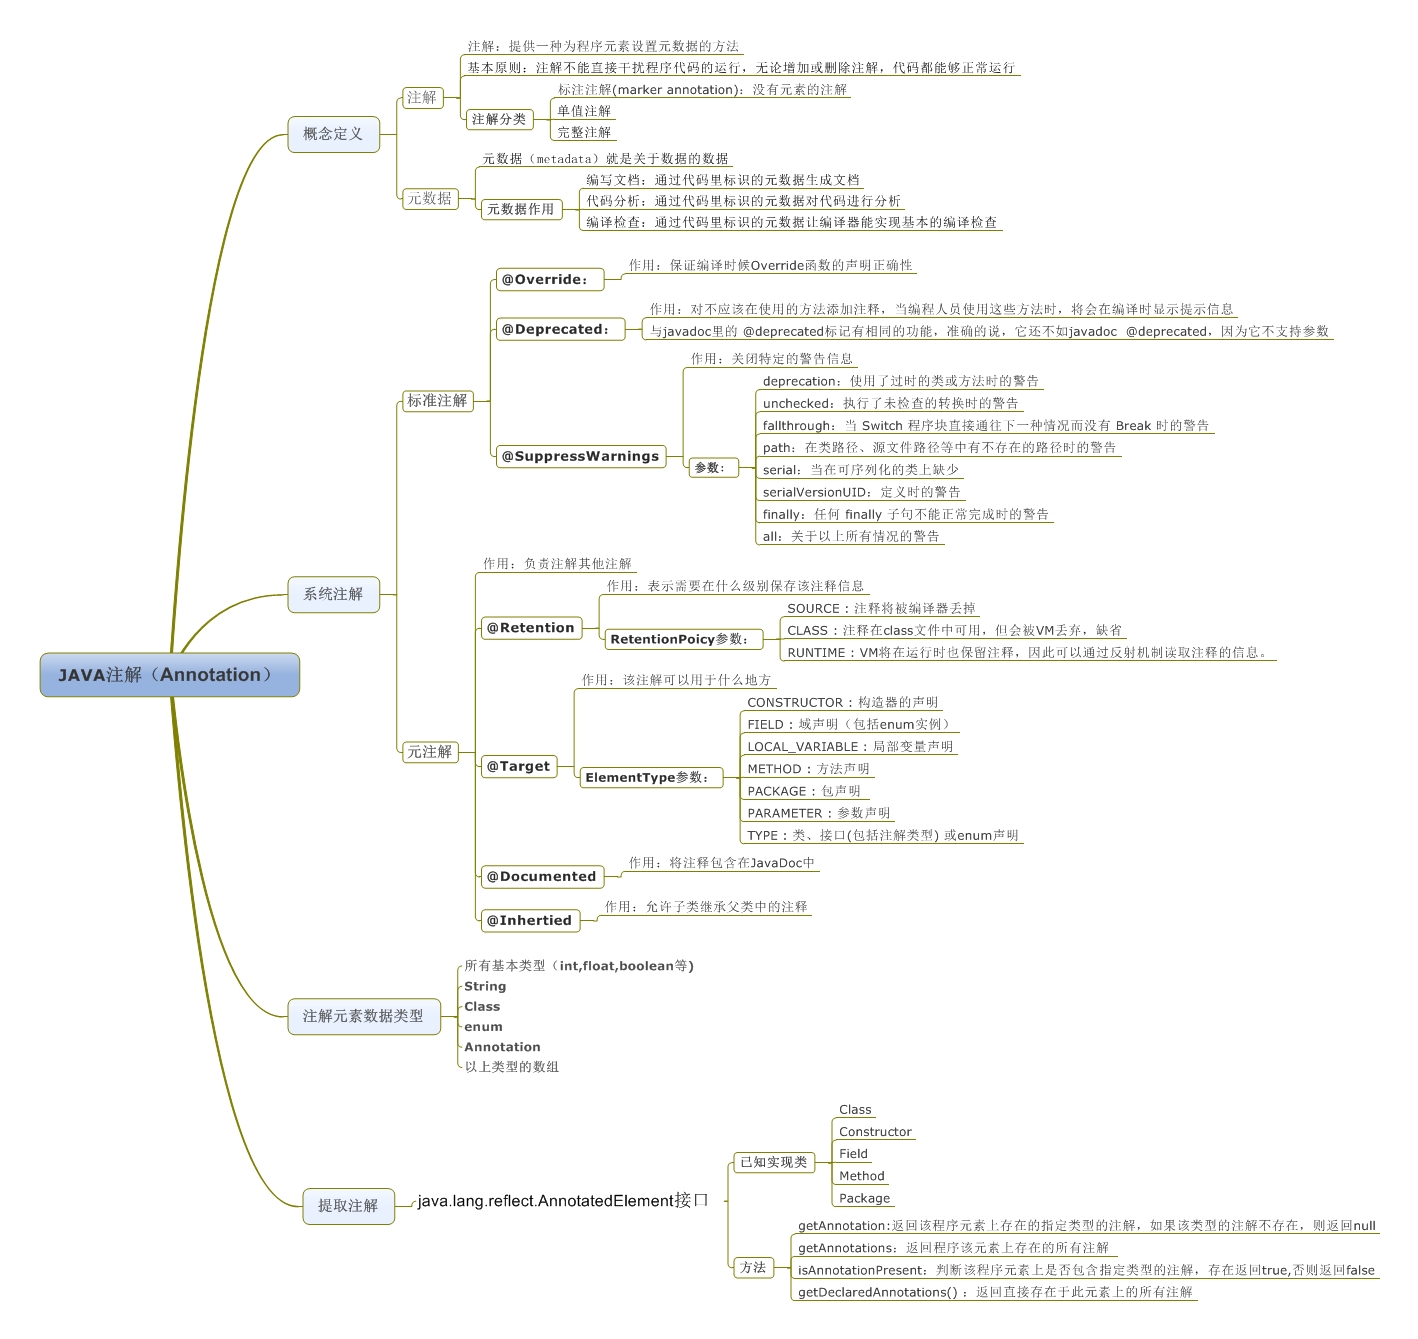
Annotations, a form of metadata, provide data about a program that is not part of the program itself. Annotations have no direct effect on the operation of the code they annotate.
更通俗的意思是为程序的元素(类、方法、成员变量)加上更直观更明了的说明,这些说明信息是与程序的业务逻辑无关,并且是供指定的工具或框架使用的。
Annontation像一种修饰符一样,应用于包、类型、构造方法、方法、成员变量、参数及本地变量的声明语句中。
Annotation其实是一种接口。通过反射来访问annotation信息。相关类(框架或工具中的类)根据这些信息来决定如何使用该程序元素或改变它们的行为。
Annotation是不会影响程序代码的执行,无论annotation怎么变化,代码都始终如一地执行。
Java语言解释器在工作时会忽略这些annotation,因此在JVM中这些annotation是“不起作用”的,只能通过配套的工具才能对这些annontaion类型的信息进行访问和处理。
-
Annotation的声明是通过关键字@interface。这个关键字会去继承Annotation接口。 -
Annotation的方法定义是独特的、受限制的。
Annotation类型的方法必须声明为无参数、无异常的。这些方法定义了Annotation的成员: 方法名代表成员变量名,而方法返回值代表了成员变量的类型。而且方法的返回值类型必须是基本数据类型、Class类型、String类型、枚举类型、Annotation类型或者由前面类型之一作为元素的一维数组。方法的后面可以使用default和一个默认的数值来声明成员变量的默认值,null不能作为成员变量的默认值,这与我们平时的使用有很大的区别。 注解如果只有一个默认属性,可直接用value()函数。一个属性也没有则表示该Annotation为Mark Annotation。 例如:public @interface UnitTest { String value(); }
在使用时可以直接使用
@UnitTest("GCD"),@UnitTest("GCD"实际上就是是@UnitTest(value="GCD)的简单写法。
例如:@Target(ElementType.METHOD) @Retention(RetentionPolicy.RUNTIME) public @interface UseCase { public int id(); public String description() default "no description"; }
Annotation一般作为一种辅助途径,应用在软件框架或者工具中。让这些工具类可以根据不同的Annotation注解信息来采取不同的处理过程或者改变相应程的行为。具有“让编译器进行编译检查的作用”。
具体可分为如下三类:
- 标记,用于告诉编译器一些信息
- 编译时动态处理,如动态生成代码
- 运行时动态处理,如得到注解信息
从jdk 1.5开始,自带了三种标准的annotation类型:
-
Override
它是一种marker类型的Annotation,用来标注方法,说明被它标注的方法是重载了父类中的方法。如果我们使用了该注解到一个没有覆盖父类方法的方法时,编译器就会提示一个编译错误的警告。 -
Deprecated
它也是一种marker类型的Annotation。当方法或者变量使用该注解时,编译器就会提示该方法已经废弃。 -
SuppressWarnings
它不是marker类型的Annotation。用户告诉编译器不要再对该类、方法或者成员变量进行警告提示。
元Annotation是指用来定义Annotation的Annotation。
-
@Retention
保留时间,可为RetentionPolicy.SOURCE(源码时)、RetentionPolicy.CLASS(编译时)、RetentionPolicy.RUNTIME(运行时),默认为CLASS。如果值为RetentionPolicy.SOURCE那大多都是Mark Annotation,例如:Override、Deprecated、Suppress Warnings。SOURCE表示仅存在于源码中,在class文件中不会包含。CLASS表示会在class文件中存在,但是运行时无法获取。RUNTIME表示会在class文件中存在,并且在运行时可以通过反射获取。 -
@Target
用来标记可进行修饰哪些元素,例如ElementType.TYPE、ElementType.METHOD、ElementType.CONSTRUCTOR、ElementType.FIELD、ElementType.PARAMETER等,如果未指定则默认为可修饰所有。 -
@Inherited
子类是否可以继承父类中的该注解。它所标注的Annotation将具有继承性。
例如:java.lang.annotation.Inherited @Inherited public @interface MyAnnotation { }
@MyAnnotation
public class MySuperClass { ... }
public class MySubClass extends MySuperClass { ... }
在这个例子中
MySubClass类继承了@MyAnnotation注解,因为MySubClass继承了MySuperClass类,而MySuperClass类使用了@MyAnnotation注解。 -
@Documented
是否会保存到javadoc文档中。
假设现在有个开发团队在每个类的开始都要提供一些信息,例如:
public class Generation3List extends Generation2List {

   // Author: John Doe
   // Date: 3/17/2002
   // Current revision: 6
   // Last modified: 4/12/2004
   // By: Jane Doe
   // Reviewers: Alice, Bill, Cindy

   // class code goes here

}
我们可以声明一个注解来保存这些相同的元数据。如下:
@interface ClassPreamble {
   String author();
   String date();
   int currentRevision() default 1;
   String lastModified() default "N/A";
   String lastModifiedBy() default "N/A";
   // Note use of array
   String[] reviewers();
}
声明完注解之后我们就可以填写一些参数来使用它,如下:
@ClassPreamble (
   author = "John Doe",
   date = "3/17/2002",
   currentRevision = 6,
   lastModified = "4/12/2004",
   lastModifiedBy = "Jane Doe",
   // Note array notation
   reviewers = {"Alice", "Bob", "Cindy"}
)
public class Generation3List extends Generation2List {

// class code goes here

}当Java源代码被编译时,编译器的一个插件annotation处理器则会处理这些annotation。
处理器可以产生报告信息,或者创建附加的Java源文件或资源。
如果annotation本身被加上了RententionPolicy的运行时类,
则Java编译器则会将annotation的元数据存储到class文件中。然后Java虚拟机或其他的程序可以查找这些元数据并做相应的处理。
当然除了annotation处理器可以处理annotation外,我们也可以使用反射自己来处理annotation。Java SE 5有一个名为AnnotatedElement的接口,
Java的反射对象类Class,Constructor,Field,Method以及Package都实现了这个接口。
这个接口用来表示当前运行在Java虚拟机中的被加上了annotation的程序元素。
通过这个接口可以使用反射读取annotation。AnnotatedElement接口可以访问被加上RUNTIME标记的annotation,
相应的方法有getAnnotation,getAnnotations,isAnnotationPresent。
由于Annotation类型被编译和存储在二进制文件中就像class一样,
所以可以像查询普通的Java对象一样查询这些方法返回的Annotation。
该类是指@Retention为RUNTIME的Annotation。
该类型的解析其实本质的使用反射。反射执行的效率是很低的
如果不是必要,应当尽量减少反射的使用,因为它会大大拖累你应用的执行效率。
-
类注解
可以通过
Class、Method、Field类来在运行时获取注解。下面是通过Class类获取注解的示例:Class aClass = TheClass.class; Annotation[] annotations = aClass.getAnnotations(); for(Annotation annotation : annotations){ if(annotation instanceof MyAnnotation){ MyAnnotation myAnnotation = (MyAnnotation) annotation; System.out.println("name: " + myAnnotation.name()); System.out.println("value: " + myAnnotation.value()); } }
也可以获取一个指定的注解类型:
Class aClass = TheClass.class;
Annotation annotation = aClass.getAnnotation(MyAnnotation.class);

if(annotation instanceof MyAnnotation){
    MyAnnotation myAnnotation = (MyAnnotation) annotation;
    System.out.println("name: " + myAnnotation.name());
    System.out.println("value: " + myAnnotation.value());
}
JDK提供的主要方法有:public <A extends Annotation> A getAnnotation(Class<A> annotationType) { ... } public Annotation[] getAnnotations() { ... } public boolean isAnnotationPresent(Class<? extends Annotation> annotationType) { ... }
-
方法注解
下面是一个方法使用注解的例子:
public class TheClass {
  @MyAnnotation(name="someName",  value = "Hello World")
  public void doSomething(){}
}
你可以通过如下方式获取方法注解:
Method method = ... //obtain method object
Annotation[] annotations = method.getDeclaredAnnotations();

for(Annotation annotation : annotations){
    if(annotation instanceof MyAnnotation){
        MyAnnotation myAnnotation = (MyAnnotation) annotation;
        System.out.println("name: " + myAnnotation.name());
        System.out.println("value: " + myAnnotation.value());
    }
}
也可以获取一个指定的方法注解,如下:
Method method = ... // obtain method object
Annotation annotation = method.getAnnotation(MyAnnotation.class);

if(annotation instanceof MyAnnotation){
    MyAnnotation myAnnotation = (MyAnnotation) annotation;
    System.out.println("name: " + myAnnotation.name());
    System.out.println("value: " + myAnnotation.value());
}
-
参数注解
在方法的参数中声明注解,如下:
public class TheClass {
  public static void doSomethingElse(
        @MyAnnotation(name="aName", value="aValue") String parameter){
  }
}
可以通过
Method对象获取到参数的注解,如下:Method method = ... //obtain method object Annotation[][] parameterAnnotations = method.getParameterAnnotations(); Class[] parameterTypes = method.getParameterTypes(); int i=0; for(Annotation[] annotations : parameterAnnotations){ Class parameterType = parameterTypes[i++]; for(Annotation annotation : annotations){ if(annotation instanceof MyAnnotation){ MyAnnotation myAnnotation = (MyAnnotation) annotation; System.out.println("param: " + parameterType.getName()); System.out.println("name : " + myAnnotation.name()); System.out.println("value: " + myAnnotation.value()); } } }
注意,
Method.getParameterAnnotations()方法会返回一个二维的Annotation数组,包含每个方法参数的一个注解数组。 -
变量注解
下面是一个变量使用注解的例子:
public class TheClass {

  @MyAnnotation(name="someName",  value = "Hello World")
  public String myField = null;
}
你可以像下面这样获取变量的注解:
Field field = ... //obtain field object
Annotation[] annotations = field.getDeclaredAnnotations();

for(Annotation annotation : annotations){
    if(annotation instanceof MyAnnotation){
        MyAnnotation myAnnotation = (MyAnnotation) annotation;
        System.out.println("name: " + myAnnotation.name());
        System.out.println("value: " + myAnnotation.value());
    }
}
当然也可以获取一个指定的变量注解,如下:
Field field = ... // obtain method object
Annotation annotation = field.getAnnotation(MyAnnotation.class);

if(annotation instanceof MyAnnotation){
    MyAnnotation myAnnotation = (MyAnnotation) annotation;
    System.out.println("name: " + myAnnotation.name());
    System.out.println("value: " + myAnnotation.value());
}
记下来我们来举个栗子,运行时注解示例:
相信很多人都知道Butter Knife。它里面就是使用了注解:
@BindView(R.id.user) EditText username;
@BindView(R.id.pass) EditText password;

@BindString(R.string.login_error) String loginErrorMessage;

@OnClick(R.id.submit) void submit() {
    // TODO call server...
}那我们就以onClick事件为例模仿着他去写一下。
public class InjectorProcessor {
    public void process(final Object object) {
        Class class_=object.getClass();
        Method[] methods=class_.getDeclaredMethods();
        for (final Method method : methods) {
            onClick clickMethod=method.getAnnotation(onClick.class);
            if (clickMethod!=null) {
                if (object instanceof Activity) {
                    for (int id : clickMethod.value()) {
                        View view=((Activity) object).findViewById(id);
                        view.setOnClickListener(new View.OnClickListener() {
                            @Override
                            public void onClick(View v) {
                                try {
                                    method.invoke(object);
                                } catch (IllegalAccessException e) {
                                    e.printStackTrace();
                                } catch (InvocationTargetException e) {
                                    e.printStackTrace();
                                }
                            }
                        });
                    }
                }
             }
         }
    }
}
使用:
public class MainActivity extends AppCompatActivity {
    @Override
    protected void onCreate(Bundle savedInstanceState) {
        super.onCreate(savedInstanceState);
        setContentView(R.layout.activity_main);
        InjectorProcessor processor=new InjectorProcessor();
        processor.process(MainActivity.this);
    }

    @onClick({R.id.textview})
    public void click() {
        Toast.makeText(this, "HHH", Toast.LENGTH_SHORT).show();
    }
}很显然大神JakeWharton不会这样做的,毕竟反射会影响性能。
我们来看一下ButterKnife的源码:
@Target(METHOD)
@Retention(CLASS)
@ListenerClass(
    targetType = "android.view.View",
    setter = "setOnClickListener",
    type = "butterknife.internal.DebouncingOnClickListener",
    method = @ListenerMethod(
        name = "doClick",
        parameters = "android.view.View"
    )
)
public @interface OnClick {
  /** View IDs to which the method will be bound. */
  @IdRes int[] value() default { View.NO_ID };
}
看到了吗?是编译型的注解。这样不会影响性能。
一张图总结一下:
在刚才介绍的运行时注解中,很多人肯定会说使用反射会影响性能,那有没有不影响性能的方式呢?当然有了,那就是编译时注解。在编译时会通过注解标示来动态生成一些类或者xml,而在运行时,这里注解是没有的,它会依靠动态生成的类来进行操作。所以它就和直接调用方法一样,当然不会有效率影响了。
该类型注解值是@Retention为CLASS的Annotation,由APT(Annotaion Processing Tool)自动进行解析。是在编译时注入,所以不会像反射一样影响效率问题。
根据sun官方的解释,APT(annotation processing tool)是一个命令行工具,
它对源代码文件进行检测找出其中的annotation后,使用annotation processors来处理annotation。
而annotation processors使用了一套反射API并具备对JSR175规范的支持。
annotation processors处理annotation的基本过程如下:
APT运行annotation processors根据提供的源文件中的annotation生成源代码文件和其它的文件(文件具体内容由annotation processors的编写者决定)- 接着
APT将生成的源代码文件和提供的源文件进行编译生成类文件。
APT在编译时自动查找所有继承自AbstractProcessor的类,然后调用他们的process方法去处理,这样就拥有了在编译过程中执行代码的能力
所以我们需要做的是:
- 自定义类继承
AbstractProcessor - 重写
process方法
那我们就开始写:
public class Processor extends AbstractProcessor{
}但是在Android Studio死活提示找不到AbstractProcessor类,这是因为注解是javase中javax包里面的,android.jar默认是不包含的,所以会编译报错.
解决方法就是新建一个Module,在选择类型时将该Module的类型选为Java Library。
然后在该Module中创建就好了Processor就好了,完美解决。
好,那我们就开始写个编译时处理的demo :
-
Android Studio中创建一个Android工程。 -
新建一个
Module,然后选择Java Library类型(我的名字为annotations),并且让app依赖该module。 -
在
annotations的module中创建注解类:package com.charon; import java.lang.annotation.ElementType; import java.lang.annotation.Retention; import java.lang.annotation.RetentionPolicy; import java.lang.annotation.Target; @Target(ElementType.METHOD) @Retention(RetentionPolicy.CLASS) public @interface AnnotationTest { String value() default ""; }
-
然后在
annotations的module自定义Processor类package com.charon; import java.util.Set; import javax.annotation.processing.AbstractProcessor; import javax.annotation.processing.RoundEnvironment; import javax.annotation.processing.SupportedAnnotationTypes; import javax.annotation.processing.SupportedSourceVersion; import javax.lang.model.SourceVersion; import javax.lang.model.element.Element; import javax.lang.model.element.TypeElement; @SupportedAnnotationTypes("com.charon.AnnotationTest") @SupportedSourceVersion(SourceVersion.RELEASE_7) public class TestProcessor extends AbstractProcessor { @Override public boolean process(Set<? extends TypeElement> annotations, RoundEnvironment roundEnv) { System.out.println("process"); for (TypeElement te : annotations) { for (Element element : roundEnv.getElementsAnnotatedWith(te)) { AnnotationTest annotation = element.getAnnotation(AnnotationTest.class); String value = annotation.value(); System.out.println("type : " + value); } } return true; } }
注意:
@SupportedAnnotationTypes("com.charon.AnnotationTest")来指定要处理的注解类。@SupportedSourceVersion(SourceVersion.RELEASE_7)指定编译的版本。这种通过注解指定编译版本和类型的方式是从Java 1.7才有的。 对于之前的版本都是通过重写AbstractProcessor中的方法来指定的。 -
注册处理器
我们自定义了Processor那如何才能让其生效呢?就是在annotations的java同级目录新建resources/META-INF/services/javax.annotation.processing.Processor文件- java - META-INF - services - javax.annotation.processing.Processor
然后在
javax.annotation.processing.Processor文件中指定自定义的处理器,如:com.charon.TestProcessor
如果多个话就分行写。
然后我们
Build一下(命令行执行./gradlew build),就能看到控制台打印出来如下的信息::app:compileReleaseJavaWithJavac :app:compileReleaseJavaWithJavac - is not incremental (e.g. outputs have changed, no previous execution, etc.). process value : haha process
注意:千万不要去
logcat中找信息,这是编译时注解。
注意:一定要使用jdk1.7,1.8对注解的支持有bug。
上面只是一个简单的例子,如果你想用编译时注解去做一些更高级的事情,例如自动生成一些代码,那你可能就会用到如下几个类库:
这三个库分别的作用为:
-
android-apt
Android Studio原本是不支持注解处理器的, 但是用android-apt这个插件后, 我们就可以使用注解处理器了, 这个插件可以自动的帮你为生成的代码创建目录, 让生成的代码编译到APK里面去, 而且它还可以让最终编译出来的APK里面不包含注解处理器本身的代码, 因为这部分代码只是编译的时候需要用来生成代码, 最终运行的时候是不需要的。
也就是说它主要有两个目的:- 允许配置只在编译时作为注解处理器的依赖,而不添加到最后的
APK或library - 设置源路径,使注解处理器生成的代码能被
Android Studio正确的引用
那在什么情况下我们会需要使用它呢?
当你需要引入Processor生成的源代码到你的代码中时。例如当你使用Dagger 2或AndroidAnnotaition. 该插件使得Android Studio可以配置生成资源的build path,避免IDE报错。 当使用apt添加添加依赖,它将不会被包含到最终的APK里。 - 允许配置只在编译时作为注解处理器的依赖,而不添加到最后的
-
AutoGoogle Auto的主要作用是注解Processor类,并对其生成META-INF的配置信息, 可以让你不用去写META-INF这些配置文件,只要在自定义的Processor上面加上@AutoService(Processor.class) -
javapoet
javapoet:A Java API for generating .java source files.可以更方便的生成代码,它可以帮助我们通过类调用的形式来生成代码。
在自定义注解时,一般来说可能会建三个modules:
app module:写一些使用注解的android应用逻辑。api module:定义一些可以在app中使用的注解。它会被app以及compiler使用。compiler module:定义Processor该module不会被包含到应用中,它只会在构建过程中被使用。在编译的过程中它会生成一些java文件,而这些java文件会被打包进apk中。 我们可以在该module中使用auto以及javapoet。
下面开始配置android-apt:
-
配置到
app module下的build.gradle中apply plugin: 'com.android.application' // apt apply plugin: 'com.neenbedankt.android-apt' android { compileSdkVersion 23 buildToolsVersion "23.0.3" defaultConfig { applicationId "com.charon.annotationdemo" minSdkVersion 14 targetSdkVersion 23 versionCode 1 versionName "1.0" } buildTypes { release { minifyEnabled false proguardFiles getDefaultProguardFile('proguard-android.txt'), 'proguard-rules.pro' } } compileOptions { sourceCompatibility JavaVersion.VERSION_1_7 targetCompatibility JavaVersion.VERSION_1_7 } } buildscript { repositories { jcenter() } dependencies { // 配置apt classpath 'com.neenbedankt.gradle.plugins:android-apt:1.8' } } dependencies { compile fileTree(dir: 'libs', include: ['*.jar']) testCompile 'junit:junit:4.12' compile 'com.android.support:appcompat-v7:23.4.0' compile project(':api') apt project(':compiler') }
-
接下来在
compiler module中配置auto以及javapoetapply plugin: 'java' sourceCompatibility = JavaVersion.VERSION_1_7 targetCompatibility = JavaVersion.VERSION_1_7 dependencies { compile project (':api') compile 'com.google.auto.service:auto-service:1.0-rc2' compile 'com.squareup:javapoet:1.7.0' }
-
在
api module中也加上如下的配置:apply plugin: 'java' sourceCompatibility = JavaVersion.VERSION_1_7 targetCompatibility = JavaVersion.VERSION_1_7
-
接下来在
api module中定义一个注解package com.charon; import java.lang.annotation.ElementType; import java.lang.annotation.Retention; import java.lang.annotation.RetentionPolicy; import java.lang.annotation.Target; @Target(ElementType.METHOD) @Retention(RetentionPolicy.CLASS) public @interface AnnotationTest { String value(); }
-
然后在
compiler module中自定义一个Processorpackage com.charon; import com.google.auto.service.AutoService; import java.util.Set; import javax.annotation.processing.AbstractProcessor; import javax.annotation.processing.ProcessingEnvironment; import javax.annotation.processing.Processor; import javax.annotation.processing.RoundEnvironment; import javax.lang.model.SourceVersion; import javax.lang.model.element.TypeElement; @AutoService(Processor.class) public class MyProcessor extends AbstractProcessor { /** * Initializes the processor with the processing environment by * setting the {@code processingEnv} field to the value of the * {@code processingEnv} argument. An {@code * IllegalStateException} will be thrown if this method is called * more than once on the same object. * * @param processingEnv environment to access facilities the tool framework * provides to the processor * @throws IllegalStateException if this method is called more than once. */ @Override public synchronized void init(ProcessingEnvironment processingEnv) { super.init(processingEnv); } /** * Processes a set of annotation types on type elements originating from the prior round * and returns whether or not these annotations are claimed by this processor. * If true is returned, the annotations are claimed and subsequent processors will * not be asked to process them; * if false is returned, the annotations are unclaimed and subsequent processors may be * asked to process them. A processor may always return the same boolean value * or may vary the result based on chosen criteria. * The input set will be empty if the processor supports "*" and the root elements * have no annotations. A Processor must gracefully handle an empty set of annotations. * @param annotations * @param roundEnv * @return */ @Override public boolean process(Set<? extends TypeElement> annotations, RoundEnvironment roundEnv) { System.out.println("hello processor"); return false; } @Override public Set<String> getSupportedAnnotationTypes() { return super.getSupportedAnnotationTypes(); } @Override public SourceVersion getSupportedSourceVersion() { return SourceVersion.latestSupported(); } }
这里简单的说一下这几个主要的方法:
init():初始化操作的方法,RoundEnvironment会提供很多有用的工具类Elements、Types和Filer等。process():这相当于每个处理器的主函数main()。在该方法中去扫描、评估、处理以及生成Java文件。getSupportedAnnotationTypes():这里你必须指定,该注解器是注册给哪个注解的。getSupportedSourceVersion():用来指定你使用的java版本。通常这里会直接放回SourceVersion.latestSupported()即可。
从
idk 1.7开始,可以使用如下注解来代替getSupporedAnnotationTypes()和getSupportedSourceVersion()方法:@SupportedSourceVersion(SourceVersion.latestSupported()) @SupportedAnnotationTypes({ // 合法注解全名的集合 })
注解相关API:
-
Set<? extends Element> getElementsAnnotatedWith(Class<? extends Annotation> a)
返回使用给定注释类型注释的元素。该注释可能直接出现或者被继承。只返回注释处理的此round中包括的package元素和type元素、成员声明、参数或者这些元素中声明的类型参数。 -
Element
表示一个程序元素,比如包、类或者方法。每个元素都表示一个静态的语言级构造(不表示虚拟机的运行时构造)。 元素应该使用equals(Object)方法进行比较。不保证总是使用相同的对象表示某个特定的元素。 要实现基于Element对象类的操作,可以使用visitor或者使用getKind()方法的结果。使用instanceof确定此建模层次结构中某一对象的有效类未必可靠,因为一个实现可以选择让单个对象实现多个Element子接口。 -
TypeElement表示一个类或接口程序元素。提供对有关类型及其成员的信息的访问。注意,枚举类型是一种类,而注释类型是一种接口。 而DeclaredType表示一个类或接口类型,后者将成为前者的一种使用(或调用)。这种区别对于一般的类型是最明显的,对于这些类型,单个元素可以定义一系列完整的类型。 例如,元素java.util.Set对应于参数化类型java.util.Set<String>和java.util.Set<Number>(以及其他许多类型),还对应于原始类型java.util.Set。
扯远了,那我们就以上面的目录结构和实现方式,通过一个具体的例子要详细说明,例子真的很难找,我在网上找到了一个大神写的,虽然从这个例子中并不能看出注解的强大之处,但是对于讲解来说还是非常有用的:
我们要解决的问题是我们想要实现一个披萨店,该店会提供两种披萨(Margherita和Calzone)和一种甜点(Tiramisu)。
首先我们在app module中创建对应的接口和代码 ,如下:
public interface Meal {
  public float getPrice();
}

public class MargheritaPizza implements Meal {

  @Override public float getPrice() {
    return 6.0f;
  }
}

public class CalzonePizza implements Meal {

  @Override public float getPrice() {
    return 8.5f;
  }
}

public class Tiramisu implements Meal {

  @Override public float getPrice() {
    return 4.5f;
  }
}
如果消费者想要下单,那么它需要输入对应的物品名字:
public class PizzaStore {

  public Meal order(String mealName) {

    if (mealName == null) {
      throw new IllegalArgumentException("Name of the meal is null!");
    }

    if ("Margherita".equals(mealName)) {
      return new MargheritaPizza();
    }

    if ("Calzone".equals(mealName)) {
      return new CalzonePizza();
    }

    if ("Tiramisu".equals(mealName)) {
      return new Tiramisu();
    }

    throw new IllegalArgumentException("Unknown meal '" + mealName + "'");
  }

  public static void main(String[] args) throws IOException {
    PizzaStore pizzaStore = new PizzaStore();
    Meal meal = pizzaStore.order(readConsole());
    System.out.println("Bill: $" + meal.getPrice());
}这样的话在order()方法中,会有很多if语句,并且每当我们添加一种新的披萨,我们都要添加一条新的if语句。但是我们可以使用注解和工厂模式,我们就可以让注解来自动生成这些在工厂中的if语句。我们期待的代码如下:
public class PizzaStore {

  private MealFactory factory = new MealFactory();

  public Meal order(String mealName) {
    return factory.create(mealName);
  }

  public static void main(String[] args) throws IOException {
    PizzaStore pizzaStore = new PizzaStore();
    Meal meal = pizzaStore.order(readConsole());
    System.out.println("Bill: $" + meal.getPrice());
  }
}MealFactory的实现应该如下:
public class MealFactory {

  public Meal create(String id) {
    if (id == null) {
      throw new IllegalArgumentException("id is null!");
    }
    if ("Calzone".equals(id)) {
      return new CalzonePizza();
    }

    if ("Tiramisu".equals(id)) {
      return new Tiramisu();
    }

    if ("Margherita".equals(id)) {
      return new MargheritaPizza();
    }

    throw new IllegalArgumentException("Unknown id = " + id);
  }
}接下来我们要做的就是通过注解来生成MealFactory中的代码。
想法是这样的:我们将使用同样的type()注解那些属于同一个工厂的类,并且用注解的id()做一个映射,例如从"Calzone"映射到"ClzonePizza"类。我们使用@Factory注解到我们的类中,如下:
@Factory(
    id = "Margherita",
    type = Meal.class
)
public class MargheritaPizza implements Meal {

  @Override public float getPrice() {
    return 6f;
  }
}@Factory(
id = "Calzone",
type = Meal.class
)
public class CalzonePizza implements Meal {
@Override public float getPrice() {
return 8.5f;
}
}@Factory(
id = "Tiramisu",
type = Meal.class
)
public class Tiramisu implements Meal {
@Override public float getPrice() {
return 4.5f;
}
}你可能会问你自己,我们是否可以只把@Factory注解应用到Meal接口上?答案是注解是不能继承的。一个类class X被注解,并不意味着它的子类class Y extends X会自动被注解。在我们开始写处理器的代码之前,我们先规定如下一些规则:
- 只有类可以被
@Factory注解,因为接口或者抽象类并不能用new操作实例化; - 被
@Factory注解的类,必须至少提供一个公开的默认构造器(即没有参数的构造函数)。否者我们没法实例化一个对象。 - 被
@Factory注解的类必须直接或者间接的继承于type()指定的类型; - 具有相同的
type的注解类,将被聚合在一起生成一个工厂类。这个生成的类使用Factory后缀,例如type = Meal.class,将生成MealFactory工厂类; id只能是String类型,并且在同一个type组中必须唯一。
那我们接着看一下在compiler module中的自定义的FactoryProcessor类:
@AutoService(Processor.class)
public class FactoryProcessor extends AbstractProcessor {

  private Types typeUtils;
  private Elements elementUtils;
  private Filer filer;
  private Messager messager;
  private Map<String, FactoryGroupedClasses> factoryClasses = new LinkedHashMap<String, FactoryGroupedClasses>();

  @Override
  public synchronized void init(ProcessingEnvironment processingEnv) {
    super.init(processingEnv);
    typeUtils = processingEnv.getTypeUtils();
    elementUtils = processingEnv.getElementUtils();
    filer = processingEnv.getFiler();
    messager = processingEnv.getMessager();
  }

  @Override
  public Set<String> getSupportedAnnotationTypes() {
    Set<String> annotataions = new LinkedHashSet<String>();
    // 指定支持@Factory注解
    annotataions.add(Factory.class.getCanonicalName());
    return annotataions;
  }

  @Override
  public SourceVersion getSupportedSourceVersion() {
    return SourceVersion.latestSupported();
  }

  @Override
  public boolean process(Set<? extends TypeElement> annotations, RoundEnvironment roundEnv) {
    ...
  }
}在init()方法中,我们初始化了几个变量:
Elements: 处理Element的工具类Types: 处理TypeMirror的工具类Filer: 用来创建你要创建的文件Messager:提供给注解处理器一个报告错误、警告以及提示信息的途径。
在注解的处理过程中会扫描所有的java源文件。源代码中的每一个部分都是一个特定类型的Element。换句话说:Element代表程序的元素,例如包、类或者方法等。每个Element代表一个构建,例如通过下面的例子我们来说明一下:
package com.example;    // PackageElement

public class Foo {        // TypeElement

    private int a;      // VariableElement
    private Foo other;  // VariableElement

    public Foo () {}    // ExecuteableElement

    public void setA (  // ExecuteableElement
                     int newA   // TypeElement
                     ) {}
}所以在注解中我们必须要换一个角度来看待源代码,它只是一个结构化的文本,我们可以像XML中的DOM一样去解析它。
例如现在有一个代表public class Foo类的TypeElement元素,你可以遍历它的子元素,如下:
TypeElement fooClass = ... ;
for (Element e : fooClass.getEnclosedElements()){ // iterate over children
    Element parent = e.getEnclosingElement();  // parent == fooClass
}正如你所见,Element代表的是源代码。TypeElement代表的是源代码中的类型元素,例如类。然而TypeElement并不包含类本身的信息。你可以从TypeElement中获取类的名字,但是你获取不到类的信息,例如它的父类。这种信息需要通过TypeMirror获取。你可以通过调用elements.asType()获取元素的TypeMirror。
接下来我们来继续实现process()方法:
@AutoService(Processor.class)
public class FactoryProcessor extends AbstractProcessor {

    private Types typeUtils;
    private Elements elementUtils;
    private Filer filer;
    private Messager messager;

    @Override
    public synchronized void init(ProcessingEnvironment processingEnv) {
        super.init(processingEnv);
        typeUtils = processingEnv.getTypeUtils();
        elementUtils = processingEnv.getElementUtils();
        filer = processingEnv.getFiler();
        messager = processingEnv.getMessager();
    }

    @Override
    public Set<String> getSupportedAnnotationTypes() {
        Set<String> annotataions = new LinkedHashSet<String>();
        annotataions.add(Factory.class.getCanonicalName());
        return annotataions;
    }

    @Override
    public SourceVersion getSupportedSourceVersion() {
        return SourceVersion.latestSupported();
    }

    @Override
    public boolean process(Set<? extends TypeElement> annotations, RoundEnvironment roundEnv) {
        // roundEnv.getElementsAnnotatedWith(Factory.class))返回所有被注解了@Factory的元素的列表。
        // 你可能已经注意到,我们并没有说“所有被注解了@Factory的类的列表”,因为它真的是返回Element的列表。
        // 请记住:Element可以是类、方法、变量等。所以,接下来,我们必须检查这些Element是否是一个类
        for (Element annotatedElement : roundEnv.getElementsAnnotatedWith(Factory.class)) {
            // Check if a class has been annotated with @Factory
            if (annotatedElement.getKind() != ElementKind.CLASS) {
                return false;
            }
        }

        return false;
    }
}在继续检查被注解@Fractory的类是否满足我们上面说的5条规则之前,我们将介绍一个让我们更方便继续处理的数据结构。有时候,一个问题或者解释器看起来如此简单,以至于程序员倾向于用一个面向过程方式来写整个处理器。但是你知道吗?一个注解处理器仍然是一个Java程序,所以我们需要使用面向对象编程、接口、设计模式,以及任何你将在其他普通Java程序中使用的技巧。
我们的FactoryProcessor非常简单,但是我们仍然想要把一些信息存为对象。在FactoryAnnotatedClass中,我们保存被注解类的数据,比如合法的类的名字,以及@Factory注解本身的一些信息。也就是说每一个使用了@Factory注解的类都对应一个FactoryAnnotatedClass类,所以,我们保存TypeElement和处理过的@Factory注解:
如下:
public class FactoryAnnotatedClass {

  private TypeElement annotatedClassElement;
  private String qualifiedSuperClassName;
  private String simpleTypeName;
  private String id;

  public FactoryAnnotatedClass(TypeElement classElement) throws IllegalArgumentException {
    this.annotatedClassElement = classElement;
    Factory annotation = classElement.getAnnotation(Factory.class);
    id = annotation.id();

    if (StringUtils.isEmpty(id)) {
      throw new IllegalArgumentException(
          String.format("id() in @%s for class %s is null or empty! that's not allowed",
              Factory.class.getSimpleName(), classElement.getQualifiedName().toString()));
    }

    // Get the full QualifiedTypeName
    try {
      Class<?> clazz = annotation.type();
      // 返回底层阶级Java语言规范中定义的标准名称。
      qualifiedSuperClassName = clazz.getCanonicalName();
      simpleTypeName = clazz.getSimpleName();
    } catch (MirroredTypeException mte) {
      DeclaredType classTypeMirror = (DeclaredType) mte.getTypeMirror();
      TypeElement classTypeElement = (TypeElement) classTypeMirror.asElement();
      qualifiedSuperClassName = classTypeElement.getQualifiedName().toString();
      simpleTypeName = classTypeElement.getSimpleName().toString();
    }
  }

  /**
   * 获取在{@link Factory#id()}中指定的id
   * return the id
   */
  public String getId() {
    return id;
  }

  /**
   * 获取在{@link Factory#type()}指定的类型合法全名
   *
   * @return qualified name
   */
  public String getQualifiedFactoryGroupName() {
    return qualifiedSuperClassName;
  }


  /**
   * 获取在{@link Factory#type()}{@link Factory#type()}指定的类型的简单名字
   *
   * @return qualified name
   */
  public String getSimpleFactoryGroupName() {
    return simpleTypeName;
  }

  /**
   * 获取被@Factory注解的原始元素
   */
  public TypeElement getTypeElement() {
    return annotatedClassElement;
  }
}上面我们用到了Class,因为这里的类型是一个java.lang.Class。这就意味着,他是一个真正的Class对象。因为注解处理是在编译Java源代码之前。我们需要考虑如下两种情况:
- 这个类已经被编译:这种情况是:如果第三方
.jar包含已编译的被@Factory注解.class文件。在这种情况下,可以通过上面的方式在try代码块中直接获取。 - 这个还没有被编译:这种情况是我们尝试编译被
@Fractory注解的源代码。这种情况下,直接获取Class会抛出MirroredTypeException异常。幸运的是,MirroredTypeException包含一个TypeMirror,它表示我们未编译类。因为我们已经知道它必定是一个类类型(我们已经在前面检查过),我们可以直接强制转换为DeclaredType,然后读取TypeElement来获取合法的名字。
好了,我们现在还需要一个数据结构类FactoryGroupedClasses,它将简单的组合所有的FactoryAnnotatedClasses到一起。
public class FactoryGroupedClasses {

  private String qualifiedClassName;

  private Map<String, FactoryAnnotatedClass> itemsMap =
      new LinkedHashMap<String, FactoryAnnotatedClass>();

  public FactoryGroupedClasses(String qualifiedClassName) {
    this.qualifiedClassName = qualifiedClassName;
  }

  public void add(FactoryAnnotatedClass toInsert) throws IdAlreadyUsedException {

    FactoryAnnotatedClass existing = itemsMap.get(toInsert.getId());
    if (existing != null) {
      throw new IdAlreadyUsedException(existing);
    }

    itemsMap.put(toInsert.getId(), toInsert);
  }

  public void generateCode(Elements elementUtils, Filer filer) throws IOException {
    ...
  }
}正如你所见,这是一个基本的Map<String, FactoryAnnotatedClass>,这个映射表用来映射@Factory.id()到FactoryAnnotatedClass。我们选择Map这个数据类型,是因为我们要确保每个id是唯一的,我们可以很容易通过map查找实现。generateCode()方法将被用来生成工厂类代码(将在后面讨论)。
我们继续实现process()方法。接下来我们想要检查被注解的类必须有只要一个公开的构造函数,不是抽象类,继承于特定的类型,以及是一个公开类:
@AutoService(Processor.class)
public class FactoryProcessor extends AbstractProcessor {

    private Types typeUtils;
    private Elements elementUtils;
    private Filer filer;
    private Messager messager;
    private Map<String, FactoryGroupedClasses> factoryClasses =
            new LinkedHashMap<String, FactoryGroupedClasses>();

    @Override
    public synchronized void init(ProcessingEnvironment processingEnv) {
        super.init(processingEnv);
        typeUtils = processingEnv.getTypeUtils();
        elementUtils = processingEnv.getElementUtils();
        filer = processingEnv.getFiler();
        messager = processingEnv.getMessager();
    }

    @Override
    public Set<String> getSupportedAnnotationTypes() {
        Set<String> annotataions = new LinkedHashSet<String>();
        annotataions.add(Factory.class.getCanonicalName());
        return annotataions;
    }

    @Override
    public SourceVersion getSupportedSourceVersion() {
        return SourceVersion.latestSupported();
    }

    @Override
    public boolean process(Set<? extends TypeElement> annotations, RoundEnvironment roundEnv) {
        // roundEnv.getElementsAnnotatedWith(Factory.class))返回所有被注解了@Factory的元素的列表。
        // 你可能已经注意到,我们并没有说“所有被注解了@Factory的类的列表”,因为它真的是返回Element的列表。
        // 请记住:Element可以是类、方法、变量等。所以,接下来,我们必须检查这些Element是否是一个类
        for (Element annotatedElement : roundEnv.getElementsAnnotatedWith(Factory.class)) {
            // Check if a class has been annotated with @Factory
            if (annotatedElement.getKind() != ElementKind.CLASS) {
                error(annotatedElement, "Only classes can be annotated with @%s",
                        Factory.class.getSimpleName());
                return true; // 退出处理
            }


            // 因为我们已经知道它是ElementKind.CLASS类型,所以可以直接强制转换
            TypeElement typeElement = (TypeElement) annotatedElement;

            try {
                FactoryAnnotatedClass annotatedClass =
                        new FactoryAnnotatedClass(typeElement); // throws IllegalArgumentException

                if (!isValidClass(annotatedClass)) {
                    return true; // 已经打印了错误信息,退出处理过程
                }

                // 一旦我们检查isValidClass()成功,我们将添加FactoryAnnotatedClass到对应的FactoryGroupedClasses中
                FactoryGroupedClasses factoryClass =
                        factoryClasses.get(annotatedClass.getQualifiedFactoryGroupName());
                if (factoryClass == null) {
                    String qualifiedGroupName = annotatedClass.getQualifiedFactoryGroupName();
                    factoryClass = new FactoryGroupedClasses(qualifiedGroupName);
                    factoryClasses.put(qualifiedGroupName, factoryClass);
                }

                // 如果和其他的@Factory标注的类的id相同冲突,
                // 抛出IdAlreadyUsedException异常
                factoryClass.add(annotatedClass);
            } catch (IllegalArgumentException e) {
                // @Factory.id()为空 --> 打印错误信息
                error(typeElement, e.getMessage());
                return true;
            } catch (IdAlreadyUsedException e) {
                FactoryAnnotatedClass existing = e.getExisting();
                // 已经存在
                error(annotatedElement,
                        "Conflict: The class %s is annotated with @%s with id ='%s' but %s already uses the same id",
                        typeElement.getQualifiedName().toString(), Factory.class.getSimpleName(),
                        existing.getTypeElement().getQualifiedName().toString());
                return true;
            }
        }

        // 为每个工厂生成Java文件
        try {
            for (FactoryGroupedClasses factoryClass : factoryClasses.values()) {
                factoryClass.generateCode(elementUtils, filer);
            }
        // TODO ...注意这里会遗留一个问题,我们后面再仔细说。
        } catch (IOException e) {
            error(null, e.getMessage());
        }

        return true;
    }

    private void error(Element e, String msg, Object... args) {
        messager.printMessage(
                Diagnostic.Kind.ERROR,
                String.format(msg, args),
                e);
    }


    private boolean isValidClass(FactoryAnnotatedClass item) {

        // 转换为TypeElement, 含有更多特定的方法
        TypeElement classElement = item.getTypeElement();

        if (!classElement.getModifiers().contains(Modifier.PUBLIC)) {
            error(classElement, "The class %s is not public.",
                    classElement.getQualifiedName().toString());
            return false;
        }

        // 检查是否是一个抽象类
        if (classElement.getModifiers().contains(Modifier.ABSTRACT)) {
            error(classElement, "The class %s is abstract. You can't annotate abstract classes with @%",
                    classElement.getQualifiedName().toString(), Factory.class.getSimpleName());
            return false;
        }

        // 检查继承关系: 必须是@Factory.type()指定的类型子类
        TypeElement superClassElement =
                elementUtils.getTypeElement(item.getQualifiedFactoryGroupName());
        if (superClassElement.getKind() == ElementKind.INTERFACE) {
            // 检查接口是否实现了
            if(!classElement.getInterfaces().contains(superClassElement.asType())) {
                error(classElement, "The class %s annotated with @%s must implement the interface %s",
                        classElement.getQualifiedName().toString(), Factory.class.getSimpleName(),
                        item.getQualifiedFactoryGroupName());
                return false;
            }
        } else {
            // 检查子类
            TypeElement currentClass = classElement;
            while (true) {
                TypeMirror superClassType = currentClass.getSuperclass();

                if (superClassType.getKind() == TypeKind.NONE) {
                    // 到达了基本类型(java.lang.Object), 所以退出
                    error(classElement, "The class %s annotated with @%s must inherit from %s",
                            classElement.getQualifiedName().toString(), Factory.class.getSimpleName(),
                            item.getQualifiedFactoryGroupName());
                    return false;
                }

                if (superClassType.toString().equals(item.getQualifiedFactoryGroupName())) {
                    // 找到了要求的父类
                    break;
                }

                // 在继承树上继续向上搜寻
                currentClass = (TypeElement) typeUtils.asElement(superClassType);
            }
        }

        // 检查是否提供了默认公开构造函数
        for (Element enclosed : classElement.getEnclosedElements()) {
            if (enclosed.getKind() == ElementKind.CONSTRUCTOR) {
                ExecutableElement constructorElement = (ExecutableElement) enclosed;
                if (constructorElement.getParameters().size() == 0 && constructorElement.getModifiers()
                        .contains(Modifier.PUBLIC)) {
                    // 找到了默认构造函数
                    return true;
                }
            }
        }

        // 没有找到默认构造函数
        error(classElement, "The class %s must provide an public empty default constructor",
                classElement.getQualifiedName().toString());
        return false;
    }

}我们这里添加了isValidClass()方法,来检查是否我们所有的规则都被满足了:
- 必须是公开类:
classElement.getModifiers().contains(Modifier.PUBLIC) - 必须是非抽象类:
classElement.getModifiers().contains(Modifier.ABSTRACT) - 必须是
@Factoy.type()指定的类型的子类或者接口的实现:首先我们使用elementUtils.getTypeElement(item.getQualifiedFactoryGroupName())创建一个传入的Class(@Factoy.type())的元素。是的,你可以仅仅通过已知的合法类名来直接创建TypeElement(使用TypeMirror)。接下来我们检查它是一个接口还是一个类:superClassElement.getKind() == ElementKind.INTERFACE。所以我们这里有两种情况:如果是接口,就判断classElement.getInterfaces().contains(superClassElement.asType());如果是类,我们就必须使用currentClass.getSuperclass()扫描继承层级。注意,整个检查也可以使用typeUtils.isSubtype()来实现。 - 类必须有一个公开的默认构造函数:我们遍历所有的闭元素
classElement.getEnclosedElements(),然后检查ElementKind.CONSTRUCTOR、Modifier.PUBLIC以及constructorElement.getParameters().size() == 0。
上面都实现完成后下面就是在FactoryGroupedClasses.generateCode()方法中去生成java文件了。
写Java文件,和写其他普通文件没有什么两样。使用Filer提供的Writer对象,我们可以连接字符串来写我们生成的Java代码。但是这样是不是非常麻烦啊?还好良心企业Square给我们提供了Javapoet,我们可以用它来非常简单的去生成java文件。那我们接下来就使用javapoet来去生成代码:
public class FactoryGroupedClasses {

    /**
     * 将被添加到生成的工厂类的名字中
     */
    private static final String SUFFIX = "Factory";

    private String qualifiedClassName;

    private Map<String, FactoryAnnotatedClass> itemsMap =
            new LinkedHashMap<String, FactoryAnnotatedClass>();

    public FactoryGroupedClasses(String qualifiedClassName) {
        this.qualifiedClassName = qualifiedClassName;
    }

    public void add(FactoryAnnotatedClass toInsert) throws ProcessingException {

        FactoryAnnotatedClass existing = itemsMap.get(toInsert.getId());
        if (existing != null) {

            // Alredy existing
            throw new ProcessingException(toInsert.getTypeElement(),
                    "Conflict: The class %s is annotated with @%s with id ='%s' but %s already uses the same id",
                    toInsert.getTypeElement().getQualifiedName().toString(), Factory.class.getSimpleName(),
                    toInsert.getId(), existing.getTypeElement().getQualifiedName().toString());
        }

        itemsMap.put(toInsert.getId(), toInsert);
    }

    public void generateCode(Elements elementUtils, Filer filer) throws IOException {
        TypeElement superClassName = elementUtils.getTypeElement(qualifiedClassName);
        String factoryClassName = superClassName.getSimpleName() + SUFFIX;
        String qualifiedFactoryClassName = qualifiedClassName + SUFFIX;
        PackageElement pkg = elementUtils.getPackageOf(superClassName);
        String packageName = pkg.isUnnamed() ? null : pkg.getQualifiedName().toString();

        MethodSpec.Builder method = MethodSpec.methodBuilder("create")
                .addModifiers(Modifier.PUBLIC)
                .addParameter(String.class, "id")
                .returns(TypeName.get(superClassName.asType()));

        // check if id is null
        method.beginControlFlow("if (id == null)")
                .addStatement("throw new IllegalArgumentException($S)", "id is null!")
                .endControlFlow();

        // Generate items map
        for (FactoryAnnotatedClass item : itemsMap.values()) {
            method.beginControlFlow("if ($S.equals(id))", item.getId())
                    .addStatement("return new $L()", item.getTypeElement().getQualifiedName().toString())
                    .endControlFlow();
        }

        method.addStatement("throw new IllegalArgumentException($S + id)", "Unknown id = ");

        TypeSpec typeSpec = TypeSpec.classBuilder(factoryClassName).addMethod(method.build()).build();

        // Write file
        JavaFile.builder(packageName, typeSpec).build().writeTo(filer);
    }
}
到这里,我感觉完成了,运行一下,结果发现报错了:
:compiler:jar UP-TO-DATE
:app:compileDebugJavaWithJavac
错误: Attempt to recreate a file for type com.charon.annotationdemo.inter.MealFactory
错误: Attempt to recreate a file for type com.charon.annotationdemo.inter.MealFactory
2 个错误
Error:Execution failed for task ':app:compileDebugJavaWithJavac'.
> Compilation failed; see the compiler error output for details.
那我们继续来解决这个问题,这个问题是由于循环引起的,我们还要处理一个重要的事情就是循环的问题:
注解处理可能会执行多次,官方文档中是这样介绍的:
Annotation processing happens in a sequence of rounds. On each round, a processor may be asked to process a subset of the annotations found on the source and class files produced by a prior round. The inputs to the first round of processing are the initial inputs to a run of the tool; these initial inputs can be regarded as the output of a virtual zeroth round of processing.
一个简单的定义:一个处理循环是调用一个注解处理器的process()方法。对应到我们的工厂模式的例子中:FactoryProcessor被初始化一次(不是每次循环都会新建处理器对象),然而,如果生成了新的源文件process()能够被调用多次。听起来有点奇怪不是么?原因是这样的,这些生成的文件中也可能包含@Factory注解,它们还将会被FactoryProcessor处理。
例如我们的PizzaStore的例子中将会经过3次循环处理:
| Round | Input | Output |
|---|---|---|
| 1 | CalzonePizza.java Tiramisu.java MargheritaPizza.java Meal.java PizzaStore.java | MealFactory.java |
| 2 | MealFactory.java | none |
| 3 | none | none |
会循环三次,但是第一次就会生成代码,所以上面会出现两次重复创建文件的错误。
解释处理循环还有另外一个原因。如果你看一下我们的FactoryProcessor代码你就能注意到,我们收集数据和保存它们在一个私有的域中Map<String, FactoryGroupedClasses> factoryClasses。在第一轮中,我们检测到了MagheritaPizza, CalzonePizza和Tiramisu,然后生成了MealFactory.java。在第二轮中把MealFactory作为输入。因为在MealFactory中没有检测到@Factory注解,我们预期并没有错误,然而我们得到如下的信息:
:compiler:jar UP-TO-DATE
:app:compileDebugJavaWithJavac
错误: Attempt to recreate a file for type com.charon.annotationdemo.inter.MealFactory
错误: Attempt to recreate a file for type com.charon.annotationdemo.inter.MealFactory
2 个错误
Error:Execution failed for task ':app:compileDebugJavaWithJavac'.
> Compilation failed; see the compiler error output for details.这个问题是因为我们没有清除factoryClasses,这意味着,在第二轮的process()中,任然保存着第一轮的数据,并且会尝试生成在第一轮中已经生成的文件,从而导致这个错误的出现。在我们的这个场景中,我们知道只有在第一轮中检查@Factory注解的类,所以我们可以简单的修复这个问题,如下:
@Override
public boolean process(Set<? extends TypeElement> annotations, RoundEnvironment roundEnv) {
    try {
      for (FactoryGroupedClasses factoryClass : factoryClasses.values()) {
        factoryClass.generateCode(elementUtils, filer);
      }

      // 清除factoryClasses
      factoryClasses.clear();

    } catch (IOException e) {
      error(null, e.getMessage());
    }
    ...
    return true;
}
我们要记住注解处理过程是需要经过多轮处理的,并且你不能重载或者重新创建已经生成的源代码。
好了,到这里就彻底完成了,运行一下,当然成功了,那生成的文件在哪里呢?
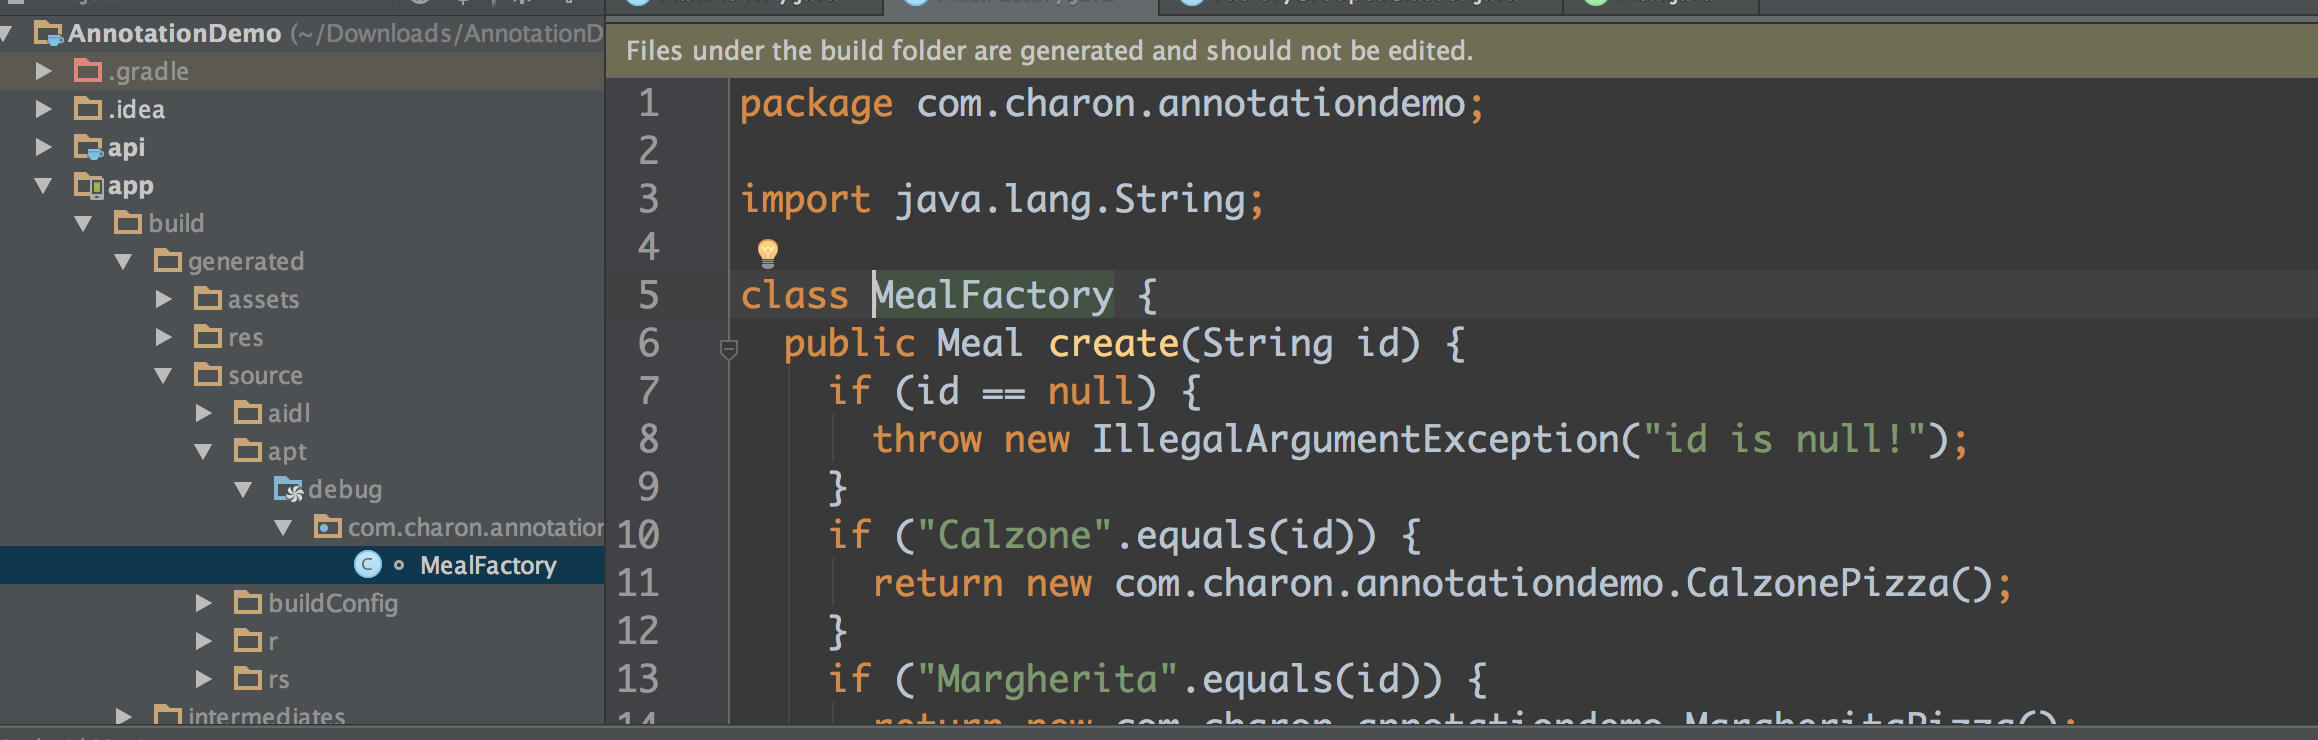
那既然能生成,我们该怎么去调用呢?很简单,像平常一样去用。
public class MainActivity extends AppCompatActivity {
    private View view;

    @Override
    protected void onCreate(Bundle savedInstanceState) {
        super.onCreate(savedInstanceState);
        setContentView(R.layout.activity_main);
        view = findViewById(R.id.tv);
        view.setOnClickListener(new View.OnClickListener() {
            @Override
            public void onClick(View v) {
                MealFactory factory = new MealFactory();
                factory.create("Calzone");
            }
        });
    }
}你可能会发现报错,找不到类,你可以不用管它,直接运行,你会发现一切都OK的。当然如果你倒错了包你就当我没说。
作为Android开发者,当然应该很熟悉ButterKnife。在ButterKnife中使用@InjectView注解View。ButterKnifeProcessor生成一个MyActivity$$ViewInjector,但是在ButterKnife你不需要手动调用new MyActivity$$ViewInjector()来实例化一个ButterKnife注入的对象,而是使用Butterknife.inject(activity)。ButterKnife内部使用反射机制来实例化MyActivity$$ViewInjector()对象:
try {
    Class<?> injector = Class.forName(clsName + "$$ViewInjector");
} catch (ClassNotFoundException e) { ... }但是反射机制会稍微有些慢,我们使用注解处理来生成本地代码,会不会导致很多的反射性能的问题?的确,反射机制的性能确实是一个问题。然而,它不需要手动去创建对象,确实提高了开发者的开发速度。ButterKnife中有一个哈希表HashMap来缓存实例化过的对象。所以MyActivity$$ViewInjector只是使用反射机制实例化一次,第二次需要MyActivity$$ViewInjector的时候,就直接从哈希表中获得。
FragmentArgs非常类似于ButterKnife。它使用反射机制来创建对象,而不需要开发者手动来做这些。FragmentArgs在处理注解的时候生成一个特别的查找表类,它其实就是一种哈希表,所以整个FragmentArgs库只是在第一次使用的时候,执行一次反射调用,一旦整个Class.forName()的Fragemnt的参数对象被创建,后面的都是本地代码运行了。
好了至此例子讲完了。
最后讲一下按照上面的三层分类:app,api,compiler进行分类的好处。
我们这么做是因为想让我们的工厂模式的例子的使用者在他们的工程中只编译注解,而包含处理器模块只是为了编译。有点晕?我们举个例子,如果我们只有一个包。如果另一个开发者想要把我们的工厂模式处理器用于他的项目中,他就必须包含@Factory注解和整个FactoryProcessor的代码(包括FactoryAnnotatedClass和FactoryGroupedClasses)到他们项目中。我非常确定的是,他并不需要在他已经编译好的项目中包含处理器相关的代码。如果你是一个Android的开发者,你肯定听说过65536个方法的限制(即在一个.dex文件中,只能寻址65536个方法)。如果你在FactoryProcessor中使用guava,并且把注解和处理器打包在一个包中,这样的话,Android APK安装包中不只是包含FactoryProcessor的代码,而也包含了整个guava的代码。Guava有大约20000个方法。所以分开注解和处理器是非常有意义的。
Google提供了Support-Annotations library来支持更多的注解功能。
可以直接在build.gradle中添加如下代码:
dependencies {
    compile 'com.android.support:support-annotations:23.3.0'
}
Android提供了很多注解来支持在方法、参数和返回值上面使用,例如:
-
@Nullable
可以为null -
@NonNull
不能为nullimport android.support.annotation.NonNull; ... /** Add support for inflating the <fragment> tag. */ @NonNull @Override public View onCreateView(String name, @NonNull Context context, @NonNull AttributeSet attrs) { ... } ...
-
@StringRes
R.string类型的资源。import android.support.annotation.StringRes; ... public abstract void setTitle(@StringRes int resId); ... 遇到那种你写了个`setTitle(int resId)`他确给你传`setTitle(R.drawable.xxx)`的选手,用这种方式能很好的去提示下。
-
@DrawableRes
Drawable类型的资源。 -
@ColorRes
Color类型的资源。 -
@InterpolatorRes
Interpolatro类型。 -
@AnyRes
R.类型。 -
@UiThread
从UI thread调用。 -
@RequiresPermission
来验证该方法的调用者所需要有的权限。检查一个列表中的任何一个权限可以使用anyOf属性。想要检查多个权限时,可以使用allOf属性。如下:@RequiresPermission(Manifest.permission.SET_WALLPAPER) public abstract void setWallpaper(Bitmap bitmap) throws IOException;
检查多个权限:
@RequiresPermission(allOf = {
    Manifest.permission.READ_EXTERNAL_STORAGE,
    Manifest.permission.WRITE_EXTERNAL_STORAGE})
public static final void copyFile(String dest, String source) {
    ...
}
示例Demo已上传到Github:AnnotationDemo
文中例子来自Hannes Dorfmann大神的ANNOTATION PROCESSING 101,我对其重新梳理了下,来让能正常使用,并且上面的示例已经过我实际运行:
- 邮箱 :charon.chui@gmail.com
- Good Luck!