- 自定义一个View继承ViewGroup等相似效果的View;
- 重写构造方法
可以在构造方法中附加要显示的内容如下:
View.inflate(context, R.layout.ui_setting_view, this);这里就是让这个填充出来的View显示到当前我们自定义的这个布局中View的构造方法共有三个,其中一个参数的构造方法,是通过代码new对象的时候调用, 两个参数的构造方法是通过在xml布局文件中声明的构造 - 实现通过
Xml文件配置属性values目录下新建attrs.xml- 内容如下
 <declare-styleable name="SettingView">
 	<attr name="title" format="string" />
 </declare-styleable>
配置完成后会自动在R文件中生产对应的R.styleable内部类
- 代码设置
- 在构造函数中将
Xml配置与属性值建立映射关系 - 使用
typedArray.getString(R.styleable.SettingView_title)得到xml中的属性值,并且设置给相应控件的属性。 - 调用
typedArray.recycle(); 回收掉资源.public SettingView(Context context, AttributeSet attrs) { super(context, attrs); TypedArray typedArray = mContext.obtainStyledAttributes(attrs, R.styleable.SettingView); //R.styleable.SettingView_title为R文件中自动生成的相应属性名 String title = typedArray.getString(R.styleable.SettingView_title); setTitle(title); typedArray.recycle(); }
- 在构造函数中将
- 布局使用
Android的命名空间为xmlns:android=http://schemas.android.com/apk/res/android
定义自己的命名空间时只需要把最后面的android改为我们应用程序的包名xmlns:itheima="http://schemas.android.com/apk/res/com.charon.test"
以系统设置页面的选中为例
-
样式
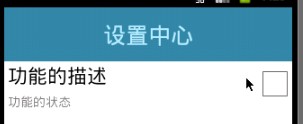
示例代码:settingview.xml<?xml version="1.0" encoding="utf-8"?> <RelativeLayout xmlns:android="http://schemas.android.com/apk/res/android" android:layout_width="match_parent" android:layout_height="wrap_content" > <TextView android:id="@+id/tv_settingview_title" android:layout_width="wrap_content" android:layout_height="wrap_content" android:layout_alignParentLeft="true" android:layout_alignParentTop="true" android:layout_marginLeft="4dip" android:text="功能的描述" android:textAppearance="?android:attr/textAppearanceLarge" android:textColor="#000000" /> <TextView android:id="@+id/tv_settingview_status" android:layout_width="wrap_content" android:layout_height="wrap_content" android:layout_alignParentLeft="true" android:layout_below="@+id/tv_settingview_title" android:layout_marginLeft="4dip" android:layout_marginTop="5dip" android:text="功能的状态" android:textAppearance="?android:attr/textAppearanceSmall" android:textColor="#88000000" /> <CheckBox android:clickable="false" android:focusable="false" android:id="@+id/cb_settingview_status" android:layout_width="wrap_content" android:layout_height="wrap_content" android:layout_alignParentRight="true" android:layout_alignParentTop="true" /> </RelativeLayout>
-
在
res-values下面新建一个attrs.xml文件<?xml version="1.0" encoding="utf-8"?> <resources> <declare-styleable name="SettingView">//这个name就是我们自定义的组合控件的名字 <attr name="title" format="string" /> //这个attr的name就是我们要在xml文件中直接使用的属性format是指这个属性的值是什么类型的 <attr name="unchecked_text" format="string" /> <attr name="checked_text" format="string" /> </declare-styleable> </resources>
-
自定义一个类继承
ViewGrouppublic class SettingView extends RelativeLayout { private TextView tv_settingview_title; private TextView tv_settingview_status; private CheckBox cb_settingview_status; private String check_text; // 选中文本 private String uncheck_text; // 未选中文本 public SettingView(Context context, AttributeSet attrs, int defStyle) { super(context, attrs, defStyle); } /** * 布局文件创建view对象 会使用 有两个参数的构造方法. */ public SettingView(Context context, AttributeSet attrs) { super(context, attrs); View view = View.inflate(context, R.layout.ui_setting_view, this);//inflate之后直接指定了父元素就是this,所以这句代码一执行就会在Relativelayout中显示出来这个样式 cb_settingview_status = (CheckBox) view .findViewById(R.id.cb_settingview_status); tv_settingview_status = (TextView) view .findViewById(R.id.tv_settingview_status); tv_settingview_title = (TextView) view .findViewById(R.id.tv_settingview_title); // 把自定义的属性 和 属性集attrs 建立一个对应关系.在用attrs.xml声明了之后会在R文件中生成一个R.styleable.SettingView这是一个int型的数组,数组中是我们在attrs中声明的三个attr属性 TypedArray a = context.obtainStyledAttributes(attrs, R.styleable.SettingView); String title = a.getString(R.styleable.SettingView_title);//这个R.styleable.SettingView_title就是我们在attrs中定义的title check_text = a.getString(R.styleable.SettingView_checked_text); uncheck_text = a.getString(R.styleable.SettingView_unchecked_text); a.recycle(); } public SettingView(Context context) { super(context); initView(context); } }
-
使用自定义控件
<?xml version="1.0" encoding="utf-8"?>
<LinearLayout xmlns:android=http://schemas.android.com/apk/res/android
	//声明自己的命名控件引入itheima把最后面的android改为我们应用程序的包名
	xmlns:itheima="http://schemas.android.com/apk/res/com.itheima.mobilesafe"
	android:layout_width="match_parent"
	android:layout_height="match_parent"
	android:orientation="vertical" >
	<TextView
		android:layout_width="match_parent"
		android:layout_height="60dip"
		android:background="#3185A3"
		android:gravity="center"
		android:text="设置中心"
		android:textColor="#B3EBFF"
		android:textSize="25sp" />
	<com.itheima.mobilesafe.ui.SettingView
		android:id="@+id/sv_setting_update"
		android:layout_width="match_parent"
		android:layout_height="wrap_content"
		itheima:checked_text="自动更新已经开启"
		itheima:title="自动更新设置"
		itheima:unchecked_text="自动更新没有开启" >
	</com.itheima.mobilesafe.ui.SettingView>
</LinearLayout>
- 邮箱 :charon.chui@gmail.com
- Good Luck!