Click here to show more.
In this version, we have made the following changes:
- 🐛 FIX!: We fixed a bug where the app will crash when using the
-bwoption.
Click here to show more.
In this version, we have made the following changes:
- 🧬 CHANGE!: We change the GUI mode to optional.
- Now, you can install the GUI mode by running:
-
pip install skin-tone-classifier[all] --upgrade
- It will support both the CLI mode and the GUI mode.
-
- If you don't specify the
[all]option, the app will install the CLI mode only.
- Now, you can install the GUI mode by running:
- 🧬 CHANGE!: [For developer]. We base the project to
project.tomlinstead ofsetup.py.
Click here to show more.
In this version, we have made the following changes:
- ✨ NEW!: We add a GUI version of
stonefor users who are not familiar with the command line interface.- You can use the config GUI of
stoneto process the images. - See more information at here.
- You can use the config GUI of
- ✨ NEW!: We add new patterns in the
-l(or--labels) option to set the skin tone labels.- Now, you can use the following patterns to set the skin tone labels:
- Default value: the uppercase alphabet list leading by the image type (
Cforcolor;BforBlack&White). - Specify the labels directly using a space as delimiters, e.g.,
-l A B C D Eor-l 1 2 3 4 5. - Specify the range of labels using a hyphen as delimiters, e.g.,
-l A-E(equivalent to-l A B C D E);-l A-E-2(equivalent to-l A C E);-l 1-5(equivalent to-l 1 2 3 4 5);-l 1-10-3(equivalent to-l 1 4 7 10);
- Default value: the uppercase alphabet list leading by the image type (
- NB: The number of skin tone labels should be equal to the number of colors in the palette.
- Now, you can use the following patterns to set the skin tone labels:
Click here to show more.
In this version, we have made the following changes:
- 🐛 FIX!: We fixed a bug where the app will crash when using the
-bwoption. Error message:cannot reshape array of size 62500 into shape (3). - 🐛 FIX!: We fixed a bug where the app may identify the image type as
colorwhen using the-bwoption.
Click here to show more.
In this version, we have made the following changes:
- ✨ NEW!: We add the
-v(or--version) option to show the version number. - ✨ NEW!: We add the
-r(or--recursive) option to enable recursive search for images.- For example,
stone -i ./path/to/images/ -rwill search all images in the./path/to/images/directory and its subdirectories. stone -i ./path/to/images/will only search images in the./path/to/images/directory.
- For example,
- 🐛 FIX!: We fixed a bug where the app cannot correctly identify the current folder if
-ioption is not specified.
Click here to show more.
In this version, we have made the following changes:
- ✨ NEW!: Now,
stonecan not only be run on the command line, but can also be imported into other projects for use. Check this for more details.- We expose the
processandshowfunctions in thestonepackage.
- We expose the
- ✨ NEW!: We add
URLsupport for the input images.- Now, you can specify the input image as a URL, e.g.,
https://example.com/images/pic.jpg. Of course, you can mix the URLs and local filenames.
- Now, you can specify the input image as a URL, e.g.,
- ✨ NEW!: We add recursive search support for the input images.
- Now, when you specify the input image as a directory, e.g.,
./path/to/images/. The app will search all images in the directory recursively.
- Now, when you specify the input image as a directory, e.g.,
- 🧬 CHANGE!: We change the column header in
result.csv:prop=>percentPERLA=>tone label
- 🐛 FIX!: We fixed a bug where the app would not correctly sort files that did not contain numbers in their filenames.
Click here to show more.
-
👋 BYE: We have removed the function to pop up a resulting window when processing a single image.
- It can raise an error when running the app in a web browser environment, e.g., Jupyter Notebook or Google Colab.
- If you want to see the processed image, please use the
-doption to store the report image in the./debugfolder.
Click here to show more.
🎉We have officially released the 1.0.0 version of the library! In this version, we have made the following changes:
- ✨ NEW!: We add the
thresholdparameter to control the minimum percentage of required face areas (Defaults to 0.15).- In previous versions, the library could incorrectly identify non-face areas as faces, such as shirts, collars,
necks, etc.
In order to improve its accuracy, the new version will further calculate the proportion of skin in the recognized
area
after recognizing the facial area. If it is less than the
thresholdvalue, the recognition area will be ignored. (While it's still not perfect, it's an improvement over what it was before.)
- In previous versions, the library could incorrectly identify non-face areas as faces, such as shirts, collars,
necks, etc.
In order to improve its accuracy, the new version will further calculate the proportion of skin in the recognized
area
after recognizing the facial area. If it is less than the
- ✨ NEW!: Now, we will back up the previous results if it already exists.
The backup file will be named as
result_bak_<current_timestamp>.csv. - 🐛 FIX!: We fix the bug that the
image_typeoption does not work in the previous version. - 🐛 FIX!: We fix the bug that the library will create an empty
logfolder when checking the help information by runningstone -h.
Click here to show more.
In this version, we have made the following changes:
-
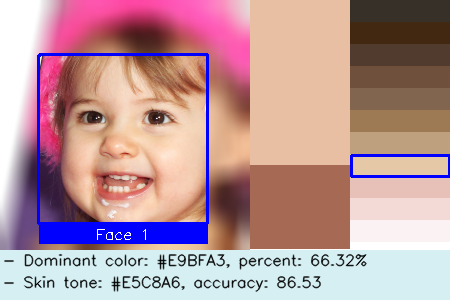
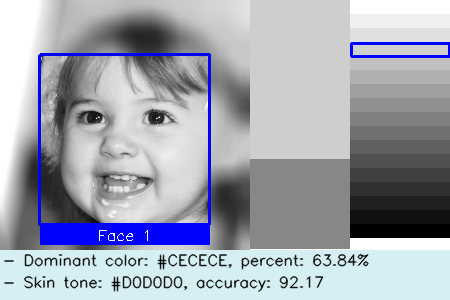
✨ NEW!: Now we support skin tone classification for black and white images.
-
In this case, the app will use different skin tone palettes for color images and black/white images.
-
We use a new parameter
-tor--image_typeto specify the type of the input image. It can becolor,bworauto(default).autowill let the app automatically detect whether the input is color or black/white image. -
We use a new parameter
-bwor--black_whiteto specify whether to convert the input to black/white image. If so, the app will convert the input to black/white image and then classify the skin tones based on the black/white palette.For example:
-
-
✨ NEW!: Now we support multiprocessing for processing the images. It will largely speed up the processing.
- The number of processes is set to the number of CPU cores by default.
- You can specify the number of processes by
--n_workersparameter.
-
🧬 CHANGE!: We add more details in the report image to facilitate the debugging, as shown above.
- We add the face id in the report image.
- We add the effective face or skin area in the report image. In this case, the other areas are blurred.
-
🧬 CHANGE!: Now, we save the report images into different folders based on their
image_type(color or black/white) and the number of detected faces.- For example, if the input image is color and there are 2 faces detected, the report image will be saved
in
./debug/color/faces_2/folder. - If the input image is black/white and no face has been detected, the report image will be saved
in
./debug/bw/faces_0/folder. - You can easily to tune the parameters and rerun the app based on the report images in the corresponding folder.
- For example, if the input image is color and there are 2 faces detected, the report image will be saved
in
-
🐛 FIX!: We fix the bug that the app will crash when the input image has dimensionality errors.
- Now, the app won't crash and will report the error message in
./result.csv.
- Now, the app won't crash and will report the error message in