☎️ A workshop to build your own fake boyfriend/boss/sibling/co-worker call with Azure & Twilio ☎️
Today we will build a fake calling app using:
- ⚡ Azure Functions
- ☎️ Twilio
- 🔘A Flic button
- 📱Your cellphone
If you don't own a Flic Button, you can purchase one at a discounted rate here. If you're looking for a group purchase for a workshop, or are interested in custom logo buttons- reach out directly and I can help! 🙋♀️
Before we begin, if you're looking for a quick summary and overview on Azure Functions (or found this page early and would like to get a headstart), I recommend starting here with our documentation, or taking 4 minutes to read in more detail how to create your first Azure Function, so you have some context on how to use functions within Azure.
You can learn more about the original project in my blog post!
Happy coding, friends! -Chloe 🎀
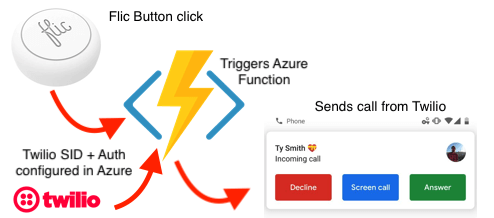
Today we will build a fake calling app using Azure Functions, Twilio, and a Flic button. We will start by creating a Function App in Azure. Then we will create a Twilio account, create 2 Azure Functions, and test it out on our phones.
Here's a diagram of what we'll be doing:
If you don't already have one, create an Azure account for free here!
I know what you may be thinking... "but Chloe- I'm a developer... this is much too bright for me!". Don't worry- there's a dark mode option. 😎

If you already have an Azure account, yay!
For the sake of easy to understand visuals/screenshots for this workshop, we'll be using the Azure portal to create this. You can also use VS Code, the Azure CLI, etc. With Azure Functions you are given the the ability to code and test Functions locally on your machine without having to deploy to the cloud every single time you want to test (a huge time saver!).
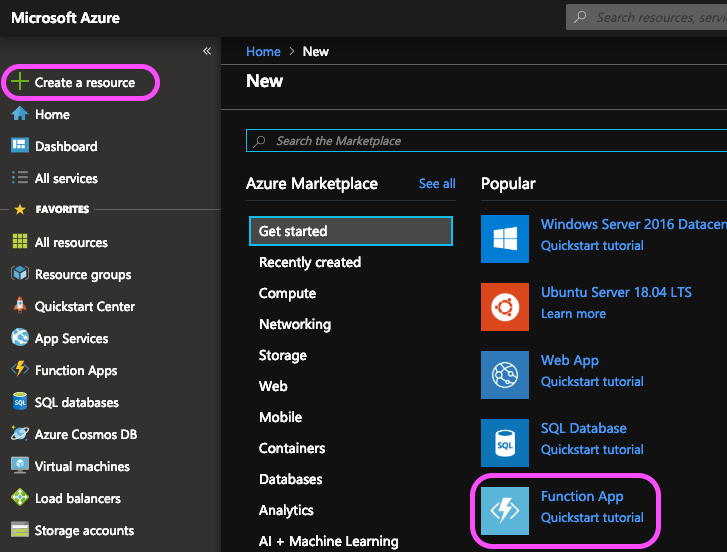
To create an Azure Function, you can just start from the Get Started menu and select Function App.
Then you’ll need to fill in some basic info about your function here. Including the app name, the Azure subscription you’d like to use, a resource group (create a new one in this case), the Operating System you’d like to use (please select Windows for this workshop), the hosting plan (I’m using consumption), the location you’d like to use (I’m based in California, so West US is usually my default), the runtime stack I’d like to use (I’m using NodeJS in this case), and we have the option to create new storage or use existing. We'll create a new one in this case.

Once you have all these filled out, you can go ahead and deploy! Wait about a minute or two, then watch for the Deployment succeeded message.
🎊 Woo! If you followed those steps, we have our resource! Select Go to resource in your notifications (top right corner) to view your new Function App.
Now we'll add our functions to our app, starting with a function to send a text message. Click the plus sign in the left-hand side navigation, or select Add Function towards the center/bottton of the screen.
Select in-portal.
And select Webhook + API

It will take about a minute to deploy and then you’ll have a fresh new Azure Function waiting to be called.
The default code is a simple hello world app. If you paste the function URL (located above your function under the link </> Get function URL) into your browser’s address bar with the query string value &name= to the end of this URL and press the Enter key on your keyboard, you should be able to execute the request. You should see the response returned by the function displayed in the browser.
Try doing this once! Add the URL with &name=your-name-here added to it, and test out that the function works in your browser.
In a new tab, head over to Twilio.com and sign up for an account if you don't have one already. Add a trial phone number to your account that has calling and SMS capabilitites (if you'd like to not work in trial mode- you can use code CHLOE20 to upgrade your account at any point).
Once you have a trial number, head back to the dashbaord. You'll see a ACCOUNT SID and AUTH TOKEN for your project. 🚨 Do not share/screenshot/commit these numbers 🚨 Think of them as your username and password for our Twilio number- we will securely store these in Azure shortly.
Navigate back to the Azure portal, and replace the exsiting code wiith the following code in your index.js file:
const accountSid = process.env.TWILIO_SID;
const authToken = process.env.TWILIO_TOKEN;
const client = require('twilio')(accountSid, authToken);

// This can also be accomplished with a Twilio output binding- you can read more on this at http://aka.ms/AA4n3j3

module.exports = function (context) {
 client.messages
 .create({ from: process.env.SENDER_NUMBER,
           body: 'Woohoo- it worked!',
           to: process.env.RECIPIENT_NUMBER
       })
        .then(message => {
           context.log("Message sent");
           context.res = {
               // status: 200, /* Defaults to 200 */
               body: 'Text successfully sent'
           };
           context.done();
        }).catch(err => {
          context.log.error("Twilio Error: " + err.message + " -- " + err.code);
          context.res = {
                   status: 500,
                   body: `Twilio Error Message: ${err.message}\nTwilio Error code: ${err.code}`
               };
          context.done();
        });
}
This will be the code that is run when our function is called.
Take a moment to read and understand the code. 🕵️♀️ You'll see that we're setting our accountSid & authToken (with credentials we have set in our function's Application Settings). We then have a function that creates a message sent from SENDER_NUMBER, to RECIPIENT_NUMBER (with credentials we have set in our function's Application Settings as well). Next, we're logging that our message is sent, and setting our context as done. Alternatively , if there's an error, we'll log it and set our context to done.
Once you have an understanding of this code, click Save.
Add a package.json file to your function. You can do this by navigating to the top-right corner of your function, and adding a file as pictured below (

Add the following code to your package.json file (adding your desired app name/description/etc):
{
  "name": "your-app-name",
  "version": "1.0.0",
  "description": "Fake text/call functions",
  "main": "index.js",
  "scripts": {
    "test": "echo \"Error: no test specified\" && exit 1"
  },
  "author": "your-name",
  "license": "MIT",
  "dependencies": {
    "twilio": "^3.33.1"
  }
}
Click Save, and navigate back to your index.js file.
Install the Twilio Node helper library using npm. This will install the twilio module so that Node.js scripts in the current directory can use it. Access the Azure console at the bottom of the screen

In the console, enter the following:
npm install twilio
This may take a couple minutes (if you're looking for a good time to go grab a coffee/LaCroix/bathroom break- this is it! ☕️🍕🚽).
You may see a warnings/notice here- don't worry, you can ignore this. This is notifying us a package-lock.json file has been created.
Head over to Configuration under your Function App in the Azure portal (highlighted in pink, below- click on your Function App Name on the left-hand side).

Add 2 new application settings named TWILIO_SID and TWILIO_TOKEN- storing with them the credentials provided to us from Twilio.
Additionally, add a setting for SENDER_NUMBER (adding your Twilio trial number in the format of plus-sign, country code, and number like so as the value: +19168675309) as well as RECIPIENT_NUMBER (add your cell phone number in the same format of +19168675309 as the value for now to test our app).

😳😭 Totally lost? Can't find your credentials? ☎️ Log into Twilio to find them!
Click Save, and navigate back to your function in the console.
Click the Run button at the top of your function. Your logs should pop up and show that your function has been called. This may take a couple minutes on your 1st try, so stay patient! If all goes smoothly, you should receive a text saying "Woohoo- it worked!". You can also run and test this function by copying and pasting the function URL (located in the </> Get function URL link above your function) in your browser.
📝 NOTE: If you are still using a trial account, texts and calls from Twilio will have a Sent from your Twilio trial account message before it. If you'd like to remove this, consider upgrading and adding code CHLOE20 for some credits.
🎊 Great job! 🎊 You made your first Azure function using Twilio to send a text! Feel free to switch the RECIPIENT_NUMBER value if you'd prefer to have the app alert a friend (vs. send a message to yourself). Of course, if you're testing- it's easiest to keep your own number for now. Here's a funny story about that. 🙈

Now we'll add our 2nd function to our app- this time, with the code to send a call (vs. a text).
Add another function to your app (as we did before on our 1st function- click the plus sign in the left-hand side navigation), and select HTTPTrigger again.
In the Azure portal, replace the exsiting code with the following code in your index.js file:
const accountSid = process.env.TWILIO_SID;
const authToken = process.env.TWILIO_TOKEN;
const client = require('twilio')(accountSid, authToken);

    module.exports = function (context) {
       client.calls
       .create({
                 url: process.env.TWIML_URL,
                 to: process.env.RECIPIENT_NUMBER,
                 from: process.env.SENDER_NUMBER,
           })
      .then(call => {
           context.log("Call sent");
           context.res = {
               // status: 200, /* Defaults to 200 */
               body: 'Call successfully sent'
           };
           context.done();
       }).catch(err => {
           context.log.error("Twilio Error: " + err.message + " -- " + err.code);
           context.res = {
               status: 500,
               body: `Twilio Error Message: ${err.message}\nTwilio Error code: ${err.code}`
           };
           context.done();
       });
   }
This will be the code that is run when our call function is called.
Take a moment to read and understand the code for your call function. You'll see that we're again setting our accountSid & authToken (with credentials we have set in our function's Application Settings). We then have a function that creates a call sent from SENDER_NUMBER, to RECIPIENT_NUMBER, with a url of TWIML_URL (this will be set-up with credentials we have set in our function's Application Settings as well). Next, we're logging that our call is sent, and setting our context as done. Alternatively , if there's an error, we'll log it and set our context to done.
Click Save.
Add a package.json file to your function (as we did before on our 1st function).
Add the following code to your package.json file:
{
  "name": "your-app-name",
  "version": "1.0.0",
  "description": "Fake text/call functions",
  "main": "index.js",
  "scripts": {
    "test": "echo \"Error: no test specified\" && exit 1"
  },
  "author": "your-name",
  "license": "MIT",
  "dependencies": {
    "twilio": "^3.33.1"
  }
}
Click Save, and navigate back to your index.js file.
Once again, we'll install the Twilio Node helper library using npm. This will install the twilio module so that Node.js scripts in the current directory can use it. Access the Azure console at the bottom of the screen.
In the console, enter the following:
npm install twilio
Again, this may take a couple minutes (if you're looking for a good time to go grab another coffee/LaCroix/bathroom break- this is it! ☕️🍕🚽).
You may see a warnings/notice here- don't worry, you can ignore this. This is notifying us a package-lock.json file has been created.
Our configurations are already set in Azure, so no need to add our TWILIO_SID, TWILIO_TOKEN, SENDER_NUMBER, or RECIPIENT_NUMBER again.
Now we'll create a Twilio Asset to hold our fake call's recorded voice message.
Download the following MP3 by clicking here. Alternatively, you can record your own MP3 here (or, use whatever MP3 you'd like!)
Head back to Twilio, and navigate to the ...* section of the left-side navigation. Select Runtime > Assets.

Add or drag/drop the Mp3 file, and copy the path of the URL.
Navigate to Runtime > TwiML Bins in the left-side navigation.
We'll now create a TwiML Bin. TwiML Bins allow you to write TwiML that Twilio will host for you - so you can quickly prototype a solution without spinning up a web server.
Add the following to your TwiML bin- make sure to replace URL-OF-YOUR-TWILIO-ASSET with the url of the Twilio Asset you just created! This will play our MP3 when a call is made to the RECIPIENT_NUMBER:
<?xml version="1.0" encoding="UTF-8"?>

<Response>
  <Say voice="man">Hey- congrats! Everything is working. You are awesome. You did it- yay!</Say>
  <Play>URL-OF-YOUR-TWILIO-ASSET</Play>
</Response>
This TwiML will speak the text, and the URL of the Twilio Asset URL you provide it.

Save your TwiML bin, and copy the URL.
Navigate to Configuration once again to add TWIML_URL with the value of your recently created/copied TwiML URL to your Application Settings.

Click Save.
Navigate to your call function and click Run to test the call.
This can sometimes take a minute or two, so be patient- and only click run once (otherwise, you may get multiple calls back to back)!
📝 NOTE: If you are still using a trial account, texts and calls from Twilio will have a Sent from your Twilio trial account message before it (with calls, you'll need to press any number to run your code). If you'd like to remove this, consider upgrading and adding code CHLOE20 for some credits.
🎊 YOU DID IT!!! 🎊 You made your second Azure function using Twilio to send a call! Feel free to play and switch the RECIPIENT_NUMBER value as you wish. Again, I'll reiterate: if you're testing- it's easiest to keep your own number for now. Here's a funny story about that. 🙈
If all goes well, you'll soon get a call and will be a victim of Rick-Rolling! 😁☎️

Feel free to play around with the TWIML_URL and add/remove your own MP3 Assests within Twilio. Your call can be whatever you'd like it to be! Your mom, dad, cousin, aunt, uncle, sister, brother, co-worker, boss, Rupaul, Justin Trudeau, Barack Obama, or Beyonce-- your choice! Get creative and experiment with your fake call- if we have time, we'll share it with the group.
The next steps of this workshop require a Flic Button. If you don't own a Flic Button, you can purchase one at a discounted rate here. If you're looking for a group purchase for a workshop, or are interested in custom logo buttons- reach out directly and I can help! 🙋♀️
For our final step, we'll need to add our Azure Function URLs to the Flic Button app! Download the Flic Button app to your phone on Google Play or Apple.
Create an account, and login. Add a button to your phone by clicking the plus sign.

Click your Flic buttton to add it to your phone (Note: in a workshop setting, this may be tricky with so many buttons! Make sure you get matched to the correct buttton)

Name your Flic button a unique name, and click Done.

Now we'll program our Flic button to send a text when clicked once. Select Click >.

And navigate to Tools

Select Internet Request (circled in pink below):

Now, add the URL of our 1st function (the message/texting function) here. Select GET request. You do not need to provide Headers or change anything else here. Save Action to continue.
Once saved, test that your function works with 1 click! You should recieve a text shortly.
Do the same steps for the Double Click > option, navigate to Tools > Internet Request URL and add your call function URL as a GET request.
Save again, and test that your function works with a double-click! You should recieve a call shortly (don't click the button too many times- be patient!).
Now for the cherry-on-top finishing touch! 🍒🍦

Add a contact to your phone for your Twilio number, and name it whatever you'd like. For example, if you'd like to trigger a fake call from "your BFF" you could upload a picture of The Rock to your contacts, and label it "The Rock". Here's an example of mine (I used "💕My Boyfriend💕" as the contact with an image of my boo):
If you've made it this far- CONGRATS! 🎊 You have successfully created 2 Azure Functions, connected them with Twilio, and are now able to trigger them from a Flic Button!
Here's a diagram you can print and hang on your fridge to remember this moment forever and ever (also, so you can review what we've just accomplished 😉):

If you're interested in learning more about Azure Functions and want to continue learning, here are some great resources to get started:
-
Azure Functions developer reference (provides more technical information about the Azure Functions runtime and a reference for coding functions and defining triggers and bindings)