This is a work in progress, and probably will be for a while. Please open an issue if there is something that you would like to see covered.
Writing the docs is important, and we thank you for your help. In this doc, you will find:
- instructions for building the ClickHouse docs
- suggestions to save you time, for example, ways to use reusable content
- ways to avoid 404s
- examples of techniques used throughout the ClickHouse docs
There are a few options that are all useful depending on how large or complex your edits are.
Every page in the docs has an Edit this page link that opens the page in the GitHub editor. GitHub has Markdown support with a preview feature. The details of GitHub Markdown and the documentation Markdown are a bit different but generally this is close enough, and the person merging your PR will build the docs and check them.
Usually, these plugins provide a preview of how the markdown will render, and they catch basic errors like unclosed tags very early.
You can build the ClickHouse docs on most machines. Our build process is a little different because part of our docs are in the ClickHouse repo, and the rest are in the ClickHouse/clickhouse-docs repo. Here is the process on macOS:
The documentation is built with Docusaurus, which requires Node.js. We recommend version 18. Install Node.js.
We use yarn classic to build the ClickHouse docs.
sudo apt-get install npm
sudo npm install --global yarn
note: if the Node version available in your distro is old (<=v16), you can use nvm to pick a specific one.
for example to use node 18:
curl -o- https://raw.githubusercontent.com/nvm-sh/nvm/v0.39.0/install.sh | bash
nvm install 18
nvm use 18brew install npm
brew install yarngit clone https://github.com/ClickHouse/clickhouse-docs.git
cd clickhouse-docs # local docs repo
# Below you can choose only ***ONE*** of the two prep commands
# yarn prep-from-master
# This command will clone master ClickHouse/Clickhouse branch to a temp folder and
# from there it will copy over the relevant docs folders to this folder
yarn prep-from-master
# OR
# yarn prep-from-local
# This command will use a locally available folder containing ClickHouse/Clickhouse
# and from there it will copy over the relevant docs folders to this folder
# running this without using the local full path as an argument will lead to error
yarn prep-from-local /full/path/to/your/local/Clickhouse/Clickhouse
# Once you have run prep command (ONE of the two) the below command installs the Docusaurus packages and prerequisites in a subdirectory of `clickhouse-docs` named `node_modules`
yarn install
# This command will start Docusaurus in development mode, which means that as you edit source (for example, .md files)
# files the changes will be rendered into HTML files and served by the Docusaurus development server.
# Edit your files. Remember that if you are editing files in the ClickHouse/ClickHouse repo then you should edit them in
# that repo and then copy the edited file into the ClickHouse/clickhouse-docs/ directory structure so that they are updated
# in your develoment environment.
yarn start
# 'yarn start' probably opened a browser for you when you ran it; if not, open a browser to http://localhost:3000/docs/en/intro
# and navigate to the documentation that you are changing. If you have already made the changes, you can verify them here; if
# not, make them, and you will see the page update as you save the changes.Some of the markdown content is generated from other files; here are some examples:
- docs/en/whats-new/changelog/index.md
- docs/en/cloud/manage/api/invitations-api-reference.md
- docs/en/cloud/manage/api/keys-api-reference.md
- docs/en/cloud/manage/api/members-api-reference.md
- docs/en/cloud/manage/api/organizations-api-reference.md
- docs/en/cloud/manage/api/services-api-reference.md
Placeholder files are needed in order for other pages to be able to link to the generated files and to let people who may want to edit the generated content that they need to edit the source information and not the markdown files.
Because the placeholder files are replaced during the build process, GitHub will consider them modified. This does not matter during the Vercel build or CI checks, but it does impact the writing process if you run yarn new-build as you will need to reset the files to the placeholder versions before switching branches or committing your changes to other files. To reset use bash ./placeholderReset.sh.
We have seen more and more 404s as the size of the docs grow.
It seems that these are related to the use of ../ in the path to the markdown files. Please write links to other doc
pages as:
[async_insert](/docs/en/operations/settings/settings.md)[async_insert](/docs/en/operations/settings/settings.md/#async-insert)Note the initial /, the .md and the slash between the .md and the #async-insert in the second example.
Absolute URLs, those starting with http are not verified
by Docusaurus. If you are linking within the docs, then use
a relative URL and use the path on disk. For example:
https://clickhouse.com/docs/en/install/
should be replaced with
/docs/en/getting-started/install.mdIf you look closely, the path on disk does not match the URL. The URLs can be changed by setting the slug in the markdown file frontmatter.
The default first page in a folder (category in Docusaurus terminology) is a list of the pages in that folder. If you would like an intro or overview page, then add that page to docs/en/coverpages/. This example is addring an Architecture folder, so the full filename would be docs/en/coverpages/architecture.md
The next step depends on the location of the file in the nav. In this example, architecture is at the root level:
Intros, cover pages, summaries--whatever you want to call them; it is important to provide the reader with a summary of a section
of the docs. The summary should let them know if they are in the right place. Also include at the bottom of the summary a link to relted content (blogs, videos, etc.)
The cover page is specified in sidebars.js, specifically with a link of type doc:
    {
      type: 'category',
      label: 'Architecture',
        link: {
          type: 'doc',
          id: 'en/coverpages/architecture',
          },
         collapsed: true,
         items: [
           {
             type: 'autogenerated',
              dirName: 'en/architecture',
           },
         ],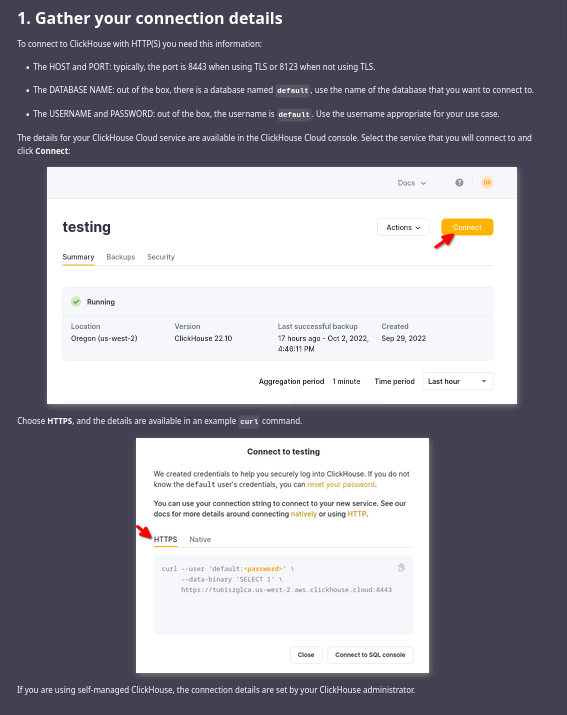
}, Many of the pages in the docs have a section toward the top about gathering the connection details for your ClickHouse service. Sending people off to look at a page to learn about the connection details and then having them forget what they were doing is a poor user experience. If you can just include the right instructions in the current doc, please do so. In general there are two interfaces that people will use when integrating some 3rd party software, or even clickhouse client to ClickHouse:
- HTTPS
- Native TCP
If you are writing about some language client or visualization tool, or ELT tool and it needs to connect to an HTTPS port then this line imports the content:
import ConnectionDetails from '@site/docs/en/_snippets/_gather_your_details_http.mdx';and this will render it:
## 1. Gather your connection details
<ConnectionDetails />
Note: in the preceding code block, a level two header is used; change it to whatever makes sense in your doc.
There are other snippets in /docs/en/_snippets for you to use. If you need to repeat something, consider adding a new snippet or opening an issue for one to be added.
Here is how the above renders:
Every time you mention a feature or product you may be tempted to link to it. Don't do it. When peole see links they can be tempted to visit them, and quite often there is no need for them to go to the linked content. If you mention a technique and you need the reader to learn it right then, add a link. If they should read about it later then add a link down at the bottom of the doc in a What's next section.
If you find yourself wanting to send the reader to another doc to perform a task before they perform the main task that you are writing about, then maybe that prerequisite task should be included in the current doc instead so the reader is not clicking back and forth. It may be time to create a snippet pull the content from the other doc into a snippet file and include it in the current doc and the other doc that you pulled it from (see above).
Some docs contain information for both Cloud and Self-managed ClickHouse, and some contain client side information for Linux and macOS (and recently Windows WSL). When possible identify the differences and use tabs for the areas of the doc which vary.
Note: in the examples below you may notice that the H1 and H2 headers are outside of the tabs, the right-side "What's on this page" nav is built from the H1,2,3 headers in the main body of the markdown file, headings within the tabs are not currently included.
Backup and restore are very different across Cloud and Self-managed as the target for the backup does not need to be specified, etc. The backup docs are an example where there is no content reused, so everything goes into one tab or the other. This is how the tabs are constructed:
---
sidebar_label: Backups
sidebar_position: 1
slug: /en/manage/backups
---

import Tabs from '@theme/Tabs';
import TabItem from '@theme/TabItem';
import CodeBlock from '@theme/CodeBlock';

# Backups

<Tabs groupId="deployMethod">
<TabItem value="serverless" label="ClickHouse Cloud" default>

Cloud specific content here

</TabItem>
<TabItem value="selfmanaged" label="Self-managed">

Self-managed specific content here

</TabItem>
</Tabs>Sometimes most of the content is the same across operating systems. For example, in the clickhouse-client and clickhouse-local docs the introductory information and the next steps are common, and only the install commands are different:
---
slug: /en/integrations/sql-clients/clickhouse-client-local
sidebar_label: clickhouse-client
title: clickhouse-client and clickhouse-local
---
import Tabs from '@theme/Tabs';
import TabItem from '@theme/TabItem';

# clickhouse-client and clickhouse-local

Common information

:::tip
If you have already installed ClickHouse server locally you may have **clickhouse-client** and **clickhouse local** installed.  Check by running **clickhouse client** and **clickhouse local** at the commandline.  Otherwise follow the instructions for your operating system.
:::

## Install clickhouse-client and clickhouse-local

<Tabs groupId="os">
<TabItem value="linux" label="Linux" default>

#### Install the clickhouse-client package:

more details for Linux

</TabItem>
<TabItem value="mac" label="macOS">

#### Download ClickHouse:

We do not provide an installer for macOS.  Download the binary build for your architecture (x86_64 or Apple Silicon).

more details for macOS

</TabItem>
<TabItem value="wsl" label="Microsoft Windows with WSL 2">

In Microsoft Windows 10 or 11 with the Windows Subsystem for Linux (WSL) version 2 (WSL 2) you can run Ubuntu Linux, and then install `clickhouse-client` and `clickhouse-local` by following the Debian install instructions.

more details for Windows WSL

</TabItem>
</Tabs>

## Next Steps

Common content
The description field in the system tables can be used to provide a description of functions, metrics, etc. To format the information addded by the developers into markdown:
WITH replaceRegexpAll(if(metric LIKE '%.%', metric, replaceRegexpAll(metric, '_.+$', '_*name*')), '_?\\d+$', '_*N*') AS title
SELECT format('### {}\n\n{}\n', title, any(description))
FROM system.metrics
GROUP BY title
ORDER BY title ASC
FORMAT TSVRaw
Replace system.metrics in the above with system.asynchronous_metrics to get the docs for those metrics.
system.functions also have descriptions and other information. TO DO: Write queries similar to above for other system tables containing embedded docs.
From system.settings:
SELECT format('### {}\n\n{}\n\nType: {}\n\nDefault: {}\n\n', name, description, type, default)
FROM system.settings
ORDER BY name ASC
FORMAT TSVRawThe CHANGELOG from the ClickHouse/ClickHouse repo is automatically included in the docs during the build process (during the yarn new-build).
The commands below are still useful to know in case you want to know what is coming in the next release to make sure that the features are documented.
Release notes are generated with Python. This requires a GitHub user token, which you can export in your environment or pass on the commandline.
cd ClickHouse/utils/changelog
git fetch --all
export GHTOKEN="<your token>"
python3.9 changelog.py --gh-user-or-token=$GHTOKEN HEAD > /tmp/cl.mdWhen writing docs about a new feature it helps to be able to use the new feature before there is an official release. The easiest way to get the latest build is:
curl https://ClickHouse.com/ | shdocker pull clickhouse/clickhouse-server:headdocker run -d \
--cap-add=SYS_NICE \
--cap-add=NET_ADMIN \
--cap-add=IPC_LOCK \
--name some-clickhouse-server \
--ulimit nofile=262144:262144 \
clickhouse/clickhouse-server:headIf you want to run the tests from the ClickHouse/tests directory you either need a full release, a CI build, or to compile yourself. How to get the binaries
If you want to extract the binary files from RPMs to use with the test runner, you can use cpio
mkdir 22.12
mv cl*rpm 22.12/
export CHDIR=`pwd`/22.12
cd $CHDIR
rpm2cpio ./clickhouse-server-22.12.1.1738.x86_64.rpm | \
  cpio -id --no-absolute-filenames

rpm2cpio ./clickhouse-client-22.12.1.1738.x86_64.rpm | \
    cpio -id --no-absolute-filenames

rpm2cpio ./clickhouse-common-static-22.12.1.1738.x86_64.rpm | \
cpio -id --no-absolute-filenamesIf you are running the ClickHouse server process and not using the standard
directories of /etc/clickhouse-server for configs and /var for the data directories
then you will need to edit the config.
Create an override dir:
mkdir $CHDIR/etc/clickhouse-server/config.dThis is a sample $CHDIR/etc/clickhouse-server/config.d/dirs.xml
file that overrides the default config:
<clickhouse>
    <logger>
        <level>error</level>
        <log>/home/droscigno/Downloads/22.12/usr/var/log/clickhouse-server/clickhouse-server.log</log>
        <errorlog>/home/droscigno/Downloads/22.12/usr/var/log/clickhouse-server/clickhouse-server.err.log</errorlog>
    </logger>
    <path>/home/droscigno/Downloads/22.12/usr/var/lib/clickhouse/</path>
    <tmp_path>/home/droscigno/Downloads/22.12/usr/var/lib/clickhouse/tmp/</tmp_path>
    <user_files_path>/home/droscigno/Downloads/22.12/usr/var/lib/clickhouse/user_files/</user_files_path>
    <user_directories>
        <local_directory>
            <path>/home/droscigno/Downloads/22.12/usr/var/lib/clickhouse/access/</path>
        </local_directory>
    </user_directories>
    <format_schema_path>/home/droscigno/Downloads/22.12/usr/var/lib/clickhouse/format_schemas/</format_schema_path>
</clickhouse>From $CHDIR/usr/bin:
./clickhouse-server -C ../../etc/clickhouse-server/config.xmlThese examples use env vars for the directory names:
- $DOCS is the parent directory of the ClickHouse repo
- $CHDIR is the parent directory of the extracted ClickHouse download files
For SQL tests:
The command to run the tests needs:
- The $PATH to use, with $CHDIR/usr/bin added to the $PATH
- The path to
clickhouse-test - The name of the test to run
For example, to run the test 01428_hash_set_nan_key:
PATH=$CHDIR/usr/bin/:$PATH \
  $DOCS/ClickHouse/tests/clickhouse-test \
  01428_hash_set_nan_key
To see the queries that were run:
PATH=$CHDIR/usr/bin/$PATH \
clickhouse-client -q \
"select query from system.query_log ORDER BY event_time FORMAT Vertical"
For integration tests:
cd $DOCS/ClickHouse/tests/integration/
./runner -n 5 \
  --src-dir $DOCS/ClickHouse/src \
  --binary $CHDIR/usr/bin/clickhouse-server \
  --cleanup-containers \
--command bashCode highlighting is based on the language chosen for your code blocks. Specify the language when you start the code block:
```sql
SELECT firstname from imdb.actors;
```
SELECT firstname from imdb.actors;If you need a language supported then open an issue in ClickHouse-docs.
At the moment there’s no easy way to do just that, but you can consider:
- To hit the “Watch” button on top of GitHub web interface to know as early as possible, even during pull request. Alternative to this is
#github-activitychannel of public ClickHouse Slack. - Some search engines allow to subscribe on specific website changes via email and you can opt-in for that for https://clickhouse.com.
You can add youtube videos by grabbing the YouTube ID and adding it to some a vimeo-container class. This also works for Vimeo videos, we just reuse the class to format the embed the same way. Here is a YouTube example from the inverted indices page:
<div class='vimeo-container'>
  <iframe src="//www.youtube.com/embed/O_MnyUkrIq8"
    width="640"
    height="360"
    frameborder="0"
    allow="autoplay;
    fullscreen;
    picture-in-picture"
    allowfullscreen>
  </iframe>
</div>
And here is a Vimeo example from the Cloud landing page:
<div class='vimeo-container'>
  <iframe src="https://player.vimeo.com/video/751409158?h=54cfbce3b9"
    width="640"
    height="360"
    frameborder="0"
    allow="autoplay;
    fullscreen;
    picture-in-picture"
    allowfullscreen>
  </iframe>
</div>The docs are crawled daily. The configuration for the crawler is in the docs-private repo as the crawler config contains a key that is used to manage the Algolia account. If you need to modify the crawler configuration log in to crawler.algolia.com and edit the configuration in the UI. Once the updated configuration is tested, update the configuration stored in the docs-private repo.
Note
Comments added to the config get removed by the Algolia editor :( The best practice would be to add your comments to the PR used to update the config in docs-private.
We use Docsearch from Algolia; there is not much for you to do to have the docs you write added to the search. Every Monday, the Algolia crawler updates our index.
If a search is not finding the page that you expect, then have a look at the Markdown for that page. For example, a search for UDF was returning a bunch of changelog entries, but not the page specifically for user defined functions. This was the Markdown for the page:
---
slug: /en/sql-reference/statements/create/function
sidebar_position: 38
sidebar_label: FUNCTION
---

# CREATE FUNCTION

Creates a user defined function from a lambda expression.
And this was the change to improve the search results (add the expected search terms to the H1 heading):
---
slug: /en/sql-reference/statements/create/function
sidebar_position: 38
sidebar_label: FUNCTION
---

# CREATE FUNCTION — user defined function (UDF)

Creates a user defined function from a lambda expression.
Note: The docs are crawled each morning. If you make a change and want the docs re-crawled sooner, open an issue in clickhouse-docs.
We process our docs with Docusaurus. The instructions for building our docs are earlier in this doc. You can learn more at Docusaurus.io.
We use Excalidraw. You can use it too. If you use Excalidraw to create an image for our docs, please submit the .excalidraw file along with the PNG or SVG so that it can be updated if necessary.