WiFi Smart Omniscient HVAC Touchscreen Theromstat
This project is discontinued (except for bugfixes and support code changes). New work will be on WT32-SC01-HVAC
2018 Model: The new model was redesigned with a cooler switching regulator (~20mA idle, with a dim screen), smaller ($16.50 from OSHPark) more options for the temp/RH sensor, and the rotory encoder was removed, but has a header for an external encoder or buttons. The only difference in connections is the SCL/SDA were accidentaly reversed on the onboard SHTxx chip. Pics should be at the bottom.
Notes about the Nextion: The baudrate is bauds=115200 in the main initialize varaibles. This will allow it to communicate at the highest speed.
The "Basic" (Discovery model works without modification) has a 10K pullduown resistor for 5V tolerance (R13: next to the connector). Removing this allows the ESP8266 to boot normally and operate without any resistors added, or add a 10K pullup between TX and 3V3 when serial debug is not connected. I've opted for the removal of the resistor, which fixes all problems. The 5K6 on the thermostat (R17) allowed it to operate with serial connected plus the pulldown, but not without. The blue wire (data sent to the ESP) doesn't really need any resistors. The ESP can't be programmed without a 1K while both are connected, and with the 1K and debug the touchscreen won't work. So just disconnect the wire while programming and reconnect it after.
This has replaced the old Spark-O-Stat with a newer system using the ESP-07 (now ESP32), with a better screen (Nextion HMI 2.8" touchscreen), 5 outputs (1 extra output for humidifier), option for SHT21 (I2C) or DHT22/11, AM2302/22, and anolog input for expansion.
Main and remote units are designed into the single PCB with wired 5V or USB Mini-B for the remote units, and 24VAC for main. Headers on top are for onboard serial programming of the ESP and Nextion. Only power it with 1 source at a time. (3V3 for just the ESP, encoder, and temp sensor, 5V to include the display, or 24VAC for all of it including the SSRs). Add the switching regulator to the remote for battery power (6-40V).
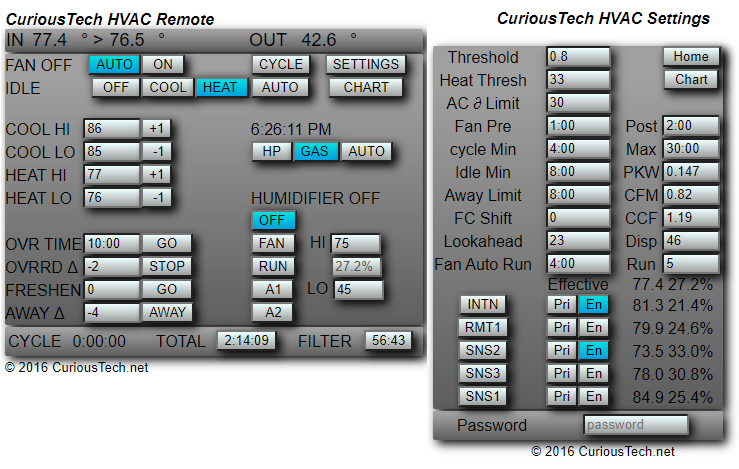
Remote: By tapping the target temperature on the display, it will toggle transmitting the remote temperature and humidity to the main unit to use in all operations. Tapping the same item on the main unit will also end the remote temperature connection. There are notifications to indicate use as well as a flashing run indicator instead of solid.
Some screens including a keyboard and SSID chooser, but this is using the auto connect with SoftAP server (which attempts to find the stored SSID while waiting on input) so it should never be needed. The dimmed screensaver will change to a clock, and a few other odd displays over time.

Cool/heat low/high:
These are the desired temperature ranges for cooling and heating, which are calculated based on outside temperature over the next set number of days.
Cycle:
Disable heat and cool, but still cycles the fan by the Auto Fan: Run: settings. 4:00 and 5 default = 5 minutes every 4 hours.
Threshold:
The temperature offset to complete a cycle.
Pre-cycle fan time:
0 disables, 1 second to 5 minutes. This is the first phase of the cycle. When the temperature reaches the target, the fan is turned on to cycle air for the set time, which causes the thermostat to read a more overall temperature. If the threshold is reached before this ends, which it can, it will shut off. Otherwise it continues to the run phase, which runs for at least the cycleMin period to save wear on the compressor because this does shorten the run time considerably. A good value to use is the time it takes to lower the temperature after turning the fan on before it plateaus. Usually around 2 minutes.
Post-cycle fan time:
Runs fan after cycle completes. This is the third phase of the cycle, which continues to push air through the cold radiator and ductwork. 2 minutes is good, but you can use an IR thermometer on a vent to see how long the cold air continues.
Humidifier settings:
Off: Always off
Fan: Run when fan is on
Run: Run when thermostat is running a cycle
Auto1: Operate by humidistat during run cycles
Auto2: Humidistat runs indepentantly of thermostat (shares fan control)
Override:
Use to heat or cool by a selected offset temperature for a specified time.
Freshen:
Starts the fan with a timeout. This uses the post fan timer, so a normal cycle will cancel it.
Idle min, cycle min/max:
These are timers in seconds to control the thermstat operating limits. Idle min is the shortest time between cycles. Cycle min is the shortest time for a cycle, and max is the longest. Be careful with these settings. Running the compressor too short or too long can cause damage.
Away time and temperature delta offset:
The away time is in hours:minutes unlike the rest of the timers, but uses the override timer. It can be turned on and off with the button, but will also turn off with the timer. There are 2 temp values that are displayed depending on heat or cool mode. One for heat and one for cool, like the pre/post fan.
Like any setting, it can be automated with something like Tasker. To turn on would be http://ip:85?key=password&away=1
Other settings:
AC differential limit: Increases thermostat if inside/outside difference is more than 30. This assumes Fahrenheit. Change for Celcius.
Heat Threshold: Heatpump will switch off and use gas when outside temp goes below set value (default 33). Change for Celcius.
PKW (price per killawatt hour), CFM (gas cubic feet per minute), CCF (cost per 100 cubic foot): Set the PPKW and CCF based on billing. CFM is dependant on the furnace.
FC Shift (in minutes): Shifts the forecast for the temperature adjust. Use the setting on the chart page (they don't affect the actual settings) to determine what's best. There are 2 values for heat and cool here as well.
The web chart. Dark gray is off, cyan is fan running, blue is compressor+fan, NG is red, HP is yellow, rh is green, the target/threshold is the wave. The thermostat is in the hottest room in the house, so it does look warmer than it really is, but that's why there's a remote unit, and now multiple sensors.


New Model
Remote (this uses only a few components: the 3.3V regulator, 3 capacitors, USB connector, temp sensor, and 7 required resistors)


Sensor web page
