


Cassandra Workshop Series are an interactive experience. Datastax Developer Advocates share some knowledge about Apache Cassandra™ NoSQL database and how you build Cloud Native applications. You interact with them through chats (youtube and discord), quizzes (menti.com), and exercises.
In this repository, you'll find everything you need related to week 3 of the Cassandra Worskhop Series. For simplicity all exercise instructions will be listed in a single README for each language: Java, Javascript, Python, CSharp. We recommended you to have some previous experience with the language you choose.
Now if you are NOT familiar with any of those, we recommended to use Python, the is the simplest. Ready ? go !
| Materials | Description and Links |
|---|---|
| Slidedeck | SLIDEDECK |
| Chat with us on Discord | DISCORD |
| Ask Question during week | COMMUNITY |
| Recording LIVESTREAM NA, LATAM | 📅 July 15th 12EDT |
| Recording LIVESTREAM APAC, EMEA | 📅 July 16th 12:30 IST |
| Homework | here |
| Exercises | Description and Links |
|---|---|
| 0. Create your Astra instance | Prerequisites |
| 1. Exercise : The spacecraft nodebook | Create Schema |
| 2. Exercise : Connectivity to Cassandra | Connectivity |
ASTRA service is available at url https://astra.datastax.com
✅ Step 1a. Register (if needed) and Sign In to Astra : You can use your Github, Google accounts or register with an email


✅ Step 1b. Fill the Create New Database Form
As you don't have have any instances the login will route through the instance creation form. You will find below which values to enter for each field.

-
Set the Compute Size: For the work we are doing please use
Free tier. You instance will be there forever, free of charge -
Select the region: This is the region where your database will reside physically (choose one close to you or your users). For people in EMEA please use
europe-west-1idea here is to reduce latency. -
Fill in the database name -
killrvideocluster.While Astra allows you to fill in these fields with values of your own choosing, please follow our reccomendations to make the rest of the exercises easier to follow. If you don't, you are on your own! :) -
Fill in the keyspace name -
killrvideo. It's really important that you use the name killrvideo (with no 'e' in "killr") here in order for all the exercises to work well. We realize you want to be creative, but please just roll with this one today. -
Fill in the Database User name -
KVUser. Note the user name is case-sensitive. Please use the case we suggest here. -
Fill in the password -
KVPassword. Fill in both the password and the confirmation fields. Note that the password is also case-sensitive. Please use the case we suggest here. -
Launch the database. Review all the fields to make sure they are as shown, and click the Launch Database button.

✅ Step 1c. View your Database and connect
View your database. It may take 2-3 minutes for your database to spin up. You will receive an email at that point. But, go ahead and continue with the rest of the exercise now.

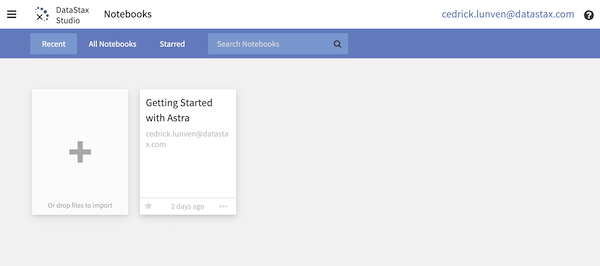
Once Database is ready you should see the following home page:

Let’s review the database you have configured. In the box on the left side of the window, you can see the database and keyspace name metadata. The box on the right describes the size and location of your database along with your estimated cost. Once Astra initializes the database completely, the left box will have connection details.
✅ Step 2a. Open DataStax Studio
You can click the Launch Now link at the bottom of "Connection Details" box on the left to start the tool. Please enter the credentials you used for Astra instance creation.

-
Fill in the Database User name -
KVUser. Note the user name is case-sensitive. Please use the case we suggest here. -
Fill in the password -
KVPassword. Fill in both the password and the confirmation fields. Note that the password is also case-sensitive. Please use the case we suggest here. -
Click Test. Wait for a "connected successfully" message before saving.
-
Click Save. Once you have a positive test then click the Save button to launch DataStax Studio.
-
Download the file
spacecraft.tarlocated in foldernotebooksdownload link -
Import the file in studio with a drag and drop in the Datastax studio window
Importing

File is now opened

✅ Step 3a Open gitpod : Gitpod is an IDE 100% online based on Eclipse Theia. To initialize your environment simply click on the button below (CTRL + Click to open in new tab)

Target url looks like https://<your_uid>.<your_region>.gitpod.io/#/workspace/cassandra-workshop-series. These URL's are dynamic and we cannot provide clickable links in advance. You will need to copy-paste <your_uid>.<your_region> as we will insert them in each URL during the exercises.
⚠️ By default Autosave is not enabled in Gitpod. Don't forget to save your modifications with CTRL+S
👁️ Expected output

That's it. Gitpod provides all tools we will need today including Maven,Pip,Npm. At initialization of the workspace we schedule a command to download dependencies.
✅ Step 3b. Download the secure connect bundle : Go to the home page. Execute a refresh of the page using (F5) (the download link will be valid for 5 minutes and we want to ensure NOT to reach the timeout). Locate link Download secure connect bundle and click. You should download a file named secure-connect-<your_db_name>.zip. Please remember the location of the file.

Save the file in a path you will remember, again we will need it for the next exercises.
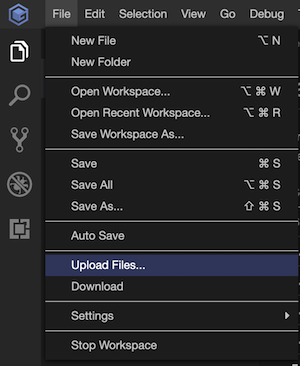
✅ Step 3c. Upload the zip in gitpod : If you are working with gitpod the secure connect bundle needs to be uploaded there.
- Select the root folder, name of the project and go to
File > Upload Files..., locate thezipand import. (in our tests the menuFile>UploadFiles only when a folder is selected).
- You can now see the file in the resources tree

The file path is located at /workspace/cassandra-workshop-series/week3-AppDev-crud/secure-connect-dev-workshop-db.zip (because my db name is dev-workshop-db).
Exercises will be different for each language. Pick the language you feel the most confortable with with and JUMP to the dedicated README.
| Sections | Material Description |
|---|---|
| Exercises 3 to 5 with JAVA | |
| Exercises 3 to 5 with JAVASCRIPT | |
| Exercises 3 to 5 with PYTHON |
THE END.