The DeskPi Pro is a hardware kit for converting a standard Raspberry Pi 4 from a naked SBC, with limited storage, into a mini PC complete with a power button, cooling, better ports and, via SATA then USB3, 2.5" or M.2 SSD storage.
- Raspberry Pi OS(32bit) - tested
- RaspiOS (64bit) - tested
- Ubuntu-mate OS(32bit) - tested
- Ubuntu OS (64bit) - tested
- Manjaro OS (32bit) - tested
- Manjaro OS (64bit) - To be tested
- Kali-linux-arm OS (32bit) - tested
- Kali-linux-arm OS (64-Bit) - To be tested
- Twister OS v2.0.2 (32bit) - tested
- DietPi OS (64bit) - tested
- Volumio OS Version: 2021-04-24-Pi (32bit) - tested
- RetroPie OS (32bit) - tested
- Windows 10 IoT - NOT Supported
- Windows 11 - To be tested
- if you are using 64bit OS, The script to control the fan is in the
rivers/c/directory. The file suffix with64means64bit, and the one without a32bitexecutable file. - Before you install this script, please make sure your Raspberry Pi can access internet and can access github website.
- Step 1. Enable Front USB port Edit /boot/firmware/config.txt file and adding following parameter:
dtoverlay=dwc2,dr_mode=hostSave it and reboot your Raspberry Pi.
- Step 2. Install fan driver TO BE DONE, we are working on it...
cd ~
git clone https://github.com/DeskPi-Team/deskpi.git
cd ~/deskpi/
chmod +x install.sh
sudo ./install.shcd ~
git clone https://github.com/DeskPi-Team/deskpi.git
cd ~/deskpi/
chmod +x install-ubuntu-64.sh
sudo ./install-ubuntu-64.shcd ~
git clone https://github.com/DeskPi-Team/deskpi.git
cd ~/deskpi/
chmod +x install-ubuntu-mate.sh
sudo ./install-ubuntu-mate.shcd ~
git clone https://github.com/DeskPi-Team/deskpi.git
cd ~/deskpi/
chmod +x install-manjaro.sh
sudo ./install-manjaro.sh- Image Download URL: https://images.kali.org/arm-images/kali-linux-2020.3a-rpi3-nexmon.img.xz
cd ~
git clone https://github.com/DeskPi-Team/deskpi.git
cd ~/deskpi/
chmod +x install-kali.sh
sudo ./install-kali.shOS image: TwisterOSv2-0-2.img
- Image Download URL:https://twisteros.com/twisteros.html
cd ~
git clone https://github.com/DeskPi-Team/deskpi.git
cd ~/deskpi/
chmod +x install.sh
sudo ./install.sh- Image Download URL: http://downloads.raspberrypi.org/raspios_arm64/images/raspios_arm64-2021-05-28/
cd ~
git clone https://github.com/DeskPi-Team/deskpi.git
cd ~/deskpi/
chmod +x install-raspios-64bit.sh
sudo ./install-raspios-64bit.sh- Uninstall:
cd ~/deskpi/
chmod +x install-raspios-64bit.sh
sudo ./uninstall-raspios-64bit.sh
- Make sure your OS can access internet and please install
gitfirst. - Execute this command in terminal:
apt-get update && apt-get -y install git
- Image Download URL: https://dietpi.com/downloads/images/DietPi_RPi-ARMv8-Bullseye.7z
cd ~
git clone https://github.com/DeskPi-Team/deskpi.git
cd ~/deskpi/
./install.sh- Image Download URL: https://updates.volumio.org/pi/volumio/2.882/volumio-2.882-2021-04-24-pi.img.zip
- Getting Start: https://volumio.github.io/docs/User_Manual/Quick_Start_Guide.html
- Make sure your Volumio can access internet.
- There are some steps need to do.
sudo nano /etc/network/interface
make sure following parameters in file /etc/network/interface
auto wlan0
allow-hotplug wlan0
iface wlan0 inet dhcp
wpa-ssid "YOUR WIFI SSID"
wpa-psk "YOUR WIFI PASSWORD"
and enable the internet access by typing this command in terminal:
volumio internet on
and then reboot your DeskPi.
sudo reboot
- Download DeskPi driver from github:
git clone https://github.com/DeskPi-Team/deskpi.git
cd deskpi/
sudo ./install.sh
- TEST it after rebooting.
deskpi-config
Select 4 and press Enter, you would see the fan is spinning and the front USB port are now available.
DeskPi-uninstall And then select the number against to your OS Type.
- Unsupported due to lacking of driver.
- Testing version: Midnight falcon
- Open a terminal and typing following command:
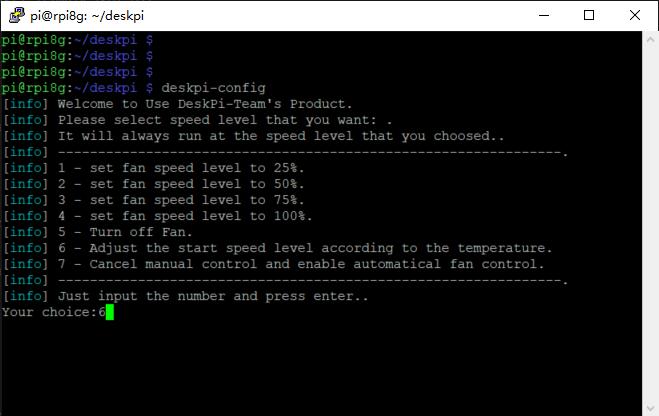
deskpi-configYou can follow the instructions to setup fan speed level by typing numbers as following example:
- The number from 1 to 4 is to setting your fan speed to a static level.
- Number 5 is just turn off the fan.
- Number 6 is to guide you to create a file located to /etc/deskpi.conf and you can specify the threshold of temperature and fan speed level according to your idea, once the file has been created, the program will according to the configuration file to setup your fan.
- Number 7 is to enable automatic fan control by default paramaters. ** Default arguments:
TEMP   : Fan_SPEED_LEVEL
<40C   : 0%
40~50C : 25%
50~65C : 50%
65~75C : 75%
>75C   : 100%
 ** If you want to change it, just typing :
deskpi-config
Select 6 and then input 45 and enter, and then input 50 means setup the fan speed level to 50% when CPU temp is above 45 degree it has 4 level to setup.
NOTE: 50% Speed level means you have already send PWM50 to /dev/ttyUSB0 port, and this port will available when you add dtoverlay=dwc2,dr_mode=host to /boot/config.txt file and reboot your DeskPi.
After initial Raspberry Pi Configuration and once you have Internet Connectivity established, Install the DeskPi Pro Utilities from https://github.com/DeskPi-Team/deskpi.git
Open a Terminal / Console and run the following commands:
sudo apt update
sudo apt full-upgrade
sudo rpi-update
When complete, run:
sudo rebootUpon reboot, open Terminal again:
sudo raspi-config- go to Advanced Options
- Select Boot Order, select #1
USB Boot, Return to Advanced Options, - Select Boot Loader Version, choose
Latest Version - Save & exit
sudo reboot After reboot, re-open Terminal again
sudo -E rpi-eeprom-config --edit• do not change anything, it is unnecessary • press Ctrl-X to save, answer Y to overwrite file.
sudo reboot Now you are ready to install Raspberry-OS onto your USB Boot Device.
You can use the Raspberry Imager from www.raspberrypi.org website.
Depending on device the new SD Card Copier can transfer the SD-Card image to the USB Device (ensure you select generate a new UUID).
Once your USB drive is imaged & ready to boot, shutdown your Deskpi-Pro, remove the SD-Card and power-up to boot from the USB Boot drive, once running & configured you can install your additional software and proceed as usual.
- Tutorial video: https://youtu.be/wUHZb9E_WDQ
- You need to enable
gpio-irfunction by modify/boot/config.txtfile. uncomment this line if not exsit please add it.
dtoverlay=gpio-ir,gpio_pin=17 - Install
lircpackage:
sudo apt-get install lirc- Modify configuration file on location: /etc/lirc/lirc_options.conf and make sure it has following parameters:
driver          = default
device = /dev/lirc0- Reboot your Raspberry Pi and test it with following command:
mode2 -d /dev/lirc1