Home
Texture Fonts is a Godot plugin that allows for the creation of custom fonts from textures inside of Godot's editor.
Download the plugin from the Releases section, and enable it.
Alternatively, you can look at some examples from this repository. Press "Code 🠻", "Download Zip", extract the files, and open the .project file with Godot.
To create a new font, right click in Godot's "FileSystem" dock, and choose "New Resource...".
Then, search for "TextureFont" under Resource > Font > BitmapFont > TextureFont and press "Create".
You will need a texture containing some of the characters you wish to add as a font. Create one in any graphics application, or take one from the examples in the repository.
 |
|---|
| example font texture in Aseprite |
The characters on your texture need to be equally spaced horizontally and vertically. For this, I like to draw a grid before adding any characters. The grid can be removed before importing the texture into Godot, or kept, if there is a gap between the characters and the texture. If you have some characters which are much larger than others, use a separate texture. Only the characters on the same texture need to have the same size.
Don't worry if some characters like "p, y or q" are "floating" above the baseline. Their offset can be adjusted later on.
To load your texture into the font, press "Add" in the files section, and choose your font from the file system.
 |
|---|
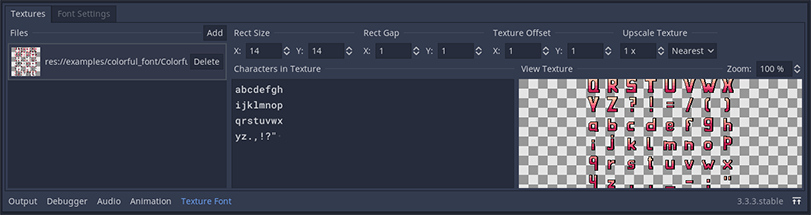
| new font after selecting and loading example texture |
Now you will need to adjust some settings to load the font properly.
First, type out every character which appears on the texture into the "Characters in Texture" section. Add a line-break for every row in your texture. This way the texture font will know what character codes to add.
Then you will need to adjust the "Rect" settings. These settings dictate what character code will be mapped to which part of your texture.
- Rect Size - is the area your individual characters each fit into.
- Rect Gap - is the gap between your characters in the image. if you used a grid in your image, you can use this property to exclude it from the final font.
- Texture Offset - is the offset your first character has from the upper left corner of your image.
You can use the "Texture Preview" Field, to check if you got the settings right. Hover over the characters in your texture, and check if each character fits into the red bounding box, and has the correct character associated with it.
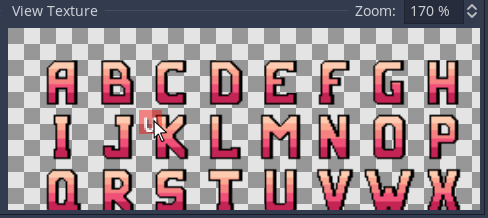 |
img/font_editor_2_currect.png |
|---|---|
| wrong texture settings | correct texture settings |