Thank you for investing your time in contributing to our project! Any contribution you make will be reflected on console-gui-tools ✨.
Read our Code of Conduct to keep our community approachable and respectable.
In this guide you will get an overview of the contribution workflow from opening an issue, creating a PR, reviewing, and merging the PR.
Use the table of contents icon on the top left corner of this document to get to a specific section of this guide quickly.
To get an overview of the project, read the README and the CODE DOCS. Here are some resources to help you get started with open source contributions:
- Finding ways to contribute to open source on GitHub
- Set up Git
- GitHub flow
- Collaborating with pull requests
Always start from an issue, the workflow starts from that. You can choose from these options:
If you spot a problem with the library, search if an issue already exists. If a related issue doesn't exist, you can open a new issue using a relevant issue form.
Scan through our existing issues to find one that interests you. You can narrow down the search using labels as filters. If you find an issue to work on, you are welcome to open a PR with a fix.
For more information about using a codespace for working on GitHub documentation, see "Working in a codespace."
- Fork the repository.
-
Using GitHub Desktop:
- Getting started with GitHub Desktop will guide you through setting up Desktop.
- Once Desktop is set up, you can use it to fork the repo!
-
Using the command line:
- Fork the repo so that you can make your changes without affecting the original project until you're ready to merge them.
-
Install or update to Node.js v16. For more information, see the development guide.
-
Create a working branch and start with your changes!
To develop on the library, after cloning the repository it is good to keep the following things in mind:
- The library is written in Typescript, and therefore it is mandatory to obey the rules described in the tsconfig.json file, in particular:
- "Any" types are not tolerated. Every variable, even objects must necessarily be typed with primitive types or by creating appropriate interfaces.
For example, to describe the type "MouseEvent" this kind of definition was made:
/**
 * @typedef {Object} MouseEventArgs
 * @description This type is used to define the parameters of the Mouse Listener event (mouseevent) data.
 *
 * @prop {string} code - The code of the pressed key.
 * @prop {boolean} alt - If the alt key is pressed.
 * @prop {boolean} ctrl - If the ctrl key is pressed.
 * @prop {boolean} shift - If the shift key is pressed.
 * @prop {boolean} left - If the left mouse key is pressed.
 * @prop {boolean} right - If the right mouse key is pressed.
 * @prop {number} x - The x position of the mouse (terminal column).
 * @prop {number} y - The y position of the mouse (terminal row).
 * @prop {number | null} xFrom - The original x position of the mouse (terminal column) when the drag started.
 * @prop {number | null} yFrom - The original y position of the mouse (terminal row) when the drag started.
 *
 * @example const mouseEventArgs = { code: "MOUSE", alt: false, ctrl: false, shift: false, left: true, right: false, x: 10, y: 10, xFrom: null, yFrom: null }
 *
 * @export
 * @interface MouseEventArgs
 */
export interface MouseEventArgs {
    code: number;
    alt: boolean;
    ctrl: boolean;
    shift: boolean;
    left: boolean;
    right: boolean;
    x: number;
    y: number;
    xFrom: number | null;
    yFrom: number | null;
}

/**
 * @typedef {Object} MouseEvent
 * @description This type is used to define the parameters of the Mouse Listener event (mouseevent).
 * available event names:
 * - MOUSE_MOTION: mouse moved (no button pressed / hover)
 * - MOUSE_DRAG: Valorized xFrom and yFrom. Use left or right to know which button is pressed.
 * - MOUSE_LEFT_BUTTON_PRESS
 * - MOUSE_LEFT_BUTTON_RELEASE
 * - MOUSE_RIGHT_BUTTON_PRESS
 * - MOUSE_RIGHT_BUTTON_RELEASE
 * - MOUSE_MIDDLE_BUTTON_PRESS
 * - MOUSE_MIDDLE_BUTTON_RELEASE
 * - MOUSE_WHEEL_UP
 * - MOUSE_WHEEL_DOWN
 *
 * @prop {string} name - The name of the event.
 * @prop {number} eaten - The number of eaten events.
 * @prop {MouseEventArgs} args - The arguments of the event.
 *
 * @example const mouseEvent = { name: "MOUSE_MOTION", eaten: 0, args: { code: "MOUSE", alt: false, ctrl: false, shift: false, left: true, right: false, x: 10, y: 10, xFrom: null, yFrom: null } }
 *
 * @export
 * @interface MouseEvent
 */
export interface MouseEvent {
    name: string;
    eaten: number;
    data: MouseEventArgs;
}
- The syntax of the code must adhere to the rules set on the .eslintrc.cjs file; the code must be formatted according to these rules.
- "Any" types are not tolerated. Every variable, even objects must necessarily be typed with primitive types or by creating appropriate interfaces.
For example, to describe the type "MouseEvent" this kind of definition was made:
- All code must be documented using docstrings compatible with the jsdoc standard. By browsing through the code, one can see how the various existing points have been commented out.
To generate the documentation pages automatically, the jsdoc2md library is used, using the
npm run docscommand, which will depend on the settings in jsdoc2md.json - The following commands are available to develop on the library:
npm run starttranspiles the files into the build folder, in "dev" mode, without code minimization so as to facilitate debugging. A file-watch reloads the transpilation with each change.npm run buildtranspilates the files into the build folder in production mode, maximizing the files produced.
If you modify an existing part of code, you usually should not create new files, unless it is right to do so for reasons of simplification or modularity. Either way, remember to update the docstrings and any modified types. Any modification to old code requires that everything that uses it be tested: look for where this code is called and create practical examples to test how it works.
The library is based on ESM classes, so it is important that new components, graphical and otherwise, are created following the same style as existing ones. If it is a user-accessible class, after creating it, remember to import it into the main file ConsoleManager.ts, and then export it to the bottom of it.
In the case of a graphical class, i.e., a component that is visible on the terminal interface (such as a button), add in the docstring a small gif uploaded on github.
To capture gifs I use the handy and opensource Screen To Gif. It directly captures your screen, focusing it on the terminal, or even better on the created component; Export it to .gif and upload it to Github. 147 To do this just drag the created gif to any GitHub textarea. The system will turn it into a link, copy and paste it into the docstring, under the parameter "@description" Example:
/**
* @class Progress
* @extends Control
* @description This class is an overload of Control that is used to create a Progress bar.
*
* 
*
* Emits the following events:
* - "valueChanged" when the user changes the value of the progress bar with the scroll wheel (if interactive is true).
* - "click" when the user clicks on the progress bar (if interactive is true).
* - "relese" when the user releases the mouse button on the progress bar (if interactive is true).
* - "rightClick" when the user clicks on the progress bar with right button (if interactive is true).
* - "rightRelese" when the user releases the right mouse button on the progress bar (if interactive is true).
*
* ### Example of interactive progress bar
* 
*
* @param {string} id - The id of the Progress.
* @param {number} length - The length of the Progress.
* @param {number} thickness - The thickness of the Progress.
* @param {number} x - The x position of the Progress.
* @param {number} y - The y position of the Progress.
* @param {ProgressStyle} style - The style of the Progress.
* @param {string} theme - The theme of the Progress.
* @param {string} orientation - The orientation of the Progress.
* @param {boolean} interactive - If the Progress is interactive.
* @param {boolean} visible - If the Progress is visible.
* @param {boolean} enabled - If the Progress is enabled.
*
* @example ```js
* const pStyle = {
* boxed: true,
* showTitle: true,
* showValue: true,
* showPercentage: true,
* showMinMax: false,
* }
* const p = new Progress("prog1", 20, 1, 3, 23, pStyle, "htop", "horizontal")
* p.setText("Mem")
* const incr = setInterval(() => {
* const value = p.getValue() + 0.25
* p.setValue(value)
* if (value >= p.getMax()) {
* clearInterval(incr)
* }
* }, 100)
*
* const p1Style = {
* background: "bgBlack",
* borderColor: "yellow",
* color: "green",
* boxed: true,
* showTitle: true,
* showValue: true,
* showPercentage: true,
* showMinMax: true,
*
* }
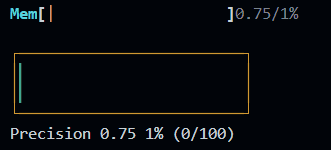
* const p1 = new Progress("prog2", 25, 2, 3, 25, p1Style, "precision", "horizontal")
* p1.setText("Precision")
* const incr1 = setInterval(() => {
* const value = p1.getValue() + 0.25
* p1.setValue(value)
* if (value >= p1.getMax()) {
* clearInterval(incr1)
* }
* }, 100)
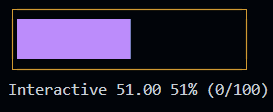
* const p2Style = {
* background: "bgBlack",
* borderColor: "yellow",
* color: "magenta",
* boxed: true,
* showTitle: true,
* showValue: true,
* showPercentage: true,
* showMinMax: true,
* }
* const p2 = new Progress("prog3", 25, 2, 3, 31, p2Style, "precision", "horizontal", true)
* p2.setText("Interactive")
* p2.on("valueChanged", (value) => {
* console.log(`Value changed: ${value}`)
* })
* ```
*/
export class Progress extends Control {
...
}See the result: Progress Bar Docs
Commit the changes once you are happy with them. Don't forget to write an example.js file to put in the examples directory that tests all the code you have written. Don't worry, this file is just for me to quickly test what you have done, however if the change is impactful, or represents a new component, I will likely keep it among the examples.
When you're finished with the changes, create a pull request, also known as a PR.
- Fill the "Ready for review" template so that we can review your PR. This template helps reviewers understand your changes as well as the purpose of your pull request.
- Don't forget to link PR to issue if you are solving one.
- Enable the checkbox to allow maintainer edits so the branch can be updated for a merge. Once you submit your PR, a Docs team member will review your proposal. We may ask questions or request additional information.
- We may ask for changes to be made before a PR can be merged, either using suggested changes or pull request comments. You can apply suggested changes directly through the UI. You can make any other changes in your fork, then commit them to your branch.
- As you update your PR and apply changes, mark each conversation as resolved.
- If you run into any merge issues, checkout this git tutorial to help you resolve merge conflicts and other issues.
Congratulations 🎉🎉 The GitHub team thanks you ✨.
Once your PR is merged, your contributions (and your name) will be publicly visible on the console-gui-tools repository.
Thanks for your help!