In order to be able to flash both the bootloader and the HID2AMI app, you need:
- A MS-Windows or Linux PC
- An A-A USB cable (https://www.google.com/search?q=a-a+usb+cable)
- for Windows: the free ST DFU Tools. Download the package from here (https://www.st.com/en/development-tools/stsw-stm32080.html)
- for Linux: the free dfu-util from http://dfu-util.sourceforge.net.
Thanks to the precious & talented friend Sukkopera (https://github.com/SukkoPera), HID2AMI App can be flashed within a Linux environment as well as its Windows counterpart. You can find the detailed procedure here: Sukkopera's Linux Flashing instructions Thank you SukkoPera !
- Install the ST DFU Tool package on your Windows machine. Make sure you have the ST DFU-USB driver installed (in case something went wrong, you can manually install them from the DFU Tool's directory)
- Set HID2AMI in DFU-BOOT mode, by selecting position 2-3 for both "BOOT0" and "PA9BOOT" jumpers (*)
- MAKE SURE THAT HID2AMI IS NOT CONNECTED TO YOUR AMIGA MOUSE/JOY PORT
- Connect HID2AMI to any USB port of your PC, by mean of the A-A USB Cable
- After few seconds, HID2AMI should be recognized by Windows as "ST Device in DFU Mode"
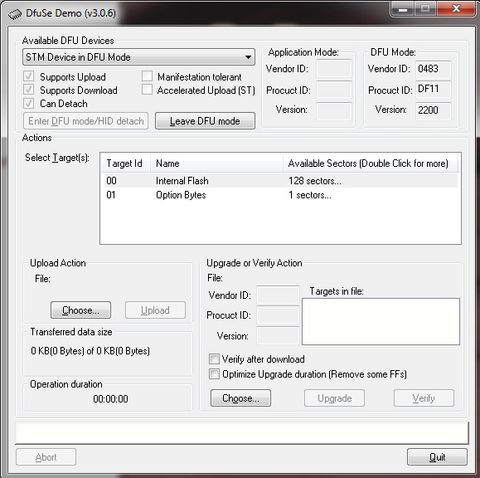
- Launch "DfuSeDemo" App from ST Tools package. You should see a form like this one, showing your HID2AMI has booted in DFU mode and has been recognized properly
(*) in newest v2.x+ adapters the "BOOT0" jumper is replaced by an open bridge-pad. To emulate closing the 2-3 position for BOOT0, just short these pads with any conductive tip at the moment of powering up the device for flashing.
- Select the HID2AMIBOOTLOADER.dfu file you previosly downloaded from here by pressing "Choose" under "Upgrade or Verify Action". You should come to a condition like this
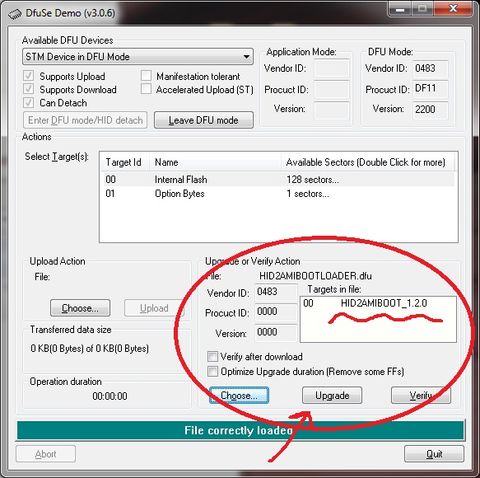
- Press "Upgrade" button and wait the process to finish with success.
If everything went fine, your board now can boot from the BOOTLOADER and is ready to be loaded with the HID2AMI App
- Set HID2AMI in BOOTLOADER mode, by selectin position 1-2 for "BOOT0" and position 2-3 for "PA9BOOT". Note: newer Rev1.1 preassembled boards do not have BOOT0 jumper installed, since it is not needed to update the App. If it is your case, simply ignore BOOT0
- MAKE SURE THAT HID2AMI IS NOT CONNECTED TO YOUR AMIGA MOUSE/JOY PORT
- Connect HID2AMI to any USB port of your PC, by mean of the A-A USB Cable: the bootloader should take control, and you should see the activity led on board (lower led near usb connector) fastly blinking
- Look at DfuSeDemo window: you should see something like as follows. Note down the four characters you see near "Version" field
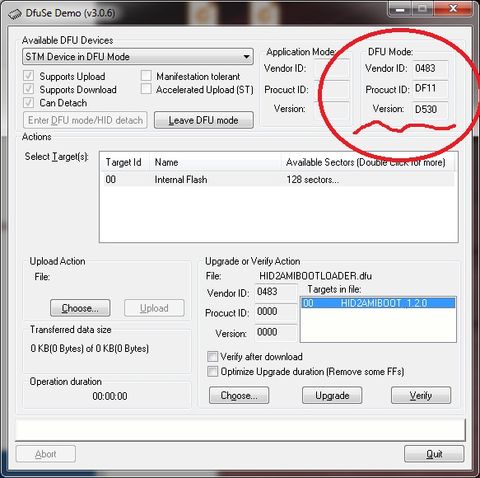
- In order to get a properly signed app, working tied to your board, you have to ask it from the author, by sending him an email together with your personal code, which is the four character as above (in the case of the picture is "D530", yours should obviously be different)
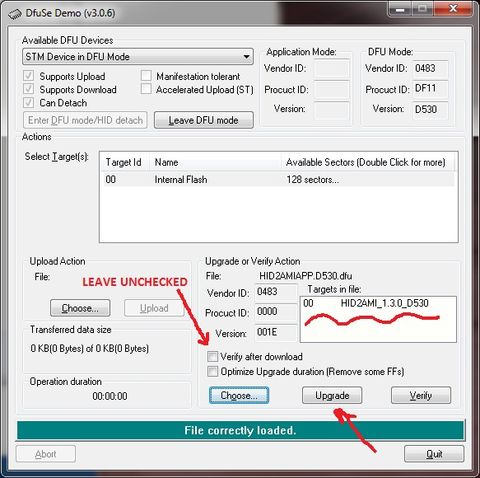
- Once received your personalized app file, in the form "HID2AMIAPP.XXXX.dfu", boot again HID2AMI in BOOTLOADER mode (just as above), "Choose" the app file "HID2AMIAPP.XXXX.dfu" and press "Upgrade"
- To boot in BOOTLOADER mode just set "PA9BOOT" jumper in position 2-3
- You're done ! Put the HID2AMI board in APP mode by by selecting position 1-2 for both "BOOT0" and "PA9BOOT" jumpers, DISCONNECT you HID2AMI board from your Windows PC and connect it to any Mouse/Joy port of your Amiga
- Enjoy !